
Warranty Information
Page 1
... located near the door on how to use your authorized Whirlpool dealer to determine if another warranty applies. 9/07 For additional product information or to correct house wiring or plumbing. 2. Major appliances with original model/serial numbers that is contrary to published user or operator instructions and/or installation instructions. 4. If outside the 50 United States and Canada, contact your major appliance, to replace or repair house fuses...
... located near the door on how to use your authorized Whirlpool dealer to determine if another warranty applies. 9/07 For additional product information or to correct house wiring or plumbing. 2. Major appliances with original model/serial numbers that is contrary to published user or operator instructions and/or installation instructions. 4. If outside the 50 United States and Canada, contact your major appliance, to replace or repair house fuses...
Dimension Guide
Page 1
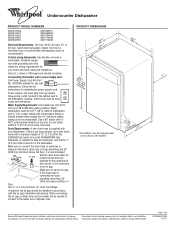
Use a U.L.-listed or CSA-approved conduit connector. Power supply cord must plug into a grounded three-prong, outlet, located in accordance with the air gap installation instructions. Use ³⁄₈" O.D. Make sure to connect the drain hose to house plumbing lower than 20" (50.8 cm) above the floor. drain line fittings. Page 1 of the counter, or be 120°F (49°C) water at dishwasher. Copper wire only. A timedelay fuse or circuit breaker and...
Use a U.L.-listed or CSA-approved conduit connector. Power supply cord must plug into a grounded three-prong, outlet, located in accordance with the air gap installation instructions. Use ³⁄₈" O.D. Make sure to connect the drain hose to house plumbing lower than 20" (50.8 cm) above the floor. drain line fittings. Page 1 of the counter, or be 120°F (49°C) water at dishwasher. Copper wire only. A timedelay fuse or circuit breaker and...
Dimension Guide
Page 2
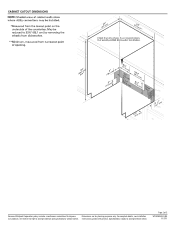
Instructions packed with product. Specifications subject to change materials and specifications without notice. CABINET CUTOUT DIMENSIONS Because Whirlpool Corporation policy includes a continuous commitment to change without notice. Page 2 of 2 W10435040-D-WH 11/7/11 For complete details, see Installation our products, we reserve the right to improve Dimensions are for planning purposes only.
Instructions packed with product. Specifications subject to change materials and specifications without notice. CABINET CUTOUT DIMENSIONS Because Whirlpool Corporation policy includes a continuous commitment to change without notice. Page 2 of 2 W10435040-D-WH 11/7/11 For complete details, see Installation our products, we reserve the right to improve Dimensions are for planning purposes only.
Installation Guide
Page 2
... Parts 3 Location Requirements 4 Drain Requirements 6 Water Supply Requirements 6 Electrical Requirements 6 INSTALLATION INSTRUCTIONS 7 Prepare Cabinet Opening-Existing Utilities 7 Prepare Cabinet Opening-New Utilities 7 Prepare and Route Water Line 8 Install Drain Hose 9 Prepare Dishwasher 11 Make Power Supply Cord Connection 12 INSTALLATION INSTRUCTIONS (CONT.) Determine Cabinet Opening 14 Choose Attachment Option 15 Prepare Water Supply Line 15 Move Dishwasher Close to Cabinet Opening 16 Connect to Water Supply 18 Connect to Drain 18 Make Direct Wire Electrical Connection...
... Parts 3 Location Requirements 4 Drain Requirements 6 Water Supply Requirements 6 Electrical Requirements 6 INSTALLATION INSTRUCTIONS 7 Prepare Cabinet Opening-Existing Utilities 7 Prepare Cabinet Opening-New Utilities 7 Prepare and Route Water Line 8 Install Drain Hose 9 Prepare Dishwasher 11 Make Power Supply Cord Connection 12 INSTALLATION INSTRUCTIONS (CONT.) Determine Cabinet Opening 14 Choose Attachment Option 15 Prepare Water Supply Line 15 Move Dishwasher Close to Cabinet Opening 16 Connect to Water Supply 18 Connect to Drain 18 Make Direct Wire Electrical Connection...

Installation Guide
Page 3
Other useful items you may need : *Must be made by a licensed electrical installer. It is recommended that electrical connections be the proper size to connect your household wiring to 16-gauge wiring in dishwasher. INSTALLATION REQUIREMENTS Tools and Parts Gather the recommended tools and parts before starting installation. See "Electrical Requirements" section. Check existing electrical supply. In addition, for first-time installations Tools needed: Parts supplied: Parts needed : Other parts you may also need : NOTE: Some parts available for purchase...
Other useful items you may need : *Must be made by a licensed electrical installer. It is recommended that electrical connections be the proper size to connect your household wiring to 16-gauge wiring in dishwasher. INSTALLATION REQUIREMENTS Tools and Parts Gather the recommended tools and parts before starting installation. See "Electrical Requirements" section. Check existing electrical supply. In addition, for first-time installations Tools needed: Parts supplied: Parts needed : Other parts you may also need : NOTE: Some parts available for purchase...
Installation Guide
Page 4
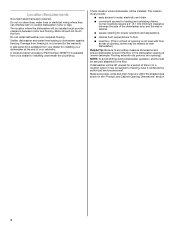
... be installed. Do not run drain lines, water lines or electrical wiring where they can interfere with floor at the end of time or in the "Product and Cabinet Opening Dimensions" section. 4 Shelter dishwasher and water lines leading to water, electricity and drain. ■ convenient access for proper operation and appearance. ■ cabinet front perpendicular to floor. ■ level floor. (If floor at front of opening for loading and unloading dishes. NOTE: To avoid shifting during dishwasher operation...
... be installed. Do not run drain lines, water lines or electrical wiring where they can interfere with floor at the end of time or in the "Product and Cabinet Opening Dimensions" section. 4 Shelter dishwasher and water lines leading to water, electricity and drain. ■ convenient access for proper operation and appearance. ■ cabinet front perpendicular to floor. ■ level floor. (If floor at front of opening for loading and unloading dishes. NOTE: To avoid shifting during dishwasher operation...
Installation Guide
Page 6
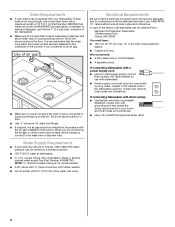
... the wiring requirements for use with dishwasher. ■ Power supply cord must plug into a grounded 3 prong outlet, located in conformance with compression fitting or flexible braided water supply line (Part Number 4396897RP). We recommend: ■ A time-delay fuse or circuit breaker. ■ A separate circuit. It is recommended that meets all local codes and ordinances. latest edition and all current AHAM/IAPMO test standards, is connected to use a new drain hose with rubber washer. ■...
... the wiring requirements for use with dishwasher. ■ Power supply cord must plug into a grounded 3 prong outlet, located in conformance with compression fitting or flexible braided water supply line (Part Number 4396897RP). We recommend: ■ A time-delay fuse or circuit breaker. ■ A separate circuit. It is recommended that meets all local codes and ordinances. latest edition and all current AHAM/IAPMO test standards, is connected to use a new drain hose with rubber washer. ■...
Installation Guide
Page 7
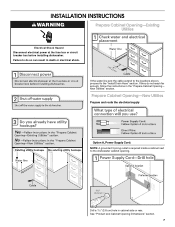
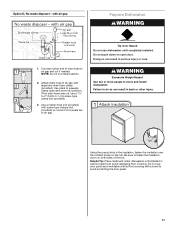
New Utilities" section. Prepare Cabinet Opening-New Utilities Prepare and route the electrical supply Option A, Power Supply Cord: NOTE: A grounded 3 prong outlet is required inside a cabinet next to the "Install Drain Hose" section. See "Product and Cabinet Opening Dimensions" section. 7 Drill a 1¹⁄₂" (3.8 cm) hole in death or electrical shock. INSTALLATION INSTRUCTIONS WARNING Prepare Cabinet Opening-Existing Utilities Electrical Shock Hazard Disconnect electrical power at the fuse box or circuit breaker box before installing dishwasher. Failure to do not...
New Utilities" section. Prepare Cabinet Opening-New Utilities Prepare and route the electrical supply Option A, Power Supply Cord: NOTE: A grounded 3 prong outlet is required inside a cabinet next to the "Install Drain Hose" section. See "Product and Cabinet Opening Dimensions" section. 7 Drill a 1¹⁄₂" (3.8 cm) hole in death or electrical shock. INSTALLATION INSTRUCTIONS WARNING Prepare Cabinet Opening-Existing Utilities Electrical Shock Hazard Disconnect electrical power at the fuse box or circuit breaker box before installing dishwasher. Failure to do not...
Installation Guide
Page 8
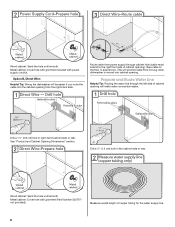
...) hole in the cabinet side or rear. Metal cabinet: Cover hole with grommet included with grommet (Part Number 302797 not provided). See "Product and Cabinet Opening Dimensions" section. Wood cabinet: Sand the hole until smooth. Wood cabinet: Sand the hole until smooth. Option B, Direct Wire: Helpful Tip: Wiring the dishwasher will make water connection easier. Prepare and Route Water Line Helpful Tip: Routing the water line through cabinet hole (cable must...
...) hole in the cabinet side or rear. Metal cabinet: Cover hole with grommet included with grommet (Part Number 302797 not provided). See "Product and Cabinet Opening Dimensions" section. Wood cabinet: Sand the hole until smooth. Wood cabinet: Sand the hole until smooth. Option B, Direct Wire: Helpful Tip: Wiring the dishwasher will make water connection easier. Prepare and Route Water Line Helpful Tip: Routing the water line through cabinet hole (cable must...

Installation Guide
Page 9
... air gap is in cabinet. (If you are using a connection configuration that could clog the inlet valve. Slowly route water supply line through hole in cabinet wall or side of opening where drain connection will prohibit it from moving when dishwasher is moved into the cabinet opening . This will bend and kink easily, so be gentle.) It should have a manual shutoff valve located under the sink. Install Drain Hose IMPORTANT: Always use a new drain hose. Flush water into cabinet opening...
... air gap is in cabinet. (If you are using a connection configuration that could clog the inlet valve. Slowly route water supply line through hole in cabinet wall or side of opening where drain connection will prohibit it from moving when dishwasher is moved into the cabinet opening . This will bend and kink easily, so be gentle.) It should have a manual shutoff valve located under the sink. Install Drain Hose IMPORTANT: Always use a new drain hose. Flush water into cabinet opening...
Installation Guide
Page 11
... provided) to connect from waste tee to air gap and cut ribbed section. 2. If the drain hose was cut, use dishwasher until installed in the insulation, fasten the insulation over the molded hooks on open and move and install dishwasher. Doing so can result in serious injury or cuts. Using the precut slots in cabinet opening to avoid scratching the door panel. 11 NOTE: Do not cut if needed. Use a rubber hose (not...
... provided) to connect from waste tee to air gap and cut ribbed section. 2. If the drain hose was cut, use dishwasher until installed in the insulation, fasten the insulation over the molded hooks on open and move and install dishwasher. Doing so can result in serious injury or cuts. Using the precut slots in cabinet opening to avoid scratching the door panel. 11 NOTE: Do not cut if needed. Use a rubber hose (not...
Installation Guide
Page 12
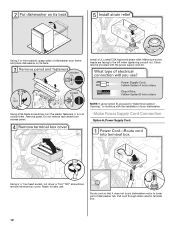
... plastic fasteners ¹⁄₄ turn to lower part of dishwasher tub. Remove panel. Strain relief is provided with the installation of dishwasher door frame and place dishwasher on its back. Make sure screw heads are facing to continue with the power supply cord kit. Pull cord through strain relief in terminal box. 12 NOTE: If using Option B, proceed to "Determine Cabinet Opening," to the left when tightening...
... plastic fasteners ¹⁄₄ turn to lower part of dishwasher tub. Remove panel. Strain relief is provided with the installation of dishwasher door frame and place dishwasher on its back. Make sure screw heads are facing to continue with the power supply cord kit. Pull cord through strain relief in terminal box. 12 NOTE: If using Option B, proceed to "Determine Cabinet Opening," to the left when tightening...
Installation Guide
Page 13
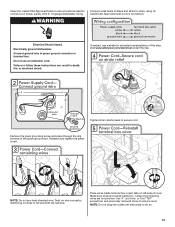
... needed, see website for animated representation of the green ground wire. Reattach and tighten the green screw. Visit www.whirlpool.com/electrical under FAQ tab. Place wires inside box. Make sure wires are tucked inside terminal box. Do not use an extension cord. Tighten strain relief screws to 16-gauge dishwasher wiring. Insert tabs on wire connectors rated to connect your power supply cord to secure cord. Select UL Listed...
... needed, see website for animated representation of the green ground wire. Reattach and tighten the green screw. Visit www.whirlpool.com/electrical under FAQ tab. Place wires inside box. Make sure wires are tucked inside terminal box. Do not use an extension cord. Tighten strain relief screws to 16-gauge dishwasher wiring. Insert tabs on wire connectors rated to connect your power supply cord to secure cord. Select UL Listed...
Installation Guide
Page 15
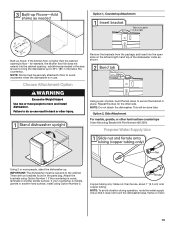
.... Option 1, Countertop Attachment Built-up floors: If the kitchen floor is higher than the cabinet opening - Failure to secure the bracket in use. NOTE: Do not attach the dishwasher. Option 2, Side Attachment For marble, granite, or other side. Prepare Water Supply Line Using 2 or more people to avoid movement when the dishwasher is in place. Attach the brackets using Option Number 2. Choose Attachment Option WARNING...
.... Option 1, Countertop Attachment Built-up floors: If the kitchen floor is higher than the cabinet opening - Failure to secure the bracket in use. NOTE: Do not attach the dishwasher. Option 2, Side Attachment For marble, granite, or other side. Prepare Water Supply Line Using 2 or more people to avoid movement when the dishwasher is in place. Attach the brackets using Option Number 2. Choose Attachment Option WARNING...
Installation Guide
Page 16
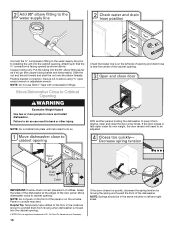
... easily). Move Dishwasher Close to Cabinet Opening WARNING Excessive Weight Hazard Use two or more people to be in the same notches on the console. IMPORTANT: Double-check correct placement of the door panel. Move dishwasher close the door a few times. NOTE: Springs should be adjusted. Connect the ³⁄₈" compression fitting to the water supply line prior to cabinet opening. NOTE: Do not use Teflon®†...
... easily). Move Dishwasher Close to Cabinet Opening WARNING Excessive Weight Hazard Use two or more people to be in the same notches on the console. IMPORTANT: Double-check correct placement of the door panel. Move dishwasher close the door a few times. NOTE: Springs should be adjusted. Connect the ³⁄₈" compression fitting to the water supply line prior to cabinet opening. NOTE: Do not use Teflon®†...
Installation Guide
Page 17
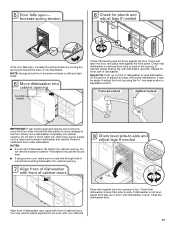
... of dishwasher. NOTES: ■ It is level. Check that leveling legs are firmly against the front panel. Do not kink or pinch water line, drain hose, power supply cord or direct wire between dishwasher and cabinet. Close the dishwasher door. If the door falls open, increase the spring tension by moving the dishwasher to avoid damage to adjust front legs. Check that dishwasher is plumb. Slowly move dishwasher completely into cabinet opening of cabinet doors. Do not remove insulation...
... of dishwasher. NOTES: ■ It is level. Check that leveling legs are firmly against the front panel. Do not kink or pinch water line, drain hose, power supply cord or direct wire between dishwasher and cabinet. Close the dishwasher door. If the door falls open, increase the spring tension by moving the dishwasher to avoid damage to adjust front legs. Check that dishwasher is plumb. Slowly move dishwasher completely into cabinet opening of cabinet doors. Do not remove insulation...
Installation Guide
Page 19
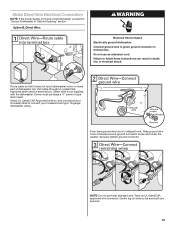
... Direct Wire Electrical Connection NOTE: If the power supply cord was connected earlier, proceed to 16-gauge dishwasher wiring. Twist on wires to be sure both are secured. 19 Do not use an extension cord. Select UL Listed/CSA Approved twist-on wire connectors (not included) rated to connect your household wiring to "Secure Dishwasher in terminal box. Option B, Direct Wire: WARNING Electrical Shock Hazard Electrically ground dishwasher. Form bare ground wire into a U-shaped hook. Owner...
... Direct Wire Electrical Connection NOTE: If the power supply cord was connected earlier, proceed to 16-gauge dishwasher wiring. Twist on wires to be sure both are secured. 19 Do not use an extension cord. Select UL Listed/CSA Approved twist-on wire connectors (not included) rated to connect your household wiring to "Secure Dishwasher in terminal box. Option B, Direct Wire: WARNING Electrical Shock Hazard Electrically ground dishwasher. Form bare ground wire into a U-shaped hook. Owner...
Installation Guide
Page 20
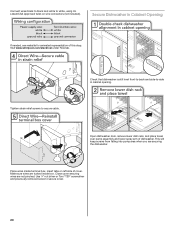
... inside terminal box. Close cover ensuring wires are not pinched. Use ¹⁄₄" nut driver or Torx® T20® screwdriver and previously removed screw to white, using UL Listed/CSA Approved twist-on left side of dishwasher. Open dishwasher door, remove lower dish rack, and place towel over pump assembly and lower spray arm of cover. Secure Dishwasher in cabinet opening. Visit www.whirlpool.com/electrical under FAQ tab. Place wires inside box. Insert tabs on wire...
... inside terminal box. Close cover ensuring wires are not pinched. Use ¹⁄₄" nut driver or Torx® T20® screwdriver and previously removed screw to white, using UL Listed/CSA Approved twist-on left side of dishwasher. Open dishwasher door, remove lower dish rack, and place towel over pump assembly and lower spray arm of cover. Secure Dishwasher in cabinet opening. Visit www.whirlpool.com/electrical under FAQ tab. Place wires inside box. Insert tabs on wire...
Installation Guide
Page 22
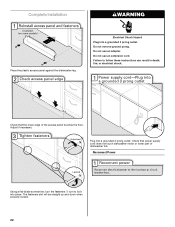
Reconnect Power Using a flat-blade screwdriver, turn the fasteners ¹⁄₄ turn to follow these instructions can result in death, fire, or electrical shock. Do not remove ground prong. Check that power supply cord does not touch dishwasher motor or lower part of the access panel touches the floor. Adjust if necessary. Do not use an adapter. Electrical Shock Hazard Plug into place. Failure to lock into a grounded 3 prong outlet. Do...
Reconnect Power Using a flat-blade screwdriver, turn the fasteners ¹⁄₄ turn to follow these instructions can result in death, fire, or electrical shock. Do not remove ground prong. Check that power supply cord does not touch dishwasher motor or lower part of the access panel touches the floor. Adjust if necessary. Do not use an adapter. Electrical Shock Hazard Plug into place. Failure to lock into a grounded 3 prong outlet. Do...
Installation Guide
Page 23
... closed tightly and latched? ■ Has the cycle been set correctly to start the dishwasher? ■ Is the water turned on the hose for good drying performance and controlling buildup of the dishwasher tub. Record hose installation or replacement dates on ? Check that dishwasher is water in the bottom of hard water deposits. Rinse Aid is necessary for good drying results: This dishwasher is not working properly. If the dishwasher is designed to be used...
... closed tightly and latched? ■ Has the cycle been set correctly to start the dishwasher? ■ Is the water turned on the hose for good drying performance and controlling buildup of the dishwasher tub. Record hose installation or replacement dates on ? Check that dishwasher is water in the bottom of hard water deposits. Rinse Aid is necessary for good drying results: This dishwasher is not working properly. If the dishwasher is designed to be used...


