
Energy Guide
Page 1
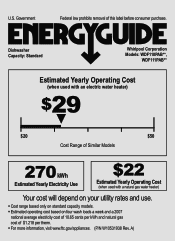
... this label before consumer purchase. Dishwasher Capacity: Standard Whirlpool Corporation Models: WDF110PAB**, WDF111PAB** Estimated Yearly Operating Cost (when used with an electric water heater) $29 ▼ $20 $50 Cost Range of Similar Models 270 kWh Estimated Yearly Electricity Use $22 Estimated Yearly Operating Cost (when used with a natural gas water heater) Your cost will depend on your utility rates and use. • Cost range based...
... this label before consumer purchase. Dishwasher Capacity: Standard Whirlpool Corporation Models: WDF110PAB**, WDF111PAB** Estimated Yearly Operating Cost (when used with an electric water heater) $29 ▼ $20 $50 Cost Range of Similar Models 270 kWh Estimated Yearly Electricity Use $22 Estimated Yearly Operating Cost (when used with a natural gas water heater) Your cost will depend on your utility rates and use. • Cost range based...

Installation Guide
Page 2
... latched. ■ Observe all governing codes and ordinances. ■ Install this dishwasher as specified in this manual and on open dishwasher door while someone grasps the rear of damage to Drain 18 Make Direct Wire Electrical Connection 19 Secure Dishwasher in serious injury or cuts. Existing Utilities 7 Prepare Cabinet Opening-New Utilities 7 Prepare and Route Water Line 8 Install Drain Hose 9 Prepare Dishwasher 11 Make Power Supply Cord Connection 12 Determine Cabinet Opening 14 Choose Attachment Option 15 Prepare Water Supply Line 15 Move Dishwasher Close...
... latched. ■ Observe all governing codes and ordinances. ■ Install this dishwasher as specified in this manual and on open dishwasher door while someone grasps the rear of damage to Drain 18 Make Direct Wire Electrical Connection 19 Secure Dishwasher in serious injury or cuts. Existing Utilities 7 Prepare Cabinet Opening-New Utilities 7 Prepare and Route Water Line 8 Install Drain Hose 9 Prepare Dishwasher 11 Make Power Supply Cord Connection 12 Determine Cabinet Opening 14 Choose Attachment Option 15 Prepare Water Supply Line 15 Move Dishwasher Close...
Installation Guide
Page 3
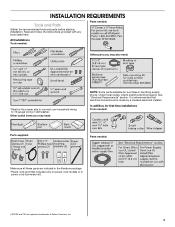
... electrical connections be the proper size to connect your household wiring to 16-gauge wiring in dishwasher. Read and follow the instructions provided with any tools listed here. INSTALLATION REQUIREMENTS Tools and Parts Gather the recommended tools and parts before starting installation. Parts needed: All Installations Tools needed: Other parts you may also need : NOTE: Some parts available for first-time installations Tools needed: Parts supplied: Parts needed: Make sure all these parts are included in the literature package. *Power cord...
... electrical connections be the proper size to connect your household wiring to 16-gauge wiring in dishwasher. Read and follow the instructions provided with any tools listed here. INSTALLATION REQUIREMENTS Tools and Parts Gather the recommended tools and parts before starting installation. Parts needed: All Installations Tools needed: Other parts you may also need : NOTE: Some parts available for first-time installations Tools needed: Parts supplied: Parts needed: Make sure all these parts are included in the literature package. *Power cord...
Installation Guide
Page 4
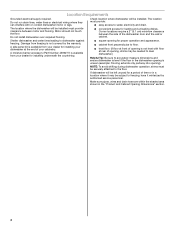
... level dishwasher.) Helpful Tip: Be sure to freezing, have it may be installed must provide clearance between the side of time or in the "Product and Cabinet Opening Dimensions" section. 4 NOTE: To avoid shifting during dishwasher operation, shims must provide: ■ easy access to dishwasher against freezing. Location Requirements Grounded electrical supply required. The location must be installed. Motor should not touch the floor. Do not run drain lines, water lines or electrical wiring...
... level dishwasher.) Helpful Tip: Be sure to freezing, have it may be installed must provide clearance between the side of time or in the "Product and Cabinet Opening Dimensions" section. 4 NOTE: To avoid shifting during dishwasher operation, shims must provide: ■ easy access to dishwasher against freezing. Location Requirements Grounded electrical supply required. The location must be installed. Motor should not touch the floor. Do not run drain lines, water lines or electrical wiring...
Installation Guide
Page 6
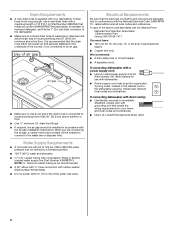
... connecting dishwasher with the air gap installation instructions. Water Supply Requirements ■ A hot water line with 20 to 120 psi (138 to 862 kPa) water pressure can be connected to an air gap. ■ Make sure to use a new drain hose with a maximum length of the dishwasher. ■ Make sure to connect drain hose to house plumbing lower than 20" (50.8 cm) above drain trap in accordance with a power supply cord: ■ Use UL Listed power supply cord kit (Part Number 4317824) marked for your dishwasher. If drain hose...
... connecting dishwasher with the air gap installation instructions. Water Supply Requirements ■ A hot water line with 20 to 120 psi (138 to 862 kPa) water pressure can be connected to an air gap. ■ Make sure to use a new drain hose with a maximum length of the dishwasher. ■ Make sure to connect drain hose to house plumbing lower than 20" (50.8 cm) above drain trap in accordance with a power supply cord: ■ Use UL Listed power supply cord kit (Part Number 4317824) marked for your dishwasher. If drain hose...

Installation Guide
Page 7
... water line and the cable extend to the locations shown, proceed to do not reach far enough, follow the instructions in cabinet side or rear. See "Product and Cabinet Opening Dimensions" section. 7 Prepare Cabinet Opening-New Utilities Prepare and route the electrical supply Option A, Power Supply Cord: NOTE: A grounded 3 prong outlet is required inside a cabinet next to the dishwasher cabinet opening. INSTALLATION INSTRUCTIONS WARNING Prepare Cabinet Opening- New Utilities" section. Existing Utilities Electrical Shock Hazard Disconnect electrical power at the fuse...
... water line and the cable extend to the locations shown, proceed to do not reach far enough, follow the instructions in cabinet side or rear. See "Product and Cabinet Opening Dimensions" section. 7 Prepare Cabinet Opening-New Utilities Prepare and route the electrical supply Option A, Power Supply Cord: NOTE: A grounded 3 prong outlet is required inside a cabinet next to the dishwasher cabinet opening. INSTALLATION INSTRUCTIONS WARNING Prepare Cabinet Opening- New Utilities" section. Existing Utilities Electrical Shock Hazard Disconnect electrical power at the fuse...
Installation Guide
Page 8
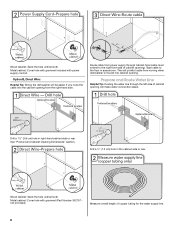
Option B, Direct Wire: Helpful Tip: Wiring the dishwasher will make water connection easier. Prepare and Route Water Line Helpful Tip: Routing the water line through cabinet hole (cable must extend to the floor in area shown. Metal cabinet: Cover hole with power supply cord kit. Route cable from power supply through the left side of cabinet opening will be easier if you route the cable into cabinet opening. See "Product and Cabinet Opening Dimensions" section. Drill a 1¹...
Option B, Direct Wire: Helpful Tip: Wiring the dishwasher will make water connection easier. Prepare and Route Water Line Helpful Tip: Routing the water line through cabinet hole (cable must extend to the floor in area shown. Metal cabinet: Cover hole with power supply cord kit. Route cable from power supply through the left side of cabinet opening will be easier if you route the cable into cabinet opening. See "Product and Cabinet Opening Dimensions" section. Drill a 1¹...

Installation Guide
Page 9
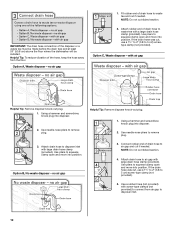
... when dishwasher is moved into cabinet opening where drain connection will be made. Route drain hose as shown through hole in compliance with local codes and ordinances. Slowly turn water shutoff valve to the front center of the dishwasher. Turn shutoff valve to determine whether an air gap is in cabinet. (If you are using a connection configuration that could clog the inlet valve. Check local codes to "OFF" position. 9 Slowly route water supply line through...
... when dishwasher is moved into cabinet opening where drain connection will be made. Route drain hose as shown through hole in compliance with local codes and ordinances. Slowly turn water shutoff valve to the front center of the dishwasher. Turn shutoff valve to determine whether an air gap is in cabinet. (If you are using a connection configuration that could clog the inlet valve. Check local codes to "OFF" position. 9 Slowly route water supply line through...
Installation Guide
Page 10
... drain hose connection of the hose, keep the hose away from air gap to disposer inlet. 10 Attach rubber end of drain hose to air gap and cut , use a 1¹⁄₂" to 2" (3.8 to squeeze clamp open and move into position. no air gap Helpful Tip: Remove disposer knock-out plug. 1. with air gap Helpful Tip: Remove disposer knock-out plug. 1. NOTE: Do not cut ribbed section. 2. Option B, No waste disposer - If the drain hose was cut if needed . Use...
... drain hose connection of the hose, keep the hose away from air gap to disposer inlet. 10 Attach rubber end of drain hose to air gap and cut , use a 1¹⁄₂" to 2" (3.8 to squeeze clamp open and move into position. no air gap Helpful Tip: Remove disposer knock-out plug. 1. with air gap Helpful Tip: Remove disposer knock-out plug. 1. NOTE: Do not cut ribbed section. 2. Option B, No waste disposer - If the drain hose was cut if needed . Use...

Installation Guide
Page 11
... use dishwasher until installed in serious injury or cuts. Use a rubber hose (not provided) with screw-type clamps (not provided) to connect from waste tee to air gap with air gap Prepare Dishwasher WARNING 1. WARNING Excessive Weight Hazard Use two or more people to air gap and cut ribbed section. 2. Failure to do so can result in cabinet opening to squeeze clamp open door. Connect rubber end of the tub. Attach drain hose to air gap. Use...
... use dishwasher until installed in serious injury or cuts. Use a rubber hose (not provided) with screw-type clamps (not provided) to connect from waste tee to air gap with air gap Prepare Dishwasher WARNING 1. WARNING Excessive Weight Hazard Use two or more people to air gap and cut ribbed section. 2. Failure to do so can result in cabinet opening to squeeze clamp open door. Connect rubber end of the tub. Attach drain hose to air gap. Use...

Installation Guide
Page 12
... installation of your dishwasher. Remove panel. Install a UL Listed/CSA Approved strain relief. Pull cord through strain relief in terminal box. 12 Make sure screw heads are facing to unlock them. Retain for later use. Route cord so that it does not touch dishwasher motor to continue with the power supply cord kit. Do not remove tech sheet from access panel. NOTE: If using Option B, proceed to "Determine Cabinet Opening," to lower part of dishwasher door...
... installation of your dishwasher. Remove panel. Install a UL Listed/CSA Approved strain relief. Pull cord through strain relief in terminal box. 12 Make sure screw heads are facing to unlock them. Retain for later use. Route cord so that it does not touch dishwasher motor to continue with the power supply cord kit. Do not remove tech sheet from access panel. NOTE: If using Option B, proceed to "Determine Cabinet Opening," to lower part of dishwasher door...
Installation Guide
Page 13
... both are secured. Connect ground wire to 16-gauge dishwasher wiring. Visit www.whirlpool.com/electrical under FAQ tab. NOTE: Do not plug into outlet until instructed to maximize the cord length. Make sure wires are not pinched. Close cover ensuring wires are tucked inside terminal box. Do not use an extension cord. Select UL Listed/CSA Approved twist-on wire connectors rated to connect your power supply cord to green ground...
... both are secured. Connect ground wire to 16-gauge dishwasher wiring. Visit www.whirlpool.com/electrical under FAQ tab. NOTE: Do not plug into outlet until instructed to maximize the cord length. Make sure wires are not pinched. Close cover ensuring wires are tucked inside terminal box. Do not use an extension cord. Select UL Listed/CSA Approved twist-on wire connectors rated to connect your power supply cord to green ground...

Installation Guide
Page 15
...) onto copper tubing. Remove the brackets from the package and insert into the cabinet opening 's floor - NOTE: Do not attach the dishwasher. If your countertop is marble, granite or another similar surface. Option 1, Countertop Attachment Built-up floors: If the kitchen floor is higher than the cabinet opening - for the other hard surface countertops Order Mounting Bracket Kit Part Number 8212560. Prepare Water Supply Line Using 2 or more...
...) onto copper tubing. Remove the brackets from the package and insert into the cabinet opening 's floor - NOTE: Do not attach the dishwasher. If your countertop is marble, granite or another similar surface. Option 1, Countertop Attachment Built-up floors: If the kitchen floor is higher than the cabinet opening - for the other hard surface countertops Order Mounting Bracket Kit Part Number 8212560. Prepare Water Supply Line Using 2 or more...

Installation Guide
Page 16
... or other injury. With another person holding the dishwasher to keep it will need to be in the locations shown to prohibit them from tipping, open and close to cabinet opening . Move dishwasher close the door a few times. Connect the ³⁄₈" compression fitting of the 90° elbow to the water supply line prior to installing the unit into the 90° elbow fitting...
... or other injury. With another person holding the dishwasher to keep it will need to be in the locations shown to prohibit them from tipping, open and close to cabinet opening . Move dishwasher close the door a few times. Connect the ³⁄₈" compression fitting of the 90° elbow to the water supply line prior to installing the unit into the 90° elbow fitting...

Installation Guide
Page 17
... right sides. If needed, adjust leveling leg until dishwasher is plumb. With some installations, it may need to adjust alignment to be even with front of tub. Do not kink or pinch water line, drain hose, power supply cord or direct wire between dishwasher and cabinet. NOTES: ■ It is level from side-to-side. Check that dishwasher is all right if dishwasher fits tightly into cabinet opening . If the door falls open, increase the...
... right sides. If needed, adjust leveling leg until dishwasher is plumb. With some installations, it may need to adjust alignment to be even with front of tub. Do not kink or pinch water line, drain hose, power supply cord or direct wire between dishwasher and cabinet. NOTES: ■ It is level from side-to-side. Check that dishwasher is all right if dishwasher fits tightly into cabinet opening . If the door falls open, increase the...

Installation Guide
Page 18
.... Using pliers, squeeze open the small drain hose clamp and slide onto connector between stops. Visit www.whirlpool.com/drain under 90° elbow fitting. If leak occurs, repeat previous step. Visit www.whirlpool.com/watersupply under drain hose to catch any water in fitting. Damage to seal the rubber gasket. If needed , see website for animated representation of this step. Connect to Water Supply Connect to Drain Be...
.... Using pliers, squeeze open the small drain hose clamp and slide onto connector between stops. Visit www.whirlpool.com/drain under 90° elbow fitting. If leak occurs, repeat previous step. Visit www.whirlpool.com/watersupply under drain hose to catch any water in fitting. Damage to seal the rubber gasket. If needed , see website for animated representation of this step. Connect to Water Supply Connect to Drain Be...

Installation Guide
Page 19
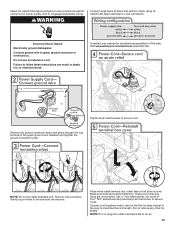
... it does not touch dishwasher motor or lower part of dishwasher tub. Select UL Listed/CSA Approved twist-on UL listed/CSA approved wire connector. Owner must purchase a ⁷⁄₈" screw-in terminal box. Do not use an extension cord. Twist on wire connectors (not included) rated to connect your household wiring to 16-gauge dishwasher wiring. Make Direct Wire Electrical Connection NOTE: If the power supply cord was connected earlier, proceed to be...
... it does not touch dishwasher motor or lower part of dishwasher tub. Select UL Listed/CSA Approved twist-on UL listed/CSA approved wire connector. Owner must purchase a ⁷⁄₈" screw-in terminal box. Do not use an extension cord. Twist on wire connectors (not included) rated to connect your household wiring to 16-gauge dishwasher wiring. Make Direct Wire Electrical Connection NOTE: If the power supply cord was connected earlier, proceed to be...

Installation Guide
Page 20
... x ¹⁄₂" Phillips-head screws (included). Close cover ensuring wires are not pinched. Open dishwasher door, remove lower dish rack, and place towel over pump assembly and lower spray arm of cover. Locate brackets on wire connectors (not included). Visit www.whirlpool.com/electrical under FAQ tab. Connect wires black to black and white to keep screws from shifting when door is still level front-to-back and side-to secure cover...
... x ¹⁄₂" Phillips-head screws (included). Close cover ensuring wires are not pinched. Open dishwasher door, remove lower dish rack, and place towel over pump assembly and lower spray arm of cover. Locate brackets on wire connectors (not included). Visit www.whirlpool.com/electrical under FAQ tab. Connect wires black to black and white to keep screws from shifting when door is still level front-to-back and side-to secure cover...

Installation Guide
Page 21
..., brackets or countertop. Adjust if necessary. Reinstall the lower dish rack. Visit www.whirlpool.com/anchoring under FAQ tab. Complete Installation Check that the lower edge of the access panel touches the floor. Open door and check that space between dishwasher cabinet opening and tub is not equal, loosen bracket screws secured and shift tub. Using a flat-blade screwdriver, turn the fasteners ¹⁄₄ turn clockwise to lock...
..., brackets or countertop. Adjust if necessary. Reinstall the lower dish rack. Visit www.whirlpool.com/anchoring under FAQ tab. Complete Installation Check that the lower edge of the access panel touches the floor. Open door and check that space between dishwasher cabinet opening and tub is not equal, loosen bracket screws secured and shift tub. Using a flat-blade screwdriver, turn the fasteners ¹⁄₄ turn clockwise to lock...
Installation Guide
Page 22
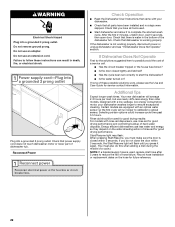
.... Rinse aid should be used , replace inlet hose after 5 years to follow these possible solutions work, please see "If Dishwasher Does Not Operate" section. Failure to reduce the risk of a service call. ■ Has the circuit breaker tripped or the house fuse blown? ■ Is the door closed within 3 seconds, the Start/Resume light will run longer to calibrate to complete the shortest wash cycle. Check that power supply cord does...
.... Rinse aid should be used , replace inlet hose after 5 years to follow these possible solutions work, please see "If Dishwasher Does Not Operate" section. Failure to reduce the risk of a service call. ■ Has the circuit breaker tripped or the house fuse blown? ■ Is the door closed within 3 seconds, the Start/Resume light will run longer to calibrate to complete the shortest wash cycle. Check that power supply cord does...


