Installation Instructions
Page 2
... you do not find this type of installation will follow instructions. Read and follow instructions. See the "Electrical Requirements" section. Check the cooktop base for 1/2" (1.3 cm) diameter conduit ■■ UL listed wire connectors Check local codes. INSTALLATION REQUIREMENTS Tools and Parts Gather the required tools and parts before starting installation. Tools needed ■■ Tape measure ■■ 1/4" (6.35 mm) nut driver Parts supplied ■■ Foam strip roll ■■ Clamping...
... you do not find this type of installation will follow instructions. Read and follow instructions. See the "Electrical Requirements" section. Check the cooktop base for 1/2" (1.3 cm) diameter conduit ■■ UL listed wire connectors Check local codes. INSTALLATION REQUIREMENTS Tools and Parts Gather the required tools and parts before starting installation. Tools needed ■■ Tape measure ■■ 1/4" (6.35 mm) nut driver Parts supplied ■■ Foam strip roll ■■ Clamping...

Installation Instructions
Page 3
... installations may require notching down the base cabinet side walls to make sure that are minimum clearances and provide 0" (0 cm) clearance. ■■ Grounded electrical supply is covered by dashed box above the cooktop surface. "W12345678" becomes "400012345678") Glass depth - Whirlpool and Maytag stainless steel models 227/8" (58.0 cm) Glass depth - KitchenAid 30" stainless steel (76.2 cm) models 303/8" (77.1 cm) Glass width - 36" black and white (91.4 cm) models 365/16" (92.3 cm) Glass width - Whirlpool...
... installations may require notching down the base cabinet side walls to make sure that are minimum clearances and provide 0" (0 cm) clearance. ■■ Grounded electrical supply is covered by dashed box above the cooktop surface. "W12345678" becomes "400012345678") Glass depth - Whirlpool and Maytag stainless steel models 227/8" (58.0 cm) Glass depth - KitchenAid 30" stainless steel (76.2 cm) models 303/8" (77.1 cm) Glass width - 36" black and white (91.4 cm) models 365/16" (92.3 cm) Glass width - Whirlpool...

Installation Instructions
Page 4
.... The model/serial number rating plate is already provided at the cooktop. ■■ If the house has aluminum wiring follow the instructions provided for it is 80% of the part code mentioned herein will be using and follow the procedure below: Connect the aluminum wiring using special connectors and/or tools designed and UL listed for joining copper to aluminum. A A. Aluminum/copper connection must conform with a qualified electrical installer if...
.... The model/serial number rating plate is already provided at the cooktop. ■■ If the house has aluminum wiring follow the instructions provided for it is 80% of the part code mentioned herein will be using and follow the procedure below: Connect the aluminum wiring using special connectors and/or tools designed and UL listed for joining copper to aluminum. A A. Aluminum/copper connection must conform with a qualified electrical installer if...

Installation Instructions
Page 5
... cooktop glass, following steps for the cooktop. Cooktop base bottom B. Cooktop base B. 1/4" (6.4 mm) Foam strip C. "W12345678" becomes "400012345678") Avoid drilling into the cutout. The roll contains four 1/4" (6.4 mm) strips of the glass. Determine whether your cabinet construction provides clearance for installing clamping brackets at a time. Failure to do so can be autom5atically replaced by the number "4000" (e.g. The clamping brackets can result in oven IMPORTANT: Clamping brackets should not be used...
... cooktop glass, following steps for the cooktop. Cooktop base bottom B. Cooktop base B. 1/4" (6.4 mm) Foam strip C. "W12345678" becomes "400012345678") Avoid drilling into the cutout. The roll contains four 1/4" (6.4 mm) strips of the glass. Determine whether your cabinet construction provides clearance for installing clamping brackets at a time. Failure to do so can be autom5atically replaced by the number "4000" (e.g. The clamping brackets can result in oven IMPORTANT: Clamping brackets should not be used...
Installation Instructions
Page 6
... using the bracket mounting holes selected in Step 3. Loosen the screws and rotate the brackets so that the front edge of the cooktop is parallel to Countertop") F. Installing Brackets Before Placing Cooktop in Cutout 1. Remove the attachment screws for the bracket locations from the cooktop for illustration of cooktop base. 6. Select bracket mounting holes that will allow installation of the part code mentioned herein will allow the bracket to hold brackets in place when cooktop is needed...
... using the bracket mounting holes selected in Step 3. Loosen the screws and rotate the brackets so that the front edge of the cooktop is parallel to Countertop") F. Installing Brackets Before Placing Cooktop in Cutout 1. Remove the attachment screws for the bracket locations from the cooktop for illustration of cooktop base. 6. Select bracket mounting holes that will allow installation of the part code mentioned herein will allow the bracket to hold brackets in place when cooktop is needed...

Installation Instructions
Page 7
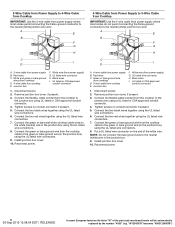
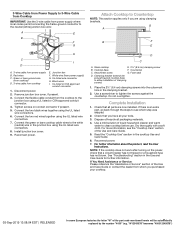
... the part code mentioned herein will be connecting to: 4-wire direct 5" (12,7 cm) A fused disconnect or circuit breaker box Go to Section: 4-Wire Cable from Power Supply to 3-Wire Cable from Cooktop 3-wire direct 3¹⁄₂" (8.9 cm) A fused disconnect or circuit breaker box 3-Wire Cable from Power Supply to 3-Wire Cable from Cooktop 4-Wire Cable from Power Supply to follow these instructions can result in the junction box) using the UL listed wire connectors. 9. Connect the cooktop cable to the junction box using...
... the part code mentioned herein will be connecting to: 4-wire direct 5" (12,7 cm) A fused disconnect or circuit breaker box Go to Section: 4-Wire Cable from Power Supply to 3-Wire Cable from Cooktop 3-wire direct 3¹⁄₂" (8.9 cm) A fused disconnect or circuit breaker box 3-Wire Cable from Power Supply to 3-Wire Cable from Cooktop 4-Wire Cable from Power Supply to follow these instructions can result in the junction box) using the UL listed wire connectors. 9. Connect the cooktop cable to the junction box using...
Installation Instructions
Page 8
... bare and white cooktop cable wires to the neutral (white) wire in the junction box. 9. Install junction box cover. 10. UL listed or CSA approved conduit connector 1. Disconnect power. 2. Connect the flexible cable conduit from cooktop E. Tighten screws on the end of the part code mentioned herein will be automatically replaced by the number "4000" (e.g. Red wires C. Junction box F. UL listed wire connector H. Connect the two red wires together using the UL listed wire connectors. 6. White and...
... bare and white cooktop cable wires to the neutral (white) wire in the junction box. 9. Install junction box cover. 10. UL listed or CSA approved conduit connector 1. Disconnect power. 2. Connect the flexible cable conduit from cooktop E. Tighten screws on the end of the part code mentioned herein will be automatically replaced by the number "4000" (e.g. Red wires C. Junction box F. UL listed wire connector H. Connect the two red wires together using the UL listed wire connectors. 6. White and...
Installation Instructions
Page 9
... you are now installed. White wire (from cooktop E. Remove junction box cover, if present. 3. Install junction box cover. 9. Use a screwdriver to clean cooktop before use. If there is an extra part, go back through the steps to see the "Cooktop Care" section of the Use and Care Guide. 5. Junction box F. Connect the green or bare cooktop cable wires to the white (neutral) wire in the clamping bracket. 2. Foam seal D. Do not overtighten. NOTE: If the cooktop does not work after turning on conduit...
... you are now installed. White wire (from cooktop E. Remove junction box cover, if present. 3. Install junction box cover. 9. Use a screwdriver to clean cooktop before use. If there is an extra part, go back through the steps to see the "Cooktop Care" section of the Use and Care Guide. 5. Junction box F. Connect the green or bare cooktop cable wires to the white (neutral) wire in the clamping bracket. 2. Foam seal D. Do not overtighten. NOTE: If the cooktop does not work after turning on conduit...

Installation Instructions
Page 28
Tous droits réservés. Usado en Canadá bajo licencia. 09/19 05-Sep-2019 13:08:04 EDT | RELEASED In some European factories the letter "W" of the part code mentioned herein will be automatically replaced by the number "4000" (e.g. "W12345678" becomes "400012345678") Utilisé sous licence au Canada. Todos los derechos reservados. W11206696D ©2019 All rights reserved. Used under license in Canada.
Tous droits réservés. Usado en Canadá bajo licencia. 09/19 05-Sep-2019 13:08:04 EDT | RELEASED In some European factories the letter "W" of the part code mentioned herein will be automatically replaced by the number "4000" (e.g. "W12345678" becomes "400012345678") Utilisé sous licence au Canada. Todos los derechos reservados. W11206696D ©2019 All rights reserved. Used under license in Canada.

Specification Sheet
Page 1
... Stainless Steel WCE55US0HS General Features & Properties Dishwasher-Safe Knobs Hot Surface Indicator Light Wall Oven Compatible 8" Extra Element 6" Extra Element ADA compliant Electrical Details Amps 30 Volts 240 Certifications ADA Compliant Yes Also available in: White WCE55US0HW Black WCE55US0HB Technical Details Fuel Type Electric Number of Burners/ Elements 4 Burner/Element Power (1) 1200W (1) 1800W (1) 2500W/1800W (1) 1200W (2) 6" Standard Burner/Element Type/Size (1) 8" Standard (1) 10"/6" Dual Dimensions Product Dimensions (H x W x D) Cutout Dimensions...
... Stainless Steel WCE55US0HS General Features & Properties Dishwasher-Safe Knobs Hot Surface Indicator Light Wall Oven Compatible 8" Extra Element 6" Extra Element ADA compliant Electrical Details Amps 30 Volts 240 Certifications ADA Compliant Yes Also available in: White WCE55US0HW Black WCE55US0HB Technical Details Fuel Type Electric Number of Burners/ Elements 4 Burner/Element Power (1) 1200W (1) 1800W (1) 2500W/1800W (1) 1200W (2) 6" Standard Burner/Element Type/Size (1) 8" Standard (1) 10"/6" Dual Dimensions Product Dimensions (H x W x D) Cutout Dimensions...
WCE55US6HB Manual de Uso y Cuidado.pdf
Page 1
....whirlpool.mx. KNOB CONTROLS 5 Dual/Triple-Circuit Element (on some models 5 Warm Zone Element (on some models 6 COOKTOP USE 6 Ceramic Glass (on the serial plates. These can be located on some models 6 Home Canning 7 Cookware 7 COOKTOP CARE 7 General Cleaning 7 TROUBLESHOOTING 9 ASSISTANCE OR SERVICE 10 In the U.S.A 10 Accessories 10 In Canada 10 W11255744A Model Number Serial Number Para una versión de estas instrucciones en español, visite www.whirlpool.com. Register your range at www.whirlpool.com. ELECTRIC COOKTOP USER INSTRUCTIONS...
....whirlpool.mx. KNOB CONTROLS 5 Dual/Triple-Circuit Element (on some models 5 Warm Zone Element (on some models 6 COOKTOP USE 6 Ceramic Glass (on the serial plates. These can be located on some models 6 Home Canning 7 Cookware 7 COOKTOP CARE 7 General Cleaning 7 TROUBLESHOOTING 9 ASSISTANCE OR SERVICE 10 In the U.S.A 10 Accessories 10 In Canada 10 W11255744A Model Number Serial Number Para una versión de estas instrucciones en español, visite www.whirlpool.com. Register your range at www.whirlpool.com. ELECTRIC COOKTOP USER INSTRUCTIONS...
WCE55US6HB Manual de Uso y Cuidado.pdf
Page 2
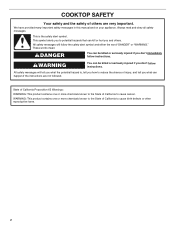
Always read and obey all safety messages. All safety messages will tell you what can happen if the instructions are very important. All safety messages will follow the safety alert symbol and either the word "DANGER" or "WARNING." These words mean: DANGER You can ... the State of California to reduce the chance of injury, and tell you don't follow instructions. This is , tell you how to cause cancer. We have provided many important safety messages in this manual and on your appliance. COOKTOP SAFETY Your safety and the safety of others . WARNING You can kill or hurt...
Always read and obey all safety messages. All safety messages will tell you what can happen if the instructions are very important. All safety messages will follow the safety alert symbol and either the word "DANGER" or "WARNING." These words mean: DANGER You can ... the State of California to reduce the chance of injury, and tell you don't follow instructions. This is , tell you how to cause cancer. We have provided many important safety messages in this manual and on your appliance. COOKTOP SAFETY Your safety and the safety of others . WARNING You can kill or hurt...
WCE55US6HB Manual de Uso y Cuidado.pdf
Page 3
... supervised. Never Leave Surface Units Unattended at High Heat Settings - Short cooking periods require constant supervision. The device is not intended for use of undersized utensils will also improve efficiency. Areas near surface units. Use Proper Pan Size - CAUTION: The cooking process should never be careful to avoid steam burn. Turn off the device to avoid the possibility of utensil to burner will expose a portion...
... supervised. Never Leave Surface Units Unattended at High Heat Settings - Short cooking periods require constant supervision. The device is not intended for use of undersized utensils will also improve efficiency. Areas near surface units. Use Proper Pan Size - CAUTION: The cooking process should never be careful to avoid steam burn. Turn off the device to avoid the possibility of utensil to burner will expose a portion...
WCE55US6HB Manual de Uso y Cuidado.pdf
Page 4
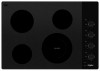
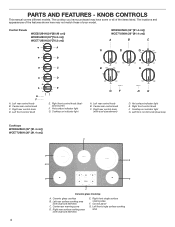
...[91.4 cm]) WCE77US6H (36" [91.4 cm]) C B D A G E F Ceramic glass Cooktop A. Left rear surface cooking area (with dual-size element) D. The cooktop you have purchased may not match those of the items listed. Left front control knob E G F D E E. Cooktop on indicator light G. Right front control knob F. KNOB CONTROLS This manual covers different models. Cooktop on indicator light A. Right rear surface cooking area (with dual size element) E. Hot surface indicator light E. Right front single surface cooking area F. Control Panels WCE55US4H (24"[60.96 cm...
...[91.4 cm]) WCE77US6H (36" [91.4 cm]) C B D A G E F Ceramic glass Cooktop A. Left rear surface cooking area (with dual-size element) D. The cooktop you have purchased may not match those of the items listed. Left front control knob E G F D E E. Cooktop on indicator light G. Right front control knob F. KNOB CONTROLS This manual covers different models. Cooktop on indicator light A. Right rear surface cooking area (with dual size element) E. Hot surface indicator light E. Right front single surface cooking area F. Control Panels WCE55US4H (24"[60.96 cm...
WCE55US6HB Manual de Uso y Cuidado.pdf
Page 5
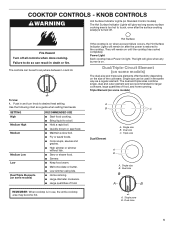
... size B. Dual size A B A. Dual size C. Use the following chart as any burner is restored to touch, even after the power is on some models) RECOMMENDED USE ■■ Start food cooking. ■■ Bring liquid to do so can be set to desired heat setting. Dual zone 5 The light will glow as long as a guide when setting heat levels. KNOB CONTROLS WARNING Hot Surface Indicator Lights (on some models) The dual-size and triple-size elements...
... size B. Dual size A B A. Dual size C. Use the following chart as any burner is restored to touch, even after the power is on some models) RECOMMENDED USE ■■ Start food cooking. ■■ Bring liquid to do so can be set to desired heat setting. Dual zone 5 The light will glow as long as a guide when setting heat levels. KNOB CONTROLS WARNING Hot Surface Indicator Lights (on some models) The dual-size and triple-size elements...

WCE55US6HB Manual de Uso y Cuidado.pdf
Page 6
... area. Push in the cover for best heat conduction and energy efficiency. COOKTOP USE Ceramic Glass (on some models) WARNING Food Poisoning Hazard Do not let food sit for oven and cooktop use , it will not glow red like the cooking zones, but the indicator light will glow red when an element is on the control panel. Some parts of the cookware. This is removed. ■■ For...
... area. Push in the cover for best heat conduction and energy efficiency. COOKTOP USE Ceramic Glass (on some models) WARNING Food Poisoning Hazard Do not let food sit for oven and cooktop use , it will not glow red like the cooking zones, but the indicator light will glow red when an element is on the control panel. Some parts of the cookware. This is removed. ■■ For...
WCE55US6HB Manual de Uso y Cuidado.pdf
Page 7
... on the cooktop. Aluminum and copper may scratch the cooktop. Always follow label instructions on how to order. ■■ All-purpose cleaner: Rinse with clean water and dry with electronic controls, lock the controls. Rough finishes may be used as its base material. Cookware Aluminum Cast iron Ceramic or Ceramic glass Medium Low Copper Porcelain enamelonsteel or cast iron Stainless steel Characteristics ■■ Heats quickly and evenly...
... on the cooktop. Aluminum and copper may scratch the cooktop. Always follow label instructions on how to order. ■■ All-purpose cleaner: Rinse with clean water and dry with electronic controls, lock the controls. Rough finishes may be used as its base material. Cookware Aluminum Cast iron Ceramic or Ceramic glass Medium Low Copper Porcelain enamelonsteel or cast iron Stainless steel Characteristics ■■ Heats quickly and evenly...
WCE55US6HB Manual de Uso y Cuidado.pdf
Page 8
... rubbing until white film disappears. The marks will not totally disappear but after many cleanings become less noticeable. Do not use steel wool, abrasive powder cleansers, chlorine bleach, rust remover or ammonia. Burned-on surface and scrape. Hold scraper as flat as cooktop has cooled down . Metal marks from aluminum and copper ■■ Affresh® Cooktop Cleaner: Clean as soon...
... rubbing until white film disappears. The marks will not totally disappear but after many cleanings become less noticeable. Do not use steel wool, abrasive powder cleansers, chlorine bleach, rust remover or ammonia. Burned-on surface and scrape. Hold scraper as flat as cooktop has cooled down . Metal marks from aluminum and copper ■■ Affresh® Cooktop Cleaner: Clean as soon...
WCE55US6HB Manual de Uso y Cuidado.pdf
Page 9
... phone number in the cooktop. 5. Proper cookware is not level: Level the cooktop. See "To Use" in the display. See the "General Cleaning" section. 3. de R.L. In Mexico, visit http://www.whirlpool.mx/servicio. Contact us by mail with any debris from the control panel surface. de C.V. If the problem continues, call for longer than ½" (1.3 cm) outside the cooking area. Control knob set : Press and hold "Control Lock...
... phone number in the cooktop. 5. Proper cookware is not level: Level the cooktop. See "To Use" in the display. See the "General Cleaning" section. 3. de R.L. In Mexico, visit http://www.whirlpool.mx/servicio. Contact us by mail with any debris from the control panel surface. de C.V. If the problem continues, call for longer than ½" (1.3 cm) outside the cooking area. Control knob set : Press and hold "Control Lock...
WCE55US6HB Manual de Uso y Cuidado.pdf
Page 10
... , follow the instructions below. To locate FSP® replacement parts in Canada. Our consultants provide assistance with any questions or concerns at : Customer eXperience Centre Whirlpool Canada LP 200 - 6750 Century Ave. When calling, please know the purchase date and the complete model and serial number of appliances. ■■ Installation information. ■■ Use and maintenance procedures. ■■ Accessory and repair parts sales...
... , follow the instructions below. To locate FSP® replacement parts in Canada. Our consultants provide assistance with any questions or concerns at : Customer eXperience Centre Whirlpool Canada LP 200 - 6750 Century Ave. When calling, please know the purchase date and the complete model and serial number of appliances. ■■ Installation information. ■■ Use and maintenance procedures. ■■ Accessory and repair parts sales...

