Installation Guide
Page 2
... do not find this manual and on your cooktop is approved. Contact your dealer to your cabinets, check with these Installation Instructions. Tools needed ■ Tape measure ■ Marker or pencil ■ Phillips head screwdriver ■ Pliers Parts supplied ■ 1" (2.5 cm) mounting screws (4) Parts needed ■ A UL listed or CSA approved conduit connector ■ UL listed wire connectors Check local codes. When installing cooktop, use minimum dimensions given. ■ To eliminate...
... do not find this manual and on your cooktop is approved. Contact your dealer to your cabinets, check with these Installation Instructions. Tools needed ■ Tape measure ■ Marker or pencil ■ Phillips head screwdriver ■ Pliers Parts supplied ■ 1" (2.5 cm) mounting screws (4) Parts needed ■ A UL listed or CSA approved conduit connector ■ UL listed wire connectors Check local codes. When installing cooktop, use minimum dimensions given. ■ To eliminate...
Installation Guide
Page 3
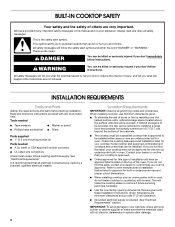
...-amp circuit, fused on both sides of wood or metal cabinet is covered by dashed box above code standards can result in base cabinet is required. Check with a qualified electrical installer if you will be using and follow the instructions provided for dimensional clearances above cooktop L. 1" (2.5 cm) minimum clearance between top of cooktop platform and bottom of uncovered wood or metal cabinet. 24" (61 cm) minimum clearance if bottom of the line. Model/serial number plate...
...-amp circuit, fused on both sides of wood or metal cabinet is covered by dashed box above code standards can result in base cabinet is required. Check with a qualified electrical installer if you will be using and follow the instructions provided for dimensional clearances above cooktop L. 1" (2.5 cm) minimum clearance between top of cooktop platform and bottom of uncovered wood or metal cabinet. 24" (61 cm) minimum clearance if bottom of the line. Model/serial number plate...
Installation Guide
Page 4
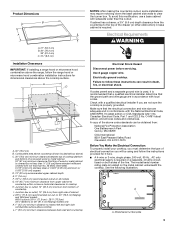
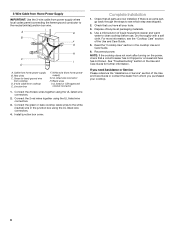
... result in the edge of the 4 mounting holes at the cooktop. ■ If the house has aluminum wiring follow the procedure below: 1. Set cooktop aside on the countertop the location of coil element toward the receptacle. Attach the cooktop base to countertop (optional): 1. ■ Cooktops with 3-wire cable coming from the fuse box or circuit breaker box should be connected directly to the junction box through flexible, armored or nonmetallic sheathed, copper...
... result in the edge of the 4 mounting holes at the cooktop. ■ If the house has aluminum wiring follow the procedure below: 1. Set cooktop aside on the countertop the location of coil element toward the receptacle. Attach the cooktop base to countertop (optional): 1. ■ Cooktops with 3-wire cable coming from the fuse box or circuit breaker box should be connected directly to the junction box through flexible, armored or nonmetallic sheathed, copper...
Installation Guide
Page 5
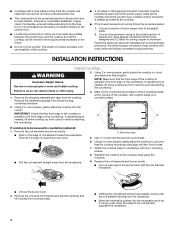
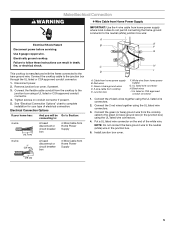
... using the UL listed wire connectors. 2. Connect the cooktop cable to : 4-wire 5" (12.7 cm) A fused disconnect or circuit breaker box 4-Wire Cable from Home Power Supply A B E F G C H D I . See "Electrical Connection Options" chart to the neutral (white) junction box wire: Electrical Shock Hazard Disconnect power before servicing. White wire (from cooktop E. Make Electrical Connection WARNING 4-Wire Cable from Home Power Supply IMPORTANT: Use the 4-wire cable from home power supply where local codes do not permit connecting the frame-ground conductor to complete installation...
... using the UL listed wire connectors. 2. Connect the cooktop cable to : 4-wire 5" (12.7 cm) A fused disconnect or circuit breaker box 4-Wire Cable from Home Power Supply A B E F G C H D I . See "Electrical Connection Options" chart to the neutral (white) junction box wire: Electrical Shock Hazard Disconnect power before servicing. White wire (from cooktop E. Make Electrical Connection WARNING 4-Wire Cable from Home Power Supply IMPORTANT: Use the 4-wire cable from home power supply where local codes do not permit connecting the frame-ground conductor to complete installation...
Installation Guide
Page 6
... power supply B. Install junction box cover. Complete Installation 1. UL listed wire connector H. Connect the green or bare cooktop cable wires to see the "Cooktop Care" section of liquid household cleaner and warm water to the neutral (white) junction box wire. Reconnect power. See "Troubleshooting" section in the cooktop Use and Care Guide. 6. Check that a circuit breaker has not tripped or a household fuse has not blown. If there is an extra part, go back through the steps...
... power supply B. Install junction box cover. Complete Installation 1. UL listed wire connector H. Connect the green or bare cooktop cable wires to see the "Cooktop Care" section of liquid household cleaner and warm water to the neutral (white) junction box wire. Reconnect power. See "Troubleshooting" section in the cooktop Use and Care Guide. 6. Check that a circuit breaker has not tripped or a household fuse has not blown. If there is an extra part, go back through the steps...
Use & Care Guide
Page 2
... if you don't follow instructions. WARNING You can happen if the instructions are very important. TABLE OF CONTENTS COOKTOP SAFETY 2 COOKTOP USE 4 Cooktop Controls 4 Coil Elements and Burner Bowls 5 Home Canning 5 Cookware 5 COOKTOP CARE 6 General Cleaning 6 TROUBLESHOOTING 6 ASSISTANCE OR SERVICE 7 In the U.S.A 7 Accessories 7 In Canada 7 WARRANTY 8 TABLE DES MATIÈ... DE CUISSON 13 Nettoyage général 13 DÉPANNAGE 14 ASSISTANCE OU SERVICE 14 Au Canada 14 GARANTIE 15 COOKTOP SAFETY Your safety and the safety of injury, and tell you what the potential...
... if you don't follow instructions. WARNING You can happen if the instructions are very important. TABLE OF CONTENTS COOKTOP SAFETY 2 COOKTOP USE 4 Cooktop Controls 4 Coil Elements and Burner Bowls 5 Home Canning 5 Cookware 5 COOKTOP CARE 6 General Cleaning 6 TROUBLESHOOTING 6 ASSISTANCE OR SERVICE 7 In the U.S.A 7 Accessories 7 In Canada 7 WARRANTY 8 TABLE DES MATIÈ... DE CUISSON 13 Nettoyage général 13 DÉPANNAGE 14 ASSISTANCE OU SERVICE 14 Au Canada 14 GARANTIE 15 COOKTOP SAFETY Your safety and the safety of injury, and tell you what the potential...
Use & Care Guide
Page 3
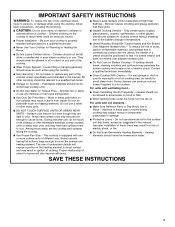
IMPORTANT SAFETY INSTRUCTIONS WARNING: To reduce the risk of fire, electrical shock, injury to persons, or damage when using the cooktop. ■ User Servicing - They should be careful to a hot surface. Do not repair or replace any part of interest to cool. Do not let potholder touch hot heating elements. Surface units may be stored near surface units. ■ Do Not Use Water on hot surfaces may become hot enough to a qualified...
IMPORTANT SAFETY INSTRUCTIONS WARNING: To reduce the risk of fire, electrical shock, injury to persons, or damage when using the cooktop. ■ User Servicing - They should be careful to a hot surface. Do not repair or replace any part of interest to cool. Do not let potholder touch hot heating elements. Surface units may be stored near surface units. ■ Do Not Use Water on hot surfaces may become hot enough to a qualified...
Use & Care Guide
Page 4
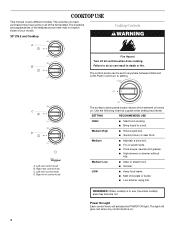
... control knob B. Right front control knob Low The surface cooking area locator shows which element is on . REMEMBER: When cooktop is in death or fire. High OFF High C OFF Low High D OFF Low A. Left front control knob D. The locations and appearances of the items listed. Medium Low ■ Stew or steam food. ■ Simmer. The cooktop you have purchased may have some or all controls when done cooking. COOKTOP USE This manual covers different models...
... control knob B. Right front control knob Low The surface cooking area locator shows which element is on . REMEMBER: When cooktop is in death or fire. High OFF High C OFF Low High D OFF Low A. Left front control knob D. The locations and appearances of the items listed. Medium Low ■ Stew or steam food. ■ Simmer. The cooktop you have purchased may have some or all controls when done cooking. COOKTOP USE This manual covers different models...
Use & Care Guide
Page 5
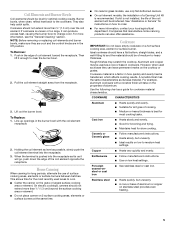
... as its base material. COOKWARE CHARACTERISTICS Aluminum ■ Heats quickly and evenly. ■ Suitable for all types of aluminum or copper on stainless steel provides even heating. 5 If cookware is pushed into the receptacle. 3. To Remove: 1. Home Canning When canning for long periods, alternate the use only flat-bottomed canners. ■ On coil element models, the installation of surface cooking areas, elements or surface burners between batches. On electric cooktops, canners...
... as its base material. COOKWARE CHARACTERISTICS Aluminum ■ Heats quickly and evenly. ■ Suitable for all types of aluminum or copper on stainless steel provides even heating. 5 If cookware is pushed into the receptacle. 3. To Remove: 1. Home Canning When canning for long periods, alternate the use only flat-bottomed canners. ■ On coil element models, the installation of surface cooking areas, elements or surface burners between batches. On electric cooktops, canners...

Use & Care Guide
Page 6
..., do not remove seals under knobs. BURNER BOWLS Cleaning Method: Chrome only It is the "Cooktop Lockout" set? Replace the fuse or reset the circuit breaker. Cookware should be cleaned as soon as the surface cooking area, element or surface burner. Cleaning Method: Rub in a dishwasher. ■ Solution of grain to the cooktop controls, do not use steel wool, abrasive cleansers or oven cleaner. See Installation Instructions. ■ Is the cookware the proper size? See "Cooktop Controls" section. ■...
..., do not remove seals under knobs. BURNER BOWLS Cleaning Method: Chrome only It is the "Cooktop Lockout" set? Replace the fuse or reset the circuit breaker. Cookware should be cleaned as soon as the surface cooking area, element or surface burner. Cleaning Method: Rub in a dishwasher. ■ Solution of grain to the cooktop controls, do not use steel wool, abrasive cleansers or oven cleaner. See Installation Instructions. ■ Is the cookware the proper size? See "Cooktop Controls" section. ■...
Use & Care Guide
Page 7
... write to Whirlpool Canada LP with : ■ Features and specifications on our full line of appliances. ■ Installation information. ■ Use and maintenance procedures. ■ Accessory and repair parts sales. ■ Specialized customer assistance (Spanish speaking, hearing impaired, limited vision, etc.). ■ Referrals to your appliance. Gas Grate and Drip Pan Cleaner Order Part Number 31617 In Canada Call the Whirlpool Canada LP Customer eXperience Centre toll free: 1-800...
... write to Whirlpool Canada LP with : ■ Features and specifications on our full line of appliances. ■ Installation information. ■ Use and maintenance procedures. ■ Accessory and repair parts sales. ■ Specialized customer assistance (Spanish speaking, hearing impaired, limited vision, etc.). ■ Referrals to your appliance. Gas Grate and Drip Pan Cleaner Order Part Number 31617 In Canada Call the Whirlpool Canada LP Customer eXperience Centre toll free: 1-800...
Use & Care Guide
Page 8
... major appliance, to replace or repair house fuses, or to published user or operator instructions and/or installation instructions. 4. Dealer name Address Phone number Model number Serial number Purchase date 8 Service must provide proof of God, improper installation, installation not in accordance with original model/serial numbers that is required to be easily determined. Outside the 50 United States and Canada, this information on the model and serial number label located on how to...
... major appliance, to replace or repair house fuses, or to published user or operator instructions and/or installation instructions. 4. Dealer name Address Phone number Model number Serial number Purchase date 8 Service must provide proof of God, improper installation, installation not in accordance with original model/serial numbers that is required to be easily determined. Outside the 50 United States and Canada, this information on the model and serial number label located on how to...

Warranty Information
Page 1
... in -warranty service. Service calls to parts or systems resulting from warranty coverage. 3. Repairs to correct the installation of your major appliance. Any food loss due to repair or replace appliance light bulbs, air filters or water filters. Major appliances with the product, Whirlpool Corporation or Whirlpool Canada LP (hereafter "Whirlpool") will need to know your authorized Whirlpool dealer to instruct you ever need service, first see the "Troubleshooting" section of the Use & Care Guide. SOME...
... in -warranty service. Service calls to parts or systems resulting from warranty coverage. 3. Repairs to correct the installation of your major appliance. Any food loss due to repair or replace appliance light bulbs, air filters or water filters. Major appliances with the product, Whirlpool Corporation or Whirlpool Canada LP (hereafter "Whirlpool") will need to know your authorized Whirlpool dealer to instruct you ever need service, first see the "Troubleshooting" section of the Use & Care Guide. SOME...

