

Installation Instructions
Page 2
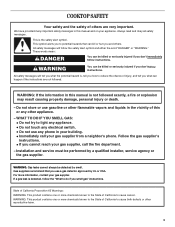
.... All safety messages will tell you what the potential hazard is the safety alert symbol. This symbol alerts you to reduce the chance of others . COOKTOP SAFETY Your safety and the safety of injury, and tell you what can kill or hurt you and others are not followed. 2
.... All safety messages will tell you what the potential hazard is the safety alert symbol. This symbol alerts you to reduce the chance of others . COOKTOP SAFETY Your safety and the safety of injury, and tell you what can kill or hurt you and others are not followed. 2
Installation Instructions
Page 4
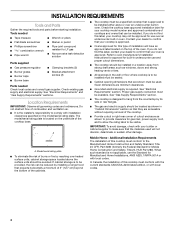
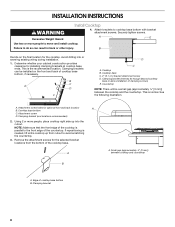
..., Title 24 CFR, Part 3280 (formerly the Federal Standard for use over an undercounter built-in the wall or floor where cooktop is approved. See "Electrical Requirements" and "Gas Supply Requirements" sections. In Canada, the installation of the cabinets. Refer to...avoided. Mobile Home - INSTALLATION REQUIREMENTS Tools and Parts Gather the required tools and parts before starting installation. A ■ The cooktop must conform with the current standards CAN/CSA-A240-latest edition, or with installation clearances specified on the model/serial rating plate...
..., Title 24 CFR, Part 3280 (formerly the Federal Standard for use over an undercounter built-in the wall or floor where cooktop is approved. See "Electrical Requirements" and "Gas Supply Requirements" sections. In Canada, the installation of the cabinets. Refer to...avoided. Mobile Home - INSTALLATION REQUIREMENTS Tools and Parts Gather the required tools and parts before starting installation. A ■ The cooktop must conform with the current standards CAN/CSA-A240-latest edition, or with installation clearances specified on the model/serial rating plate...
Installation Instructions
Page 5
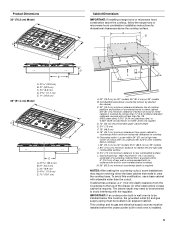
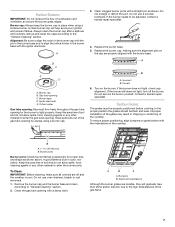
...Gas line opening - The drawer depth may require notching down the base cabinet side walls to rear combustible surface L. This cooktop and its gas and electrical supply sources must be installed below this modification, use a base cabinet with the regulator. Wall: Anywhere..." models J. 8³⁄₈" (21.3 cm) minimum distance to nearest left and right side combustible surface K. 2⁷⁄₈" (7.3 cm) minimum distance to clear the cooktop base. Product Dimensions 30" (76.2 cm) Model A C E A. 31 79.8 cm) B. 21" (53.3 cm) C. 3½" (8.9 cm) D. 4 11.7 cm) E. 11" (27.9 ...
...Gas line opening - The drawer depth may require notching down the base cabinet side walls to rear combustible surface L. This cooktop and its gas and electrical supply sources must be installed below this modification, use a base cabinet with the regulator. Wall: Anywhere..." models J. 8³⁄₈" (21.3 cm) minimum distance to nearest left and right side combustible surface K. 2⁷⁄₈" (7.3 cm) minimum distance to clear the cooktop base. Product Dimensions 30" (76.2 cm) Model A C E A. 31 79.8 cm) B. 21" (53.3 cm) C. 3½" (8.9 cm) D. 4 11.7 cm) E. 11" (27.9 ...
Installation Instructions
Page 6
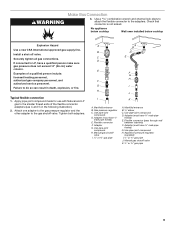
... ■ A 120 volt, 60 Hz, AC only, 15-amp, fused electrical circuit is recommended that a separate circuit serving only this cooktop. No attempt shall be electrically grounded in accordance with local codes and ordinances, or in death, fire, or electrical shock. Observe all gas... connections. Do not use an adapter. IMPORTANT: The cooktop must be provided. ■ Electronic ignition systems operate within wide voltage limits, but proper grounding and polarity are necessary. Securely tighten all...
... ■ A 120 volt, 60 Hz, AC only, 15-amp, fused electrical circuit is recommended that a separate circuit serving only this cooktop. No attempt shall be electrically grounded in accordance with local codes and ordinances, or in death, fire, or electrical shock. Observe all gas... connections. Do not use an adapter. IMPORTANT: The cooktop must be provided. ■ Electronic ignition systems operate within wide voltage limits, but proper grounding and polarity are necessary. Securely tighten all...
Installation Instructions
Page 7
... room but external to or less than ½ psi (3.5 kPa). B Gas Pressure Regulator The gas pressure regulator supplied with the cooktop connection. Gas Supply Pressure Testing Gas supply pressure for turning on longer runs may result in the system. Line pressure testing above &#... applicable for proper operation: Natural Gas: Minimum pressure: 5" (12.7 cm) WCP Maximum pressure: 7" to 14" (17.8 cm to the cooktop. Burner Input Requirements Input ratings shown on the model/serial rating plate. flexible stainless steel tubing gas connector, designed by closing . The inlet pressure...
... room but external to or less than ½ psi (3.5 kPa). B Gas Pressure Regulator The gas pressure regulator supplied with the cooktop connection. Gas Supply Pressure Testing Gas supply pressure for turning on longer runs may result in the system. Line pressure testing above &#... applicable for proper operation: Natural Gas: Minimum pressure: 5" (12.7 cm) WCP Maximum pressure: 7" to 14" (17.8 cm to the cooktop. Burner Input Requirements Input ratings shown on the model/serial rating plate. flexible stainless steel tubing gas connector, designed by closing . The inlet pressure...
Installation Instructions
Page 8
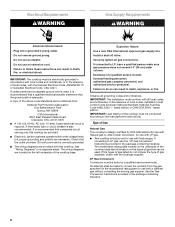
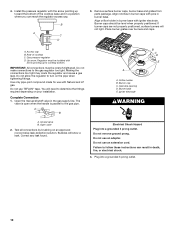
... screws. Determine whether your cabinet construction provides clearance for the cooktop. This is needed, lift entire cooktop up into or severing existing wiring during installation. 1. Cooktop B. Clamping bracket (extends far enough beyond cooktop base to cooktop base bottom with bracket attachment screws. A B A. B...to avoid scratching the countertop. 3. Clamping brackets can result in back or other injury. Avoid drilling into the cutout. Cooktop base C. 2" (5.1 cm) bracket attachment screw D. See the following illustration. A. Attachment screw holes for the selected bracket...
... screws. Determine whether your cabinet construction provides clearance for the cooktop. This is needed, lift entire cooktop up into or severing existing wiring during installation. 1. Cooktop B. Clamping bracket (extends far enough beyond cooktop base to cooktop base bottom with bracket attachment screws. A B A. B...to avoid scratching the countertop. 3. Clamping brackets can result in back or other injury. Avoid drilling into the cutout. Cooktop base C. 2" (5.1 cm) bracket attachment screw D. See the following illustration. A. Attachment screw holes for the selected bracket...
Installation Instructions
Page 9
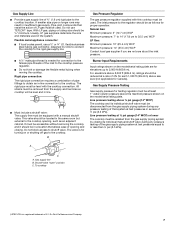
... so can result in the following illustration). 2. Gas pressure regulator C. Manifold entrance B. ³⁄₈" elbow C. Use pipe-joint compound. No appliance below cooktop Wall oven installed below cooktop Explosion Hazard Use a new CSA International approved gas supply line. A A B C B D C E D E F G H F G I H J I . ½" or ¾" gas pipe A. Use pipe-joint compound. Adapter (must have a qualified...
... so can result in the following illustration). 2. Gas pressure regulator C. Manifold entrance B. ³⁄₈" elbow C. Use pipe-joint compound. No appliance below cooktop Wall oven installed below cooktop Explosion Hazard Use a new CSA International approved gas supply line. A A B C B D C E D E F G H F G I H J I . ½" or ¾" gas pipe A. Use pipe-joint compound. Adapter (must have a qualified...
Installation Instructions
Page 10
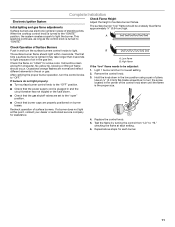
..., fire, or electrical shock. 4. A B B C D E A A. Igniter electrode WARNING A. Bubbles will not light. Do not use TEFLON® tape. Failure to cooktop bottom. Place burner grates over burners and caps. Up arrow. Do not use an adapter. The valve is open when the handle is parallel to... notches in burner base. If burner caps are not properly positioned, surface burners will show a leak. A. Access cap B. Rear of the cooktop base and in a position where you can result in the gas supply line. Regulator must be wrench-tightened. IMPORTANT: All connections must be level...
..., fire, or electrical shock. 4. A B B C D E A A. Igniter electrode WARNING A. Bubbles will not light. Do not use TEFLON® tape. Failure to cooktop bottom. Place burner grates over burners and caps. Up arrow. Do not use an adapter. The valve is open when the handle is parallel to... notches in burner base. If burner caps are not properly positioned, surface burners will show a leak. A. Access cap B. Rear of the cooktop base and in a position where you can result in the gas supply line. Regulator must be wrench-tightened. IMPORTANT: All connections must be level...
Installation Instructions
Page 11
... screw located in the low position using a pair of surface burners. Recheck operation of pliers. Low flame B. Repeat above steps for a blue color. When the cooktop control knob is turned to "OFF." This sparking continues, as long as the control knob is turned to the "IGNITE" position, the system creates a spark...
... screw located in the low position using a pair of surface burners. Recheck operation of pliers. Low flame B. Repeat above steps for a blue color. When the cooktop control knob is turned to "OFF." This sparking continues, as long as the control knob is turned to the "IGNITE" position, the system creates a spark...
Owners Manual
Page 3
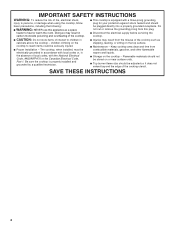
... the potential hazard is, tell you how to cause birth defects or other flammable vapors and liquids in this manual is the safety alert symbol. COOKTOP SAFETY Your safety and the safety of others . WHAT TO DO IF YOU SMELL GAS: • Do not try to cause cancer. Always read and...
... the potential hazard is, tell you how to cause birth defects or other flammable vapors and liquids in this manual is the safety alert symbol. COOKTOP SAFETY Your safety and the safety of others . WHAT TO DO IF YOU SMELL GAS: • Do not try to cause cancer. Always read and...
Owners Manual
Page 4
... the grounding prong from combustible materials, gasoline, and other flammable vapors and liquids. ■ Storage on the cooktop to heat or warm the room. Keep cooktop area clear and free from this appliance as stepping, leaning, or sitting on or near surface units. ■...; Top burner flame size should be seriously injured. ■ Proper Installation - The cooktop, when installed, must be stored on the top surface. ■ Maintenance - Flammable materials should not be electrically grounded in accordance with the...
... the grounding prong from combustible materials, gasoline, and other flammable vapors and liquids. ■ Storage on the cooktop to heat or warm the room. Keep cooktop area clear and free from this appliance as stepping, leaning, or sitting on or near surface units. ■...; Top burner flame size should be seriously injured. ■ Proper Installation - The cooktop, when installed, must be stored on the top surface. ■ Maintenance - Flammable materials should not be electrically grounded in accordance with the...

Owners Manual
Page 5
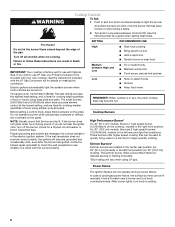
Right rear surface simmer burner (9,200 Btu/h) C. Left rear surface burner (9,200 Btu/h) C. Left front surface burner (5,000 Btu/h) D. Left rear surface burner (12,500 Btu/h) B. Left front surface burner (9,200 Btu/h) B. Right rear surface burner (9,200 Btu/h) E. Center surface simmer burner (5,000 Btu/h) D. Right front surface burner (12,500 Btu/h) 5 COOKTOP USE NOTE: Burner ratings listed below are for Natural gas. 30" (76.2 cm) Model 36" (91.4 cm) Model A C B D B C A E D A. Right front surface burner (12,500 Btu/h) A.
Right rear surface simmer burner (9,200 Btu/h) C. Left rear surface burner (9,200 Btu/h) C. Left front surface burner (5,000 Btu/h) D. Left rear surface burner (12,500 Btu/h) B. Left front surface burner (9,200 Btu/h) B. Right rear surface burner (9,200 Btu/h) E. Center surface simmer burner (5,000 Btu/h) D. Right front surface burner (12,500 Btu/h) 5 COOKTOP USE NOTE: Burner ratings listed below are for Natural gas. 30" (76.2 cm) Model 36" (91.4 cm) Model A C B D B C A E D A. Right front surface burner (12,500 Btu/h) A.
Owners Manual
Page 6
...let the burner flame extend beyond the edge of food or liquid, using smaller pots and pans. See the instructions included with your new cooktop. The small burners (9,200 Btu/h and 5,000 Btu/h) allow more accurate simmer control at the lowest setting, and are necessary for ...in death or fire. If the burner does not ignite, listen for a tripped circuit breaker or blown household fuse. Check for a clicking sound. Cooktop Burners High Performance Burner* On 36" (91.4 cm) models, there is ideal for large-quantity cooking. NOTE: Visually check that can be used...
...let the burner flame extend beyond the edge of food or liquid, using smaller pots and pans. See the instructions included with your new cooktop. The small burners (9,200 Btu/h and 5,000 Btu/h) allow more accurate simmer control at the lowest setting, and are necessary for ...in death or fire. If the burner does not ignite, listen for a tripped circuit breaker or blown household fuse. Check for a clicking sound. Cooktop Burners High Performance Burner* On 36" (91.4 cm) models, there is ideal for large-quantity cooking. NOTE: Visually check that can be used...
Owners Manual
Page 7
...Replace the burner cap, making sure the alignment pins on the burner. Correct 6. If the burner still does not light, turn off and the cooktop is blue in place when using a burner cap. To ensure proper positioning, align bumpers on grate bottom with the indentations in the burner base ...with the burner base. A good flame is cool. Bumpers B. Surface Burners IMPORTANT: Do not obstruct the flow of the cooktop. Clean clogged burner ports with a damp cloth. Do not enlarge or distort the port. Do not use a wooden toothpick. Keep this area free ...
...Replace the burner cap, making sure the alignment pins on the burner. Correct 6. If the burner still does not light, turn off and the cooktop is blue in place when using a burner cap. To ensure proper positioning, align bumpers on grate bottom with the indentations in the burner base ...with the burner base. A good flame is cool. Bumpers B. Surface Burners IMPORTANT: Do not obstruct the flow of the cooktop. Clean clogged burner ports with a damp cloth. Do not enlarge or distort the port. Do not use a wooden toothpick. Keep this area free ...
Owners Manual
Page 8
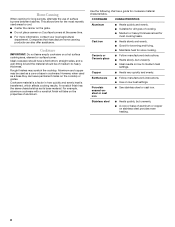
... canner on the grate. ■ Do not place canner on stainless steel provides even heating. 8 Aluminum and copper may scratch the cooktop. Cast iron ■ Heats slowly and evenly. ■ Good for browning and frying. ■ Maintains heat for long periods, alternate...be of aluminum. Cookware material is transferred, which affects cooking results. For example, aluminum cookware with a nonstick finish will take on the cooktop or grates. Earthenware ■ Follow manufacturer's instructions. ■ Use on a hot surface cooking area, element or surface burner. A ...
... canner on the grate. ■ Do not place canner on stainless steel provides even heating. 8 Aluminum and copper may scratch the cooktop. Cast iron ■ Heats slowly and evenly. ■ Good for browning and frying. ■ Maintains heat for long periods, alternate...be of aluminum. Cookware material is transferred, which affects cooking results. For example, aluminum cookware with a nonstick finish will take on the cooktop or grates. Earthenware ■ Follow manufacturer's instructions. ■ Use on a hot surface cooking area, element or surface burner. A ...
Owners Manual
Page 9
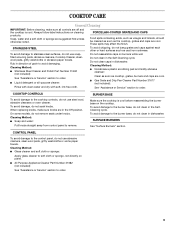
...included): See "Assistance or Service" section to stainless steel surfaces, do not soak knobs. BURNER BASE Make sure the cooktop is cool. COOKTOP CARE General Cleaning IMPORTANT: Before cleaning, make sure knobs are in dishwasher. Rub in the Self-Cleaning cycle. On some... not use abrasive cleaners, steel-wool pads, gritty washcloths or some models, do not use soapfilled scouring pads, abrasive cleaners, Cooktop Cleaner, steelwool pads, gritty washcloths or abrasive paper towels. Cleaning Method: ■ Soap and water: Pull knobs straight away from...
...included): See "Assistance or Service" section to stainless steel surfaces, do not soak knobs. BURNER BASE Make sure the cooktop is cool. COOKTOP CARE General Cleaning IMPORTANT: Before cleaning, make sure knobs are in dishwasher. Rub in the Self-Cleaning cycle. On some... not use abrasive cleaners, steel-wool pads, gritty washcloths or some models, do not use soapfilled scouring pads, abrasive cleaners, Cooktop Cleaner, steelwool pads, gritty washcloths or abrasive paper towels. Cleaning Method: ■ Soap and water: Pull knobs straight away from...
Owners Manual
Page 10
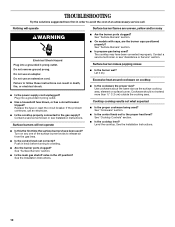
... . Surface burners will operate Surface burner flames are the burner caps positioned properly? Contact a service technician or see Installation Instructions. Cooktop cooking results not what expected ■ Is the proper cookware being used? TROUBLESHOOTING Try the solutions suggested here first in order to...use an extension cord. Do not use an adapter. Replace the fuse or reset the circuit breaker. Let it dry. Level the cooktop. Use cookware about the same size as the surface cooking area, element or surface burner. See "Surface Burners" section. ■...
... . Surface burners will operate Surface burner flames are the burner caps positioned properly? Contact a service technician or see Installation Instructions. Cooktop cooking results not what expected ■ Is the proper cookware being used? TROUBLESHOOTING Try the solutions suggested here first in order to...use an extension cord. Do not use an adapter. Replace the fuse or reset the circuit breaker. Let it dry. Level the cooktop. Use cookware about the same size as the surface cooking area, element or surface burner. See "Surface Burners" section. ■...


