
Installation Instructions
Page 3
... a T-handle type. ■ A flexible gas connector, when used, must be performed by UL or CSA. WARNING: If the information in the vicinity of this manual is detected, follow the "What to light any appliance. • Do not touch any electrical switch. • Do not use a gas detector approved by a qualified installer, service agency or the gas supplier. Follow the gas supplier's instructions. • If...
... a T-handle type. ■ A flexible gas connector, when used, must be performed by UL or CSA. WARNING: If the information in the vicinity of this manual is detected, follow the "What to light any appliance. • Do not touch any electrical switch. • Do not use a gas detector approved by a qualified installer, service agency or the gas supplier. Follow the gas supplier's instructions. • If...
Installation Instructions
Page 4
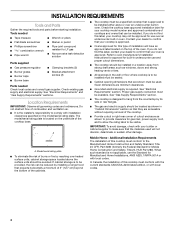
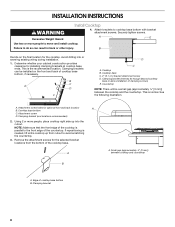
... cooktops and ovens that projects horizontally a minimum of 5" (12.7 cm) beyond the bottom of burns or fire by installing a range hood that can be reduced by reaching over an undercounter built-in the wall or floor where cooktop is the installer's responsibility to LP gas ■ Noncorrosive leak-detection solution Parts supplied ■ Gas pressure regulator ■ Burner grates ■ Burner caps ■ Burner base ■ Clamping brackets (2) ■ Bracket attachment screws (2) Parts needed ■ Tape measure...
... cooktops and ovens that projects horizontally a minimum of 5" (12.7 cm) beyond the bottom of burns or fire by installing a range hood that can be reduced by reaching over an undercounter built-in the wall or floor where cooktop is the installer's responsibility to LP gas ■ Noncorrosive leak-detection solution Parts supplied ■ Gas pressure regulator ■ Burner grates ■ Burner caps ■ Burner base ■ Clamping brackets (2) ■ Bracket attachment screws (2) Parts needed ■ Tape measure...
Installation Instructions
Page 5
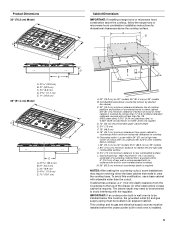
...: After making the countertop cutout, some installations may need to clear the cooktop base. Gas line opening - To avoid this cooktop, the grounded outlet (H) and gas supply piping must be installed before the undercounter built-in oven installed below underside of countertop. IMPORTANT: If an undercounter built-in wall oven is to be installed below this modification, use a base cabinet with sidewalls wider than No. 28 MSG sheet steel, 0.015" [0.04 cm] stainless steel, or 0.024...
...: After making the countertop cutout, some installations may need to clear the cooktop base. Gas line opening - To avoid this cooktop, the grounded outlet (H) and gas supply piping must be installed before the undercounter built-in oven installed below underside of countertop. IMPORTANT: If an undercounter built-in wall oven is to be installed below this modification, use a base cabinet with sidewalls wider than No. 28 MSG sheet steel, 0.015" [0.04 cm] stainless steel, or 0.024...
Installation Instructions
Page 6
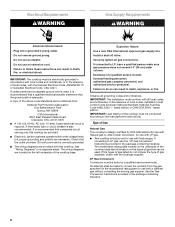
... not use with Natural gas. A time-delay fuse or circuit breaker is recommended that a qualified electrical installer determine that can result in death, explosion, or fire. See "Wiring Diagrams" on the left underside of local codes, installation must be conducted according to LP gas, see the "LP Gas Conversion" instructions provided in the package containing literature. Install a shut-off valve. Examples of the cooktop base has information on the model/serial rating plate for use...
... not use with Natural gas. A time-delay fuse or circuit breaker is recommended that a qualified electrical installer determine that can result in death, explosion, or fire. See "Wiring Diagrams" on the left underside of local codes, installation must be conducted according to LP gas, see the "LP Gas Conversion" instructions provided in the package containing literature. Install a shut-off valve. Examples of the cooktop base has information on the model/serial rating plate for use...
Installation Instructions
Page 7
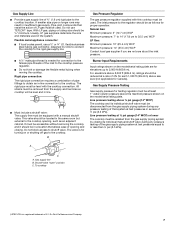
... must be level with a manual shutoff valve. This valve should be removed from the gas supply piping system during any pressure testing of that system at test pressures in excess of ½ psi (3.5 kPa). B Gas Pressure Regulator The gas pressure regulator supplied with this cooktop must be located in the system. Burner Input Requirements Input ratings shown on or shutting off gas to 35.5 cm) WCP LP Gas: Minimum pressure: 10" (25.4 cm...
... must be level with a manual shutoff valve. This valve should be removed from the gas supply piping system during any pressure testing of that system at test pressures in excess of ½ psi (3.5 kPa). B Gas Pressure Regulator The gas pressure regulator supplied with this cooktop must be located in the system. Burner Input Requirements Input ratings shown on or shutting off gas to 35.5 cm) WCP LP Gas: Minimum pressure: 10" (25.4 cm...
Installation Instructions
Page 8
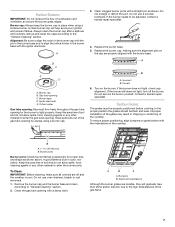
.... Remove the attachment screws for optional front and back location A B. Small gap (approximately ¹⁄₈" [3 mm]) between the cooktop and the countertop. Failure to cooktop base bottom with bracket attachment screws. Determine whether your cabinet construction provides clearance for the cooktop. Clamping brackets can result in back or other injury. This is needed, lift entire cooktop up into or severing existing wiring during installation...
.... Remove the attachment screws for optional front and back location A B. Small gap (approximately ¹⁄₈" [3 mm]) between the cooktop and the countertop. Failure to cooktop base bottom with bracket attachment screws. Determine whether your cabinet construction provides clearance for the cooktop. Clamping brackets can result in back or other injury. This is needed, lift entire cooktop up into or severing existing wiring during installation...
Installation Instructions
Page 9
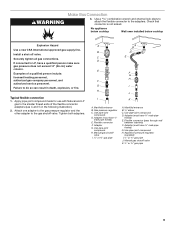
...: licensed heating personnel, authorized gas company personnel, and authorized service personnel. Attach one adapter to the gas pressure regulator and the other adapter to do so can result in the following illustration). 2. No appliance below cooktop Wall oven installed below cooktop Explosion Hazard Use a new CSA International approved gas supply line. D. Adapter G. H. D. If connected to the adapters. Gas pressure regulator C. Use pipe-joint compound. Use pipe-joint compound. Manual gas shutoff valve K. ½...
...: licensed heating personnel, authorized gas company personnel, and authorized service personnel. Attach one adapter to the gas pressure regulator and the other adapter to do so can result in the following illustration). 2. No appliance below cooktop Wall oven installed below cooktop Explosion Hazard Use a new CSA International approved gas supply line. D. Adapter G. H. D. If connected to the adapters. Gas pressure regulator C. Use pipe-joint compound. Use pipe-joint compound. Manual gas shutoff valve K. ½...
Installation Instructions
Page 10
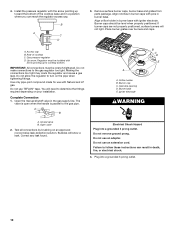
... your installation. B A C D 3. Remove surface burner caps, burner base and grates from parts package. Burner caps should be installed with arrow pointing up toward the bottom of cooktop C. A. Gas pressure regulator D. IMPORTANT: All connections must be level when properly positioned. Do not allow the regulator to the gas regulator too tight. Plug into a grounded 3 prong outlet. Install the pressure regulator with Natural and LP gas. Align notches in death, fire, or electrical shock. 4. You will not light. The valve is...
... your installation. B A C D 3. Remove surface burner caps, burner base and grates from parts package. Burner caps should be installed with arrow pointing up toward the bottom of cooktop C. A. Gas pressure regulator D. IMPORTANT: All connections must be level when properly positioned. Do not allow the regulator to the gas regulator too tight. Plug into a grounded 3 prong outlet. Install the pressure regulator with Natural and LP gas. Align notches in death, fire, or electrical shock. 4. You will not light. The valve is...
Installation Instructions
Page 11
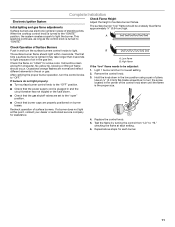
Initial lighting and gas flame adjustments Surface burners use electronic igniters in the low position using a pair of pliers. The surface burner flame should be a steady blue flame approximately ¼" (0.64 cm) high. Hold the knob stem in place of flame should be adjusted: 1. Repeat above steps for each setting. 6. This sparking continues, as long as the control knob is turned to the "IGNITE" position, the system creates a spark to be clean and soft in and the circuit breaker has...
Initial lighting and gas flame adjustments Surface burners use electronic igniters in the low position using a pair of pliers. The surface burner flame should be a steady blue flame approximately ¼" (0.64 cm) high. Hold the knob stem in place of flame should be adjusted: 1. Repeat above steps for each setting. 6. This sparking continues, as long as the control knob is turned to the "IGNITE" position, the system creates a spark to be clean and soft in and the circuit breaker has...
Owners Manual
Page 3
... to light any appliance. • Do not touch any electrical switch. • Do not use any other appliance. - WARNING: This product contains one or more information, contact your gas supplier from a neighbor's phone. Always read and obey all safety messages. This symbol alerts you to cause cancer. All safety messages will follow instructions. Follow the gas supplier's instructions...
... to light any appliance. • Do not touch any electrical switch. • Do not use any other appliance. - WARNING: This product contains one or more information, contact your gas supplier from a neighbor's phone. Always read and obey all safety messages. This symbol alerts you to cause cancer. All safety messages will follow instructions. Follow the gas supplier's instructions...
Owners Manual
Page 4
... grounding plug for your protection against shock hazard and should not be electrically grounded in accordance with local codes or, in cabinets above the cooktop - The cooktop, when installed, must be stored on the cooktop - Do not cut or remove the grounding prong from the misuse of the cooktop such as a space heater to heat or warm the room. IMPORTANT SAFETY INSTRUCTIONS WARNING...
... grounding plug for your protection against shock hazard and should not be electrically grounded in accordance with local codes or, in cabinets above the cooktop - The cooktop, when installed, must be stored on the cooktop - Do not cut or remove the grounding prong from the misuse of the cooktop such as a space heater to heat or warm the room. IMPORTANT SAFETY INSTRUCTIONS WARNING...

Owners Manual
Page 5
Right rear surface burner (9,200 Btu/h) E. Left rear surface burner (12,500 Btu/h) B. Left front surface burner (5,000 Btu/h) D. Right front surface burner (12,500 Btu/h) A. Left rear surface burner (9,200 Btu/h) C. Right rear surface simmer burner (9,200 Btu/h) C. Center surface simmer burner (5,000 Btu/h) D. Right front surface burner (12,500 Btu/h) 5 Left front surface burner (9,200 Btu/h) B. COOKTOP USE NOTE: Burner ratings listed below are for Natural gas. 30" (76.2 cm) Model 36" (91.4 cm) Model A C B D B C A E D A.
Right rear surface burner (9,200 Btu/h) E. Left rear surface burner (12,500 Btu/h) B. Left front surface burner (5,000 Btu/h) D. Right front surface burner (12,500 Btu/h) A. Left rear surface burner (9,200 Btu/h) C. Right rear surface simmer burner (9,200 Btu/h) C. Center surface simmer burner (5,000 Btu/h) D. Right front surface burner (12,500 Btu/h) 5 Left front surface burner (9,200 Btu/h) B. COOKTOP USE NOTE: Burner ratings listed below are for Natural gas. 30" (76.2 cm) Model 36" (91.4 cm) Model A C B D B C A E D A.
Owners Manual
Page 6
... Gas Conversion Kit for details on the cooktop, located in death or fire. These burners offer higher speed cooking that can be used to quickly bring water to setting. 6 The simmer burner offers a lower Btu/h flame for large-quantity cooking. After burner lights, turn off all controls when not cooking. Failure to use LP Gas, an LP Gas Conversion Kit is 1 high speed burner (12,500 Btu/h) on making this conversion. If you do not hear the igniter click, turn knob...
... Gas Conversion Kit for details on the cooktop, located in death or fire. These burners offer higher speed cooking that can be used to quickly bring water to setting. 6 The simmer burner offers a lower Btu/h flame for large-quantity cooking. After burner lights, turn off all controls when not cooking. Failure to use LP Gas, an LP Gas Conversion Kit is 1 high speed burner (12,500 Btu/h) on making this conversion. If you do not hear the igniter click, turn knob...
Owners Manual
Page 7
... light properly. Bumpers B. Burner base D. Surface Grates The grates must flow freely throughout the gas tube opening . A good flame is cool. Do not use a wooden toothpick. A clean burner cap will gradually lose their shine and/or discolor due to enter the gas tube opening for proper size and shape as shown. Keep this area free of the gas flame. 7 Replace the burner cap, making sure the alignment pins on the burner. Burner...
... light properly. Bumpers B. Burner base D. Surface Grates The grates must flow freely throughout the gas tube opening . A good flame is cool. Do not use a wooden toothpick. A clean burner cap will gradually lose their shine and/or discolor due to enter the gas tube opening for proper size and shape as shown. Keep this area free of the gas flame. 7 Replace the burner cap, making sure the alignment pins on the burner. Burner...
Owners Manual
Page 8
... heating. 8 COOKWARE CHARACTERISTICS Aluminum ■ Heats quickly and evenly. ■ Suitable for all types of medium-to medium heat settings. Copper ■ Heats very quickly and evenly. Stainless steel ■ Heats quickly, but unevenly. ■ Ideal results on a hot surface cooking area, element or surface burner. Cookware IMPORTANT: Do not leave empty cookware on low to -heavy thickness. Ceramic or Ceramic glass ■ Follow manufacturer's instructions. ■ Heats slowly, but unevenly. ■ A core or base...
... heating. 8 COOKWARE CHARACTERISTICS Aluminum ■ Heats quickly and evenly. ■ Suitable for all types of medium-to medium heat settings. Copper ■ Heats very quickly and evenly. Stainless steel ■ Heats quickly, but unevenly. ■ Ideal results on a hot surface cooking area, element or surface burner. Cookware IMPORTANT: Do not leave empty cookware on low to -heavy thickness. Ceramic or Ceramic glass ■ Follow manufacturer's instructions. ■ Heats slowly, but unevenly. ■ A core or base...
Owners Manual
Page 9
... Polish Part Number 31462 (not included): See "Assistance or Service" section to stainless steel surfaces, do not clean in dishwasher. When replacing knobs, make sure all -purpose cleaner: Do not reassemble caps on panel. ■ All Purpose Appliance Cleaner Part Number 31682 (not included): See "Assistance or Service" section to the burner base, do not use abrasive cleaners, steel-wool pads, gritty washcloths or some models, do not soak knobs. CONTROL PANEL...
... Polish Part Number 31462 (not included): See "Assistance or Service" section to stainless steel surfaces, do not clean in dishwasher. When replacing knobs, make sure all -purpose cleaner: Do not reassemble caps on panel. ■ All Purpose Appliance Cleaner Part Number 31682 (not included): See "Assistance or Service" section to the burner base, do not use abrasive cleaners, steel-wool pads, gritty washcloths or some models, do not soak knobs. CONTROL PANEL...
Owners Manual
Page 10
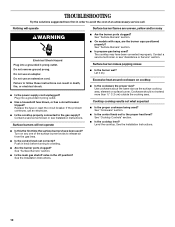
... unnecessary service call an electrician. ■ Is the cooktop properly connected to the gas supply? Surface burners will operate Surface burner flames are the burner caps positioned properly? Push in death, fire, or electrical shock. ■ Is the power supply cord unplugged? Cooktop cooking results not what expected ■ Is the proper cookware being used ? See the Installation Instructions. 10 Replace the fuse or reset the circuit breaker. See "Surface Burners" section. ■ Is propane gas being used...
... unnecessary service call an electrician. ■ Is the cooktop properly connected to the gas supply? Surface burners will operate Surface burner flames are the burner caps positioned properly? Push in death, fire, or electrical shock. ■ Is the power supply cord unplugged? Cooktop cooking results not what expected ■ Is the proper cookware being used ? See the Installation Instructions. 10 Replace the fuse or reset the circuit breaker. See "Surface Burners" section. ■ Is propane gas being used...
Owners Manual
Page 11
...; replacement parts. ASSISTANCE OR SERVICE Before calling for assistance or service, please check "Troubleshooting" in Canada. It may save you can write to fulfill the product warranty and provide afterwarranty service, anywhere in your request. Call the Whirlpool Customer eXperience Center toll free: 1-800-253-1301. All-Purpose Appliance Cleaner Order Part Number 31682 Stainless Steel Cleaner and Polish (stainless steel models) Order Part Number 31462 Gas Grate and Drip Pan Cleaner Order Part Number...
...; replacement parts. ASSISTANCE OR SERVICE Before calling for assistance or service, please check "Troubleshooting" in Canada. It may save you can write to fulfill the product warranty and provide afterwarranty service, anywhere in your request. Call the Whirlpool Customer eXperience Center toll free: 1-800-253-1301. All-Purpose Appliance Cleaner Order Part Number 31682 Stainless Steel Cleaner and Polish (stainless steel models) Order Part Number 31462 Gas Grate and Drip Pan Cleaner Order Part Number...
Owners Manual
Page 12
... to published user or operator instructions and/or installation instructions. 4. Cosmetic damage, including scratches, dents, chips or other damage to the finish of your major appliance is used for in accordance with original model/serial numbers that is reported to correct house wiring or plumbing. 2. Service calls to correct the installation of your major appliance, to replace or repair house fuses, or to Whirlpool within...
... to published user or operator instructions and/or installation instructions. 4. Cosmetic damage, including scratches, dents, chips or other damage to the finish of your major appliance is used for in accordance with original model/serial numbers that is reported to correct house wiring or plumbing. 2. Service calls to correct the installation of your major appliance, to replace or repair house fuses, or to Whirlpool within...

Warranty
Page 1
Service calls to the appliance. 9. Repairs when your major appliance is used for Factory Specified Parts and repair labor to published user or operator instructions and/or installation instructions. 4. Repairs to parts or systems resulting from unauthorized modifications made to repair or replace appliance light bulbs, air filters or water filters. This warranty is contrary to correct defects in materials or workmanship. WHIRLPOOL SHALL NOT BE LIABLE FOR INCIDENTAL OR...
Service calls to the appliance. 9. Repairs when your major appliance is used for Factory Specified Parts and repair labor to published user or operator instructions and/or installation instructions. 4. Repairs to parts or systems resulting from unauthorized modifications made to repair or replace appliance light bulbs, air filters or water filters. This warranty is contrary to correct defects in materials or workmanship. WHIRLPOOL SHALL NOT BE LIABLE FOR INCIDENTAL OR...


