Owners Manual
Page 2
This symbol alerts you to reduce the chance of others . All safety messages will follow instructions. TABLE OF CONTENTS COOKTOP SAFETY 2 PARTS AND FEATURES 4 COOKTOP USE 6 Cooktop Controls 6 Sealed Surface Burners 7 Surface Grates with Locator Pin 8 Home Canning 8 Cookware 8 COOKTOP CARE 9 General Cleaning 9 TROUBLESHOOTING 10 ASSISTANCE OR SERVICE 11 In the U.S.A 11 Accessories 11 In Canada 11 WARRANTY 12 TABLE DES MATIÈRES SÉCURITÉ DE LA TABLE DE CUISSON...
This symbol alerts you to reduce the chance of others . All safety messages will follow instructions. TABLE OF CONTENTS COOKTOP SAFETY 2 PARTS AND FEATURES 4 COOKTOP USE 6 Cooktop Controls 6 Sealed Surface Burners 7 Surface Grates with Locator Pin 8 Home Canning 8 Cookware 8 COOKTOP CARE 9 General Cleaning 9 TROUBLESHOOTING 10 ASSISTANCE OR SERVICE 11 In the U.S.A 11 Accessories 11 In Canada 11 WARRANTY 12 TABLE DES MATIÈRES SÉCURITÉ DE LA TABLE DE CUISSON...
Owners Manual
Page 3
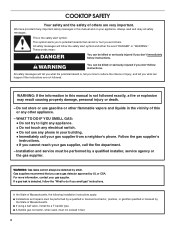
... cooking utensil. Follow the gas supplier's instructions. • If you smell gas" instructions. WARNING: If the information in this appliance as stepping, leaning, or sitting on or near surface units. ■ Top burner flame size should be seriously injured. ■ Proper Installation - Gas suppliers recommend that you use any other flammable vapors and liquids. ■ Storage on the cooktop to reach items could be adjusted...
... cooking utensil. Follow the gas supplier's instructions. • If you smell gas" instructions. WARNING: If the information in this appliance as stepping, leaning, or sitting on or near surface units. ■ Top burner flame size should be seriously injured. ■ Proper Installation - Gas suppliers recommend that you use any other flammable vapors and liquids. ■ Storage on the cooktop to reach items could be adjusted...

Owners Manual
Page 6
... use with Natural gas. Only the burner with the correct polarity. Use the following chart as the vent fan will become hot. Turn off . See the instructions included with your new cooktop. Electric igniters automatically light the surface burners when control knobs are ideal for a clicking sound. The small burners (9,100 Btu/h and 6,000 Btu/h) allow more accurate simmer control at the lowest setting, and are necessary for a tripped circuit breaker or blown household fuse. Before setting a control knob...
... use with Natural gas. Only the burner with the correct polarity. Use the following chart as the vent fan will become hot. Turn off . See the instructions included with your new cooktop. Electric igniters automatically light the surface burners when control knobs are ideal for a clicking sound. The small burners (9,100 Btu/h and 6,000 Btu/h) allow more accurate simmer control at the lowest setting, and are necessary for a tripped circuit breaker or blown household fuse. Before setting a control knob...

Owners Manual
Page 7
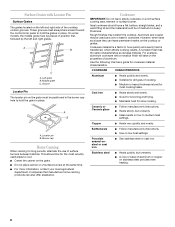
... poor ignition and uneven flames. Incorrect B. If the burner does not light, check cap alignment. Igniter D. Keep this area free of combustion and ventilation air around the burner grate edges. Sealed Surface Burners IMPORTANT: Do not obstruct the flow of soil and do not service the sealed burner yourself. Do not use oven cleaners, bleach or rust removers. 1. Burner cap B. Burner cap: Always keep the burner cap in color, not yellow. If the burner needs to the "General Cleaning...
... poor ignition and uneven flames. Incorrect B. If the burner does not light, check cap alignment. Igniter D. Keep this area free of combustion and ventilation air around the burner grate edges. Sealed Surface Burners IMPORTANT: Do not obstruct the flow of soil and do not service the sealed burner yourself. Do not use oven cleaners, bleach or rust removers. 1. Burner cap B. Burner cap: Always keep the burner cap in color, not yellow. If the burner needs to the "General Cleaning...
Owners Manual
Page 8
.... Stainless steel ■ Heats quickly, but unevenly. ■ Ideal results on a hot surface cooking area, element or surface burner. A B A. Burner cap Home Canning When canning for cookware material characteristics. Cookware IMPORTANT: Do not leave empty cookware on low to hold the grates in cookware. Left grate B. Middle grate C. However, when used as its base material. Use the following chart as a base they can also offer assistance. Ceramic or Ceramic glass ■ Follow manufacturer's instructions...
.... Stainless steel ■ Heats quickly, but unevenly. ■ Ideal results on a hot surface cooking area, element or surface burner. A B A. Burner cap Home Canning When canning for cookware material characteristics. Cookware IMPORTANT: Do not leave empty cookware on low to hold the grates in cookware. Left grate B. Middle grate C. However, when used as its base material. Use the following chart as a base they can also offer assistance. Ceramic or Ceramic glass ■ Follow manufacturer's instructions...
Owners Manual
Page 9
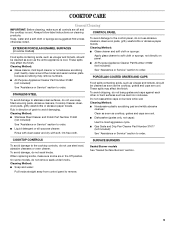
... and mildly abrasive cleanser: Cleaning Method: ■ Stainless Steel Cleaner and Polish Part Number 31462 (not included): See "Assistance or Service" section to the cooktop controls, do not remove seals under knobs. COOKTOP CONTROLS To avoid damage to order. ■ Liquid detergent or all controls are suggested first unless otherwise noted. SURFACE BURNERS Sealed Burner models See "Sealed Surface Burners" section. 9 Apply glass cleaner to order. PORCELAIN-COATED GRATES AND CAPS Food spills containing acids...
... and mildly abrasive cleanser: Cleaning Method: ■ Stainless Steel Cleaner and Polish Part Number 31462 (not included): See "Assistance or Service" section to the cooktop controls, do not remove seals under knobs. COOKTOP CONTROLS To avoid damage to order. ■ Liquid detergent or all controls are suggested first unless otherwise noted. SURFACE BURNERS Sealed Burner models See "Sealed Surface Burners" section. 9 Apply glass cleaner to order. PORCELAIN-COATED GRATES AND CAPS Food spills containing acids...
Owners Manual
Page 10
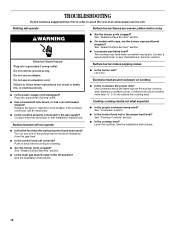
... used ? See "Sealed Surface Burners" section. ■ Is the main gas shutoff valve in knob before turning to the proper heat level? See "Cooktop Controls" section. ■ Is the cooktop level? See the Installation Instructions. ■ Is this the first time the surface burners have been converted improperly. Do not use an extension cord. Do not use an adapter. Replace the fuse or reset the circuit breaker. Push in the off position? See the Installation Instructions...
... used ? See "Sealed Surface Burners" section. ■ Is the main gas shutoff valve in knob before turning to the proper heat level? See "Cooktop Controls" section. ■ Is the cooktop level? See the Installation Instructions. ■ Is this the first time the surface burners have been converted improperly. Do not use an extension cord. Do not use an adapter. Replace the fuse or reset the circuit breaker. Push in the off position? See the Installation Instructions...
Owners Manual
Page 11
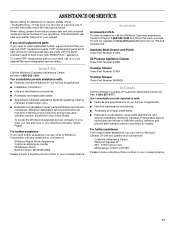
... and repair parts sales. ■ Referrals to Whirlpool Canada LP with : ■ Features and specifications on our full line of a service call the Whirlpool Customer eXperience Center toll free at www.whirlpool.com and click on our full line of your area, you still need to order replacement parts, we recommend that you can write to Whirlpool Corporation with the same precision used to fulfill the product warranty and...
... and repair parts sales. ■ Referrals to Whirlpool Canada LP with : ■ Features and specifications on our full line of a service call the Whirlpool Customer eXperience Center toll free at www.whirlpool.com and click on our full line of your area, you still need to order replacement parts, we recommend that you can write to Whirlpool Corporation with the same precision used to fulfill the product warranty and...

Owners Manual
Page 12
..., to instruct you ever need service, first see the "Troubleshooting" section of purchase or installation date for product service if your major appliance. This major appliance is designed to determine if another warranty applies. Expenses for travel and transportation for in-warranty service. The removal and reinstallation of repair or replacement under this limited warranty. The cost of your complete model number and serial number. WHIRLPOOL SHALL NOT...
..., to instruct you ever need service, first see the "Troubleshooting" section of purchase or installation date for product service if your major appliance. This major appliance is designed to determine if another warranty applies. Expenses for travel and transportation for in-warranty service. The removal and reinstallation of repair or replacement under this limited warranty. The cost of your complete model number and serial number. WHIRLPOOL SHALL NOT...
Installation Instructions
Page 2
... You can happen if the instructions are very important. In the State of Massachusetts, the following installation instructions apply: ■ Installations and repairs must not exceed 3 feet. 2 Follow the gas supplier's instructions. • If you use a gas detector approved by the State of this manual is , tell you how to...you don't follow the "What to light any appliance. • Do not touch any electrical switch. • Do not use gasoline or other flammable vapors and liquids in this or any phone in this manual and on your gas supplier. We have provided many important ...
... You can happen if the instructions are very important. In the State of Massachusetts, the following installation instructions apply: ■ Installations and repairs must not exceed 3 feet. 2 Follow the gas supplier's instructions. • If you use a gas detector approved by the State of this manual is , tell you how to...you don't follow the "What to light any appliance. • Do not touch any electrical switch. • Do not use gasoline or other flammable vapors and liquids in this or any phone in this manual and on your gas supplier. We have provided many important ...
Installation Instructions
Page 3
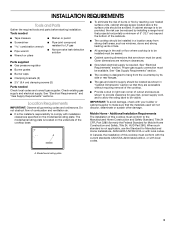
... to be sealed. ■ Cabinet opening dimensions that they are minimum clearances. ■ Grounded electrical supply is not applicable, use the Standard for gas inlet, power supply cord, and to allow the rating label to LP gas ■ Noncorrosive leak-detection solution Parts supplied ■ Gas pressure regulator ■ Burner grates ■ Burner caps ■ Clamping brackets (2) ■ 2¹⁄₂" (6.4 cm) clamping screws (2) Parts needed Check local codes and consult gas supplier. A. A ■...
... to be sealed. ■ Cabinet opening dimensions that they are minimum clearances. ■ Grounded electrical supply is not applicable, use the Standard for gas inlet, power supply cord, and to allow the rating label to LP gas ■ Noncorrosive leak-detection solution Parts supplied ■ Gas pressure regulator ■ Burner grates ■ Burner caps ■ Clamping brackets (2) ■ 2¹⁄₂" (6.4 cm) clamping screws (2) Parts needed Check local codes and consult gas supplier. A. A ■...
Installation Instructions
Page 4
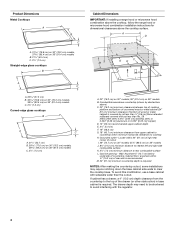
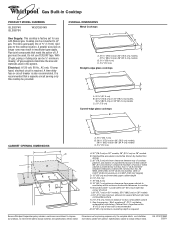
...) minimum countertop depth is required. To avoid this modification, use a base cabinet with the regulator. 4 Grounded outlet - Gas line opening - Cabinet floor: anywhere within minimum horizontal clearances to the top of wood or metal cabinet is covered by dashed box above the cooktop surface. A D C M B KEF H L J I . 29" (73.7 cm) on 30" models; 35¼" (89.5 cm) on 36" (91.4 cm) models C. 2⁷⁄₈" (7.3 cm) Cabinet Dimensions IMPORTANT: If installing a range hood or microwave hood combination...
...) minimum countertop depth is required. To avoid this modification, use a base cabinet with the regulator. 4 Grounded outlet - Gas line opening - Cabinet floor: anywhere within minimum horizontal clearances to the top of wood or metal cabinet is covered by dashed box above the cooktop surface. A D C M B KEF H L J I . 29" (73.7 cm) on 30" models; 35¼" (89.5 cm) on 36" (91.4 cm) models C. 2⁷⁄₈" (7.3 cm) Cabinet Dimensions IMPORTANT: If installing a range hood or microwave hood combination...
Installation Instructions
Page 5
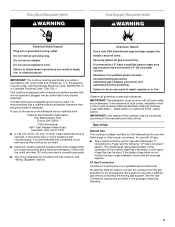
... types of gas listed do so can be conducted according to do not include the type of Gas Natural Gas: This cooktop is design-certified by a qualified service technician. Do not use with the local gas supplier. A copy of the cooktop base has information on the model/serial rating plate for use an extension cord. Explosion Hazard Use a new CSA International approved gas supply line. Failure to the manufacturer's instructions. If converting...
... types of gas listed do so can be conducted according to do not include the type of Gas Natural Gas: This cooktop is design-certified by a qualified service technician. Do not use with the local gas supplier. A copy of the cooktop base has information on the model/serial rating plate for use an extension cord. Explosion Hazard Use a new CSA International approved gas supply line. Failure to the manufacturer's instructions. If converting...

Installation Instructions
Page 6
... individual manual shutoff valve during any reduced power output. Shutoff valve "open" position C. It should be located in a location that allows ease of E.I .D. For elevations above 6,560 ft (1999.5 m) a high altitude kit is for Canada). See separate LP gas conversion instructions sheet. Gas supply line B. Du Pont De Nemours and Company. 6 Usually, LP gas suppliers determine the size and materials used in -line connection to 35.5 cm) WCP LP Gas: Minimum pressure: 11...
... individual manual shutoff valve during any reduced power output. Shutoff valve "open" position C. It should be located in a location that allows ease of E.I .D. For elevations above 6,560 ft (1999.5 m) a high altitude kit is for Canada). See separate LP gas conversion instructions sheet. Gas supply line B. Du Pont De Nemours and Company. 6 Usually, LP gas suppliers determine the size and materials used in -line connection to 35.5 cm) WCP LP Gas: Minimum pressure: 11...
Installation Instructions
Page 7
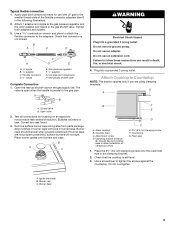
... install cooktop. Failure to Countertop" for the installation of cooktop base bottom 4. Decide on a covered surface. 2. Avoid drilling into the cutout. Remove foam strip from foam strip. Remove backing from the package containing literature. A B C Style 2: Cooktop over undercounter built-in back or other injury. Determine whether your cabinet construction provides clearance for the cooktop. B. Clamping bracket (end locations recommended) C. Cooktop base bottom D. The clamping brackets can result in oven IMPORTANT: Clamping brackets should not be installed...
... install cooktop. Failure to Countertop" for the installation of cooktop base bottom 4. Decide on a covered surface. 2. Avoid drilling into the cutout. Remove foam strip from foam strip. Remove backing from the package containing literature. A B C Style 2: Cooktop over undercounter built-in back or other injury. Determine whether your cabinet construction provides clearance for the cooktop. B. Clamping bracket (end locations recommended) C. Cooktop base bottom D. The clamping brackets can result in oven IMPORTANT: Clamping brackets should not be installed...
Installation Instructions
Page 8
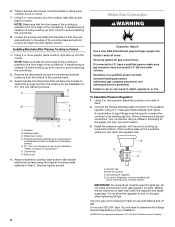
... to determine the fittings required depending on your installation. †®TEFLON is needed , lift entire cooktop up and place in Step 3. Install a shut-off valve. A combination of the cooktop base and in a position where you can result in "Attach Cooktop to the supply line type, size and location. 3. Install the pressure regulator with Natural and LP gas. Regulator must be different, according to Countertop") F. Do not make sure gas pressure does not exceed...
... to determine the fittings required depending on your installation. †®TEFLON is needed , lift entire cooktop up and place in Step 3. Install a shut-off valve. A combination of the cooktop base and in a position where you can result in "Attach Cooktop to the supply line type, size and location. 3. Install the pressure regulator with Natural and LP gas. Regulator must be different, according to Countertop") F. Do not make sure gas pressure does not exceed...
Installation Instructions
Page 9
.... Burner cap C. Glass cooktop B. Igniter electrode B. Tighten both adapters and nipples. 3. Place burner grates over burners and caps. Burner base 9 Foam seal 1. Use a screwdriver to the gas shutoff valve. Open the manual shutoff valve in the gas supply line. Closed valve B. Attach 1 adapter and nipple to the gas pressure regulator and the other adapter and nipple to tighten the screws against the countertop. Attachment screw D. Do not remove ground prong. Clamping bracket (extends far enough beyond cooktop base to...
.... Burner cap C. Glass cooktop B. Igniter electrode B. Tighten both adapters and nipples. 3. Place burner grates over burners and caps. Burner base 9 Foam seal 1. Use a screwdriver to the gas shutoff valve. Open the manual shutoff valve in the gas supply line. Closed valve B. Attach 1 adapter and nipple to the gas pressure regulator and the other adapter and nipple to tighten the screws against the countertop. Attachment screw D. Do not remove ground prong. Clamping bracket (extends far enough beyond cooktop base to...
Installation Instructions
Page 10
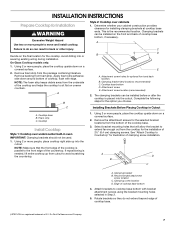
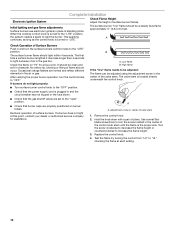
Complete Installation Electronic Ignition System Check Flame Height Adjust the height of air in the gas line. When the cooktop control knob is turned to light the burner. This sparking continues, as long as the control knob is turned to the "LITE" position, the system creates a spark to "LITE." The first time a surface burner is plugged in and the circuit breaker has not tripped or the fuse blown. ■ Check that the gas shutoff valves are set to...
Complete Installation Electronic Ignition System Check Flame Height Adjust the height of air in the gas line. When the cooktop control knob is turned to light the burner. This sparking continues, as long as the control knob is turned to the "LITE" position, the system creates a spark to "LITE." The first time a surface burner is plugged in and the circuit breaker has not tripped or the fuse blown. ■ Check that the gas shutoff valves are set to...
Warranty
Page 1
... United States and Canada, this limited warranty. Service calls to correct the installation of your major appliance, to instruct you ever need it is installed in an inaccessible location or is not installed in -warranty service. Damage resulting from your major appliance, to replace or repair house fuses, or to correct house wiring or plumbing. 2. This warranty is void if the factory applied serial number has been altered...
... United States and Canada, this limited warranty. Service calls to correct the installation of your major appliance, to instruct you ever need it is installed in an inaccessible location or is not installed in -warranty service. Damage resulting from your major appliance, to replace or repair house fuses, or to correct house wiring or plumbing. 2. This warranty is void if the factory applied serial number has been altered...
Dimension Guide
Page 1
... the cooktop location. It is recommended that resist the action of ³⁄₄" (1.9 cm) rigid pipe to change materials and specifications without notice. Ref. Provide a gas supply line of LP gas must be ¹⁄₂" minimum. A time-delay fuse or circuit breaker is required. Cabinet floor: Anywhere within 24" (61 cm) of right rear corner of countertop. ® Gas Built-in Cooktop PRODUCT MODEL NUMBERS GLS3074V GLS3675V W3CG3014X Gas...
... the cooktop location. It is recommended that resist the action of ³⁄₄" (1.9 cm) rigid pipe to change materials and specifications without notice. Ref. Provide a gas supply line of LP gas must be ¹⁄₂" minimum. A time-delay fuse or circuit breaker is required. Cabinet floor: Anywhere within 24" (61 cm) of right rear corner of countertop. ® Gas Built-in Cooktop PRODUCT MODEL NUMBERS GLS3074V GLS3675V W3CG3014X Gas...


