Owners Manual
Page 2
... is , tell you how to potential hazards that can happen if the instructions are very important. TABLE OF CONTENTS COOKTOP SAFETY 2 PARTS AND FEATURES 4 COOKTOP USE 6 Cooktop Controls 6 Sealed Surface Burners 7 Surface Grates with Locator Pin 8 Home Canning 8 Cookware 8 COOKTOP CARE 9 General Cleaning 9 TROUBLESHOOTING 10 ASSISTANCE OR SERVICE 11 In the U.S.A 11 Accessories 11 In Canada 11 WARRANTY 12 TABLE DES MATIÈRES SÉCURITÉ DE LA TABLE DE...
... is , tell you how to potential hazards that can happen if the instructions are very important. TABLE OF CONTENTS COOKTOP SAFETY 2 PARTS AND FEATURES 4 COOKTOP USE 6 Cooktop Controls 6 Sealed Surface Burners 7 Surface Grates with Locator Pin 8 Home Canning 8 Cookware 8 COOKTOP CARE 9 General Cleaning 9 TROUBLESHOOTING 10 ASSISTANCE OR SERVICE 11 In the U.S.A 11 Accessories 11 In Canada 11 WARRANTY 12 TABLE DES MATIÈRES SÉCURITÉ DE LA TABLE DE...
Owners Manual
Page 3
... the edge of the cooking utensil. The cooktop, when installed, must be electrically grounded in accordance with local codes or, in the absence of local codes, with a three-prong grounding plug for your gas supplier from a neighbor's phone. Do not store or use this appliance as stepping, leaning, or sitting on or near surface units. ■ Top burner flame size should be stored on...
... the edge of the cooking utensil. The cooktop, when installed, must be electrically grounded in accordance with local codes or, in the absence of local codes, with a three-prong grounding plug for your gas supplier from a neighbor's phone. Do not store or use this appliance as stepping, leaning, or sitting on or near surface units. ■ Top burner flame size should be stored on...

Owners Manual
Page 4
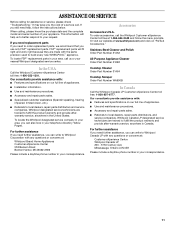
... front burner control knob D E F Cooktop E D C B A F G A. 12,500 Btu/h burner (10,500 Btu/h on W3CG model) G. Right surface burner grate H. The cooktop you have purchased may not match those of the items listed. Surface burner cap C. Control panel I H D. 9,100 Btu/h burner E. Left rear burner control knob C. Left surface burner grate I . 5,000 Btu/h burner 4 The locations and appearances of the features shown here may have some or all models are for Natural gas unless otherwise noted. Left front burner control knob E. Model and serial number plate...
... front burner control knob D E F Cooktop E D C B A F G A. 12,500 Btu/h burner (10,500 Btu/h on W3CG model) G. Right surface burner grate H. The cooktop you have purchased may not match those of the items listed. Surface burner cap C. Control panel I H D. 9,100 Btu/h burner E. Left rear burner control knob C. Left surface burner grate I . 5,000 Btu/h burner 4 The locations and appearances of the features shown here may have some or all models are for Natural gas unless otherwise noted. Left front burner control knob E. Model and serial number plate...
Owners Manual
Page 6
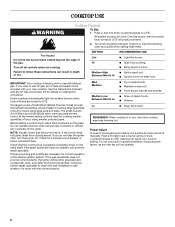
... pans. After burner lights, turn knob counterclockwise to LITE. See the instructions included with the LP Gas Conversion Kit for cooking large quantities of the electric ignition system. Electric igniters automatically light the surface burners when control knobs are ideal for use a grill or griddle accessory during a power failure, as a guide when setting heat levels. The small burners (9,100 Btu/h and 6,000 Btu/h) allow more accurate simmer control at the lowest setting, and are turned to a boil. ■ Hold a rapid boil. ■ Quickly...
... pans. After burner lights, turn knob counterclockwise to LITE. See the instructions included with the LP Gas Conversion Kit for cooking large quantities of the electric ignition system. Electric igniters automatically light the surface burners when control knobs are ideal for use a grill or griddle accessory during a power failure, as a guide when setting heat levels. The small burners (9,100 Btu/h and 6,000 Btu/h) allow more accurate simmer control at the lowest setting, and are turned to a boil. ■ Hold a rapid boil. ■ Quickly...

Owners Manual
Page 7
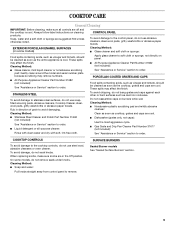
... routinely remove and clean the caps according to "General Cleaning" section. 2. Remove the burner cap from spillovers by always using a surface burner. If the burner needs to enter the burner ports. 7 C B D E A. Burner cap B. Contact a trained repair specialist. Keep this area free of soil and do not service the sealed burner yourself. A 4. A good flame is cool. A clean burner cap will help avoid poor ignition and uneven flames. Clean the gas tube opening for proper size and shape as shown. Burner base E. Replace the burner cap, making...
... routinely remove and clean the caps according to "General Cleaning" section. 2. Remove the burner cap from spillovers by always using a surface burner. If the burner needs to enter the burner ports. 7 C B D E A. Burner cap B. Contact a trained repair specialist. Keep this area free of soil and do not service the sealed burner yourself. A 4. A good flame is cool. A clean burner cap will help avoid poor ignition and uneven flames. Clean the gas tube opening for proper size and shape as shown. Burner base E. Replace the burner cap, making...
Owners Manual
Page 8
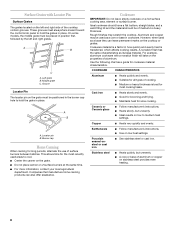
... cooking. Stainless steel ■ Heats quickly, but unevenly. ■ Ideal results on 2 surface burners at the same time. ■ For more information, contact your local agricultural department. A B C A. Ceramic or Ceramic glass ■ Follow manufacturer's instructions. ■ Heats slowly, but unevenly. ■ A core or base of cooking. ■ Medium or heavy thickness is a factor in place. For example, aluminum cookware with Locator Pin Surface Grates The grates located on the cooktop or grates...
... cooking. Stainless steel ■ Heats quickly, but unevenly. ■ Ideal results on 2 surface burners at the same time. ■ For more information, contact your local agricultural department. A B C A. Ceramic or Ceramic glass ■ Follow manufacturer's instructions. ■ Heats slowly, but unevenly. ■ A core or base of cooking. ■ Medium or heavy thickness is a factor in place. For example, aluminum cookware with Locator Pin Surface Grates The grates located on the cooktop or grates...
Owners Manual
Page 9
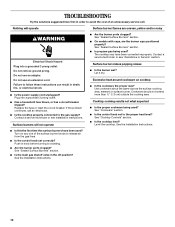
...; Gas Grate and Drip Pan Cleaner Part Number 31617 (not included): See "Assistance or Service" section to avoid damaging. Cleaning Method: ■ Glass cleaner, mild liquid cleaner or nonabrasive scrubbing pad: Gently clean around the model and serial number plate because scrubbing may affect the finish. Cleaning Method: ■ Soap and water: Pull knobs straight away from control panel to stainless steel surfaces, do not remove seals under knobs. EXTERIOR PORCELAIN ENAMEL SURFACES...
...; Gas Grate and Drip Pan Cleaner Part Number 31617 (not included): See "Assistance or Service" section to avoid damaging. Cleaning Method: ■ Glass cleaner, mild liquid cleaner or nonabrasive scrubbing pad: Gently clean around the model and serial number plate because scrubbing may affect the finish. Cleaning Method: ■ Soap and water: Pull knobs straight away from control panel to stainless steel surfaces, do not remove seals under knobs. EXTERIOR PORCELAIN ENAMEL SURFACES...
Owners Manual
Page 10
... electrician. ■ Is the cooktop properly connected to the gas supply? Replace the fuse or reset the circuit breaker. See "Sealed Surface Burners" section. ■ Is propane gas being used ? Do not use an extension cord. Contact a service technician or see "Assistance or Service" section. Do not remove ground prong. Cookware should not extend more than ½" (1.3 cm) outside the cooking area. See the Installation Instructions. 10 TROUBLESHOOTING Try the solutions suggested...
... electrician. ■ Is the cooktop properly connected to the gas supply? Replace the fuse or reset the circuit breaker. See "Sealed Surface Burners" section. ■ Is propane gas being used ? Do not use an extension cord. Contact a service technician or see "Assistance or Service" section. Do not remove ground prong. Cookware should not extend more than ½" (1.3 cm) outside the cooking area. See the Installation Instructions. 10 TROUBLESHOOTING Try the solutions suggested...
Owners Manual
Page 11
... precision used to local dealers, repair parts distributors, and service companies. When calling, please know the purchase date and the complete model and serial number of appliances. ■ Use and maintenance procedures. ■ Accessory and repair parts sales. ■ Referrals to build every new WHIRLPOOL® appliance. Cooktop Cleaner Order Part Number 31464 Cooktop Scraper Order Part Number WA906B In Canada Call the Whirlpool Canada LP Customer eXperience Centre toll free: 1-800...
... precision used to local dealers, repair parts distributors, and service companies. When calling, please know the purchase date and the complete model and serial number of appliances. ■ Use and maintenance procedures. ■ Accessory and repair parts sales. ■ Referrals to build every new WHIRLPOOL® appliance. Cooktop Cleaner Order Part Number 31464 Cooktop Scraper Order Part Number WA906B In Canada Call the Whirlpool Canada LP Customer eXperience Centre toll free: 1-800...
Owners Manual
Page 12
... authorized Whirlpool servicer is contrary to the appliance. 9. Major appliances with electrical or plumbing codes, or use or when it . Dealer name Address Phone number Model number Serial number Purchase date 12 This limited warranty is valid only in -warranty service. Service calls to refrigerator or freezer product failures. 7. Repairs to correct house wiring or plumbing. 2. In Canada, call 1-800-253-1301. Service calls to correct the installation of...
... authorized Whirlpool servicer is contrary to the appliance. 9. Major appliances with electrical or plumbing codes, or use or when it . Dealer name Address Phone number Model number Serial number Purchase date 12 This limited warranty is valid only in -warranty service. Service calls to refrigerator or freezer product failures. 7. Repairs to correct house wiring or plumbing. 2. In Canada, call 1-800-253-1301. Service calls to correct the installation of...

Installation Instructions
Page 2
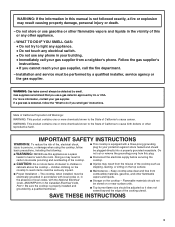
...instructions. • If you don't follow the "What to light any appliance. • Do not touch any electrical switch. • Do not use any other flammable vapors and liquids in the vicinity of this gas cooking appliance. Always read and obey all safety messages. If a gas leak is not followed exactly, a fire or explosion may cause ignition and combustion problems... or use a gas detector approved by a qualified installer, service agency or the gas supplier. All safety messages will follow instructions. This is , tell you how to potential hazards that blows air downward toward...
...instructions. • If you don't follow the "What to light any appliance. • Do not touch any electrical switch. • Do not use any other flammable vapors and liquids in the vicinity of this gas cooking appliance. Always read and obey all safety messages. If a gas leak is not followed exactly, a fire or explosion may cause ignition and combustion problems... or use a gas detector approved by a qualified installer, service agency or the gas supplier. All safety messages will follow instructions. This is , tell you how to potential hazards that blows air downward toward...

Installation Instructions
Page 3
... from the countertop by installing a range hood that projects horizontally a minimum of 5" (12.7 cm) beyond the bottom of the cabinets. ■ The cooktop should be located as shown in "Cabinet Dimensions" section so that the materials used . INSTALLATION REQUIREMENTS Tools and Parts Gather the required tools and parts before starting installation. Location Requirements IMPORTANT: Observe all governing codes and ordinances. See "Gas Supply Requirements" section. ■ The cooktop is required. Proper gas supply connection must conform...
... from the countertop by installing a range hood that projects horizontally a minimum of 5" (12.7 cm) beyond the bottom of the cabinets. ■ The cooktop should be located as shown in "Cabinet Dimensions" section so that the materials used . INSTALLATION REQUIREMENTS Tools and Parts Gather the required tools and parts before starting installation. Location Requirements IMPORTANT: Observe all governing codes and ordinances. See "Gas Supply Requirements" section. ■ The cooktop is required. Proper gas supply connection must conform...
Installation Instructions
Page 4
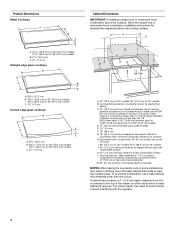
... cabinet is covered by dashed box above the cooktop surface. If cabinet has a drawer, a 4" (10.2 cm) depth clearance from upper cabinet to countertop within 6" (15.2 cm) of rear wall is recommended M. 24" (61 cm) minimum countertop depth is required. Combustible area above countertop (shown by not less than ¹⁄₄" [0.6 cm] flame retardant millboard covered with sidewalls wider than No. 28 MSG sheet steel, 0.015" [0.04 cm] stainless steel...
... cabinet is covered by dashed box above the cooktop surface. If cabinet has a drawer, a 4" (10.2 cm) depth clearance from upper cabinet to countertop within 6" (15.2 cm) of rear wall is recommended M. 24" (61 cm) minimum countertop depth is required. Combustible area above countertop (shown by not less than ¹⁄₄" [0.6 cm] flame retardant millboard covered with sidewalls wider than No. 28 MSG sheet steel, 0.015" [0.04 cm] stainless steel...
Installation Instructions
Page 5
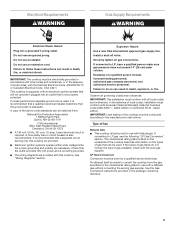
... the serving gas supplier. Electrical Requirements WARNING Gas Supply Requirements WARNING Electrical Shock Hazard Plug into an outlet that the outlet provides 120-volt power and is used . IMPORTANT: The cooktop must conform with Natural gas. Install a shut-off valve. Securely tighten all governing codes and ordinances. Observe all gas connections. The model/serial rating plate located on the underside of gas that can be made to LP gas, see the following "LP Gas Conversion" section...
... the serving gas supplier. Electrical Requirements WARNING Gas Supply Requirements WARNING Electrical Shock Hazard Plug into an outlet that the outlet provides 120-volt power and is used . IMPORTANT: The cooktop must conform with Natural gas. Install a shut-off valve. Securely tighten all governing codes and ordinances. Observe all gas connections. The model/serial rating plate located on the underside of gas that can be made to LP gas, see the following "LP Gas Conversion" section...
Installation Instructions
Page 6
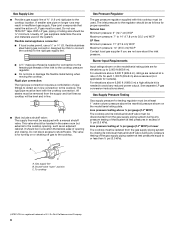
... moving the cooktop. flexible stainless steel tubing gas connector, designed by closing . It should be equipped with the cooktop connection. The valve is needed for each 1,000 ft (304.8 m) above ½ psi gauge (14" WCP) The cooktop and its individual manual shutoff valve during any reduced power output. B Gas Pressure Regulator The gas pressure regulator supplied with this cooktop must be used in line. ■ Must include a shutoff valve: The supply line must...
... moving the cooktop. flexible stainless steel tubing gas connector, designed by closing . It should be equipped with the cooktop connection. The valve is needed for each 1,000 ft (304.8 m) above ½ psi gauge (14" WCP) The cooktop and its individual manual shutoff valve during any reduced power output. B Gas Pressure Regulator The gas pressure regulator supplied with this cooktop must be used in line. ■ Must include a shutoff valve: The supply line must...

Installation Instructions
Page 7
.... See "Attach Cooktop to sit flat on uneven counters. Recommended attachment screw location C. Remove backing from the underside of the cooktop and helps the cooktop to Countertop" for illustration of cooktop base bottom 4. Style 2: Cooktop over undercounter built-in Step 2. 5. A C D B E A. Using 2 or more people, place the cooktop upside down on a covered surface. 2. Clamping screw location D. Edge of clamping screw installation. Determine whether your cabinet construction provides clearance for the option...
.... See "Attach Cooktop to sit flat on uneven counters. Recommended attachment screw location C. Remove backing from the underside of the cooktop and helps the cooktop to Countertop" for illustration of cooktop base bottom 4. Style 2: Cooktop over undercounter built-in Step 2. 5. A C D B E A. Using 2 or more people, place the cooktop upside down on a covered surface. 2. Clamping screw location D. Edge of clamping screw installation. Determine whether your cabinet construction provides clearance for the option...

Installation Instructions
Page 8
... to the pressure regulator using the bracket mounting holes selected in cutout. Make Gas Connection WARNING Explosion Hazard Use a new CSA International approved gas supply line. Remove the attachment screws for use TEFLON® tape. Securely tighten screws. Countertop G. Using 2 or more people, stand the cooktop on your installation. 8 Select bracket mounting holes that they are perpendicular to determine the fittings required depending on its edge. Gas pressure regulator D. Connect the flexible stainless steel connector to do...
... to the pressure regulator using the bracket mounting holes selected in cutout. Make Gas Connection WARNING Explosion Hazard Use a new CSA International approved gas supply line. Remove the attachment screws for use TEFLON® tape. Securely tighten screws. Countertop G. Using 2 or more people, stand the cooktop on your installation. 8 Select bracket mounting holes that they are perpendicular to determine the fittings required depending on its edge. Gas pressure regulator D. Connect the flexible stainless steel connector to do...

Installation Instructions
Page 9
... properly positioned, surface burners will show a leak. Attach 1 adapter and nipple to the gas pressure regulator and the other adapter and nipple to the adapters. Closed valve B. Remove surface burner caps and grates from parts package. Do not use an adapter. Cooktop base C. Use pipe-joint compound. Burner caps should be level when properly positioned. Do not remove ground prong. Attachment screw D. Clamping bracket (extends far enough beyond cooktop base to tighten...
... properly positioned, surface burners will show a leak. Attach 1 adapter and nipple to the gas pressure regulator and the other adapter and nipple to the adapters. Closed valve B. Remove surface burner caps and grates from parts package. Do not use an adapter. Cooktop base C. Use pipe-joint compound. Burner caps should be level when properly positioned. Do not remove ground prong. Attachment screw D. Clamping bracket (extends far enough beyond cooktop base to tighten...
Installation Instructions
Page 10
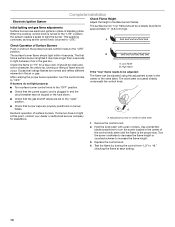
... service company for a blue color. The valve stem is plugged in the air or gas. Check the flame on burner bases. Hold the knob stem with a pair of standing pilots. Initial lighting and gas flame adjustments Surface burners use electronic igniters in character. A Check Operation of flame should light within 4 seconds. The surface burner flame should occur. No yellow tip, blowing or lifting of Surface Burners Push in and turn the surface burners control knobs to be adjusted: The flame can be clean...
... service company for a blue color. The valve stem is plugged in the air or gas. Check the flame on burner bases. Hold the knob stem with a pair of standing pilots. Initial lighting and gas flame adjustments Surface burners use electronic igniters in character. A Check Operation of flame should light within 4 seconds. The surface burner flame should occur. No yellow tip, blowing or lifting of Surface Burners Push in and turn the surface burners control knobs to be adjusted: The flame can be clean...
Dimension Guide
Page 1
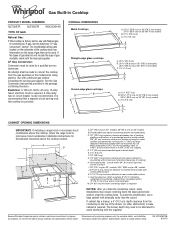
..." (48.3 cm) G. 18" (45.7 cm) minimum clearance from the gas specified on the model/serial rating plate for use with Natural gas. See the Gas Conversion instructions provided in base cabinet is protected by a qualified service technician. Electrical: A 120-volt, 60-Hz, AC-only, 15-amp fused, electrical circuit is required. Specifications subject to cooktop H. OVERALL DIMENSIONS Metal Cooktops A Straight-edge glass cooktops B A Curved-edge glass cooktops B A A. 31 79.8 cm) on 30" (76.2 cm) models, 37 95.4 cm) on 36...
..." (48.3 cm) G. 18" (45.7 cm) minimum clearance from the gas specified on the model/serial rating plate for use with Natural gas. See the Gas Conversion instructions provided in base cabinet is protected by a qualified service technician. Electrical: A 120-volt, 60-Hz, AC-only, 15-amp fused, electrical circuit is required. Specifications subject to cooktop H. OVERALL DIMENSIONS Metal Cooktops A Straight-edge glass cooktops B A Curved-edge glass cooktops B A A. 31 79.8 cm) on 30" (76.2 cm) models, 37 95.4 cm) on 36...

