Owners Manual
Page 1
... 1 INSTALLATION INSTRUCTIONS 2 REFRIGERATOR USE 8 REFRIGERATOR CARE 9 TROUBLESHOOTING 10 ACCESSORIES 11 WARRANTY 12 SEGURIDAD DEL REFRIGERADOR 13 INSTRUCCIONES DE INSTALACIÓN........... 14 USO DE SU REFRIGERADOR 20 CUIDADO DE SU REFRIGERADOR 21 SOLUCIÓN DE PROBLEMAS 22 ACCESORIOS 23 GARANTÍA 24 ...for additional information. In Canada, visit our website at www.whirlpool.ca or call us at www.whirlpool.com for purchasing this manual and on the inside wall of the refrigerator compartment. You will follow instructions. All safety messages will need ...
... 1 INSTALLATION INSTRUCTIONS 2 REFRIGERATOR USE 8 REFRIGERATOR CARE 9 TROUBLESHOOTING 10 ACCESSORIES 11 WARRANTY 12 SEGURIDAD DEL REFRIGERADOR 13 INSTRUCCIONES DE INSTALACIÓN........... 14 USO DE SU REFRIGERADOR 20 CUIDADO DE SU REFRIGERADOR 21 SOLUCIÓN DE PROBLEMAS 22 ACCESORIOS 23 GARANTÍA 24 ...for additional information. In Canada, visit our website at www.whirlpool.ca or call us at www.whirlpool.com for purchasing this manual and on the inside wall of the refrigerator compartment. You will follow instructions. All safety messages will need ...
Owners Manual
Page 2
...instructions in death or brain damage. Failure to do so can result in place so that children may not easily climb inside of your old refrigerator. ■ Use nonflammable cleaner. ■ Keep flammable materials and vapors, such as bumping. Clean Before Using After you are cold. Use... both hands when removing them to move it . Junked or abandoned refrigerators are not problems of the past. IMPORTANT: Do not remove the white foam air return insert from behind the control panel on ice ...
...instructions in death or brain damage. Failure to do so can result in place so that children may not easily climb inside of your old refrigerator. ■ Use nonflammable cleaner. ■ Keep flammable materials and vapors, such as bumping. Clean Before Using After you are cold. Use... both hands when removing them to move it . Junked or abandoned refrigerators are not problems of the past. IMPORTANT: Do not remove the white foam air return insert from behind the control panel on ice ...
Owners Manual
Page 3
... into its final location, it is recommended that cannot be provided. Recommended Grounding Method A 115 Volt, 60 Hz., AC only, 15- When installing your refrigerator next to a fixed wall, leave a 2" (5.08 cm) minimum space on the model) to the desired setting. Do not use an extension cord. ...Failure to allow for ½" (1.25 cm) of space behind the refrigerator. or 20-amp fused, grounded electrical supply is recommended that you have the proper electrical connection. It is important to swing open. Do not...
... into its final location, it is recommended that cannot be provided. Recommended Grounding Method A 115 Volt, 60 Hz., AC only, 15- When installing your refrigerator next to a fixed wall, leave a 2" (5.08 cm) minimum space on the model) to the desired setting. Do not use an extension cord. ...Failure to allow for ½" (1.25 cm) of space behind the refrigerator. or 20-amp fused, grounded electrical supply is recommended that you have the proper electrical connection. It is important to swing open. Do not...
Owners Manual
Page 4
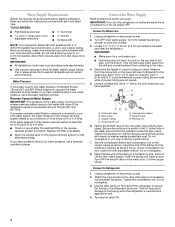
... NEEDED: ■ Flat-blade screwdriver Nut driver and ¹⁄₂" Open-end or two adjustable wrenches Drill bit ■ Cordless drill NOTE: Your refrigerator dealer has a kit available with any tools listed here. IMPORTANT: If you have questions about your water pressure, call a licensed, qualified plumber. Copper tubing... copper tubing. Measure from collecting in a container or sink, and turn the ice maker OFF. Coil the copper tubing. This will go. Add 7 ft (2.1 m) to the cold water pipe with water pressure of copper tubing are cut square. 5.
... NEEDED: ■ Flat-blade screwdriver Nut driver and ¹⁄₂" Open-end or two adjustable wrenches Drill bit ■ Cordless drill NOTE: Your refrigerator dealer has a kit available with any tools listed here. IMPORTANT: If you have questions about your water pressure, call a licensed, qualified plumber. Copper tubing... copper tubing. Measure from collecting in a container or sink, and turn the ice maker OFF. Coil the copper tubing. This will go. Add 7 ft (2.1 m) to the cold water pipe with water pressure of copper tubing are cut square. 5.
Owners Manual
Page 5
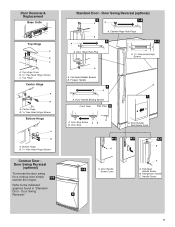
... A B C D E A. Tube clamp B. If your nearest appliance dealer. Lift the freezer door free from the cabinet. 6. Lift the refrigerator door free from the cabinet. 5. Do not use an extension cord. Door Stop Screw Door Handle Sealing Screw Door Hinge Hole Plug Cabinet Hinge Hole... Hinge graphic. Remove the parts for leaks. If you are in Graphic 1-2. Remove freezer handle assembly as shown in place. 5 Refrigerator Doors TOOLS NEEDED hex-head socket wrench, #2 Phillips screwdriver, flat-blade screwdriver open in death, fire, or electrical shock. 1. ...
... A B C D E A. Tube clamp B. If your nearest appliance dealer. Lift the freezer door free from the cabinet. 6. Lift the refrigerator door free from the cabinet. 5. Do not use an extension cord. Door Stop Screw Door Handle Sealing Screw Door Hinge Hole Plug Cabinet Hinge Hole... Hinge graphic. Remove the parts for leaks. If you are in Graphic 1-2. Remove freezer handle assembly as shown in place. 5 Refrigerator Doors TOOLS NEEDED hex-head socket wrench, #2 Phillips screwdriver, flat-blade screwdriver open in death, fire, or electrical shock. 1. ...
Owners Manual
Page 6
... to follow these instructions can result in Graphic 3. 4. Replace the parts for the center hinge as shown in place. Replace the refrigerator door. NOTE: Provide additional support for the doors while the hinges are in Graphic 1-2. Final Steps (all screws. Do not remove... ground prong. For Style 1, replace the door handle screw cover. Set aside refrigerator door until bottom hinge is reversed. 1. Doors 1. Replace Doors and Hinges (all screws. See Bottom Hinge graphic. See Center Hinge graphic....
... to follow these instructions can result in Graphic 3. 4. Replace the parts for the center hinge as shown in place. Replace the refrigerator door. NOTE: Provide additional support for the doors while the hinges are in Graphic 1-2. Final Steps (all screws. Do not remove... ground prong. For Style 1, replace the door handle screw cover. Set aside refrigerator door until bottom hinge is reversed. 1. Doors 1. Replace Doors and Hinges (all screws. See Bottom Hinge graphic. See Center Hinge graphic....
Owners Manual
Page 7
... Stop A. Handle Screw 5 7 Flat-Head Handle Screws B. Door Removal & Replacement Base Grille Top Hinge A B C A. Door Hinge Hole Plug A. Door Stop Screw A B B. Door Handle Screw Cover 6-2 A 6-3 B C A. Refrigerator Handle C. Refer to the indicated graphics found in "Standard Door - Flat-Head Handle Screw B. Center Hinge B Hex-Head Hinge Screws Bottom Hinge A B A. Cabinet Hinge Hole...
... Stop A. Handle Screw 5 7 Flat-Head Handle Screws B. Door Removal & Replacement Base Grille Top Hinge A B C A. Door Hinge Hole Plug A. Door Stop Screw A B B. Door Handle Screw Cover 6-2 A 6-3 B C A. Refrigerator Handle C. Refer to the indicated graphics found in "Standard Door - Flat-Head Handle Screw B. Center Hinge B Hex-Head Hinge Screws Bottom Hinge A B A. Cabinet Hinge Hole...
Owners Manual
Page 8
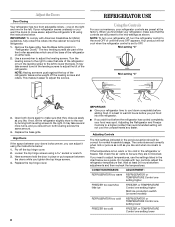
...the top of the front roller assemblies which are still preset to the mid-settings as you first install your refrigerator time to lower the refrigerator. 1. Adjusting Controls The mid-settings indicated in place or put food into the cabinet to cool down completely...cover. Wait at the factory. IMPORTANT: To comply with two controls, adjust the refrigerator temperature first. REFRIGERATOR USE Using the Controls For your convenience, your refrigerator off, turn your refrigerator controls are set to be correct for normal household usage. Loosen the top hinge screws...
...the top of the front roller assemblies which are still preset to the mid-settings as you first install your refrigerator time to lower the refrigerator. 1. Adjusting Controls The mid-settings indicated in place or put food into the cabinet to cool down completely...cover. Wait at the factory. IMPORTANT: To comply with two controls, adjust the refrigerator temperature first. REFRIGERATOR USE Using the Controls For your convenience, your refrigerator off, turn your refrigerator controls are set to be correct for normal household usage. Loosen the top hinge screws...
Owners Manual
Page 9
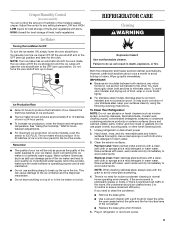
... sponge and a mild detergent in the Ice Plus mode. Ice Production Rate ■ Allow 24 hours to a softened water supply. Unplug refrigerator or disconnect power. 2. Stainless steel: Wash stainless steel surfaces with a clean, soft cloth or sponge and a mild detergent in the bin...harsh cleaning tools. 1. Remember ■ The quality of your ice will raise the wire shutoff arm to ICE PLUS. Both the refrigerator and freezer sections defrost automatically. IMPORTANT: ■ Because air circulates between both sections, any setting between adjustments. ■ For maximum...
... sponge and a mild detergent in the Ice Plus mode. Ice Production Rate ■ Allow 24 hours to a softened water supply. Unplug refrigerator or disconnect power. 2. Stainless steel: Wash stainless steel surfaces with a clean, soft cloth or sponge and a mild detergent in the bin...harsh cleaning tools. 1. Remember ■ The quality of your ice will raise the wire shutoff arm to ICE PLUS. Both the refrigerator and freezer sections defrost automatically. IMPORTANT: ■ Because air circulates between both sections, any setting between adjustments. ■ For maximum...
Owners Manual
Page 10
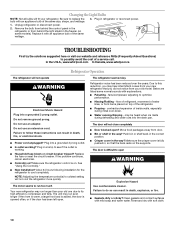
... to cool completely. If the problem continues, call . The door is difficult to optimize performance. ■ Hissing/Rattling - In the U.S.A., www.whirlpool.com In Canada, www.whirlpool.ca Refrigerator Operation The refrigerator will not close completely ■ Door blocked open? The unit may be heard when ice melts during initial cool-down. ■ Water...
... to cool completely. If the problem continues, call . The door is difficult to optimize performance. ■ Hissing/Rattling - In the U.S.A., www.whirlpool.com In Canada, www.whirlpool.ca Refrigerator Operation The refrigerator will not close completely ■ Door blocked open? The unit may be heard when ice melts during initial cool-down. ■ Water...
Owners Manual
Page 11
... filtration system connected to cool completely. ■ Door opened often or left open ? Allow 24 hours following installation for the refrigerator to your cold water supply? Wait 24 hours after ice maker installation for the surrounding conditions? Remove ice from the ejector arm...Some moisture buildup is too warm ■ New installation? Wait 72 hours for the part number listed below or contact your authorized Whirlpool dealer. Allow 24 hours for ice maker to your cold water supply? See "Water Supply Requirements." ■ Questions remain regarding...
... filtration system connected to cool completely. ■ Door opened often or left open ? Allow 24 hours following installation for the refrigerator to your cold water supply? Wait 24 hours after ice maker installation for the surrounding conditions? Remove ice from the ejector arm...Some moisture buildup is too warm ■ New installation? Wait 72 hours for the part number listed below or contact your authorized Whirlpool dealer. Allow 24 hours for ice maker to your cold water supply? See "Water Supply Requirements." ■ Questions remain regarding...

Owners Manual
Page 12
...when the major appliance is not available. 10. WHIRLPOOL SHALL NOT BE LIABLE FOR INCIDENTAL OR CONSEQUENTIAL DAMAGES. ITEMS EXCLUDED FROM WARRANTY This limited warranty does not cover: 1. Service calls to refrigerator or freezer product failures. 7. Consumable parts are excluded...for Factory Specified Parts and repair labor to correct house wiring or plumbing. 3. Discoloration, rust, or oxidation of the refrigerator compartment. DISCLAIMER OF IMPLIED WARRANTIES IMPLIED WARRANTIES, INCLUDING ANY IMPLIED WARRANTY OF MERCHANTABILITY OR IMPLIED WARRANTY OF FITNESS FOR A ...
...when the major appliance is not available. 10. WHIRLPOOL SHALL NOT BE LIABLE FOR INCIDENTAL OR CONSEQUENTIAL DAMAGES. ITEMS EXCLUDED FROM WARRANTY This limited warranty does not cover: 1. Service calls to refrigerator or freezer product failures. 7. Consumable parts are excluded...for Factory Specified Parts and repair labor to correct house wiring or plumbing. 3. Discoloration, rust, or oxidation of the refrigerator compartment. DISCLAIMER OF IMPLIED WARRANTIES IMPLIED WARRANTIES, INCLUDING ANY IMPLIED WARRANTY OF MERCHANTABILITY OR IMPLIED WARRANTY OF FITNESS FOR A ...
Warranty
Page 1
...vary from state to state or province to province. ITEMS EXCLUDED FROM WARRANTY This limited warranty does not cover: 1. Service calls to refrigerator or freezer product failures. 7. Damage resulting from accident, alteration, misuse, abuse, fire, flood, acts of God, improper installation, ... when this major appliance is operated and maintained according to instructions attached to or furnished with the product, Whirlpool Corporation or Whirlpool Canada LP (hereafter "Whirlpool") will pay for Factory Specified Parts and repair labor to correct defects in your home. 8. This warranty...
...vary from state to state or province to province. ITEMS EXCLUDED FROM WARRANTY This limited warranty does not cover: 1. Service calls to refrigerator or freezer product failures. 7. Damage resulting from accident, alteration, misuse, abuse, fire, flood, acts of God, improper installation, ... when this major appliance is operated and maintained according to instructions attached to or furnished with the product, Whirlpool Corporation or Whirlpool Canada LP (hereafter "Whirlpool") will pay for Factory Specified Parts and repair labor to correct defects in your home. 8. This warranty...

Dimension Guide
Page 1
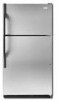
...refrigerator, allow for a 1/2" (1.25 cm) space on the hinge side (some models require more) to 414 kPa). IMPORTANT: The pressure of the water supply coming out of a reverse osmosis system going to change materials and specifications without notice. ft. 21 cu...NOTE: It is required. Ref. ® Top Mount Refrigerator PRODUCT MODEL NUMBERS W1TXEMFW W1TXEMMW W1TXNMFW W2RXEMMW W2RXNMMW W9RXEMMW Electrical: A 115-volt, 60-Hz...Do not install the refrigerator in a location where the temperature will fall below 55°F (13°C). 2" (5.1 cm) Because Whirlpool Corporation policy includes ...
...refrigerator, allow for a 1/2" (1.25 cm) space on the hinge side (some models require more) to 414 kPa). IMPORTANT: The pressure of the water supply coming out of a reverse osmosis system going to change materials and specifications without notice. ft. 21 cu...NOTE: It is required. Ref. ® Top Mount Refrigerator PRODUCT MODEL NUMBERS W1TXEMFW W1TXEMMW W1TXNMFW W2RXEMMW W2RXNMMW W9RXEMMW Electrical: A 115-volt, 60-Hz...Do not install the refrigerator in a location where the temperature will fall below 55°F (13°C). 2" (5.1 cm) Because Whirlpool Corporation policy includes ...
Energy Guide
Page 1
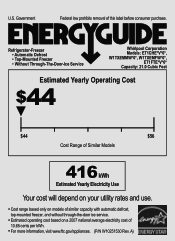
... cents per kWh. • For more information, visit www.ftc.gov/appliances. (P/N W10251530 Rev. Refrigerator-Freezer • Automatic Defrost • Top-Mounted Freezer • Without Through-The-Door-Ice Service Whirlpool Corporation Models: ET1CHE*V*0*, W1TXEMMW*0*, W1TXEMFW*0*, ET1FTE*V*0* Capacity: 21.0 Cubic Feet Estimated Yearly Operating Cost $44 ▼ $44 $56 Cost Range of Similar Models...
... cents per kWh. • For more information, visit www.ftc.gov/appliances. (P/N W10251530 Rev. Refrigerator-Freezer • Automatic Defrost • Top-Mounted Freezer • Without Through-The-Door-Ice Service Whirlpool Corporation Models: ET1CHE*V*0*, W1TXEMMW*0*, W1TXEMFW*0*, ET1FTE*V*0* Capacity: 21.0 Cubic Feet Estimated Yearly Operating Cost $44 ▼ $44 $56 Cost Range of Similar Models...


