
Installation Instructions
Page 2
...Requirements 8 INSTALLATION INSTRUCTIONS 9 Prepare Cabinet Opening-New Utilities 9 Moisture Barrier-Recommended for Wood Countertops........9 Direct Wire Routing 10 Prepare Dishwasher 10 Remove Access Panel 11 Connect Elbow to Valve 11 Connect Fill Hose to Elbow 11 Power Cord Connection 12 Utility Routing Channel Location 13 Choose Anchor Attachment Method... Wire Electrical Connection 17 Connect Water Line to House Shutoff Valve 18 Connect Drain Hose 18 Complete Installation 20 Reinstall Access Panel 20 Check Operation 20 If Dishwasher Does Not Operate 20 Additional Tips 20 2
...Requirements 8 INSTALLATION INSTRUCTIONS 9 Prepare Cabinet Opening-New Utilities 9 Moisture Barrier-Recommended for Wood Countertops........9 Direct Wire Routing 10 Prepare Dishwasher 10 Remove Access Panel 11 Connect Elbow to Valve 11 Connect Fill Hose to Elbow 11 Power Cord Connection 12 Utility Routing Channel Location 13 Choose Anchor Attachment Method... Wire Electrical Connection 17 Connect Water Line to House Shutoff Valve 18 Connect Drain Hose 18 Complete Installation 20 Reinstall Access Panel 20 Check Operation 20 If Dishwasher Does Not Operate 20 Additional Tips 20 2
Installation Instructions
Page 6
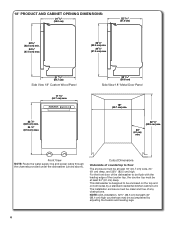
...) 321/2" (82.5 cm) min. 341/2" (87.5 cm) max 321/2" (82.5 cm) min. 341/2" (87.5 cm) max 21 9/16" (54.7 cm) Side View 18" Custom Wood Panel 17 5/8" (44.7 cm) max 32 1/2" (82.5 cm) min. 34 1/2" (87.5 cm) max 22 5/16" (56.6 cm) Side View 18" Metal Door... Panel 18" (45.7 cm) min. 24" (61 cm) min. 32 1/2" (82.5 cm) min. Front View NOTE: Route the water supply line and power cable through the ...
...) 321/2" (82.5 cm) min. 341/2" (87.5 cm) max 321/2" (82.5 cm) min. 341/2" (87.5 cm) max 21 9/16" (54.7 cm) Side View 18" Custom Wood Panel 17 5/8" (44.7 cm) max 32 1/2" (82.5 cm) min. 34 1/2" (87.5 cm) max 22 5/16" (56.6 cm) Side View 18" Metal Door... Panel 18" (45.7 cm) min. 24" (61 cm) min. 32 1/2" (82.5 cm) min. Front View NOTE: Route the water supply line and power cable through the ...
Installation Instructions
Page 7
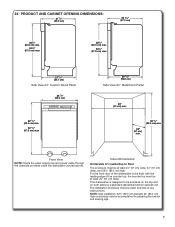
...) 321/2" (82.5 cm) min. 341/2" (87.5 cm) max 321/2" (82.5 cm) min. 341/2" (87.5 cm) max 21 9/16" (54.7 cm) Side View 24" Custom Wood Panel 23 1/2" (59.6 cm) 32 1/2" (82.5 cm) min. 34 1/2" (87.5 cm) max 22 5/16" (56.6 cm) Side View 24" Metal Door... Panel 24" (61 cm) min. 24" (61 cm) min. 32 1/2" (82.5 cm) min. Front View NOTE: Route the water supply line and power cable through the ...
...) 321/2" (82.5 cm) min. 341/2" (87.5 cm) max 321/2" (82.5 cm) min. 341/2" (87.5 cm) max 21 9/16" (54.7 cm) Side View 24" Custom Wood Panel 23 1/2" (59.6 cm) 32 1/2" (82.5 cm) min. 34 1/2" (87.5 cm) max 22 5/16" (56.6 cm) Side View 24" Metal Door... Panel 24" (61 cm) min. 24" (61 cm) min. 32 1/2" (82.5 cm) min. Front View NOTE: Route the water supply line and power cable through the ...
Installation Instructions
Page 10
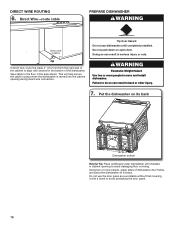
...and place the dishwasher on its back Dishwasher bottom Helpful Tip: Place cardboard under dishwasher until completely installed. Tape cable to avoid scratching the door panel. 10 Do not push down on its back. Failure to align with a towel to the floor in back or other injury. 7. Doing so... Weight Hazard Use two or more people, grasp sides of the dishwasher. DIRECT WIRE ROUTING 6. Tip Over Hazard Do not use the door panel as a worktable without first covering it with channel in serious injury or cuts. This will help secure the cable in cabinet opening during direct...
...and place the dishwasher on its back Dishwasher bottom Helpful Tip: Place cardboard under dishwasher until completely installed. Tape cable to avoid scratching the door panel. 10 Do not push down on its back. Failure to align with a towel to the floor in back or other injury. 7. Doing so... Weight Hazard Use two or more people, grasp sides of the dishwasher. DIRECT WIRE ROUTING 6. Tip Over Hazard Do not use the door panel as a worktable without first covering it with channel in serious injury or cuts. This will help secure the cable in cabinet opening during direct...
Installation Instructions
Page 11
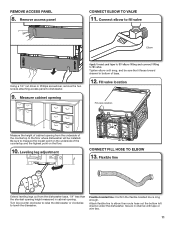
...Secure in cabinet opening. Connect elbow to fill valve Elbow Using a 1/4" nut driver or Phillips screwdriver, remove the two screws attaching access panel to measure the lowest point on the floor. 10. Leveling leg adjustment CONNECT FILL HOSE TO ELBOW 13. Flexible braided line: Confirm the... flexible braided line is long enough. Measure cabinet opening height measured in channel with tape or wire ties. 11 REMOVE ACCESS PANEL 8. Fill valve location Fill valve location Measure the height of cabinet opening from the dishwasher base, 1/4" less than the shortest opening...
...Secure in cabinet opening. Connect elbow to fill valve Elbow Using a 1/4" nut driver or Phillips screwdriver, remove the two screws attaching access panel to measure the lowest point on the floor. 10. Leveling leg adjustment CONNECT FILL HOSE TO ELBOW 13. Flexible braided line: Confirm the... flexible braided line is long enough. Measure cabinet opening height measured in channel with tape or wire ties. 11 REMOVE ACCESS PANEL 8. Fill valve location Fill valve location Measure the height of cabinet opening from the dishwasher base, 1/4" less than the shortest opening...
Installation Instructions
Page 20
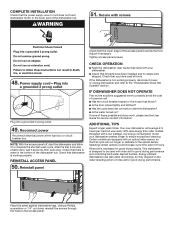
...properly. Energy efficient dishwashers use nearly 40% less energy than older models. COMPLETE INSTALLATION Check that there is water in the access panel. If the dishwasher is necessary for good drying performance. Designed with an optical water sensor, so the first cycle will average 2-5... of the dishwasher tub. Power supply cord-Plug into a grounded 3 prong outlet Plug into a grounded 3 prong outlet. 49. REINSTALL ACCESS PANEL 50. Using a Phillips screwdriver or 1/4" nut driver, reinstall the screws through the holes in the bottom of these possible solutions work, please see...
...properly. Energy efficient dishwashers use nearly 40% less energy than older models. COMPLETE INSTALLATION Check that there is water in the access panel. If the dishwasher is necessary for good drying performance. Designed with an optical water sensor, so the first cycle will average 2-5... of the dishwasher tub. Power supply cord-Plug into a grounded 3 prong outlet Plug into a grounded 3 prong outlet. 49. REINSTALL ACCESS PANEL 50. Using a Phillips screwdriver or 1/4" nut driver, reinstall the screws through the holes in the bottom of these possible solutions work, please see...


