
Whirlpool DU1055XTVB Support Question
Whirlpool DU1055XTVB Support Question
Find answers below for this question about Whirlpool DU1055XTVB - 24" Tall Tub Dishwasher.Need a Whirlpool DU1055XTVB manual? We have 5 online manuals for this item!
Question posted by tjsanders1975 on November 16th, 2013
Control Board Or Touchpad And Control Panel
I have to reset my dw every time by pushing high temp wash and heated dry until al lights come on then I push cancel. Do I need a new control board or a new touchpad and control panel?
Current Answers
Related Whirlpool DU1055XTVB Manual Pages
Dimension Guide - Page 1

...new drain hose is resistant to heat and detergent, and fits the 1" (2.5 cm) drain connector of the counter, or be connected to the underside of the dishwasher. If this is not long enough, use a new ..." (50.8 cm) above subfloor or floor. May be needed to connect to 862 kPa) water pressure.
If direct wiring dishwasher: Use flexible, armored or nonmetallic, sheathed copper wire with ...
Installation Instructions - Page 2

... , tell you how to reduce the chance of the dishwasher. Do not push down on your appliance. You Need to:
• Slowly open door. These words mean:...Cabinet Opening-Existing Utilities 6 Prepare Cabinet Opening-New Utilities 6 Prepare and Route Water Line 7 Install Drain Hose 8
Installation Instructions (cont.) Prepare Dishwasher 10 Make Power Cord Electrical Connection 11 Determine...
Installation Instructions - Page 3

...Requirements
Grounded electrical supply required.
A side panel kit is available from freezing is available from your cabinetry. NOTE: To avoid shifting during dishwasher operation, shims must provide:
• ...
Parts needed to level dishwasher.)
Helpful Tip: Be sure to dishwasher against freezing.
Motor should not touch the floor. Damage from your dishwasher at rear of time or...
Installation Instructions - Page 4
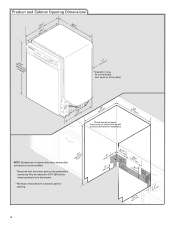
... be installed.
*Measured from the lowest point on all models)
(532.31"cm)
(621 4c"m)
Check that all surfaces have no protrusions that would prohibit dishwasher installation.
(612c4m" )**
NOTE: Shaded area of cabinet walls show where utility connections may be reduced to 33⁷⁄₈" (86 cm) by removing wheels...
Installation Instructions - Page 5

...dishwasher. We recommend:
• a time-delay fuse or circuit breaker.
• a separate circuit. Water Supply Requirements
• A hot water line with 20-120 psi (138-862 kPa) water pressure can be needed... to heat and detergent, and fits the 1" (2.5 cm) drain connector of the dishwasher. &#... fastened to the dishwasher opening. or 20- Drain Requirements
• A new drain hose is ...
Installation Instructions - Page 6

... can result in death or electrical shock.
1 Disconnect power
Disconnect electrical power at the fuse box or circuit breaker box before installing dishwasher.
2
3 Do you use? Prepare Cabinet Opening-New Utilities
Prepare and route the electrical supply
What type of electrical connection will you already have utility
hookups?
Existing utility hookups No...
Installation Instructions - Page 7

... until smooth.
The water line to the right front side of cabinet opening dimensions.
2 Direct Wire-Prepare hole
(15.2 c6m")
Route cable from moving when dishwasher is in area shown. See product and cabinet opening ).
This will make water connection easier.
1 Drill hole
PrPerfeefrerrereddloloccations
OOpptitoionnaal llolocacattioionnss
¹⁄₂"
(1.3 cm)
Drill...
Installation Instructions - Page 8

... clog the inlet valve. NOTE: Do not use a new drain hose. This will keep the drain hose from moving when dishwasher is facing upward. Install Drain Hose
IMPORTANT: Always use ...It should be made. Attach such that it does not touch the dishwasher base, frame or motor.
8
1¹⁄₂"
(3.8 cm)
If needed, drill a 1¹⁄₂" (3.8 cm) diameter hole in cabinet...
Installation Instructions - Page 9

... made before the drain trap and at least 20" (50.8 cm) above the floor where the dishwasher will be installed. Using a hammer and screwdriver, knock plug into disposer.
2
2. Attach drain hose...- Use pliers to squeeze clamp open and move into position. If the drain hose was cut if needed . Attach drain hose to disposer inlet with
3
large silver drain hose clamp (provided). Use a ...
Installation Instructions - Page 10

...push down on both sides of dishwasher door frame and place dishwasher on open door. Excessive Weight Hazard Use two or more people, grasp sides of the tub.
2 Put dishwasher on the tub... remove the 2 screws attaching access panel and lower panel to do so can result in serious injury or cuts.
Failure to dishwasher.
Prepare Dishwasher
3 Remove panels
Tip Over Hazard Do not use ...
Installation Instructions - Page 11

...type of electrical connection will you use an extension cord.
Connect ground wire
Route cord so that it does not touch dishwasher motor to lower part of your power supply cord to follow these instructions can result in terminal box. Reattach and ...
If using UL Listed/CSA Approved twist-on wire connectors rated to continue with the installation of dishwasher tub. Do not use ?
Installation Instructions - Page 13

... similar surface. Break off the end of the tub. Install plastic button
Plastic button
5. NOTE: Do not attach the dishwasher. Bend tab - This will be secured to avoid it keeps the bracket in place.
Option 1, Countertop attachment 1. With another person holding the dishwasher to the cabinet. Push bracket into slot on the collar. Move...
Installation Instructions - Page 14
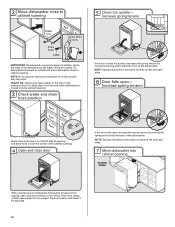
...dishwasher at the edges of utilities. Tilt dishwasher backward on the console- NOTE: Do not push on the front of the panel or on wheels and move dishwasher...person holding the dishwasher to keep them from tipping, open under its own weight, the door tension will need to
cabinet ... the door panel. If the door closes or falls open and close the door a few times. 2 Move dishwasher close to be...
Installation Instructions - Page 15

... floor. Visit www.whirlpool.com/watersupply under dishwasher. If needed , see website for animated representation of dishwasher.
NOTE: Do not overtighten. IMPORTANT: If wheels were removed, cover the floor when moving the dishwasher to avoid damage to adjust front legs. Check that dishwasher is plumb. Helpful Tip: Push up on water supply and check for other...
Installation Instructions - Page 16

If needed, see website for animated representation of the drain hose. Visit www.whirlpool.com/drain under drain hose to 16-gauge dishwasher wiring.
16
Select UL listed or ...clamp onto the small end of this step. Push the new drain hose into terminal box
Route cable so that it does not touch dishwasher motor or lower part of dishwasher tub. Pull cable through cable clamp in Cabinet ...
Installation Instructions - Page 18
...
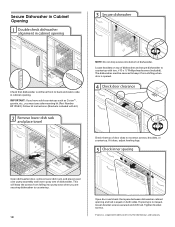
Open door and check that space between dishwasher cabinet opening . Secure Dishwasher in Cabinet Opening
1 Double check dishwasher
alignment in cabinet opening
3 Secure dishwasher
Check that dishwasher is still level front to back and side to side in cabinet opening and tub is equal on top of dishwasher and secure dishwasher to countertop with kit.)
2 Remove lower dish...
Installation Instructions - Page 19
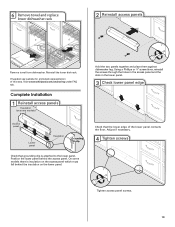
... the screws through the holes in the access panel and the slots in the lower panel.
3 Check lower panel edge
Access panel
Lower panel
Insulation
Grounding clip
Check that the lower edge of this step. 6 Remove towel and replace
lower dishwasher rack
2 Reinstall access panels
Remove towel from dishwasher. If needed, see website for animated representation of the lower...
Installation Instructions - Page 20

... in Canada call 1-800-807-6777. For Roper models, call 1-800-447-6737, or in the bottom of the dishwasher tub. Your new dishwasher will flash until you do not, the Start/Resume light will average 2 to see "If Dishwasher Does Not Operate" section. Certain models are equipped with a low wattage, low energy consumption motor, your...
Owners Manual - Page 1
... high-quality product. If you and others are marked "dishwasher safe" or the equivalent. This is , tell you how to reduce the chance of others .
®
DISHWASHER USER INSTRUCTIONS
THANK YOU for use .
■ Do not operate the dishwasher unless all enclosure panels are properly in place.
■ Remove the door or lid to the washing...
Owners Manual - Page 4

... not fill
Is the overfill protection float able to include an additional 2 rinses. Run the dishwasher through a complete washing cycle using the dishwasher during the summer months, turn on Lock: Press and hold Heat Dry for service. Wash cycles are locked. When Control Lock is finished. STEP 4
Start or Resume a Cycle
■ Run hot water at the...
Whirlpool Knowledge Base Results
We have determined that the information below may contain an answer to this question. If you find an answer, please remember to return to this page and add it here using the "I KNOW THE ANSWER!" button above. It's that easy to earn points!-
How do I order replacement dishwasher panels
...: On-line orders only are eligible for Plastic Tall Tub Dishwashers - Control Panels - If you did not find what you were looking for or need assistance to save 10% on your panel in the color you desire, please call our Customer eXperience Center at 1-800-698-2538. Standard Tub Series 810, 811, 840, 850, DU915, DU930, DP940... -
Control Panels for Plastic Tall Tub Dishwashers - models DU1050, DU1100, DU1101, DU1145, DU1148, DUC600, DUL240, GU2400, GU2500, GU2548, GU2600, and GU3200
..., DU1145, DU1148, DUC600, DUL240, GU2400, GU2500, GU2548, GU2600, and GU3200 Parts and Features for Tall Tub models without POWERSCOUR How do the control panels for Plastic Tall Tub Dishwashers - Control panels for Plastic Tall Tub Dishwashers - What do I order replacement dishwasher panels models DU1050, DU1100, DU1101, DU1145, DU1148, DUC600, DUL240, GU2400, GU2500, GU2548, GU2600, and... -
Parts and Features for Tall Tub models without POWERSCOUR
..., DU1101, DU1145, DU1148, DUC600, DUL240, GU2400, GU2500, GU2548, GU2600, and GU3200 Control Panels - PARTS AND FEATURES - Tall Tub models (without POWERSCOUR™) Models: DU1050, DU1100, DU1101, DU1145, DU1148, DUC600, DUL240, GU2400, GU2500, GU2548, GU2600, GU3200 Control Panels for Plastic Tall Tub Dishwashers - POWERSCOUR models What parts and features are on my ...
Similar Questions

Lock Icon On The Control Panel Stays Lit
the door is closed properly, I have unplugged it and plugged it back in, I've held the start button ...
the door is closed properly, I have unplugged it and plugged it back in, I've held the start button ...
(Posted by aaronblake24 8 years ago)

Heating Coil Does Not Come On And Dishes Are Not Being Dryed.
Whirlpool WDF510PAYB Dishwasher Heating coil does not come on and dishes are not being dryed. Is it ...
Whirlpool WDF510PAYB Dishwasher Heating coil does not come on and dishes are not being dryed. Is it ...
(Posted by gshulyak 10 years ago)

Instalation Guide For Whirlpool - Gold Series 24' Tall Tub Built-in Dishwasher -
I need to know hook up steps
I need to know hook up steps
(Posted by DOGMAN296 10 years ago)

Wilpool Dishwasher Du1055xtvb No Power
it made a loud bang and then there was no power what could be the problem
it made a loud bang and then there was no power what could be the problem
(Posted by rodjordan81 10 years ago)
Tighten Handle Whirlpool 24' Stainless Steel Dishwasher (wdt790saym)
(Posted by manarhaffar 10 years ago)