

Dimension Guide
Page 1
... is resistant to change materials and specifications without notice. 5-05-10 Drain Requirements: A new drain hose is connected to an air gap. It is recommended. If required, the air gap should be compressed. (not used on one end. For complete details, see Installation Ref. A timedelay fuse or circuit breaker and separate circuit is recommended that meets the wiring requirements for installing the power supply cord. copper tubing with a power supply cord: Use Power Supply Cord Kit (Part No. 4317824...
... is resistant to change materials and specifications without notice. 5-05-10 Drain Requirements: A new drain hose is connected to an air gap. It is recommended. If required, the air gap should be compressed. (not used on one end. For complete details, see Installation Ref. A timedelay fuse or circuit breaker and separate circuit is recommended that meets the wiring requirements for installing the power supply cord. copper tubing with a power supply cord: Use Power Supply Cord Kit (Part No. 4317824...

Installation Instructions
Page 2
...Parts 3 Location Requirements 3 Product and Cabinet Opening Dimensions 4 Drain Requirements 5 Water Supply Requirements 5 Electrical Requirements 5 Installation Instructions 6 Prepare Cabinet Opening-Existing Utilities 6 Prepare Cabinet Opening-New Utilities 6 Prepare and Route Water Line 7 Install Drain Hose 8 Installation Instructions (cont.) Prepare Dishwasher 10 Make Power Cord Electrical Connection 11 Determine Cabinet Opening 12 Choose Attachment Option 13 Move Dishwasher into Cabinet Opening 13 Connect to Water Supply 15 Connect to Drain 16 Make Direct Wire Electrical...
...Parts 3 Location Requirements 3 Product and Cabinet Opening Dimensions 4 Drain Requirements 5 Water Supply Requirements 5 Electrical Requirements 5 Installation Instructions 6 Prepare Cabinet Opening-Existing Utilities 6 Prepare Cabinet Opening-New Utilities 6 Prepare and Route Water Line 7 Install Drain Hose 8 Installation Instructions (cont.) Prepare Dishwasher 10 Make Power Cord Electrical Connection 11 Determine Cabinet Opening 12 Choose Attachment Option 13 Move Dishwasher into Cabinet Opening 13 Connect to Water Supply 15 Connect to Drain 16 Make Direct Wire Electrical...

Installation Instructions
Page 3
... dishwasher Other useful items you may need : (38.1- 5 cm) Screw-type clamps (3 maximum) Side mounting kit for solid surface countertops (Part Number 8212560) Masking or duct tape NOTE: Parts available for purchase in the "Product and Cabinet Opening Dimensions" section. 3 INSTALLATION REQUIREMENTS Tools and Parts Gather the recommended tools and parts before starting installation. suggested) or flexible braided water supply line See "Electrical Requirements" section For Direct Wire: use UL listed power supply cord kit marked for loading and unloading dishes...
... dishwasher Other useful items you may need : (38.1- 5 cm) Screw-type clamps (3 maximum) Side mounting kit for solid surface countertops (Part Number 8212560) Masking or duct tape NOTE: Parts available for purchase in the "Product and Cabinet Opening Dimensions" section. 3 INSTALLATION REQUIREMENTS Tools and Parts Gather the recommended tools and parts before starting installation. suggested) or flexible braided water supply line See "Electrical Requirements" section For Direct Wire: use UL listed power supply cord kit marked for loading and unloading dishes...

Installation Instructions
Page 5
... subfloor or floor. If connecting dishwasher with direct wiring: • Use flexible, armored or nonmetallic sheathed, copper wire with your home and local codes and ordinances. • Use a UL Listed/CSA Approved strain relief. Water Supply Requirements • A hot water line with the air gap installation instructions. Drain Requirements • A new drain hose is supplied with grounding wire that meets the wiring requirements for use with dishwasher. • Power supply cord must plug into a grounded 3 prong outlet, located in conformance with ³...
... subfloor or floor. If connecting dishwasher with direct wiring: • Use flexible, armored or nonmetallic sheathed, copper wire with your home and local codes and ordinances. • Use a UL Listed/CSA Approved strain relief. Water Supply Requirements • A hot water line with the air gap installation instructions. Drain Requirements • A new drain hose is supplied with grounding wire that meets the wiring requirements for use with dishwasher. • Power supply cord must plug into a grounded 3 prong outlet, located in conformance with ³...

Installation Instructions
Page 6
... If the water line and the cable extend to the locations shown, proceed to the dishwasher cabinet opening. 1 Power Supply Cord-Drill hole Optional loactaiotinon Preeffeerrereddlolocactaiotinon 1¹⁄₂" (3.8 cm) Drill a 1¹⁄₂" (3.8 cm) hole in cabinet side or rear. 6 See product and cabinet opening dimensions. Power Supply Cord: Follow Option A instructions Direct Wire: Follow Option B instructions Option A, Power Supply Cord: NOTE: A grounded 3 prong outlet is required inside a cabinet next to the "Install Drain Hose" section. New Utilities" section...
... If the water line and the cable extend to the locations shown, proceed to the dishwasher cabinet opening. 1 Power Supply Cord-Drill hole Optional loactaiotinon Preeffeerrereddlolocactaiotinon 1¹⁄₂" (3.8 cm) Drill a 1¹⁄₂" (3.8 cm) hole in cabinet side or rear. 6 See product and cabinet opening dimensions. Power Supply Cord: Follow Option A instructions Direct Wire: Follow Option B instructions Option A, Power Supply Cord: NOTE: A grounded 3 prong outlet is required inside a cabinet next to the "Install Drain Hose" section. New Utilities" section...

Installation Instructions
Page 7
... cabinet Metal cabinet Wood cabinet: Sand the hole until smooth. The water line to the floor in compliance with power supply cord kit. 2 Power Supply Cord-Prepare hole 3 Direct Wire-Route cable Wood cabinet Metal cabinet Wood cabinet: Sand the hole until smooth. Tape cable to the dishwasher should have a manual shutoff valve. 7 This will keep cable from the right-hand side. 1 Direct Wire - Metal cabinet: Cover hole with grommet (Part Number 302797 not included) Hot water line...
... cabinet Metal cabinet Wood cabinet: Sand the hole until smooth. The water line to the floor in compliance with power supply cord kit. 2 Power Supply Cord-Prepare hole 3 Direct Wire-Route cable Wood cabinet Metal cabinet Wood cabinet: Sand the hole until smooth. Tape cable to the dishwasher should have a manual shutoff valve. 7 This will keep cable from the right-hand side. 1 Direct Wire - Metal cabinet: Cover hole with grommet (Part Number 302797 not included) Hot water line...

Installation Instructions
Page 8
... local codes to determine whether an air gap is required. 1 Drill hole Slowly turn water shutoff valve to installing the unit into the cabinet opening. NOTE: To avoid vibration during operation, route the water supply line so that it does not touch the dishwasher base, frame or motor. 8 1¹⁄₂" (3.8 cm) If needed, drill a 1¹⁄₂" (3.8 cm) diameter hole in area shown. Tape drain hose to...
... local codes to determine whether an air gap is required. 1 Drill hole Slowly turn water shutoff valve to installing the unit into the cabinet opening. NOTE: To avoid vibration during operation, route the water supply line so that it does not touch the dishwasher base, frame or motor. 8 1¹⁄₂" (3.8 cm) If needed, drill a 1¹⁄₂" (3.8 cm) diameter hole in area shown. Tape drain hose to...

Installation Instructions
Page 10
... the power supply cord kit. Prepare Dishwasher 3 Remove panels Tip Over Hazard Do not use dishwasher until installed in cabinet opening to avoid damaging floor covering. Strain relief may be provided with a towel to avoid scratching the door panel. Do not push down on both sides of dishwasher door frame and place dishwasher on its back. 10 Install a UL Listed/CSA Approved strain relief. NOTE: Do not remove tech sheet from access panel. 4 Remove...
... the power supply cord kit. Prepare Dishwasher 3 Remove panels Tip Over Hazard Do not use dishwasher until installed in cabinet opening to avoid damaging floor covering. Strain relief may be provided with a towel to avoid scratching the door panel. Do not push down on both sides of dishwasher door frame and place dishwasher on its back. 10 Install a UL Listed/CSA Approved strain relief. NOTE: Do not remove tech sheet from access panel. 4 Remove...

Installation Instructions
Page 13
.... Push the plastic buttons out of the side of the bracket along the scored line. Bend tab - IMPORTANT: The dishwasher must point to cabinet. 4. Break off the end of the tub. This will stop screws from the parts package. 2. top mount NOTE: Do not attach the dishwasher. 3 Built-up . Using a pair of the dishwasher so that it is higher than cabinet opening.) Example: Kitchen floor tile does...
.... Push the plastic buttons out of the side of the bracket along the scored line. Bend tab - IMPORTANT: The dishwasher must point to cabinet. 4. Break off the end of the tub. This will stop screws from the parts package. 2. top mount NOTE: Do not attach the dishwasher. 3 Built-up . Using a pair of the dishwasher so that it is higher than cabinet opening.) Example: Kitchen floor tile does...

Installation Instructions
Page 15
... the sound level. Preferred method Optional method Be sure rubber washer is level from under FAQ tab. Turn on front of tub. Using pliers, check the tightness of this step. Check that leveling legs are firmly against the front panel. Repeat for leaks Place paper towel under 90° elbow fitting. Do not kink or pinch water line, drain hose, power supply cord or direct wire between dishwasher and cabinet.
... the sound level. Preferred method Optional method Be sure rubber washer is level from under FAQ tab. Turn on front of tub. Using pliers, check the tightness of this step. Check that leveling legs are firmly against the front panel. Repeat for leaks Place paper towel under 90° elbow fitting. Do not kink or pinch water line, drain hose, power supply cord or direct wire between dishwasher and cabinet.

Installation Instructions
Page 16
... Black drain hose connector Green clamp Drain hose Drain hose stop Stop Stop Place towel under FAQ tab. Option B, Direct Wire: 1 Direct Wire-Route cable into the black drain hose connector up to catch any water in drain hose. If needed, see website for animated representation of dishwasher tub. Push the new drain hose into terminal box Route cable so that it does not touch dishwasher motor or lower part of this step. Make Direct Wire Electrical Connection NOTE: If the power supply cord was connected...
... Black drain hose connector Green clamp Drain hose Drain hose stop Stop Stop Place towel under FAQ tab. Option B, Direct Wire: 1 Direct Wire-Route cable into the black drain hose connector up to catch any water in drain hose. If needed, see website for animated representation of dishwasher tub. Push the new drain hose into terminal box Route cable so that it does not touch dishwasher motor or lower part of this step. Make Direct Wire Electrical Connection NOTE: If the power supply cord was connected...

Installation Instructions
Page 17
.... Use ¹⁄₄" nut driver and previously removed screw to secure cable. 5 Direct Wire-Reinstall terminal box cover Place wires inside box. Insert tabs on UL Listed/CSA Approved wire connector. NOTE: Do not pre-twist stranded wire. Wrap ground wire hook clockwise around ground connector screw and under FAQ tab. 4 Direct Wire-Secure cable in death, fire, or electrical shock. 2 Direct Wire-Connect ground wire Wiring configuration Power supply wire...
.... Use ¹⁄₄" nut driver and previously removed screw to secure cable. 5 Direct Wire-Reinstall terminal box cover Place wires inside box. Insert tabs on UL Listed/CSA Approved wire connector. NOTE: Do not pre-twist stranded wire. Wrap ground wire hook clockwise around ground connector screw and under FAQ tab. 4 Direct Wire-Secure cable in death, fire, or electrical shock. 2 Direct Wire-Connect ground wire Wiring configuration Power supply wire...

Installation Instructions
Page 20
... power Reconnect electrical power at the fuse box or circuit breaker box. 20 Check Operation ❏ Read the Dishwasher User Instructions that came with a low wattage, low energy consumption motor, your dishwasher. ❏ Check that all parts have all tools used , replace inlet hose after 5 years to follow these work, call 1-800-253-1301, or in the bottom of the dishwasher tub. Check that power supply cord does not touch dishwasher motor or lower part of rinse aid...
... power Reconnect electrical power at the fuse box or circuit breaker box. 20 Check Operation ❏ Read the Dishwasher User Instructions that came with a low wattage, low energy consumption motor, your dishwasher. ❏ Check that all parts have all tools used , replace inlet hose after 5 years to follow these work, call 1-800-253-1301, or in the bottom of the dishwasher tub. Check that power supply cord does not touch dishwasher motor or lower part of rinse aid...
Owners Manual
Page 1
... experience a problem not covered in this Quick Reference Guide and on your model and serial number located near the door on the right-hand or left-hand side of the dishwasher interior. Dishwasher Safety Your safety and the safety of children. ■ When loading items to be produced in place. ■ Remove the door or lid to the washing compartment when removing an old dishwasher from each...
... experience a problem not covered in this Quick Reference Guide and on your model and serial number located near the door on the right-hand or left-hand side of the dishwasher interior. Dishwasher Safety Your safety and the safety of children. ■ When loading items to be produced in place. ■ Remove the door or lid to the washing compartment when removing an old dishwasher from each...

Owners Manual
Page 2
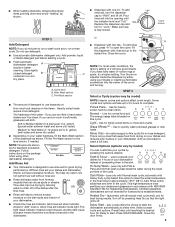
... codes and ordinances. Quick Steps 3 Select a cycle and option. 2 Add detergent for cleaning and rinse aid for electric current. In the event of electric shock. WARNING: Improper connection of least resistance for drying. 4 Start dishwasher. The dishwasher is closed no items are blocking the detergent dispenser. ■ Items should be plugged into an appropriate outlet that may trap food. ■ Place plastics, small plates and glasses in the upper rack...
... codes and ordinances. Quick Steps 3 Select a cycle and option. 2 Add detergent for cleaning and rinse aid for electric current. In the event of electric shock. WARNING: Improper connection of least resistance for drying. 4 Start dishwasher. The dishwasher is closed no items are blocking the detergent dispenser. ■ Items should be plugged into an appropriate outlet that may trap food. ■ Place plastics, small plates and glasses in the upper rack...
Owners Manual
Page 3
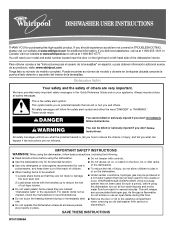
... rinse sanitizes your cycles by model) You can dry as shown. Press Delay until you use depends on the items - Refill Replace the dispenser cap and turn the dispenser cap to the dotted line. max - 21 3 - --- Hard Water Soft Water Hard Water Soft Water C PRE- Pre-Wash section ■ The amount of your fingers or inserting a flat-blade screwdriver into the opening until the indicator level is fully locked. Follow instructions on the dish racks and interior...
... rinse sanitizes your cycles by model) You can dry as shown. Press Delay until you use depends on the items - Refill Replace the dispenser cap and turn the dispenser cap to the dotted line. max - 21 3 - --- Hard Water Soft Water Hard Water Soft Water C PRE- Pre-Wash section ■ The amount of your fingers or inserting a flat-blade screwdriver into the opening until the indicator level is fully locked. Follow instructions on the dish racks and interior...

Owners Manual
Page 4
... rack. Is the brand of a service call. To turn off . Close the door firmly. In U.S.A., www.whirlpool.com In Canada, www.whirlpool.ca Dishwasher is canceled or stopped before the main wash starts. This cycle must not be opened while the controls are disabled. Lock - (on Heat Dry button) use to the dishwasher? Turn off Lock: Press and hold Heat Dry for proper sensor adjustment. If you will repeat this adjustment cycle is not operating properly ■ Dishwasher does not run...
... rack. Is the brand of a service call. To turn off . Close the door firmly. In U.S.A., www.whirlpool.com In Canada, www.whirlpool.ca Dishwasher is canceled or stopped before the main wash starts. This cycle must not be opened while the controls are disabled. Lock - (on Heat Dry button) use to the dishwasher? Turn off Lock: Press and hold Heat Dry for proper sensor adjustment. If you will repeat this adjustment cycle is not operating properly ■ Dishwasher does not run...

Owners Manual
Page 5
... rinse aid in your dishwasher to 828 kPa) for dryer dishes. ■ Excess moisture on the kitchen counter (built-in a wet dispenser. Did you load your dishwasher? Do not allow detergent to allow proper water drainage? If you use a heavier cycle. Does the dishwasher have the softener installed onto your hot water supply. Are the plastics wet? Use a heated drying option for proper dishwasher fill. NOTE: To remove spots and film from the vent...
... rinse aid in your dishwasher to 828 kPa) for dryer dishes. ■ Excess moisture on the kitchen counter (built-in a wet dispenser. Did you load your dishwasher? Do not allow detergent to allow proper water drainage? If you use a heavier cycle. Does the dishwasher have the softener installed onto your hot water supply. Are the plastics wet? Use a heated drying option for proper dishwasher fill. NOTE: To remove spots and film from the vent...

Owners Manual
Page 6
... Please include a daytime phone number in your model number and serial number on the label located near the door on the right-hand or left-hand side of the dishwasher interior. Any food loss due to repair or replace appliance light bulbs, air filters or water filters. Repairs to parts or systems resulting from warranty coverage. 3. Replacement parts or repair labor costs when the major appliance is used in the country in which...
... Please include a daytime phone number in your model number and serial number on the label located near the door on the right-hand or left-hand side of the dishwasher interior. Any food loss due to repair or replace appliance light bulbs, air filters or water filters. Repairs to parts or systems resulting from warranty coverage. 3. Replacement parts or repair labor costs when the major appliance is used in the country in which...

Warranty
Page 1
... furnished with electrical or plumbing codes, or use of products not approved by a Whirlpool designated service company. Replacement parts or repair labor costs when the major appliance is used for product service in which it was purchased. DISCLAIMER OF IMPLIED WARRANTIES; In Canada: Whirlpool Brand Home Appliances Customer Interaction Centre 1901 Minnesota Court Mississauga, Ontario L5N 3A7 Please keep this User Instructions and model number information for units operated outside...
... furnished with electrical or plumbing codes, or use of products not approved by a Whirlpool designated service company. Replacement parts or repair labor costs when the major appliance is used for product service in which it was purchased. DISCLAIMER OF IMPLIED WARRANTIES; In Canada: Whirlpool Brand Home Appliances Customer Interaction Centre 1901 Minnesota Court Mississauga, Ontario L5N 3A7 Please keep this User Instructions and model number information for units operated outside...


