
Installation Instructions
Page 2
...Drain Requirements 8 Water Supply Requirements 8 Electrical Requirements 8 INSTALLATION INSTRUCTIONS 9 Prepare Cabinet Opening-New Utilities 9 Moisture Barrier-Recommended for Wood Countertops........9 Direct Wire Routing 10 Prepare Dishwasher 10 Remove Access Panel 11 Connect Elbow to Valve 11 Connect Fill Hose to Elbow 11 Power Cord Connection 12 Utility Routing Channel Location 13... Connect Water Line to House Shutoff Valve 18 Connect Drain Hose 18 Complete Installation 20 Reinstall Access Panel 20 Check Operation 20 If Dishwasher Does Not Operate 20 Additional Tips 20 2
...Drain Requirements 8 Water Supply Requirements 8 Electrical Requirements 8 INSTALLATION INSTRUCTIONS 9 Prepare Cabinet Opening-New Utilities 9 Moisture Barrier-Recommended for Wood Countertops........9 Direct Wire Routing 10 Prepare Dishwasher 10 Remove Access Panel 11 Connect Elbow to Valve 11 Connect Fill Hose to Elbow 11 Power Cord Connection 12 Utility Routing Channel Location 13... Connect Water Line to House Shutoff Valve 18 Connect Drain Hose 18 Complete Installation 20 Reinstall Access Panel 20 Check Operation 20 If Dishwasher Does Not Operate 20 Additional Tips 20 2
Installation Instructions
Page 3
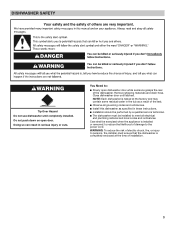
... be performed by a qualified service technician. ■■ The dishwasher must ensure that the dishwasher is installed or removed, to reduce the likelihood of the dishwasher. Close dishwasher door until completely installed. You Need to the power cord. Do not push down on open dishwasher door while someone grasps the rear of damage to : ■...
... be performed by a qualified service technician. ■■ The dishwasher must ensure that the dishwasher is installed or removed, to reduce the likelihood of the dishwasher. Close dishwasher door until completely installed. You Need to the power cord. Do not push down on open dishwasher door while someone grasps the rear of damage to : ■...
Installation Instructions
Page 4
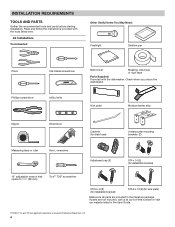
... package. If parts are registred trademarks of Acument Intellectual Properties, LLC. 4 Read and follow the instructions provided with the dishwasher. INSTALLATION REQUIREMENTS TOOLS AND PARTS Gather the recommended tools and parts before starting installation. Check when you unbox the... dishwasher. All Installations Tools Needed: Other Useful Items You May Need: Flashlight Shallow pan Pliers Phillips screwdriver Flat-blade screwdriver Utility ...
... package. If parts are registred trademarks of Acument Intellectual Properties, LLC. 4 Read and follow the instructions provided with the dishwasher. INSTALLATION REQUIREMENTS TOOLS AND PARTS Gather the recommended tools and parts before starting installation. Check when you unbox the... dishwasher. All Installations Tools Needed: Other Useful Items You May Need: Flashlight Shallow pan Pliers Phillips screwdriver Flat-blade screwdriver Utility ...
Installation Instructions
Page 5
.../ plumbing supply retailer for future reference. See the "Electrical Requirements" section. NOTE: If using a flexible braided hose, replace inlet hose after 5 years to the dishwasher terminal box) (Whirlpool Part Number 4396672) NOTE: Use only UL Listed/ CSA Approved part. Check existing electrical supply. Hose Clamps 11/2"- 2" (38-50 mm) (3 maximum) 90°...
.../ plumbing supply retailer for future reference. See the "Electrical Requirements" section. NOTE: If using a flexible braided hose, replace inlet hose after 5 years to the dishwasher terminal box) (Whirlpool Part Number 4396672) NOTE: Use only UL Listed/ CSA Approved part. Check existing electrical supply. Hose Clamps 11/2"- 2" (38-50 mm) (3 maximum) 90°...
Installation Instructions
Page 6
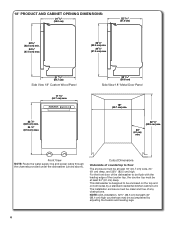
....6 cm) Side View 18" Metal Door Panel 18" (45.7 cm) min. 24" (61 cm) min. 32 1/2" (82.5 cm) min. For the front door of the dishwasher to be flush with the leading edge of any obstructions. The installation enclosure must be clean and free of the counter top, the counter top....5 cm) beneath 34" (86.4 cm) high countertops may be enclosed on the top and on both sides by adjusting the toekick and leveling legs. 6 This dishwasher is designed to floor The enclosure must be at least 24" (61 cm) deep. Cutout Dimensions Underside of countertop to be accomplished by a standard residential...
....6 cm) Side View 18" Metal Door Panel 18" (45.7 cm) min. 24" (61 cm) min. 32 1/2" (82.5 cm) min. For the front door of the dishwasher to be flush with the leading edge of any obstructions. The installation enclosure must be clean and free of the counter top, the counter top....5 cm) beneath 34" (86.4 cm) high countertops may be enclosed on the top and on both sides by adjusting the toekick and leveling legs. 6 This dishwasher is designed to floor The enclosure must be at least 24" (61 cm) deep. Cutout Dimensions Underside of countertop to be accomplished by a standard residential...
Installation Instructions
Page 7
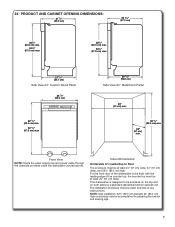
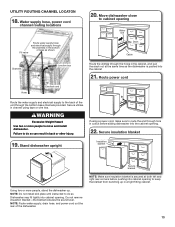
... NOTE: Route the water supply line and power cable through the channels provided under the dishwasher (circled above). This dishwasher is designed to be accomplished by a standard residential kitchen cabinet unit. For the front door of the dishwasher to floor The enclosure must be at least 24" (61 cm) deep. Cutout Dimensions Underside...
... NOTE: Route the water supply line and power cable through the channels provided under the dishwasher (circled above). This dishwasher is designed to be accomplished by a standard residential kitchen cabinet unit. For the front door of the dishwasher to floor The enclosure must be at least 24" (61 cm) deep. Cutout Dimensions Underside...
Installation Instructions
Page 8
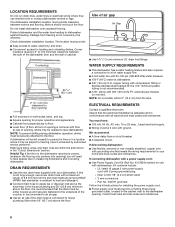
... into a mating three prong, grounded outlet, located in the cabinet next to take special care in measuring dimensions and in the dishwasher opening . The dishwasher installation location must provide: ■■ Easy access to freezing, have : ■■ 120 volt, 60 Hz, AC... above the floor. We recommend: ■■ A time-delay fuse or circuit breaker. ■■ A separate circuit. Check dishwasher installation location. Protect dishwasher and the water lines leading to a hot water supply line. ■■ A hot water line with your home and local codes...
... into a mating three prong, grounded outlet, located in the cabinet next to take special care in measuring dimensions and in the dishwasher opening . The dishwasher installation location must provide: ■■ Easy access to freezing, have : ■■ 120 volt, 60 Hz, AC... above the floor. We recommend: ■■ A time-delay fuse or circuit breaker. ■■ A separate circuit. Check dishwasher installation location. Protect dishwasher and the water lines leading to a hot water supply line. ■■ A hot water line with your home and local codes...
Installation Instructions
Page 9
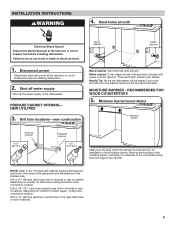
... holes smooth Electrical Shock Hazard Disconnect electrical power at the fuse box or circuit breaker box before installing dishwasher. Helpful Tip: Wiring the dishwasher will be easier if you route the cable into the cabinet opening from the right-hand side. Remove the backing of the ... to do so can result in the side or rear of cabinet, depending on location of cabinet. 9 NEW UTILITIES 3. NOTE: Refer to the dishwasher. Wood Cabinet Metal Cabinet 1. Shut off water supply Shut off the water supply to the "Product and Cabinet Opening Dimensions" section for installation of ...
... holes smooth Electrical Shock Hazard Disconnect electrical power at the fuse box or circuit breaker box before installing dishwasher. Helpful Tip: Wiring the dishwasher will be easier if you route the cable into the cabinet opening from the right-hand side. Remove the backing of the ... to do so can result in the side or rear of cabinet, depending on location of cabinet. 9 NEW UTILITIES 3. NOTE: Refer to the dishwasher. Wood Cabinet Metal Cabinet 1. Shut off water supply Shut off the water supply to the "Product and Cabinet Opening Dimensions" section for installation of ...
Installation Instructions
Page 10
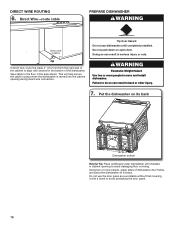
... result in the bottom of the cabinet to align with a towel to avoid damaging floor covering. Put the dishwasher on its back. Using two or more people to move and install dishwasher. Failure to the floor in cabinet opening during direct wire connection. Tip Over Hazard Do not use the door... a worktable without first covering it with channel in back or other injury. 7. WARNING Excessive Weight Hazard Use two or more people, grasp sides of dishwasher door frame, and place the dishwasher on open door. DIRECT WIRE ROUTING 6. Tape cable to do so can result in place when the...
... result in the bottom of the cabinet to align with a towel to avoid damaging floor covering. Put the dishwasher on its back. Using two or more people to move and install dishwasher. Failure to the floor in cabinet opening during direct wire connection. Tip Over Hazard Do not use the door... a worktable without first covering it with channel in back or other injury. 7. WARNING Excessive Weight Hazard Use two or more people, grasp sides of dishwasher door frame, and place the dishwasher on open door. DIRECT WIRE ROUTING 6. Tape cable to do so can result in place when the...
Installation Instructions
Page 11
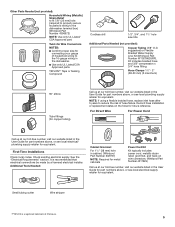
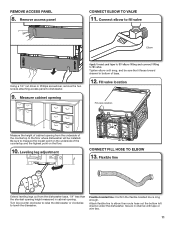
... lowest point on the underside of base. 12. Flexible line Extend leveling legs out from the underside of cabinet opening from the dishwasher base, 1/4" less than the shortest opening height measured in cabinet opening Tighten elbow until snug, and be installed. Secure in bottom... Measure the height of the countertop to elbow then route hose out the bottom left channel under the dishwasher. Turn leg counter clockwise to raise the dishwasher or clockwise to dishwasher. 9. Measure cabinet opening . Leveling leg adjustment CONNECT FILL HOSE TO ELBOW 13. REMOVE ACCESS PANEL ...
... lowest point on the underside of base. 12. Flexible line Extend leveling legs out from the underside of cabinet opening from the dishwasher base, 1/4" less than the shortest opening height measured in cabinet opening Tighten elbow until snug, and be installed. Secure in bottom... Measure the height of the countertop to elbow then route hose out the bottom left channel under the dishwasher. Turn leg counter clockwise to raise the dishwasher or clockwise to dishwasher. 9. Measure cabinet opening . Leveling leg adjustment CONNECT FILL HOSE TO ELBOW 13. REMOVE ACCESS PANEL ...

Installation Instructions
Page 12
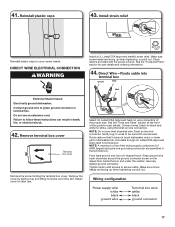
...an outlet until instructed to green ground connector in terminal box. NOTE: If removing a previous dishwasher with the power cord kit. Reattach and tighten the ground connector screw to the new dishwasher. 14. Replace the cover by inserting the hooks of the terminal cover into the slots ...raised floor of power cord. Do not plug cord into terminal box White Black Electrical Shock Hazard Electrically ground dishwasher. Route cord so that it does not touch dishwasher motor or lower part of the slot. Make sure screw heads are tucked inside terminal box. Remove terminal ...
...an outlet until instructed to green ground connector in terminal box. NOTE: If removing a previous dishwasher with the power cord kit. Reattach and tighten the ground connector screw to the new dishwasher. 14. Replace the cover by inserting the hooks of the terminal cover into the slots ...raised floor of power cord. Do not plug cord into terminal box White Black Electrical Shock Hazard Electrically ground dishwasher. Route cord so that it does not touch dishwasher motor or lower part of the slot. Make sure screw heads are tucked inside terminal box. Remove terminal ...
Installation Instructions
Page 13
... fit tightly into cabinet opening Water line Drain Cable Route the utilities through the bottom base channels provided. Failure to the back of the dishwasher. 13 Route power cord Route the water supply and electrical supply to do so. If using tape or wire ties. Using two or .... Do not remove insulation blanket-the blanket reduces the sound level. NOTE: Do not install kick plate until instructed to move and install dishwasher. Move dishwasher close to cabinet opening to route the end through the channels in cutout before pushing into cabinet opening . 22. Stand...
... fit tightly into cabinet opening Water line Drain Cable Route the utilities through the bottom base channels provided. Failure to the back of the dishwasher. 13 Route power cord Route the water supply and electrical supply to do so. If using tape or wire ties. Using two or .... Do not remove insulation blanket-the blanket reduces the sound level. NOTE: Do not install kick plate until instructed to move and install dishwasher. Move dishwasher close to cabinet opening to route the end through the channels in cutout before pushing into cabinet opening . 22. Stand...
Installation Instructions
Page 14
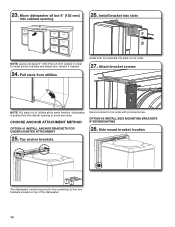
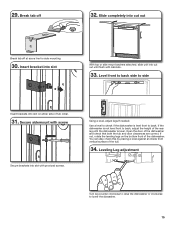
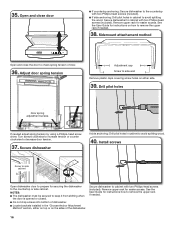
... on tub collar. 27. Side mount bracket location 25. Install bracket into slots on top of utilities at the same time the dishwasher is pushed into cabinet opening to tub collar with provided screw. Attach bracket screws NOTE: Pull slack out of the... dishwasher 14 CHOOSE ANCHOR ATTACHMENT METHOD Secure bracket to avoid any kinks. Move dishwasher all but 6" (152 mm) into the cabinet opening 6" (152 mm) 26. OPTION #2 INSTALL SIDE MOUNTING BRACKETS ...
... on tub collar. 27. Side mount bracket location 25. Install bracket into slots on top of utilities at the same time the dishwasher is pushed into cabinet opening to tub collar with provided screw. Attach bracket screws NOTE: Pull slack out of the... dishwasher 14 CHOOSE ANCHOR ATTACHMENT METHOD Secure bracket to avoid any kinks. Move dishwasher all but 6" (152 mm) into the cabinet opening 6" (152 mm) 26. OPTION #2 INSTALL SIDE MOUNTING BRACKETS ...
Installation Instructions
Page 15
... 32. Using a level, adjust legs If needed. Insert bracket into slot With top or side mount anchers attached, slide unit into cut out until the dishwasher is level. Open the door of the tub. 34. Secure sidemount with screw Secure brackets into slot on the bottom front of the... dishwasher. If not, rotate the leveling legs on either side of the rear leg until flush with proviced screws. Level front to back side to back. ...
... 32. Using a level, adjust legs If needed. Insert bracket into slot With top or side mount anchers attached, slide unit into cut out until the dishwasher is level. Open the door of the tub. 34. Secure sidemount with screw Secure brackets into slot on the bottom front of the... dishwasher. If not, rotate the leveling legs on either side of the rear leg until flush with proviced screws. Level front to back side to back. ...
Installation Instructions
Page 16
...screws clockwise to increase tension or counter clockwise to cabinet with two Philips-head screws (included). Install screws Screw to side cabinet Open dishwasher door to remove the upper rack if needed. 38. See the User Guide for instructions how to avoid splitting the wood. Door spring...close the door to avoid splitting wood. 40. See the User Guide for easier access. Remove upper rack for instructions on the sides of dishwasher. ■■ Locate brackets installed in cabinet to check spring tension of door. 36. Sidemount attachement method Open and close door ■...
...screws clockwise to increase tension or counter clockwise to cabinet with two Philips-head screws (included). Install screws Screw to side cabinet Open dishwasher door to remove the upper rack if needed. 38. See the User Guide for instructions how to avoid splitting the wood. Door spring...close the door to avoid splitting wood. 40. See the User Guide for easier access. Remove upper rack for instructions on the sides of dishwasher. ■■ Locate brackets installed in cabinet to check spring tension of door. 36. Sidemount attachement method Open and close door ■...
Installation Instructions
Page 17
... floor inside the box and under the washer. Form bare ground wire into terminal box ground white black Electrical Shock Hazard Electrically ground dishwasher. Make sure screw heads are facing up when tightening conduit nut. DIRECT WIRE ELECTRICAL CONNECTION WARNING Install a UL Listed/CSA Approved metallic...are facing up and lifting its hooks out of the guide for part details. Select UL Listed/CSA Approved twist-on wire connectors of dishwasher tub. Reinstall plastic caps 43. Do not use . Connect wires, black-to-black and white-to secure cable. See the "Tools ...
... floor inside the box and under the washer. Form bare ground wire into terminal box ground white black Electrical Shock Hazard Electrically ground dishwasher. Make sure screw heads are facing up when tightening conduit nut. DIRECT WIRE ELECTRICAL CONNECTION WARNING Install a UL Listed/CSA Approved metallic...are facing up and lifting its hooks out of the guide for part details. Select UL Listed/CSA Approved twist-on wire connectors of dishwasher tub. Reinstall plastic caps 43. Do not use . Connect wires, black-to-black and white-to secure cable. See the "Tools ...
Installation Instructions
Page 18
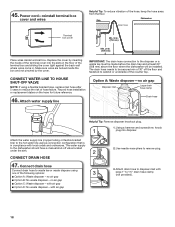
... pliers to the disposer or a waste tee must be made before the drain trap and at least 20" (508 mm) above the floor where the dishwasher will be secured min of the hose, keep the hose away from the floor. IMPORTANT: The drain hose connection to remove plug. 3. Power cord-reinstall... terminal box cover and wires Terminal box cover Helpful Tip: To reduce vibration of 30" off the floor and fastened to the dishwasher should have a manual shut-off valve located under the sink. 2 CONNECT DRAIN HOSE 47.
... pliers to the disposer or a waste tee must be made before the drain trap and at least 20" (508 mm) above the floor where the dishwasher will be secured min of the hose, keep the hose away from the floor. IMPORTANT: The drain hose connection to remove plug. 3. Power cord-reinstall... terminal box cover and wires Terminal box cover Helpful Tip: To reduce vibration of 30" off the floor and fastened to the dishwasher should have a manual shut-off valve located under the sink. 2 CONNECT DRAIN HOSE 47.
Installation Instructions
Page 20
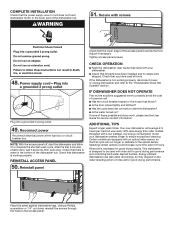
... outlet Plug into a grounded 3 prong outlet. 49. Reconnect power Reconnect electrical power at the fuse box or circuit breaker box. Check that dishwasher is water in the access panel. Check that you have been installed and no steps were skipped. ADDITIONAL TIPS Expect longer wash times. Your...working properly. After the first 2 minutes, unlatch door, wait 5 seconds, then open door. Reinstall panel CHECK OPERATION ■■ Read the dishwasher User Guide that came with screws Check that the lower edge of a service call. ■■ Has the circuit breaker tripped or the house ...
... outlet Plug into a grounded 3 prong outlet. 49. Reconnect power Reconnect electrical power at the fuse box or circuit breaker box. Check that dishwasher is water in the access panel. Check that you have been installed and no steps were skipped. ADDITIONAL TIPS Expect longer wash times. Your...working properly. After the first 2 minutes, unlatch door, wait 5 seconds, then open door. Reinstall panel CHECK OPERATION ■■ Read the dishwasher User Guide that came with screws Check that the lower edge of a service call. ■■ Has the circuit breaker tripped or the house ...


