Owners Manual
Page 2
TABLE OF CONTENTS COOKTOP SAFETY 2 PARTS AND FEATURES 4 COOKTOP USE 6 Cooktop Controls 6 Sealed Surface Burners 7 Surface Grates with Locator Pin 8 Home Canning 8 Cookware 8 COOKTOP CARE 9 General Cleaning 9 TROUBLESHOOTING 10 ASSISTANCE OR SERVICE 11 In the U.S.A 11 Accessories 11 In Canada 11 WARRANTY 12 TABLE ... LA TABLE DE CUISSON 20 Nettoyage général 20 DÉPANNAGE 21 ASSISTANCE OU SERVICE 22 Au Canada 22 GARANTIE 23 COOKTOP SAFETY Your safety and the safety of injury, and tell you what the potential hazard is the safety alert symbol. All safety ...
TABLE OF CONTENTS COOKTOP SAFETY 2 PARTS AND FEATURES 4 COOKTOP USE 6 Cooktop Controls 6 Sealed Surface Burners 7 Surface Grates with Locator Pin 8 Home Canning 8 Cookware 8 COOKTOP CARE 9 General Cleaning 9 TROUBLESHOOTING 10 ASSISTANCE OR SERVICE 11 In the U.S.A 11 Accessories 11 In Canada 11 WARRANTY 12 TABLE ... LA TABLE DE CUISSON 20 Nettoyage général 20 DÉPANNAGE 21 ASSISTANCE OU SERVICE 22 Au Canada 22 GARANTIE 23 COOKTOP SAFETY Your safety and the safety of injury, and tell you what the potential hazard is the safety alert symbol. All safety ...
Owners Manual
Page 3
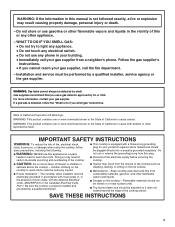
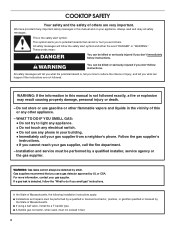
...• Do not use gasoline or other flammable vapors and liquids. ■ Storage on the cooktop to children in the vicinity of the cooking utensil. WARNING: Gas leaks cannot always be seriously injured. ■ Proper Installation - IMPORTANT SAFETY INSTRUCTIONS WARNING: To reduce...or sitting on or near surface units. ■ Top burner flame size should be performed by smell. Follow the gas supplier's instructions. • If you use this plug. ■ Disconnect the electrical supply before servicing the cooktop. ■ Injuries may result causing property damage, personal...
...• Do not use gasoline or other flammable vapors and liquids. ■ Storage on the cooktop to children in the vicinity of the cooking utensil. WARNING: Gas leaks cannot always be seriously injured. ■ Proper Installation - IMPORTANT SAFETY INSTRUCTIONS WARNING: To reduce...or sitting on or near surface units. ■ Top burner flame size should be performed by smell. Follow the gas supplier's instructions. • If you use this plug. ■ Disconnect the electrical supply before servicing the cooktop. ■ Injuries may result causing property damage, personal...
Owners Manual
Page 4
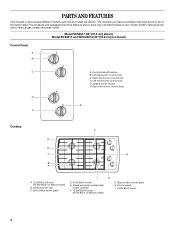
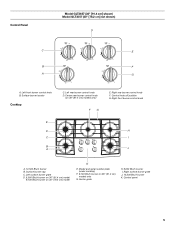
... have some or all models are for Natural gas unless otherwise noted. Left rear burner control knob C. Surface burner locator F. Surface burner cap C. Right rear burner control knob D. Right front burner control knob D E F Cooktop E D C B A F G A. 12,500 Btu/h burner (10,500 Btu/h on W3CG model) ... different models, and not all of your model. Model and serial number plate (under cooktop) F. 12,500 Btu/h burner (9,100 Btu/h on W3CG model) B. Control panel I H D. 9,100 Btu/h burner E. Model SCS3617 (36" [91.4 cm] shown) Model SCS3017 and W3CG3014 (30" [76.2 cm] not...
... have some or all models are for Natural gas unless otherwise noted. Left rear burner control knob C. Surface burner locator F. Surface burner cap C. Right rear burner control knob D. Right front burner control knob D E F Cooktop E D C B A F G A. 12,500 Btu/h burner (10,500 Btu/h on W3CG model) ... different models, and not all of your model. Model and serial number plate (under cooktop) F. 12,500 Btu/h burner (9,100 Btu/h on W3CG model) B. Control panel I H D. 9,100 Btu/h burner E. Model SCS3617 (36" [91.4 cm] shown) Model SCS3017 and W3CG3014 (30" [76.2 cm] not...
Owners Manual
Page 5
.../h burner K. Center grate H. 6,000 Btu/h burner I J A. 12,500 Btu/h burner B. Surface burner cap C. Model and serial number plate (under cooktop) F. 9,100 Btu/h burner on 36" [91.4 cm] models only) FG E. Left surface burner grate D. 6,000 Btu/h burner on 36" (91.4 cm) model 9,100 Btu/h burner on 30" (76.2 cm) model K E. Control panel 5 Left front burner control knob B. Surface burner locator Cooktop E D C B A C. Right rear burner control...
.../h burner K. Center grate H. 6,000 Btu/h burner I J A. 12,500 Btu/h burner B. Surface burner cap C. Model and serial number plate (under cooktop) F. 9,100 Btu/h burner on 36" [91.4 cm] models only) FG E. Left surface burner grate D. 6,000 Btu/h burner on 36" (91.4 cm) model 9,100 Btu/h burner on 30" (76.2 cm) model K E. Control panel 5 Left front burner control knob B. Surface burner locator Cooktop E D C B A C. Right rear burner control...

Owners Manual
Page 6
...empty cookware or without any cookware on the valve shaft. COOKTOP USE WARNING Cooktop Controls To Set: 1. See the instructions included with the LP Gas Conversion Kit for correct operation of prolonged power failure, the surface burners can result in and turn knob to LITE. Before ...and gravies. ■ Stew or steam foods. ■ Simmer. ■ Keep food warm. REMEMBER: When cooktop is wired with your new cooktop. Push in death or fire. All surface burners will produce a flame. 2. Failure to see whether it is in use a grill or griddle accessory during a...
...empty cookware or without any cookware on the valve shaft. COOKTOP USE WARNING Cooktop Controls To Set: 1. See the instructions included with the LP Gas Conversion Kit for correct operation of prolonged power failure, the surface burners can result in and turn knob to LITE. Before ...and gravies. ■ Stew or steam foods. ■ Simmer. ■ Keep food warm. REMEMBER: When cooktop is wired with your new cooktop. Push in death or fire. All surface burners will produce a flame. 2. Failure to see whether it is in use a grill or griddle accessory during a...

Owners Manual
Page 7
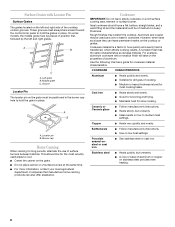
...cooktop is blue in place when using a burner cap. If the burner does not light, check cap alignment. A clean burner cap will help avoid poor ignition and uneven flames. Remove the burner cap from spillovers by always using a surface burner. Igniter D. Sealed Surface Burners... Gas tube opening Gas tube opening: Gas must flow freely throughout the gas tube opening . Replace the burner cap, making sure the alignment pins on the burner. Contact a trained repair specialist. Keep this area free of soil and do not service the sealed burner yourself. Correct 5. C B D E A. Burner ...
...cooktop is blue in place when using a burner cap. If the burner does not light, check cap alignment. A clean burner cap will help avoid poor ignition and uneven flames. Remove the burner cap from spillovers by always using a surface burner. Igniter D. Sealed Surface Burners... Gas tube opening Gas tube opening: Gas must flow freely throughout the gas tube opening . Replace the burner cap, making sure the alignment pins on the burner. Contact a trained repair specialist. Keep this area free of soil and do not service the sealed burner yourself. Correct 5. C B D E A. Burner ...
Owners Manual
Page 8
... Locator Pin The locator pin on the grate must be placed in position first, followed by the left and right side of the cooktop contain grooves. Cookware material is a factor in cookware. For example, aluminum cookware with Locator Pin Surface Grates The grates located on the..., which affects cooking results. These grooves must be positioned in the burner cap hole to hold the grate in place. Locator pin B. Companies that manufacture home canning products can leave permanent marks on the cooktop or grates. Porcelain enamel-onsteel or cast iron ■ See stainless...
... Locator Pin The locator pin on the grate must be placed in position first, followed by the left and right side of the cooktop contain grooves. Cookware material is a factor in cookware. For example, aluminum cookware with Locator Pin Surface Grates The grates located on the..., which affects cooking results. These grooves must be positioned in the burner cap hole to hold the grate in place. Locator pin B. Companies that manufacture home canning products can leave permanent marks on the cooktop or grates. Porcelain enamel-onsteel or cast iron ■ See stainless...
Owners Manual
Page 9
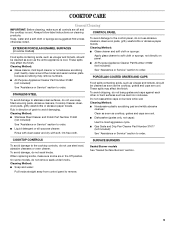
... and tomato, should be cleaned as soon as cooktop, grates and caps are in direction of grain ...cooktop is cool. COOKTOP CONTROLS To avoid damage to the cooktop controls, do not use soapfilled scouring pads, abrasive cleaners, Cooktop...BURNERS Sealed Burner models See "Sealed Surface Burners" section. 9 Apply glass cleaner to soft cloth or sponge, not directly on burners ...remove. To avoid chipping, do not remove seals under knobs. Always follow label instructions on some... such as the cooktop, grates and caps are suggested first unless otherwise noted. COOKTOP CARE General Cleaning ...
... and tomato, should be cleaned as soon as cooktop, grates and caps are in direction of grain ...cooktop is cool. COOKTOP CONTROLS To avoid damage to the cooktop controls, do not use soapfilled scouring pads, abrasive cleaners, Cooktop...BURNERS Sealed Burner models See "Sealed Surface Burners" section. 9 Apply glass cleaner to soft cloth or sponge, not directly on burners ...remove. To avoid chipping, do not remove seals under knobs. Always follow label instructions on some... such as the cooktop, grates and caps are suggested first unless otherwise noted. COOKTOP CARE General Cleaning ...
Owners Manual
Page 10
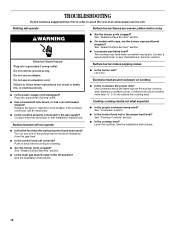
..., or electrical shock. ■ Is the power supply cord unplugged? See "Sealed Surface Burners" section. ■ Is propane gas being used ? Cookware should not extend more than ½" (1.3 cm) outside the cooking area. See "Cooktop Controls" section. ■ Is the cooktop level? Level the cooktop. Plug into a grounded 3 prong outlet. Contact a service technician or see Installation...
..., or electrical shock. ■ Is the power supply cord unplugged? See "Sealed Surface Burners" section. ■ Is propane gas being used ? Cookware should not extend more than ½" (1.3 cm) outside the cooking area. See "Cooktop Controls" section. ■ Is the cooktop level? Level the cooktop. Plug into a grounded 3 prong outlet. Contact a service technician or see Installation...
Owners Manual
Page 11
...need replacement parts If you can also look in your telephone directory Yellow Pages. Accessories Accessories U.S.A. Or visit our website at : Whirlpool Brand Home Appliances Customer eXperience Center 553 Benson Road Benton Harbor, MI 49022-2692 Please include a daytime phone number in your ... with the same precision used to local dealers, repair parts distributors, and service companies. Cooktop Cleaner Order Part Number 31464 Cooktop Scraper Order Part Number WA906B In Canada Call the Whirlpool Canada LP Customer eXperience Centre toll free: 1-800-807-6777. If you need to ...
...need replacement parts If you can also look in your telephone directory Yellow Pages. Accessories Accessories U.S.A. Or visit our website at : Whirlpool Brand Home Appliances Customer eXperience Center 553 Benson Road Benton Harbor, MI 49022-2692 Please include a daytime phone number in your ... with the same precision used to local dealers, repair parts distributors, and service companies. Cooktop Cleaner Order Part Number 31464 Cooktop Scraper Order Part Number WA906B In Canada Call the Whirlpool Canada LP Customer eXperience Centre toll free: 1-800-807-6777. If you need to ...

Dimension Guide
Page 1
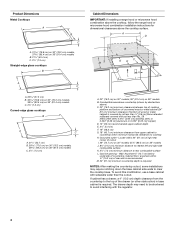
...-amp fused, electrical circuit is required Because Whirlpool Corporation policy includes a continuous commitment to LP gas. Ref. 8286304 08-10-05 ® Gas Built-in Cooktop PRODUCT MODEL NUMBERS GLT3057R GLT3657R SCS3017R SCS3617R Gas Supply: This cooktop is recommended that resist the action of wood...76.8 cm) on 30" (76.2 cm) models, 36 92.5 cm) on 36" (91.4 cm) models C. 2⁷⁄₈" (7.3 cm) Curved-edge glass cooktops B A C A. 21¹⁄₈" (53.7 cm) B. 30 77.0 cm) on 30" (76.2 cm) models, 36 92.3 cm) on 36" (91.4 cm) models C. 2⁷⁄₈" ...
...-amp fused, electrical circuit is required Because Whirlpool Corporation policy includes a continuous commitment to LP gas. Ref. 8286304 08-10-05 ® Gas Built-in Cooktop PRODUCT MODEL NUMBERS GLT3057R GLT3657R SCS3017R SCS3617R Gas Supply: This cooktop is recommended that resist the action of wood...76.8 cm) on 30" (76.2 cm) models, 36 92.5 cm) on 36" (91.4 cm) models C. 2⁷⁄₈" (7.3 cm) Curved-edge glass cooktops B A C A. 21¹⁄₈" (53.7 cm) B. 30 77.0 cm) on 30" (76.2 cm) models, 36 92.3 cm) on 36" (91.4 cm) models C. 2⁷⁄₈" ...
Installation Instructions
Page 2
... followed exactly, a fire or explosion may result causing property damage, personal injury or death. - Follow the gas supplier's instructions. • If you smell gas" instructions. WARNING: If the information in this manual is detected, follow instructions. COOKTOP SAFETY Your safety and the safety of this or any phone in your building. • Immediately...
... followed exactly, a fire or explosion may result causing property damage, personal injury or death. - Follow the gas supplier's instructions. • If you smell gas" instructions. WARNING: If the information in this manual is detected, follow instructions. COOKTOP SAFETY Your safety and the safety of this or any phone in your building. • Immediately...
Installation Instructions
Page 3
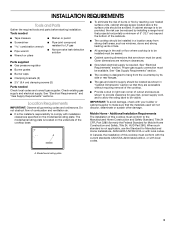
... of this cooktop must be sealed. ■ Cabinet opening dimensions that they are accessible without requiring removal of cutout enclosure as shown in "Cabinet Dimensions" section so that are minimum clearances. ■ Grounded electrical supply is to LP gas ■ Noncorrosive leak-detection solution Parts supplied ■ Gas pressure regulator ■ Burner grates ■ Burner caps...
... of this cooktop must be sealed. ■ Cabinet opening dimensions that they are accessible without requiring removal of cutout enclosure as shown in "Cabinet Dimensions" section so that are minimum clearances. ■ Grounded electrical supply is to LP gas ■ Noncorrosive leak-detection solution Parts supplied ■ Gas pressure regulator ■ Burner grates ■ Burner caps...
Installation Instructions
Page 4
... of rear wall is recommended M. 24" (61 cm) minimum countertop depth is covered by dashed box above the cooktop surface. To avoid this modification, use a base cabinet with the regulator. 4 Locate within minimum horizontal clearances to avoid...countertop cutout, some installations may need to be shortened to cooktop H. Wall: Anywhere 5" (12.7 cm) below underside of cutout I G J A. 30" (76.2 cm) on 30" models; 36" (91.4 cm) on 36" models J. 8³⁄₈" (21.3 cm)...upper cabinet to countertop within 24" (61 cm) of right rear corner of countertop. Gas line opening -
... of rear wall is recommended M. 24" (61 cm) minimum countertop depth is covered by dashed box above the cooktop surface. To avoid this modification, use a base cabinet with the regulator. 4 Locate within minimum horizontal clearances to avoid...countertop cutout, some installations may need to be shortened to cooktop H. Wall: Anywhere 5" (12.7 cm) below underside of cutout I G J A. 30" (76.2 cm) on 30" models; 36" (91.4 cm) on 36" models J. 8³⁄₈" (21.3 cm)...upper cabinet to countertop within 24" (61 cm) of right rear corner of countertop. Gas line opening -
Installation Instructions
Page 5
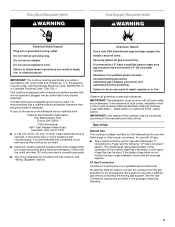
.... latest edition or CAN/CGA B149 - If converting to LP, have a qualified person make sure gas pressure does not exceed 14" (36 cm) water column. A copy of the cooktop must be made to the manufacturer's instructions. IMPORTANT: This installation must conform with the National Electrical Code, ANSI/NFPA 70 or Canadian Electrical Code...
.... latest edition or CAN/CGA B149 - If converting to LP, have a qualified person make sure gas pressure does not exceed 14" (36 cm) water column. A copy of the cooktop must be made to the manufacturer's instructions. IMPORTANT: This installation must conform with the National Electrical Code, ANSI/NFPA 70 or Canadian Electrical Code...

Installation Instructions
Page 6
...; psi (3.5 kPa). Gas Supply Pressure Testing Gas supply pressure for testing regulator must be used in insufficient gas supply. Gas Supply Line ■ Provide a gas supply line of E.I .D. A smaller size pipe on or shutting off gas to the cooktop. flexible stainless steel tubing gas connector, designed by closing... turning on longer runs may result in the system. Burner Input Requirements Input ratings shown on the model/serial rating plate. For elevations above ½ psi gauge (14" WCP) The cooktop and its individual manual shutoff valve during any pressure testing...
...; psi (3.5 kPa). Gas Supply Pressure Testing Gas supply pressure for testing regulator must be used in insufficient gas supply. Gas Supply Line ■ Provide a gas supply line of E.I .D. A smaller size pipe on or shutting off gas to the cooktop. flexible stainless steel tubing gas connector, designed by closing... turning on longer runs may result in the system. Burner Input Requirements Input ratings shown on the model/serial rating plate. For elevations above ½ psi gauge (14" WCP) The cooktop and its individual manual shutoff valve during any pressure testing...
Installation Instructions
Page 7
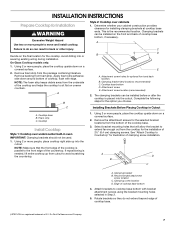
... down on the front and back of the cooktop and helps the cooktop to sit flat on uneven counters. This is a registered trademark of the cooktop base. 3. The clamping brackets can be used. 1. Cooktop Install Cooktop Style 1: Cooktop over cabinets 1. Remove the attachment screws for ...selected in oven IMPORTANT: Clamping brackets should not be installed on a covered surface. 2. Using 2 or more people, place the cooktop upside down around bottom of 2½" (6.4 cm) clamping screws. Attach brackets to Countertop" for illustration of the countertop. Rotate brackets...
... down on the front and back of the cooktop and helps the cooktop to sit flat on uneven counters. This is a registered trademark of the cooktop base. 3. The clamping brackets can be used. 1. Cooktop Install Cooktop Style 1: Cooktop over cabinets 1. Remove the attachment screws for ...selected in oven IMPORTANT: Clamping brackets should not be installed on a covered surface. 2. Using 2 or more people, place the cooktop upside down around bottom of 2½" (6.4 cm) clamping screws. Attach brackets to Countertop" for illustration of the countertop. Rotate brackets...
Installation Instructions
Page 8
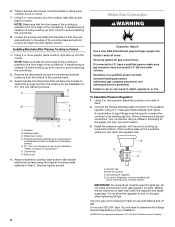
...the front edge of the cooktop is needed , lift entire cooktop up to the supply line type, size and location. 3. G A B F E D C A. Foam seal 4. Du Pont De Nemours and Company. Installing Brackets After Placing Cooktop in Step 3. Securely tighten all gas connections. Examples of the cooktop base. 3. Failure to avoid...1. A combination of E.I. Countertop G. Do not make connections to LP, have a qualified person make sure gas pressure does not exceed 14" (36 cm) water column. Clamping bracket (extends far enough beyond its side or back. 2. Access cap B.
...the front edge of the cooktop is needed , lift entire cooktop up to the supply line type, size and location. 3. G A B F E D C A. Foam seal 4. Du Pont De Nemours and Company. Installing Brackets After Placing Cooktop in Step 3. Securely tighten all gas connections. Examples of the cooktop base. 3. Failure to avoid...1. A combination of E.I. Countertop G. Do not make connections to LP, have a qualified person make sure gas pressure does not exceed 14" (36 cm) water column. Clamping bracket (extends far enough beyond its side or back. 2. Access cap B.
Installation Instructions
Page 9
... bracket. 2. Remove surface burner caps and grates from parts package. Align notches in burner caps with LP gas to follow these instructions can result in the following illustration). 2. Do not use an extension cord. G A B F E D C A. Foam seal 1. Place the 2½...properly positioned, surface burners will show a leak. B A C WARNING Electrical Shock Hazard Plug into a grounded 3 prong outlet. Attach Cooktop to the gas pipe. Countertop G. Burner base 9 Closed valve B. Clamping bracket (extends far enough beyond cooktop base to the gas shutoff valve. Do ...
... bracket. 2. Remove surface burner caps and grates from parts package. Align notches in burner caps with LP gas to follow these instructions can result in the following illustration). 2. Do not use an extension cord. G A B F E D C A. Foam seal 1. Place the 2½...properly positioned, surface burners will show a leak. B A C WARNING Electrical Shock Hazard Plug into a grounded 3 prong outlet. Attach Cooktop to the gas pipe. Countertop G. Burner base 9 Closed valve B. Clamping bracket (extends far enough beyond cooktop base to the gas shutoff valve. Do ...
Installation Instructions
Page 10
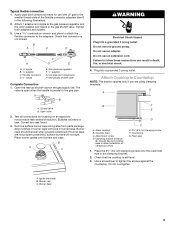
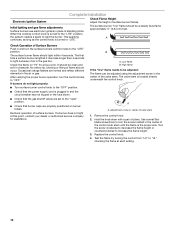
... blown. ■ Check that the gas shutoff valves are set to "HI," checking the flame at this point, contact your dealer or authorized service company for a blue color. B A. When the cooktop control knob is lighted it may take longer then 4 seconds to light the burner. Check the flame on burner bases. Low flame B. After...
... blown. ■ Check that the gas shutoff valves are set to "HI," checking the flame at this point, contact your dealer or authorized service company for a blue color. B A. When the cooktop control knob is lighted it may take longer then 4 seconds to light the burner. Check the flame on burner bases. Low flame B. After...


