

Use and Care Guide
Page 1
W_',whidpool.com or ww'w.whirlpool.com/cartada Table of Contents 2 4450568B MODELS RBS245 RBS275 RBS305 RBD245 RBD275 RBD305 RBD306 YRBS275 YRBS305 In Canada, for product-related questions call: 1-800-461-568t, for questions about features, operation, performance, parts, accessories or service, call : 1-800-807-6777. BUILT.INELECTRIC OVEN Use &Care Guide In the U.S.A, for parts, accessories, instal]ation and service call : 1-800-253-t30t. or visit our website at...
W_',whidpool.com or ww'w.whirlpool.com/cartada Table of Contents 2 4450568B MODELS RBS245 RBS275 RBS305 RBD245 RBD275 RBD305 RBD306 YRBS275 YRBS305 In Canada, for product-related questions call: 1-800-461-568t, for questions about features, operation, performance, parts, accessories or service, call : 1-800-807-6777. BUILT.INELECTRIC OVEN Use &Care Guide In the U.S.A, for parts, accessories, instal]ation and service call : 1-800-253-t30t. or visit our website at...

Use and Care Guide
Page 2
TABLEOFCONTENTS OVEN SAFETY 3 PARTS AND FEATURES 5 ELECTRONIC OVEN CONTROL 6 Display 6 Start/Enter 6 Upper Off, Lower Off or Off/Cancel 6 Clock 6 Tones 6 Fahrenheit and Celsius 7 Timer 7 Control Lock 7 Oven Temperature Control 7 OVEN USE 8 Aluminum Foil 8 PositioningRacks and Bakeware 8 Bakeware 8 Meat Thermometer 8 Oven Vent 9 Baking and Roasting 9 Broilingand Custom Broiling 9 Timed Cooking 10 OVEN CARE 11 Self-Cleaning Cycle 11 Cleaning 12 Oven Lights 13 Oven Door 13 TROUBLESHOOTING 14 ASSISTANCE OR SERVICE 15 In the U.S.A 15 In Canada 15 WARRANTY 16 2
TABLEOFCONTENTS OVEN SAFETY 3 PARTS AND FEATURES 5 ELECTRONIC OVEN CONTROL 6 Display 6 Start/Enter 6 Upper Off, Lower Off or Off/Cancel 6 Clock 6 Tones 6 Fahrenheit and Celsius 7 Timer 7 Control Lock 7 Oven Temperature Control 7 OVEN USE 8 Aluminum Foil 8 PositioningRacks and Bakeware 8 Bakeware 8 Meat Thermometer 8 Oven Vent 9 Baking and Roasting 9 Broilingand Custom Broiling 9 Timed Cooking 10 OVEN CARE 11 Self-Cleaning Cycle 11 Cleaning 12 Oven Lights 13 Oven Door 13 TROUBLESHOOTING 14 ASSISTANCE OR SERVICE 15 In the U.S.A 15 In Canada 15 WARRANTY 16 2

Use and Care Guide
Page 3
..., All safety messages will tell you what can be stored in this manual and on hot surfaces may be moved while oven is , tell you and others are oven vent openings and surfaces near these surfaces are very important. We have had sufficient time to a qualified technician. •...you what the potential hazard is hot, do not touch, or let clothing or other flammable materials contact heating elements or interior surfaces of oven doors. Moist or damp potholders on your appliance. Heating elements may result in color. If rack must be hot even though they have...
..., All safety messages will tell you what can be stored in this manual and on hot surfaces may be moved while oven is , tell you and others are oven vent openings and surfaces near these surfaces are very important. We have had sufficient time to a qualified technician. •...you what the potential hazard is hot, do not touch, or let clothing or other flammable materials contact heating elements or interior surfaces of oven doors. Moist or damp potholders on your appliance. Heating elements may result in color. If rack must be hot even though they have...

Use and Care Guide
Page 4
... benzene, formaldehyde, carbon monoxide, and toluene. 4 This appliance can cause low-level exposure to some of potential exposure to the State of the oven. • Clean Only Parts Listed in or around any kind shouldbe used in Manual. • Before Self-Cleaning the... Oven - WARNING: This product contains a chemical known to such substances. No commercial oven cleaner or oven liner protective coating of any part of California to rub, damage, or move the gasket. • Do ...
... benzene, formaldehyde, carbon monoxide, and toluene. 4 This appliance can cause low-level exposure to some of potential exposure to the State of the oven. • Clean Only Parts Listed in or around any kind shouldbe used in Manual. • Before Self-Cleaning the... Oven - WARNING: This product contains a chemical known to such substances. No commercial oven cleaner or oven liner protective coating of any part of California to rub, damage, or move the gasket. • Do ...

Use and Care Guide
Page 5
The locations and appearances of the items listed. Electronic Oven Control 2. Oven Door Window 6. J . Bake Element 5. Automatic Oven Light Switch 8. Model and Serial Number Plate (on right mounting rail) Parts and Features not shown Oven Lights Broiler Pan and Grid Oven Vent 3. The oven you have some or all of the features shown hers may have purchased may not match your model. PARTSANDFEATURES This manual covers different models. lllI 1. Oven Lock Latch 9. Lower Oven 7. Broil Element (not shown) 4.
The locations and appearances of the items listed. Electronic Oven Control 2. Oven Door Window 6. J . Bake Element 5. Automatic Oven Light Switch 8. Model and Serial Number Plate (on right mounting rail) Parts and Features not shown Oven Lights Broiler Pan and Grid Oven Vent 3. The oven you have some or all of the features shown hers may have purchased may not match your model. PARTSANDFEATURES This manual covers different models. lllI 1. Oven Lock Latch 9. Lower Oven 7. Broil Element (not shown) 4.

Use and Care Guide
Page 6
... has been entered Three tones • Invalid pad press Four tones • End-of-cycle • Reminder, repeating each minute after pressing a pad, the oven display will return to the time of the above tones are preset on, but can be turned off . 1. To reset the clock, press UPPER OFF...the appliance, everything on ". Repeat to change back to the display: Press CLOCK. The left cavity symbol represents the upper oven and the right cavity symbol represents the lower oven. Clock This is being set the time of day to "Snd on the display will be reset. Electronic Display When the...
... has been entered Three tones • Invalid pad press Four tones • End-of-cycle • Reminder, repeating each minute after pressing a pad, the oven display will return to the time of the above tones are preset on, but can be turned off . 1. To reset the clock, press UPPER OFF...the appliance, everything on ". Repeat to change back to the display: Press CLOCK. The left cavity symbol represents the upper oven and the right cavity symbol represents the lower oven. Clock This is being set the time of day to "Snd on the display will be reset. Electronic Display When the...

Use and Care Guide
Page 7
...on . Press the TEMP "up " or "down " arrow pad to Fahrenheit. Reminder tones do not press the Off/Cancel pads because the respective oven will be cooler by the displayed amount. Timed Cooking To Turn Tones Off/On: Press and hold START/ENTER until a tone sounds. To Change:... off . PressTIMER SET Press again to -21 °C) ...much more 25 ° to 35°F (15 ° to 21°C) ...much less To Adjust Oven Temperature Calibration: 1. Repeat to unlock and remove "LOC" from display. A tone will sound and "C °" will sound every minute. 4. When in Celsius, only ...
...on . Press the TEMP "up " or "down " arrow pad to Fahrenheit. Reminder tones do not press the Off/Cancel pads because the respective oven will be cooler by the displayed amount. Timed Cooking To Turn Tones Off/On: Press and hold START/ENTER until a tone sounds. To Change:... off . PressTIMER SET Press again to -21 °C) ...much more 25 ° to 35°F (15 ° to 21°C) ...much less To Adjust Oven Temperature Calibration: 1. Repeat to unlock and remove "LOC" from display. A tone will sound and "C °" will sound every minute. 4. When in Celsius, only ...

Use and Care Guide
Page 8
...RESULTS RECOMMENDATIONS Light colored aluminum • Light golden crusts • Even browning • Use temperature and time recommended in center of oven. Meat Thermometer On models withouta temperature probe, always rely on each rack. Ovenproof glassware, ceramic glass or ceramic • Brown,... sheets or baking pans • Little or no bottom browning • Place in . (5 cm) of space around bakeware and oven walls. Positioning Racks andBakeware IMPORTANT: Never place food or bakeware directly on them. Use the following illustration and chart as a guide....
...RESULTS RECOMMENDATIONS Light colored aluminum • Light golden crusts • Even browning • Use temperature and time recommended in center of oven. Meat Thermometer On models withouta temperature probe, always rely on each rack. Ovenproof glassware, ceramic glass or ceramic • Brown,... sheets or baking pans • Little or no bottom browning • Place in . (5 cm) of space around bakeware and oven walls. Positioning Racks andBakeware IMPORTANT: Never place food or bakeware directly on them. Use the following illustration and chart as a guide....

Use and Care Guide
Page 9
...5gOlF (77°C and 260°C). 1. Broil element 2. Bake element ACCUBAKE® Temperature Management System The ACCUBAKE system electronically regulates the oven heat levels dudng preheat and bake to maintain a precise temperature range for easier cleaning. • Trim excess fat to drain juices and ...the rack according to the "Positioning Racks and Bakeware" section. Press UPPER OFE LOWER OFF or OFF/CANCEL when finished cooking. 9 Upperoven Oven vent 3. Press UPPER OFF, LOWER OFF or OFF/CANCEL when finished cooking. Broiling and CustomBroiling 2 I. The bake and broil elements ...
...5gOlF (77°C and 260°C). 1. Broil element 2. Bake element ACCUBAKE® Temperature Management System The ACCUBAKE system electronically regulates the oven heat levels dudng preheat and bake to maintain a precise temperature range for easier cleaning. • Trim excess fat to drain juices and ...the rack according to the "Positioning Racks and Bakeware" section. Press UPPER OFE LOWER OFF or OFF/CANCEL when finished cooking. 9 Upperoven Oven vent 3. Press UPPER OFF, LOWER OFF or OFF/CANCEL when finished cooking. Broiling and CustomBroiling 2 I. The bake and broil elements ...

Use and Care Guide
Page 10
...CHART For best results, place food 3 in food poisoning or sickness. Times are guidelines only and may not bake properly. Timed Cooking allows the oven to be set to clear the display and/or stop time will sound every minute. 6. To Set a Cook Time and Stop Time [Delay...* Place up " or "down " arrow pads to clear the display and/or stop time is turned off automatically.Delay start time is reached, the oven will shut off automatically and "End" will automatically turn on at lower broiling temperatures. 1. The set length of day, cook for individualfoods and tastes. Press...
...CHART For best results, place food 3 in food poisoning or sickness. Times are guidelines only and may not bake properly. Timed Cooking allows the oven to be set to clear the display and/or stop time will sound every minute. 6. To Set a Cook Time and Stop Time [Delay...* Place up " or "down " arrow pads to clear the display and/or stop time is turned off automatically.Delay start time is reached, the oven will shut off automatically and "End" will automatically turn on at lower broiling temperatures. 1. The set length of day, cook for individualfoods and tastes. Press...

Use and Care Guide
Page 11
... birds to another closed completely or it is heavily soiled. Hand clean inside door edge and the 1V2in. (3.8 cm) area around the inside oven cavity frame, being careful not to heavy soil. This area does not get rid of heat, odors, and smoke. How the Cycle Works IMPORTANT..."Positioning Racks and Bakeware". enter slots on . The clean time can result in discoloring, loss of gloss, hairlinecracks and popping sounds. On double oven models, press UPPER OVEN or LOWER OVEN. 2. The clean time can be set a clean time other than 3 hour 30 minutes. Press the HR and MIN "up " or ...
... birds to another closed completely or it is heavily soiled. Hand clean inside door edge and the 1V2in. (3.8 cm) area around the inside oven cavity frame, being careful not to heavy soil. This area does not get rid of heat, odors, and smoke. How the Cycle Works IMPORTANT..."Positioning Racks and Bakeware". enter slots on . The clean time can result in discoloring, loss of gloss, hairlinecracks and popping sounds. On double oven models, press UPPER OVEN or LOWER OVEN. 2. The clean time can be set a clean time other than 3 hour 30 minutes. Press the HR and MIN "up " or ...

Use and Care Guide
Page 12
... soft cloth or sponge: Apply glass cleaner to slide. At high temperatures, foods react with scouring or steel wool pad. • Oven cleaner: Follow product label instructions. Steel wool pad m m BROILER PANAND GRID Do not clean in direction of vegetable oil applied to the... Polishing Creme, steel-wool pads, gritty wash cloths or some paper towels. Always follow label instructionson cleaning products. Food spills should be cleaned when oven cools. After cleaning, a light coating of grain to avoid damaging. • Stainless Steel Cleaner & Polish (not included): See "Assistance or ...
... soft cloth or sponge: Apply glass cleaner to slide. At high temperatures, foods react with scouring or steel wool pad. • Oven cleaner: Follow product label instructions. Steel wool pad m m BROILER PANAND GRID Do not clean in direction of vegetable oil applied to the... Polishing Creme, steel-wool pads, gritty wash cloths or some paper towels. Always follow label instructionson cleaning products. Food spills should be cleaned when oven cools. After cleaning, a light coating of grain to avoid damaging. • Stainless Steel Cleaner & Polish (not included): See "Assistance or ...

Use and Care Guide
Page 13
...to ensure hinge arms are fully engaged, 2. Make sure door removal pins have been misplaced. Insert small end of door removal pins, included with the oven, into slots in frame. They will shut. Turn the glass bulb cover in at lower corner to turn them for normal use . 3. Before removing... or replacing, make sure the oven is no need to help is cool. Open the door completely and remove the door removal pins. Two %2in. (4 mm) allenwrenches or two nailsof similar...
...to ensure hinge arms are fully engaged, 2. Make sure door removal pins have been misplaced. Insert small end of door removal pins, included with the oven, into slots in frame. They will shut. Turn the glass bulb cover in at lower corner to turn them for normal use . 3. Before removing... or replacing, make sure the oven is no need to help is cool. Open the door completely and remove the door removal pins. Two %2in. (4 mm) allenwrenches or two nailsof similar...

Use and Care Guide
Page 14
... circuit breaker been tripped? See "Self-Cleaning Cycle" section. • On some models, is self-cleaning, the other oven cannot be set or turned on the bottom? Replace the fuse or reset the circuit. • Is the appliance wired propedy?. When one...the display.See "Display(s)"section. If it reappears, call . a Has the function been entered? See "Electronic Oven Control" section. Choose UPPER OVEN or LOWER OVEN first. See "oven Temperature Control" section. • Was the oven preheated? See "Clock" section. See "Timed Cooking" section. a Has a delay start Self-Clean cycle ...
... circuit breaker been tripped? See "Self-Cleaning Cycle" section. • On some models, is self-cleaning, the other oven cannot be set or turned on the bottom? Replace the fuse or reset the circuit. • Is the appliance wired propedy?. When one...the display.See "Display(s)"section. If it reappears, call . a Has the function been entered? See "Electronic Oven Control" section. Choose UPPER OVEN or LOWER OVEN first. See "oven Temperature Control" section. • Was the oven preheated? See "Clock" section. See "Timed Cooking" section. a Has a delay start Self-Clean cycle ...

Use and Care Guide
Page 16
...Contents: Pages [] Product dimensions [] Cutout dimensions [] Before you start [] Electrical requirements [] [] Installation steps If you need : [] The built-in oven model number. [] The built-in the Yellow Pages of an authorized service company. When you call the dealer from whom you will need assistance: Check... your phone directory under "Appliances -- Call when you: [] Have questions about built-in oven installation or operation. [] Need to obtain the name and number of your Use and Care Guide for a toll-free number to call or...
...Contents: Pages [] Product dimensions [] Cutout dimensions [] Before you start [] Electrical requirements [] [] Installation steps If you need : [] The built-in oven model number. [] The built-in the Yellow Pages of an authorized service company. When you call the dealer from whom you will need assistance: Check... your phone directory under "Appliances -- Call when you: [] Have questions about built-in oven installation or operation. [] Need to obtain the name and number of your Use and Care Guide for a toll-free number to call or...

Use and Care Guide
Page 17
.... Drill a 1-inch minimum diameter hole in the upper or lower right or left rear corner of cutout to floor Double oven T 27-3/4" min. Oven support surface MUST be solid, level and flush with National Electrical Code, ANSI/NFPA 70 -- Copies of cabinet cutout. overall...from : * National Fire Protection Association Batterymarch Park Quincy, Massachusetts 02269 Tool needed: Z screwdriver Parts supplied: 4 screws (double oven) Note: If installing a single oven, you will need only two screws and two door removal pins. overall height 49-1/2" recessed height 51" max. Proper installation ...
.... Drill a 1-inch minimum diameter hole in the upper or lower right or left rear corner of cutout to floor Double oven T 27-3/4" min. Oven support surface MUST be solid, level and flush with National Electrical Code, ANSI/NFPA 70 -- Copies of cabinet cutout. overall...from : * National Fire Protection Association Batterymarch Park Quincy, Massachusetts 02269 Tool needed: Z screwdriver Parts supplied: 4 screws (double oven) Note: If installing a single oven, you will need only two screws and two door removal pins. overall height 49-1/2" recessed height 51" max. Proper installation ...
Use and Care Guide
Page 18
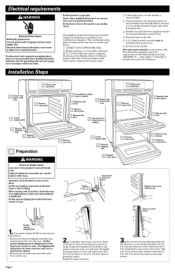
...position. • Remove and discard shipping materials, tape and protective film from appliance should be provided at the front lower corners of oven. Oframretao lsift poven oven. Remove side trim, cabinet. Rsheimppoivneg feet. Important: Use both sides of the line. [] A U.L.-listed conduit connector must be... Code, ANSI/NFPA 70 -- If codes permit and a separate grounding wire is used, it will protect the lower oven trim until oven is located on the oven door or on the oven frame.) [] CONNECT WITH COPPERWIRE ONLY. [] Models rated from 7.3 to 9.6 kW at 240 volts (5.5 to junction ...
...position. • Remove and discard shipping materials, tape and protective film from appliance should be provided at the front lower corners of oven. Oframretao lsift poven oven. Remove side trim, cabinet. Rsheimppoivneg feet. Important: Use both sides of the line. [] A U.L.-listed conduit connector must be... Code, ANSI/NFPA 70 -- If codes permit and a separate grounding wire is used, it will protect the lower oven trim until oven is located on the oven door or on the oven frame.) [] CONNECT WITH COPPERWIRE ONLY. [] Models rated from 7.3 to 9.6 kW at 240 volts (5.5 to junction ...

Use and Care Guide
Page 19
... screws to attach each hinge so that door closes and opens completely. "PF" should appear in the display. After 2 minutes, partially open oven door. "BROIL" will appear in the display, contact your installation. 1. Push behind each trim to check that hinges are pushed into cabinet...eo°,,erot,o. 0 • Turn on connectors. 6. Press the "BROIL" pad. Press the "START" pad. Press the "Upper Oven" pad. Make sure the oven door is closed and the "ON" light is manufactured with white (neutral) power supply wire and a cabinet-connected bare grounding wire twisted ...
... screws to attach each hinge so that door closes and opens completely. "PF" should appear in the display. After 2 minutes, partially open oven door. "BROIL" will appear in the display, contact your installation. 1. Push behind each trim to check that hinges are pushed into cabinet...eo°,,erot,o. 0 • Turn on connectors. 6. Press the "BROIL" pad. Press the "START" pad. Press the "Upper Oven" pad. Make sure the oven door is closed and the "ON" light is manufactured with white (neutral) power supply wire and a cabinet-connected bare grounding wire twisted ...

Use and Care Guide
Page 20
...." To obtain the name and number of your phone directory under "Appliances -- Household -Major -- If oven does not operate: [] Check that circuit breaker is listed in your built-in oven by calling an authorized service company. Major -- or [] Look in the Yellow Pages of an authorized service... Assistance Center. Part No. 4450409 Rev. Household -- If you will need assistance: If you have questions about operating, cleaning or maintaining your oven: [] Refer to Use and Care Guide. [] Call the Consumer Assistance Center: Check your Use and Care Guide for a toll-free number ...
...." To obtain the name and number of your phone directory under "Appliances -- Household -Major -- If oven does not operate: [] Check that circuit breaker is listed in your built-in oven by calling an authorized service company. Major -- or [] Look in the Yellow Pages of an authorized service... Assistance Center. Part No. 4450409 Rev. Household -- If you will need assistance: If you have questions about operating, cleaning or maintaining your oven: [] Refer to Use and Care Guide. [] Call the Consumer Assistance Center: Check your Use and Care Guide for a toll-free number ...


