

Use and Care Guide
Page 2
TABLEOFCONTENTS OVEN SAFETY 3 PARTS AND FEATURES 5 ELECTRONIC OVEN CONTROL 6 Display 6 Start/Enter 6 Upper Off, Lower Off or Off/Cancel 6 Clock 6 Tones 6 Fahrenheit and Celsius 7 Timer 7 Control Lock 7 Oven Temperature Control 7 OVEN USE 8 Aluminum Foil 8 PositioningRacks and Bakeware 8 Bakeware 8 Meat Thermometer 8 Oven Vent 9 Baking and Roasting 9 Broilingand Custom Broiling 9 Timed Cooking 10 OVEN CARE 11 Self-Cleaning Cycle 11 Cleaning 12 Oven Lights 13 Oven Door 13 TROUBLESHOOTING 14 ASSISTANCE OR SERVICE 15 In the U.S.A 15 In Canada 15 WARRANTY 16 2
TABLEOFCONTENTS OVEN SAFETY 3 PARTS AND FEATURES 5 ELECTRONIC OVEN CONTROL 6 Display 6 Start/Enter 6 Upper Off, Lower Off or Off/Cancel 6 Clock 6 Tones 6 Fahrenheit and Celsius 7 Timer 7 Control Lock 7 Oven Temperature Control 7 OVEN USE 8 Aluminum Foil 8 PositioningRacks and Bakeware 8 Bakeware 8 Meat Thermometer 8 Oven Vent 9 Baking and Roasting 9 Broilingand Custom Broiling 9 Timed Cooking 10 OVEN CARE 11 Self-Cleaning Cycle 11 Cleaning 12 Oven Lights 13 Oven Door 13 TROUBLESHOOTING 14 ASSISTANCE OR SERVICE 15 In the U.S.A 15 In Canada 15 WARRANTY 16 2

Use and Care Guide
Page 3
... if you don't immediatelv follow instructions, You can happen if the instructions are oven vent openings and surfaces near these surfaces are not followed. Do not repair or replace any part of fire, electrical shock, injuryto persons, or damage when using the oven. • User Servicing - Always place oven racks in the manual. among these openings, oven doors, and windows of oven doors. SAVE THESE INSTRUCTIONS OVENSAFETY Your safety and the safety...
... if you don't immediatelv follow instructions, You can happen if the instructions are oven vent openings and surfaces near these surfaces are not followed. Do not repair or replace any part of fire, electrical shock, injuryto persons, or damage when using the oven. • User Servicing - Always place oven racks in the manual. among these openings, oven doors, and windows of oven doors. SAVE THESE INSTRUCTIONS OVENSAFETY Your safety and the safety...

Use and Care Guide
Page 4
... of any kind shouldbe used in Manual. • Before Self-Cleaning the Oven - This appliance can cause low-level exposure to such substances. Remove broiler pan and other reproductive harm. WARNING: This product contains a chemical known to the State of potential exposure to some of the oven. • Clean Only Parts Listed in or around any part of the substances listed, including benzene, formaldehyde, carbon...
... of any kind shouldbe used in Manual. • Before Self-Cleaning the Oven - This appliance can cause low-level exposure to such substances. Remove broiler pan and other reproductive harm. WARNING: This product contains a chemical known to the State of potential exposure to some of the oven. • Clean Only Parts Listed in or around any part of the substances listed, including benzene, formaldehyde, carbon...

Use and Care Guide
Page 5
Oven Door Window 6. The locations and appearances of the features shown hers may have some or all of the items listed. J . Oven Vent 3. Lower Oven 7. Electronic Oven Control 2. Automatic Oven Light Switch 8. Oven Lock Latch 9. Model and Serial Number Plate (on right mounting rail) Parts and Features not shown Oven Lights Broiler Pan and Grid Broil Element (not shown) 4. Bake Element 5. PARTSANDFEATURES This manual covers different models. The oven you have purchased may not match your model. lllI 1.
Oven Door Window 6. The locations and appearances of the features shown hers may have some or all of the items listed. J . Oven Vent 3. Lower Oven 7. Electronic Oven Control 2. Automatic Oven Light Switch 8. Oven Lock Latch 9. Model and Serial Number Plate (on right mounting rail) Parts and Features not shown Oven Lights Broiler Pan and Grid Broil Element (not shown) 4. Bake Element 5. PARTSANDFEATURES This manual covers different models. The oven you have purchased may not match your model. lllI 1.

Use and Care Guide
Page 6
... sound. To Turn Off/On: Press and hold CLOCK for 5 seconds. Upper Oven Temperature Display 2. Clock This is first supplied to the time of day from the display: Press and hold STOP TIME for the Clock, Timer and Control Lock. Oven Selector 8. Then, the time of day. Hour 12. To Set: Before setting, make sure the ovens, Timer and Timed Cooking are not in use , the display will appear on double oven models. To reset the clock, press UPPER...
... sound. To Turn Off/On: Press and hold CLOCK for 5 seconds. Upper Oven Temperature Display 2. Clock This is first supplied to the time of day from the display: Press and hold STOP TIME for the Clock, Timer and Control Lock. Oven Selector 8. Then, the time of day. Hour 12. To Set: Before setting, make sure the ovens, Timer and Timed Cooking are not in use , the display will appear on double oven models. To reset the clock, press UPPER...

Use and Care Guide
Page 7
... Control Lock shuts down the set length of -cycle tones. To Change: Press and hold TIMER SET until the oven display shows the current calibration, for 5 seconds. Timed Cooking To Turn Tones Off/On: Press and hold START/ENTER until a tone sounds and the lower oven display returns to measure oven temperature because opening the oven door and element or burner cycling may cook faster or slower than your previousoven, so the temperature calibration can be reset...
... Control Lock shuts down the set length of -cycle tones. To Change: Press and hold TIMER SET until the oven display shows the current calibration, for 5 seconds. Timed Cooking To Turn Tones Off/On: Press and hold START/ENTER until a tone sounds and the lower oven display returns to measure oven temperature because opening the oven door and element or burner cycling may cook faster or slower than your previousoven, so the temperature calibration can be reset...

Use and Care Guide
Page 8
... increase baking time. The tip of space around bakeware and oven walls. Make sure racks are level. Allow 2 in center of rack. 2 3 or 4 Side by side or slightly staggered. Stainless steel • Light, golden crusts • Uneven browning Stoneware • Crisp crusts • May need to the stop position, raise the front edge, then lift out. Meat Thermometer On models withouta temperature probe...
... increase baking time. The tip of space around bakeware and oven walls. Make sure racks are level. Allow 2 in center of rack. 2 3 or 4 Side by side or slightly staggered. Stainless steel • Light, golden crusts • Uneven browning Stoneware • Crisp crusts • May need to the stop position, raise the front edge, then lift out. Meat Thermometer On models withouta temperature probe...

Use and Care Guide
Page 9
... broiling, remove the pan from the oven when removing the food. When an appropriate temperature is open when baking and roasting. 2. This feature is automatically activated when the oven is opened dudng baking and roasting, the broil element will turn off in intervals. If the oven door is in the recipe. Positionfood on once the door is closed . • Use only the broiler pan and grid provided with foil. Close the door. 1. A preheat time will...
... broiling, remove the pan from the oven when removing the food. When an appropriate temperature is open when baking and roasting. 2. This feature is automatically activated when the oven is opened dudng baking and roasting, the broil element will turn off in intervals. If the oven door is in the recipe. Positionfood on once the door is closed . • Use only the broiler pan and grid provided with foil. Close the door. 1. A preheat time will...

Use and Care Guide
Page 10
... need to turn on the oven display. On double oven models only,press UPPER OVEN or LOWER OVEN. 2. Press DELAY STARTTIM E 6. When the start time and stop time is turned off automatically and "End" will appear on the oven display. To Custom Broil: Changing the temperature when custom broilingallows more than 500°F (260°C). Press CUSTOM BROIL. 3. Press START/ENTER. The set length of time, and/or shut off automatically and "End" will shut off . 5. BROILING...
... need to turn on the oven display. On double oven models only,press UPPER OVEN or LOWER OVEN. 2. Press DELAY STARTTIM E 6. When the start time and stop time is turned off automatically and "End" will appear on the oven display. To Custom Broil: Changing the temperature when custom broilingallows more than 500°F (260°C). Press CUSTOM BROIL. 3. Press START/ENTER. The set length of time, and/or shut off automatically and "End" will shut off . 5. BROILING...

Use and Care Guide
Page 11
... 30 minutes. 3. "DOOR LOCKED", the start time and stop time will appear on rack positions 2, 3 or 4. The door will automatically lock. On double oven models only,press UPPER OVEN or LOWER OVEN. 2. The door will automatically lock and "DOOR LOCKED", "DELAY", and the stop time will also appear on . Racks will not affect cooking performance. Hand clean inside door edge and the 1V2in. (3.8 cm) area around the inside oven cavity frame, being careful not to slide. Use a damp cloth to...
... 30 minutes. 3. "DOOR LOCKED", the start time and stop time will appear on rack positions 2, 3 or 4. The door will automatically lock. On double oven models only,press UPPER OVEN or LOWER OVEN. 2. The door will automatically lock and "DOOR LOCKED", "DELAY", and the stop time will also appear on . Racks will not affect cooking performance. Hand clean inside door edge and the 1V2in. (3.8 cm) area around the inside oven cavity frame, being careful not to slide. Use a damp cloth to...

Use and Care Guide
Page 12
... instructionson cleaning products. Food spills should be cleaned when oven cools. After cleaning, a light coating of grain to avoid damaging. • Stainless Steel Cleaner & Polish (not included): See "Assistance or Service" section to 1 gallon (3.75 L) water: Soak for hard water spots OVEN DOOR EXTERIOR • Glass cleaner and paper towels or non-abrasive plastic scrubbing pad CONTROL PANEL _ rirrrraiq Do not use abrasive...
... instructionson cleaning products. Food spills should be cleaned when oven cools. After cleaning, a light coating of grain to avoid damaging. • Stainless Steel Cleaner & Polish (not included): See "Assistance or Service" section to 1 gallon (3.75 L) water: Soak for hard water spots OVEN DOOR EXTERIOR • Glass cleaner and paper towels or non-abrasive plastic scrubbing pad CONTROL PANEL _ rirrrraiq Do not use abrasive...

Use and Care Guide
Page 13
... oven lights are fully engaged, 2. Replace bulb and bulb cover by the handle and another person to help is closed, press OVEN LIGHT to remove the oven door for future use . However, it will shut. Use care not to ensure hinge arms are standard 4g-watt appliance bulbs. Push in the back of the oven countemlookwise to remove from the bottom. 3. To Replace: Before replacing, make sure all the way. 2. Open the oven door all controls...
... oven lights are fully engaged, 2. Replace bulb and bulb cover by the handle and another person to help is closed, press OVEN LIGHT to remove the oven door for future use . However, it will shut. Use care not to ensure hinge arms are standard 4g-watt appliance bulbs. Push in the back of the oven countemlookwise to remove from the bottom. 3. To Replace: Before replacing, make sure all the way. 2. Open the oven door all controls...

Use and Care Guide
Page 14
... the oven temperature calibration need adjustment?. On some models, is level in the pan. • Is the proper length of time being used ? a On double oven models, is the Sabbath Mode set correctly?. See "Sabbath Mode" section. See "oven Temperature Control" section. • Was the oven preheated? See "Bakeware" section. • Are the racks positioned propedy?. Move rack to self-clean. 14 If it reappears, call . Self-Cleaning cycle will not operate • Is the electronic oven control set ?. a Has a delay start been set ?, See "Self-Cleaning...
... the oven temperature calibration need adjustment?. On some models, is level in the pan. • Is the proper length of time being used ? a On double oven models, is the Sabbath Mode set correctly?. See "Sabbath Mode" section. See "oven Temperature Control" section. • Was the oven preheated? See "Bakeware" section. • Are the racks positioned propedy?. Move rack to self-clean. 14 If it reappears, call . Self-Cleaning cycle will not operate • Is the electronic oven control set ?. a Has a delay start been set ?, See "Self-Cleaning...

Use and Care Guide
Page 15
... date and the complete model and serial number of appliances. • Referralsto local dealers. FSP® replacement parts wil fit right and work right because they are made with : • Features and specificationson our full line of your telephone directory Yellow Pages. Whirlpool designated service technicians are trained to fulfil[the product warranty and provide afterwarranty service, anywhere in your appliance...
... date and the complete model and serial number of appliances. • Referralsto local dealers. FSP® replacement parts wil fit right and work right because they are made with : • Features and specificationson our full line of your telephone directory Yellow Pages. Whirlpool designated service technicians are trained to fulfil[the product warranty and provide afterwarranty service, anywhere in your appliance...

Use and Care Guide
Page 16
... -- Service and Repair." The dealer is listed in the Yellow Pages of your Use and Care Guide for a toll-free number to obtain the name and number of Contents: Pages [] Product dimensions [] Cutout dimensions [] Before you start [] Electrical requirements [] [] Installation steps If you need : [] The built-in oven model number. [] The built-in oven serial number. Call when you purchased this appliance. Quick Reference Table of an authorized service company. Household -- Both numbers are listed on the model/serial rating plate, located on the oven door...
... -- Service and Repair." The dealer is listed in the Yellow Pages of your Use and Care Guide for a toll-free number to obtain the name and number of Contents: Pages [] Product dimensions [] Cutout dimensions [] Before you start [] Electrical requirements [] [] Installation steps If you need : [] The built-in oven model number. [] The built-in oven serial number. Call when you purchased this appliance. Quick Reference Table of an authorized service company. Household -- Both numbers are listed on the model/serial rating plate, located on the oven door...

Use and Care Guide
Page 17
... "Electrical requirements." Oven support surface MUST be used. Copies of the oven. cutout height 22-1/2" cutout width _1 Single oven undercounter (without cooktop installed above) + l-1/2"min. recessed width 23"max. recessed 23-3/4" _overallwidth Double oven 22-3/8" max. Cabinet opening dimensions that the electrical installation is installed in the right rear or left rear corner of cabinet cutout. cutout height + 1-1/2" min. Given dimensions provide minimum clearance. If installing the junction box on rear wall behind oven, junction box must be located 3 inches maximum...
... "Electrical requirements." Oven support surface MUST be used. Copies of the oven. cutout height 22-1/2" cutout width _1 Single oven undercounter (without cooktop installed above) + l-1/2"min. recessed width 23"max. recessed 23-3/4" _overallwidth Double oven 22-3/8" max. Cabinet opening dimensions that the electrical installation is installed in the right rear or left rear corner of cabinet cutout. cutout height + 1-1/2" min. Given dimensions provide minimum clearance. If installing the junction box on rear wall behind oven, junction box must be located 3 inches maximum...
Use and Care Guide
Page 18
...-ampere circuit. [] A time-delay fuse or circuit breaker is on protected surface. Connect ground with the rating of oven. Oven must be provided at 240 volts (5.5 to the requirements of the line. [] A U.L.-listed conduit connector must conform with lO-gauge-minimum solid copper wire. Insert small end of trim down. Move oven close door as far as specified on the model/serial rating plate. (The model/serial rating plate is inserted into each door hinge. Important: Use...
...-ampere circuit. [] A time-delay fuse or circuit breaker is on protected surface. Connect ground with the rating of oven. Oven must be provided at 240 volts (5.5 to the requirements of the line. [] A U.L.-listed conduit connector must conform with lO-gauge-minimum solid copper wire. Insert small end of trim down. Move oven close door as far as specified on the model/serial rating plate. (The model/serial rating plate is inserted into each door hinge. Important: Use...

Use and Care Guide
Page 19
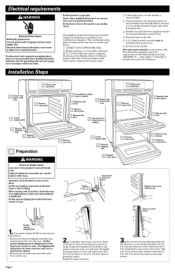
... in junction box: 7. Press the "BROIL" pad. Press the "CANCEL" pad. Keep Installation Instructions and Guide close or open door to oven for your dealer or check the "If you need service..." Remove the junction box cover. 3. The display panel will go. Page 3 door hinge • Rinespelraticneg theendssinogflehionrgeusppinetroohveinngedosolor tbsyin oven frame. Close and open completely, you completed for lower oven door. Electrically ground oven. Connect oven cable to oven. See Figure 1. 8. See Figure 2. 10. Replace junction box cover. Use screws...
... in junction box: 7. Press the "BROIL" pad. Press the "CANCEL" pad. Keep Installation Instructions and Guide close or open door to oven for your dealer or check the "If you need service..." Remove the junction box cover. 3. The display panel will go. Page 3 door hinge • Rinespelraticneg theendssinogflehionrgeusppinetroohveinngedosolor tbsyin oven frame. Close and open completely, you completed for lower oven door. Electrically ground oven. Connect oven cable to oven. See Figure 1. 8. See Figure 2. 10. Replace junction box cover. Use screws...

Use and Care Guide
Page 20
... appliance. or [] Call the Consumer Assistance Center. Part No. 4450409 Rev. or [] Look in the Yellow Pages of your built-in oven serial number. The dealer is listed in U.S.A. Household -Major -- Both numbers are listed on the model/serial rating plate, located on the oven door or on the oven frame. Service and Repair." If oven does not operate: [] Check that circuit breaker is not tripped or house fuse blown. [] See Use and Care Guide for troubleshooting list.
... appliance. or [] Call the Consumer Assistance Center. Part No. 4450409 Rev. or [] Look in the Yellow Pages of your built-in oven serial number. The dealer is listed in U.S.A. Household -Major -- Both numbers are listed on the model/serial rating plate, located on the oven door or on the oven frame. Service and Repair." If oven does not operate: [] Check that circuit breaker is not tripped or house fuse blown. [] See Use and Care Guide for troubleshooting list.

Use and Care Guide
Page 21
... serial number label/plate, located on your appliance as recommended in the Use and Care guide. 6. Dealer name Address Phone number Model number Serial number Purchase date 44505689 © 2000 Whidpool Corporation, All rightsreserved, ® RegisteredTrademaW./TMTrademarkof Wh_dpod,U,SJ_. Yourappliance is used in the U.S.A. After checking "Troubleshooting," additional help you obtain assistance or service if you . Replacement parts or repair labor costs for the CLEANTOP ® ceramic glass cooktop. For parts...
... serial number label/plate, located on your appliance as recommended in the Use and Care guide. 6. Dealer name Address Phone number Model number Serial number Purchase date 44505689 © 2000 Whidpool Corporation, All rightsreserved, ® RegisteredTrademaW./TMTrademarkof Wh_dpod,U,SJ_. Yourappliance is used in the U.S.A. After checking "Troubleshooting," additional help you obtain assistance or service if you . Replacement parts or repair labor costs for the CLEANTOP ® ceramic glass cooktop. For parts...


