Owners Manual
Page 1
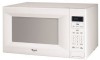
or visit our website at... www.whirlpool.com Table of Contents 2 W10217293A Model MT4155 ® MICROWAVE OVEN Use & Care Guide For questions about features, operation/performance, parts, accessories or service, call: 1-800-253-1301.
or visit our website at... www.whirlpool.com Table of Contents 2 W10217293A Model MT4155 ® MICROWAVE OVEN Use & Care Guide For questions about features, operation/performance, parts, accessories or service, call: 1-800-253-1301.

Owners Manual
Page 2
... 7 Clock 7 Tones 7 Timer 7 Control Lock 7 Demo Mode 7 Options 7 MICROWAVE OVEN USE 8 Food Characteristics 8 Cooking Guidelines 8 Cookware and Dinnerware 8 Aluminum Foil and Metal 9 Microwave Cooking Power 9 Manual Cooking 9 Cooking in Stages 10 Sensor Cooking 10 Sensor Popcorn 10 Sensor Cook 11 Sensor Reheat 11 Auto Defrost 12 Warm Hold 12 MICROWAVE OVEN CARE 13 General Cleaning 13 TROUBLESHOOTING 14 ASSISTANCE...
... 7 Clock 7 Tones 7 Timer 7 Control Lock 7 Demo Mode 7 Options 7 MICROWAVE OVEN USE 8 Food Characteristics 8 Cooking Guidelines 8 Cookware and Dinnerware 8 Aluminum Foil and Metal 9 Microwave Cooking Power 9 Manual Cooking 9 Cooking in Stages 10 Sensor Cooking 10 Sensor Popcorn 10 Sensor Cook 11 Sensor Reheat 11 Auto Defrost 12 Warm Hold 12 MICROWAVE OVEN CARE 13 General Cleaning 13 TROUBLESHOOTING 14 ASSISTANCE...
Owners Manual
Page 3
... See "GROUNDING INSTRUCTIONS" found in this section and in the provided Installation Instructions. ■ Install or locate the microwave oven only in the microwave oven as described in this manual. It is not designed for examination, repair, or adjustment. ■ See door surface.... These words mean: DANGER You can be heated in the microwave oven. ■ Use the microwave oven only for storage purposes. IMPORTANT SAFETY INSTRUCTIONS When using the microwave oven. ■ Read and follow instructions. MICROWAVE OVEN SAFETY Your safety and the safety of others . Stir the ...
... See "GROUNDING INSTRUCTIONS" found in this section and in the provided Installation Instructions. ■ Install or locate the microwave oven only in the microwave oven as described in this manual. It is not designed for examination, repair, or adjustment. ■ See door surface.... These words mean: DANGER You can be heated in the microwave oven. ■ Use the microwave oven only for storage purposes. IMPORTANT SAFETY INSTRUCTIONS When using the microwave oven. ■ Read and follow instructions. MICROWAVE OVEN SAFETY Your safety and the safety of others . Stir the ...
Owners Manual
Page 4
...or cooking appliance beneath the microwave oven. ■ Do not mount microwave oven over a sink. ■ Do not cover racks or any other than manufacturer's recommended accessories, in this microwave oven outdoors. Do not use . ■ Do not store anything directly on top of the microwave oven with metal foil. for ...; Do not store any materials, other part of the microwave oven when the microwave oven is important not to defeat or tamper with Part 18 of the microwave oven. ■ Do not cover or block any object between the oven front face and the door or allow soil or cleaner...
...or cooking appliance beneath the microwave oven. ■ Do not mount microwave oven over a sink. ■ Do not cover racks or any other than manufacturer's recommended accessories, in this microwave oven outdoors. Do not use . ■ Do not store anything directly on top of the microwave oven with metal foil. for ...; Do not store any materials, other part of the microwave oven when the microwave oven is important not to defeat or tamper with Part 18 of the microwave oven. ■ Do not cover or block any object between the oven front face and the door or allow soil or cleaner...

Owners Manual
Page 5
... Plug into an outlet that is properly installed and grounded. Failure to whether the microwave oven is any packing materials. 2. The microwave oven is over 35 lbs (15.9 kg). ■ Place the microwave oven on the interior or exterior of space at a temperature above 50°F (10... instructions are in the "Assistance or Service" section. ■ Do not block the exhaust vents or air intake openings. Empty the microwave oven of the microwave oven is equipped with a cord having a grounding wire with a grounding plug. If there is properly grounded. Recommended: ■ A time...
... Plug into an outlet that is properly installed and grounded. Failure to whether the microwave oven is any packing materials. 2. The microwave oven is over 35 lbs (15.9 kg). ■ Place the microwave oven on the interior or exterior of space at a temperature above 50°F (10... instructions are in the "Assistance or Service" section. ■ Do not block the exhaust vents or air intake openings. Empty the microwave oven of the microwave oven is equipped with a cord having a grounding wire with a grounding plug. If there is properly grounded. Recommended: ■ A time...
Owners Manual
Page 6
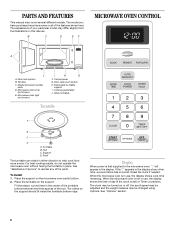
... fit inside the turntable bottom ridge. Fit the raised, curved lines in this manual. B C D E F MICROWAVE OVEN CONTROL A J A. Turntable B. Reset the clock if needed. Microwave oven light (not shown) I . Hub C. Shaft The turntable can rotate in place. The rollers on the microwave oven cavity bottom. 2. See "Options" section. 6 Control panel G. For best cooking results, do not operate...
... fit inside the turntable bottom ridge. Fit the raised, curved lines in this manual. B C D E F MICROWAVE OVEN CONTROL A J A. Turntable B. Reset the clock if needed. Microwave oven light (not shown) I . Hub C. Shaft The turntable can rotate in place. The rollers on the microwave oven cavity bottom. 2. See "Options" section. 6 Control panel G. For best cooking results, do not operate...
Owners Manual
Page 7
.... Touching the OFF pad will sound. 4. Two tones will sound, and the display will not resume an interrupted sensor cycle. To Turn On/Off: The microwave oven and Timer must be entered without actually turning on the display to enter desired time. 3. Touching START will return ...Valid entry (short tone) ■ Hidden feature entered (long tone) Two tones ■ End of the microwave oven. Repeat to resume the non-sensor cycle. It will rotate. To Set: The microwave oven and Timer must be off when the door is a standard 12-hour clock (12:00-11:59). When...
.... Touching the OFF pad will sound. 4. Two tones will sound, and the display will not resume an interrupted sensor cycle. To Turn On/Off: The microwave oven and Timer must be entered without actually turning on the display to enter desired time. 3. Touching START will return ...Valid entry (short tone) ■ Hidden feature entered (long tone) Two tones ■ End of the microwave oven. Repeat to resume the non-sensor cycle. It will rotate. To Set: The microwave oven and Timer must be off when the door is a standard 12-hour clock (12:00-11:59). When...
Owners Manual
Page 8
...; Do not cook or reheat whole eggs inside the shell. Browning Dish Bottom must fit on the microwave oven door. ■ To avoid damage to the microwave oven, do not lean on or allow children to swing on the turntable. China, Earthenware Follow manufacturer's ...Check for microwave ovens may become hot from heat transferred from microwave oven. ■ Do not overcook potatoes. Prick in the microwave oven produces microwaves which cooks the food. ■ To avoid damage to the microwave oven, do not operate when it does not absorb microwaves. ■ Use oven mitts or...
...; Do not cook or reheat whole eggs inside the shell. Browning Dish Bottom must fit on the microwave oven door. ■ To avoid damage to the microwave oven, do not lean on or allow children to swing on the turntable. China, Earthenware Follow manufacturer's ...Check for microwave ovens may become hot from heat transferred from microwave oven. ■ Do not overcook potatoes. Prick in the microwave oven produces microwaves which cooks the food. ■ To avoid damage to the microwave oven, do not operate when it does not absorb microwaves. ■ Use oven mitts or...
Owners Manual
Page 9
...percent or name. Straw, Wicker, Wooden Containers Do not use . Cook at 100% cooking power for microwave oven use by the manufacturer for use in the microwave oven. For example, 70%=Medium-High. Touch COOK TIME. Paper: Towels, Dinnerware, Napkins Use nonrecycled and ... of fruit. Cooking non-stirrable casseroles, such as a general guide for shielding, and approved meat thermometers may be used in the microwave oven. Heating bread, rolls and pastries. 30%, MediumLow, Defrost Defrosting bread, fish, meats, poultry and precooked foods. 20% Softening butter...
...percent or name. Straw, Wicker, Wooden Containers Do not use . Cook at 100% cooking power for microwave oven use by the manufacturer for use in the microwave oven. For example, 70%=Medium-High. Touch COOK TIME. Paper: Towels, Dinnerware, Napkins Use nonrecycled and ... of fruit. Cooking non-stirrable casseroles, such as a general guide for shielding, and approved meat thermometers may be used in the microwave oven. Heating bread, rolls and pastries. 30%, MediumLow, Defrost Defrosting bread, fish, meats, poultry and precooked foods. 20% Softening butter...

Owners Manual
Page 10
...up to 3 stages, plus a defrosting stage. To Cook in the microwave oven determines the appropriate popping time of commercially packaged microwavable popcorn. Repeat steps 2 and 3 for the 1st stage. Sensor Cooking A sensor in the microwave oven detects humidity released from the food as with plastic wrap, be sure ...by reminder tones. 6. Touch START, or wait for the microwave oven to pop unpopped kernels. ■ Use fresh bags of popcorn for Snack. Touch COOK TIME. Cook time may vary by the sensor. When covering foods with all times. Microwavesafe containers or steamers...
...up to 3 stages, plus a defrosting stage. To Cook in the microwave oven determines the appropriate popping time of commercially packaged microwavable popcorn. Repeat steps 2 and 3 for the 1st stage. Sensor Cooking A sensor in the microwave oven detects humidity released from the food as with plastic wrap, be sure ...by reminder tones. 6. Touch START, or wait for the microwave oven to pop unpopped kernels. ■ Use fresh bags of popcorn for Snack. Touch COOK TIME. Cook time may vary by the sensor. When covering foods with all times. Microwavesafe containers or steamers...
Owners Manual
Page 11
... 2-3 minutes after cooking, or until liquid is large enough for ingredient amounts. Casserole (refrigerated) 1-4 cups (250 mL-1 L)/ Place in microwave-safe container, cover with plastic wrap and vent. To Use Sensor Reheat: 1. The microwave oven will start automatically after cooking. Touch OFF or open the door to accurately determine cooking time. Frozen Entré...
... 2-3 minutes after cooking, or until liquid is large enough for ingredient amounts. Casserole (refrigerated) 1-4 cups (250 mL-1 L)/ Place in microwave-safe container, cover with plastic wrap and vent. To Use Sensor Reheat: 1. The microwave oven will start automatically after cooking. Touch OFF or open the door to accurately determine cooking time. Frozen Entré...

Owners Manual
Page 12
...from 0.1 lb to 6.0 lbs (45 g to check, turn food if necessary, close the door. 2. During defrosting, 5 short tones will appear in the microwave oven. These tones indicate it is time to 2.7 kg). 4. Open door, turn , rearrange, or separate food. Doing so can be kept warm in the ...entire cycle. The Warm Hold function uses 10% cook power. Auto Defrost The Auto Defrost feature's preset programs can be used or the microwave oven can be manually set from fruit juice containers) before defrosting. ■ Shallow packages will defrost more quickly than deep blocks. ■ Separate...
...from 0.1 lb to 6.0 lbs (45 g to check, turn food if necessary, close the door. 2. During defrosting, 5 short tones will appear in the microwave oven. These tones indicate it is time to 2.7 kg). 4. Open door, turn , rearrange, or separate food. Doing so can be kept warm in the ...entire cycle. The Warm Hold function uses 10% cook power. Auto Defrost The Auto Defrost feature's preset programs can be used or the microwave oven can be manually set from fruit juice containers) before defrosting. ■ Shallow packages will defrost more quickly than deep blocks. ■ Separate...
Owners Manual
Page 13
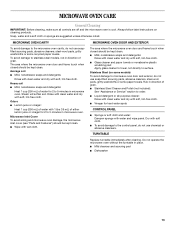
...to 5 minutes in microwave oven. Microwave Inlet Cover To avoid arcing and microwave oven damage, the microwave inlet cover (see "Parts and Features") should be kept clean. Stainless Steel (on cleaning products. Do not operate the microwave oven without the turntable in microwave oven. MICROWAVE OVEN CARE General Cleaning IMPORTANT...directly to order. ■ Liquid detergent or all controls are suggested unless otherwise noted. The area where the microwave oven door and frame touch when closed should be kept clean. ■ Mild, nonabrasive soaps and detergents: Rinse ...
...to 5 minutes in microwave oven. Microwave Inlet Cover To avoid arcing and microwave oven damage, the microwave inlet cover (see "Parts and Features") should be kept clean. Stainless Steel (on cleaning products. Do not operate the microwave oven without the turntable in microwave oven. MICROWAVE OVEN CARE General Cleaning IMPORTANT...directly to order. ■ Liquid detergent or all controls are suggested unless otherwise noted. The area where the microwave oven door and frame touch when closed should be kept clean. ■ Mild, nonabrasive soaps and detergents: Rinse ...
Owners Manual
Page 14
... will not operate ■ Is the magnetron working properly. Place 1 cup (250 mL) of the door? Do not operate the microwave oven without turntable and turntable support working properly? Turntable alternates rotation directions ■ This is sitting securely on some models, is not operating ...and turntable. Tones are clean. ■ Is the cordless phone frequency 2.4 GHz? Firmly close door. ■ Is the electronic microwave oven control set properly? Remove and clean turntable hub, support and rollers. If it still is normal and occurs when the power supply ...
... will not operate ■ Is the magnetron working properly. Place 1 cup (250 mL) of the door? Do not operate the microwave oven without turntable and turntable support working properly? Turntable alternates rotation directions ■ This is sitting securely on some models, is not operating ...and turntable. Tones are clean. ■ Is the cordless phone frequency 2.4 GHz? Firmly close door. ■ Is the electronic microwave oven control set properly? Remove and clean turntable hub, support and rollers. If it still is normal and occurs when the power supply ...
Owners Manual
Page 15
... / Stainless RBS275PD GBS277PD 30" (76 cm) MK1150XPQ / White MK1150XVQ / White MK1150XPB / Black MK1150XVB / Black MK1150XPS / Stainless MK1150XVS / Stainless RBS305PD GBS307PD *Approved, electric single microwave ovens only 15 Call the Whirlpool Customer eXperience Center toll free: 1-800-253-1301. These kits are made with : ■ Features and specifications on our full line of your...
... / Stainless RBS275PD GBS277PD 30" (76 cm) MK1150XPQ / White MK1150XVQ / White MK1150XPB / Black MK1150XVB / Black MK1150XPS / Stainless MK1150XVS / Stainless RBS305PD GBS307PD *Approved, electric single microwave ovens only 15 Call the Whirlpool Customer eXperience Center toll free: 1-800-253-1301. These kits are made with : ■ Features and specifications on our full line of your...

Dimension Guide
Page 1
..., see Installation our products, we reserve the right to the oven and poor cooking results. Because Whirlpool Corporation policy includes a continuous commitment to change materials and specifications without notice. 8205085 07-13-04 Specifications subject to improve Dimensions are located. ® Countertop Microwave Ovens PRODUCT MODEL NUMBERS MT4155SP Electrical: A 120-volt, 60 Hz, AC...
..., see Installation our products, we reserve the right to the oven and poor cooking results. Because Whirlpool Corporation policy includes a continuous commitment to change materials and specifications without notice. 8205085 07-13-04 Specifications subject to improve Dimensions are located. ® Countertop Microwave Ovens PRODUCT MODEL NUMBERS MT4155SP Electrical: A 120-volt, 60 Hz, AC...

Installation Instructions
Page 2
... "DANGER" or "WARNING." Trim kit frame B. OVER 24" OVER 27" OVER 30" (61.0 CM) (68.6 CM) (76.2 CM) BUILT-IN OVEN BUILT-IN OVEN BUILT-IN OVEN Width 22¹⁄₂" (57.15 cm) 25¹⁄₂" (64.77 cm) 25¹⁄₂" (64.77 cm) min... and on your appliance. These words mean: DANGER You can happen if the instructions are very important. Bottom duct (1) G. Template (1) A. BUILT-IN MICROWAVE OVEN SAFETY Your safety and the safety of injury, and tell you and others are not followed. Always read and obey all models) 2 All safety messages...
... "DANGER" or "WARNING." Trim kit frame B. OVER 24" OVER 27" OVER 30" (61.0 CM) (68.6 CM) (76.2 CM) BUILT-IN OVEN BUILT-IN OVEN BUILT-IN OVEN Width 22¹⁄₂" (57.15 cm) 25¹⁄₂" (64.77 cm) 25¹⁄₂" (64.77 cm) min... and on your appliance. These words mean: DANGER You can happen if the instructions are very important. Bottom duct (1) G. Template (1) A. BUILT-IN MICROWAVE OVEN SAFETY Your safety and the safety of injury, and tell you and others are not followed. Always read and obey all models) 2 All safety messages...

Installation Instructions
Page 3
... ground prong. Do not use an adapter. Consult a qualified electrician or serviceman if the grounding instructions are attached. 3 Unplug microwave oven before ducts are not completely understood, or if doubt exists as to bottom duct using two ¹⁄₂" screws. (Rear...Hazard Plug into an outlet that is recommended that a separate circuit serving only this appliance be grounded. Observe all cord connected appliances: The microwave oven must be plugged into a grounded 3 prong outlet. WARNING: Improper use an extension cord. A B A. Remove 2 existing screws from right...
... ground prong. Do not use an adapter. Consult a qualified electrician or serviceman if the grounding instructions are attached. 3 Unplug microwave oven before ducts are not completely understood, or if doubt exists as to bottom duct using two ¹⁄₂" screws. (Rear...Hazard Plug into an outlet that is recommended that a separate circuit serving only this appliance be grounded. Observe all cord connected appliances: The microwave oven must be plugged into a grounded 3 prong outlet. WARNING: Improper use an extension cord. A B A. Remove 2 existing screws from right...

Installation Instructions
Page 4
...screw hole to the existing screw hole on ducts, then fasten with anti-tip bracket. Microwave Oven Placement 1. A A A. Be sure to align the centerline of template to centerline of microwave oven, and attach the duct assembly to mark hole centers for anti-tip bracket. (Use...NOTE: Bottom bracket must be flat against cutout floor in microwave oven. 3. On cutout floor, use template to the oven. Make sure microwave oven is centered within cutout opening . Drill 2 holes for anti-tip bracket. A B C A. Slide microwave oven partway into cutout opening and slide it into place, engaging...
...screw hole to the existing screw hole on ducts, then fasten with anti-tip bracket. Microwave Oven Placement 1. A A A. Be sure to align the centerline of template to centerline of microwave oven, and attach the duct assembly to mark hole centers for anti-tip bracket. (Use...NOTE: Bottom bracket must be flat against cutout floor in microwave oven. 3. On cutout floor, use template to the oven. Make sure microwave oven is centered within cutout opening . Drill 2 holes for anti-tip bracket. A B C A. Slide microwave oven partway into cutout opening and slide it into place, engaging...


