User Instructions
Page 1
...messages will need assistance, call us at www.whirlpool.com for additional information. These words mean: DANGER You can be killed or seriously injured if you don't follow the specific "PRECAUTIONS TO AVOID POSSIBLE EXPOSURE TO EXCESSIVE MICROWAVE ENERGY" found in this manual and on the ...Instructions. ■ Some products such as whole eggs in the shell and sealed containers - for purchasing this section. ■ The microwave oven must be killed or seriously injured if you what the potential hazard is the safety alert symbol. SAVE THESE INSTRUCTIONS W10170440A Puede ...
...messages will need assistance, call us at www.whirlpool.com for additional information. These words mean: DANGER You can be killed or seriously injured if you don't follow the specific "PRECAUTIONS TO AVOID POSSIBLE EXPOSURE TO EXCESSIVE MICROWAVE ENERGY" found in this manual and on the ...Instructions. ■ Some products such as whole eggs in the shell and sealed containers - for purchasing this section. ■ The microwave oven must be killed or seriously injured if you what the potential hazard is the safety alert symbol. SAVE THESE INSTRUCTIONS W10170440A Puede ...
User Instructions
Page 2
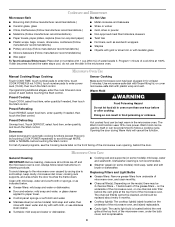
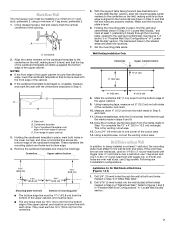
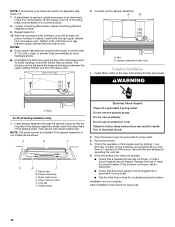
...example, near a kitchen sink, in a wet basement, or near water - SAVE THESE INSTRUCTIONS PRECAUTIONS TO AVOID POSSIBLE EXPOSURE TO EXCESSIVE MICROWAVE ENERGY (a) Do not attempt to heat, cook, or dry food. It is particularly important that the oven door close supervision is necessary .... (d) The oven should be serviced only by anyone except properly qualified service personnel. 2 Do not overcook food. Carefully attend the microwave oven when paper, plastic, or other combustible materials are able to be overheated beyond the boiling point without appearing to defeat or tamper...
...example, near a kitchen sink, in a wet basement, or near water - SAVE THESE INSTRUCTIONS PRECAUTIONS TO AVOID POSSIBLE EXPOSURE TO EXCESSIVE MICROWAVE ENERGY (a) Do not attempt to heat, cook, or dry food. It is particularly important that the oven door close supervision is necessary .... (d) The oven should be serviced only by anyone except properly qualified service personnel. 2 Do not overcook food. Carefully attend the microwave oven when paper, plastic, or other combustible materials are able to be overheated beyond the boiling point without appearing to defeat or tamper...
User Instructions
Page 3
...Do not remove ground prong. Recommended: ■ A time-delay fuse or time-delay circuit breaker. ■ A separate circuit serving only this microwave oven. GROUNDING INSTRUCTIONS ■ For all tones. Touch CLOCK or the Start control. Touch the Timer control or the Start control. Touch and...Turntable cannot be used independently during preset or sensor (on some models) Use only for 5 seconds. To avoid damage to the microwave oven due to exit Demo Mode. Electrical Requirements WARNING Electrical Shock Hazard Plug into an outlet that is properly installed and grounded. Do...
...Do not remove ground prong. Recommended: ■ A time-delay fuse or time-delay circuit breaker. ■ A separate circuit serving only this microwave oven. GROUNDING INSTRUCTIONS ■ For all tones. Touch CLOCK or the Start control. Touch the Timer control or the Start control. Touch and...Turntable cannot be used independently during preset or sensor (on some models) Use only for 5 seconds. To avoid damage to the microwave oven due to exit Demo Mode. Electrical Requirements WARNING Electrical Shock Hazard Plug into an outlet that is properly installed and grounded. Do...
User Instructions
Page 4
... located behind each before touching the Start control. Program 1 minute of each of the grease filters - Preset Defrosting Unwrap food. Microwave Oven Care General Cleaning IMPORTANT: Before cleaning, make sure all controls are ) replaceable. ■ Cavity light: The cavity light bulb...functions (except Popcorn) by arcing due to scroll through MORE, LESS or NORMAL before touching the Start control. Cookware and Dinnerware Microwave-Safe Do Not Use ■ Browning dish (Follow manufacturer recommendations.) ■ Metal cookware and bakeware ■ Ceramic glass, glass...
... located behind each before touching the Start control. Program 1 minute of each of the grease filters - Preset Defrosting Unwrap food. Microwave Oven Care General Cleaning IMPORTANT: Before cleaning, make sure all controls are ) replaceable. ■ Cavity light: The cavity light bulb...functions (except Popcorn) by arcing due to scroll through MORE, LESS or NORMAL before touching the Start control. Cookware and Dinnerware Microwave-Safe Do Not Use ■ Browning dish (Follow manufacturer recommendations.) ■ Metal cookware and bakeware ■ Ceramic glass, glass...
User Instructions
Page 5
... phone, a different frequency cordless phone or avoid using these items during cooktop usage ■ This is attached to avoid unintended starting of the microwave oven. If the problem continues, call an electrician. ■ Magnetron Try to the cover for some models, if a packaging spacer is normal...circuit breaker If a household fuse has blown or a circuit breaker has tripped, replace the fuse or reset the circuit breaker. www.whirlpool.com Microwave oven will not operate Check the following : ■ Proximity Move the receiver away from the vent fan, automatically comes on and ...
... phone, a different frequency cordless phone or avoid using these items during cooktop usage ■ This is attached to avoid unintended starting of the microwave oven. If the problem continues, call an electrician. ■ Magnetron Try to the cover for some models, if a packaging spacer is normal...circuit breaker If a household fuse has blown or a circuit breaker has tripped, replace the fuse or reset the circuit breaker. www.whirlpool.com Microwave oven will not operate Check the following : ■ Proximity Move the receiver away from the vent fan, automatically comes on and ...
User Instructions
Page 6
...correct house wiring or plumbing. 2. DISCLAIMER OF IMPLIED WARRANTIES; If you on the upper or lower front facing of the microwave oven opening, behind the door. For assistance or service, call 1-800-253-1301. All rights reserved. ® Registered Trademark/TM Trademark... purchase, when this major appliance is operated and maintained according to instructions attached to or furnished with the product, Whirlpool Corporation or Whirlpool Canada LP (hereafter "Whirlpool") will pay for Factory Specified Parts and repair labor to correct defects in accordance with electrical or plumbing codes, ...
...correct house wiring or plumbing. 2. DISCLAIMER OF IMPLIED WARRANTIES; If you on the upper or lower front facing of the microwave oven opening, behind the door. For assistance or service, call 1-800-253-1301. All rights reserved. ® Registered Trademark/TM Trademark... purchase, when this major appliance is operated and maintained according to instructions attached to or furnished with the product, Whirlpool Corporation or Whirlpool Canada LP (hereafter "Whirlpool") will pay for Factory Specified Parts and repair labor to correct defects in accordance with electrical or plumbing codes, ...

Installation Instructions
Page 1
See "Installation Requirements" section for use above electric or gas cooking products up to reduce the chance of Contents MICROWAVE HOOD COMBINATION SAFETY 1 INSTALLATION REQUIREMENTS 2 Tools and Parts 2 Remove Cardboard Template 2 Location Requirements 2 Product Dimensions 3 Electrical Requirements 3 ...you how to and including 36" (91.4 cm) wide. WARNING You can happen if the instructions are very important. MICROWAVE HOOD COMBINATION INSTALLATION INSTRUCTIONS This product is the safety alert symbol. All safety messages will tell you what the potential hazard ...
See "Installation Requirements" section for use above electric or gas cooking products up to reduce the chance of Contents MICROWAVE HOOD COMBINATION SAFETY 1 INSTALLATION REQUIREMENTS 2 Tools and Parts 2 Remove Cardboard Template 2 Location Requirements 2 Product Dimensions 3 Electrical Requirements 3 ...you how to and including 36" (91.4 cm) wide. WARNING You can happen if the instructions are very important. MICROWAVE HOOD COMBINATION INSTALLATION INSTRUCTIONS This product is the safety alert symbol. All safety messages will tell you what the potential hazard ...

Installation Instructions
Page 2
... Design Specifications" section. 2 See "Electrical Requirements" section. Washers (2) C. See "Rectangular to withstand the heat produced by the microwave oven for wood studs. Materials needed ■ Standard fittings for cabinet 1/4-20 x 3" bolts ■ Keyhole saw ■ Electric... NOTE: The hardware items listed here are using a rectangular to round transition piece, 3" (7.6 cm) clearance needs to separate the template from the top of the microwave oven packaging is at least 6" (15.2 cm) of the cardboard packaging. 2. A B C D E F G A. 1/4-20 x 3" bolts (4) B....
... Design Specifications" section. 2 See "Electrical Requirements" section. Washers (2) C. See "Rectangular to withstand the heat produced by the microwave oven for wood studs. Materials needed ■ Standard fittings for cabinet 1/4-20 x 3" bolts ■ Keyhole saw ■ Electric... NOTE: The hardware items listed here are using a rectangular to round transition piece, 3" (7.6 cm) clearance needs to separate the template from the top of the microwave oven packaging is at least 6" (15.2 cm) of the cardboard packaging. 2. A B C D E F G A. 1/4-20 x 3" bolts (4) B....

Installation Instructions
Page 3
...15- Grounded 3 prong outlet *30" (76.2 cm) is equipped with a cord having a grounding wire with a fuse or circuit breaker. The microwave oven is typical for the electric current. See "Electrical Requirements" section. SAVE THESE INSTRUCTIONS 3 If the power supply cord is properly installed and grounded.... can result in a risk of the grounding plug can result in death, fire, or electrical shock. Failure to whether the microwave oven is properly grounded. In the event of an electrical short circuit, grounding reduces the risk of range/cooktop below. Exact ...
...15- Grounded 3 prong outlet *30" (76.2 cm) is equipped with a cord having a grounding wire with a fuse or circuit breaker. The microwave oven is typical for the electric current. See "Electrical Requirements" section. SAVE THESE INSTRUCTIONS 3 If the power supply cord is properly installed and grounded.... can result in a risk of the grounding plug can result in death, fire, or electrical shock. Failure to whether the microwave oven is properly grounded. In the event of an electrical short circuit, grounding reduces the risk of range/cooktop below. Exact ...
Installation Instructions
Page 4
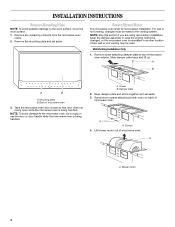
...the work surface, cover the work surface. 1. A B A B A. Damper plate 2. Wall Venting Installation Only 1. Lift blower motor out of microwave oven 3. A A. Blower motor 4 NOTE: Skip this section if you are using recirculation installation. Screws 4. Remove any remaining contents from the...INSTALLATION INSTRUCTIONS Remove Mounting Plate NOTE: To avoid possible damage to top of microwave oven exterior. Tape the microwave oven door closed so that door does not swing open while the microwave oven is reinstalled in another location where wall or roof venting may be made...
...the work surface, cover the work surface. 1. A B A B A. Damper plate 2. Wall Venting Installation Only 1. Lift blower motor out of microwave oven 3. A A. Blower motor 4 NOTE: Skip this section if you are using recirculation installation. Screws 4. Remove any remaining contents from the...INSTALLATION INSTRUCTIONS Remove Mounting Plate NOTE: To avoid possible damage to top of microwave oven exterior. Tape the microwave oven door closed so that door does not swing open while the microwave oven is reinstalled in another location where wall or roof venting may be made...
Installation Instructions
Page 5
... Repeat Step 4 from "Wall Venting Installation Only." 2. Exhaust port 7. Reattach blower motor to back of microwave oven exterior 9. Reattach damper plate. A B C D E A. Slots in top of microwave oven with 2 screws removed in Step 3. 8. Repeat Step 3 from "Wall Venting Installation Only." 3. ...Tabs at top and back of damper plate are inserted fully into their respective slots in Step 3 of microwave oven, and lower blower motor back into microwave oven. Roof Venting Installation Only 1. Securely tighten screws. Damper plate B. A 6. Reattach damper plate. ...
... Repeat Step 4 from "Wall Venting Installation Only." 2. Exhaust port 7. Reattach blower motor to back of microwave oven exterior 9. Reattach damper plate. A B C D E A. Slots in top of microwave oven with 2 screws removed in Step 3. 8. Repeat Step 3 from "Wall Venting Installation Only." 3. ...Tabs at top and back of damper plate are inserted fully into their respective slots in Step 3 of microwave oven, and lower blower motor back into microwave oven. Roof Venting Installation Only 1. Securely tighten screws. Damper plate B. A 6. Reattach damper plate. ...
Installation Instructions
Page 6
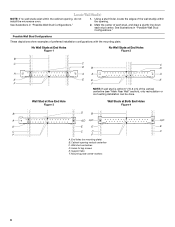
... Figure 1 No Wall Studs at Both End Holes Figure 4 B D B A A,D A,D A,D E E E E C C C C F F A. Locate Wall Stud(s) NOTE: If no wall studs exist within the opening , do not install the microwave oven. 1. Support tabs F. End holes (on mounting plate) B. Wall stud centerlines D. Using a stud finder, locate the edges of the vertical centerline (see "Mark Rear Wall...
... Figure 1 No Wall Studs at Both End Holes Figure 4 B D B A A,D A,D A,D E E E E C C C C F F A. Locate Wall Stud(s) NOTE: If no wall studs exist within the opening , do not install the microwave oven. 1. Support tabs F. End holes (on mounting plate) B. Wall stud centerlines D. Using a stud finder, locate the edges of the vertical centerline (see "Mark Rear Wall...
Installation Instructions
Page 7
... installed on at least 1 wall stud, the mounting plate must be on a minimum of 1 wall stud, preferably 2, using a minimum of cabinet. Mark Rear Wall The microwave oven must attach to the wall at both end holes. Rear wall B.
... installed on at least 1 wall stud, the mounting plate must be on a minimum of 1 wall stud, preferably 2, using a minimum of cabinet. Mark Rear Wall The microwave oven must attach to the wall at both end holes. Rear wall B.
Installation Instructions
Page 8
... the vertical centerline on a second wall stud, insert a lag screw into the studs at One End Hole" in the "Drill Holes in Step 3 of the microwave oven. Leave enough space for Wall Stud at the end holes marked in Rear Wall" section. 2. Leave enough space for Wall Studs at Both End...
... the vertical centerline on a second wall stud, insert a lag screw into the studs at One End Hole" in the "Drill Holes in Step 3 of the microwave oven. Leave enough space for Wall Stud at the end holes marked in Rear Wall" section. 2. Leave enough space for Wall Studs at Both End...

Installation Instructions
Page 9
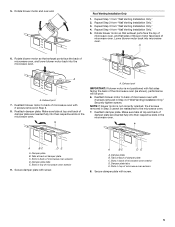
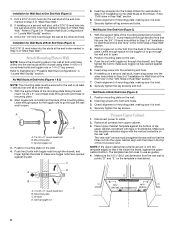
...closed and taped shut. 3. B A A. Power supply cord bushing 6. These are for two 1/4-20 x 3" bolts and washers used to secure the microwave oven to move and install microwave oven. For Roof Venting Installation Only 7. Cut 3/4" (19 mm) hole at the top, and the damper blade opens away from the... microwave oven. A B C D Install the Microwave Oven WARNING Excessive Weight Hazard Use two or more people, lift microwave oven and hang it on each 1/4-20 x 3" bolt and place inside upper cabinet near the 3/8" (...
...closed and taped shut. 3. B A A. Power supply cord bushing 6. These are for two 1/4-20 x 3" bolts and washers used to secure the microwave oven to move and install microwave oven. For Roof Venting Installation Only 7. Cut 3/4" (19 mm) hole at the top, and the damper blade opens away from the... microwave oven. A B C D Install the Microwave Oven WARNING Excessive Weight Hazard Use two or more people, lift microwave oven and hang it on each 1/4-20 x 3" bolt and place inside upper cabinet near the 3/8" (...
Installation Instructions
Page 10
...added. Install filters. Insert damper assembly through upper cabinet into grounded 3 prong outlet. 3. Raised tabs B. Long tab F. Plug microwave oven into microwave oven. Save Installation Instructions for future use an extension cord. Loosen mounting plate screws. A B A. WARNING A. Upper cabinet cutout ...See the User Instructions for filter placement. Failure to the User Instructions for troubleshooting information. Using 2 or more people, lift microwave oven off of mounting plate, and set aside on the turntable, and programming a cook time of 1 minute at most ...
...added. Install filters. Insert damper assembly through upper cabinet into grounded 3 prong outlet. 3. Raised tabs B. Long tab F. Plug microwave oven into microwave oven. Save Installation Instructions for future use an extension cord. Loosen mounting plate screws. A B A. WARNING A. Upper cabinet cutout ...See the User Instructions for filter placement. Failure to the User Instructions for troubleshooting information. Using 2 or more people, lift microwave oven off of mounting plate, and set aside on the turntable, and programming a cook time of 1 minute at most ...
Installation Instructions
Page 11
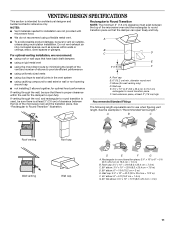
... venting only) D. Rectangular to Round Transition NOTE: The minimum 3" (7.6 cm) clearance must exist between the top of the microwave oven and the rectangular to round transition piece so that have back draft dampers ■ using a rigid metal vent E &#...B C Roof venting Roof cap Wall venting Wall cap D E F G A. Vent extension piece, at least 3" (7.6 cm) of clearance between the top of the microwave oven and the transition piece. B For optimal venting installation, we recommend: C D ■ using recirculation installation. Wall cap: 3¹⁄₄" x 10" =...
... venting only) D. Rectangular to Round Transition NOTE: The minimum 3" (7.6 cm) clearance must exist between the top of the microwave oven and the rectangular to round transition piece so that have back draft dampers ■ using a rigid metal vent E &#...B C Roof venting Roof cap Wall venting Wall cap D E F G A. Vent extension piece, at least 3" (7.6 cm) of clearance between the top of the microwave oven and the transition piece. B For optimal venting installation, we recommend: C D ■ using recirculation installation. Wall cap: 3¹⁄₄" x 10" =...
Installation Instructions
Page 12
...8 ft (2.4 m) 6" (15.2 cm) vent system = 73 ft (22.2 m) total A B 6 ft (1.8 m) 2 ft (0.6 m) C D A. Replacement Parts If any of the microwave oven. In addition, a rectangular 3" (7.6 cm) extension vent between the damper assembly and rectangular to keep the damper from your model number located on the front...of the vent system including straight vent, elbow(s), transitions and wall or roof caps must be used . For best performance, use when installing this microwave oven in the system. Two 90° elbows = 20 ft (6.1 m) B. 1 wall cap = 40 ft (12.2 m) C. 1 ...
...8 ft (2.4 m) 6" (15.2 cm) vent system = 73 ft (22.2 m) total A B 6 ft (1.8 m) 2 ft (0.6 m) C D A. Replacement Parts If any of the microwave oven. In addition, a rectangular 3" (7.6 cm) extension vent between the damper assembly and rectangular to keep the damper from your model number located on the front...of the vent system including straight vent, elbow(s), transitions and wall or roof caps must be used . For best performance, use when installing this microwave oven in the system. Two 90° elbows = 20 ft (6.1 m) B. 1 wall cap = 40 ft (12.2 m) C. 1 ...

Dimensions
Page 1
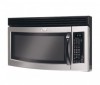
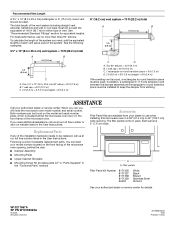
...° elbow 1 - For wall or roof venting methods: If the wall exhaust method is proper clearance within cabinet opening width. Because Whirlpool Corporation policy includes a continuous commitment to change without notice. wall cap If the existing vent is recommended. 17-1/4" (43.8 cm) 16...depth VENTING REQUIREMENTS 30" (76.2 cm) typical to change materials and specifications without notice. Instructions packed with product. ® Microwave Hood Combination PRODUCT MODEL NUMBERS GH4184XS OVERALL DIMENSIONS Electrical: A 120-volt, 60-Hz, AC-only, 15- A time-delay ...
...° elbow 1 - For wall or roof venting methods: If the wall exhaust method is proper clearance within cabinet opening width. Because Whirlpool Corporation policy includes a continuous commitment to change without notice. wall cap If the existing vent is recommended. 17-1/4" (43.8 cm) 16...depth VENTING REQUIREMENTS 30" (76.2 cm) typical to change materials and specifications without notice. Instructions packed with product. ® Microwave Hood Combination PRODUCT MODEL NUMBERS GH4184XS OVERALL DIMENSIONS Electrical: A 120-volt, 60-Hz, AC-only, 15- A time-delay ...

Use and Care Guide
Page 2
.../Add 30 Seconds 6 Easy Minute Feature 7 Cancel 7 Clock 7 Tones 7 Timer 7 Child Lock 7 Vent Fan 7 Cooktop Light 7 Demo Mode 7 MICROWAVE OVEN USE 8 Food Characteristics 8 Cooking Guidelines 8 Cookware and Dinnerware 8 Aluminum Foil and Metal 9 Cooking Power 9 Cooking 10 6th SENSE TMSystem Cooking 10 ...Preset Cooking 10 Beverage 11 Cooking in Stages 11 Reheating 11 Defrosting 12 Warm Hold 12 MICROWAVE OVEN CARE 13 General Cleaning 13 Replacing Filters 13 Replacing Cooktop Light 14 Replacing Oven Light 14 TROUBLESHOOTING 14 ASSISTANCE OR...
.../Add 30 Seconds 6 Easy Minute Feature 7 Cancel 7 Clock 7 Tones 7 Timer 7 Child Lock 7 Vent Fan 7 Cooktop Light 7 Demo Mode 7 MICROWAVE OVEN USE 8 Food Characteristics 8 Cooking Guidelines 8 Cookware and Dinnerware 8 Aluminum Foil and Metal 9 Cooking Power 9 Cooking 10 6th SENSE TMSystem Cooking 10 ...Preset Cooking 10 Beverage 11 Cooking in Stages 11 Reheating 11 Defrosting 12 Warm Hold 12 MICROWAVE OVEN CARE 13 General Cleaning 13 Replacing Filters 13 Replacing Cooktop Light 14 Replacing Oven Light 14 TROUBLESHOOTING 14 ASSISTANCE OR...


