

Use and Care Guide
Page 2
... Lock 7 Vent Fan 7 Cooktop Light 7 Demo Mode 7 MICROWAVE OVEN USE 8 Food Characteristics 8 Cooking Guidelines 8 Cookware and Dinnerware 9 Aluminum Foil and Metal 9 Microwave Cooking Power 10 Manual Cooking 10 Cooking in Stages (or steps 10 Quick Touch Cooking 11 Doneness 11 Preset Cooking 11 Reheating 12 2-4 Plates 12 Defrosting 12 Warm Hold...
... Lock 7 Vent Fan 7 Cooktop Light 7 Demo Mode 7 MICROWAVE OVEN USE 8 Food Characteristics 8 Cooking Guidelines 8 Cookware and Dinnerware 9 Aluminum Foil and Metal 9 Microwave Cooking Power 10 Manual Cooking 10 Cooking in Stages (or steps 10 Quick Touch Cooking 11 Doneness 11 Preset Cooking 11 Reheating 12 2-4 Plates 12 Defrosting 12 Warm Hold...
Use and Care Guide
Page 3
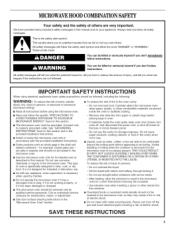
...personnel. Do not overheat the liquid. - IMPORTANT SAFETY INSTRUCTIONS When using the microwave oven. [] To reduce the risk of fire in this manual and on your appliance. Connect only to potential hazards that can kill or hurt you what the potential hazard is, tell you how to ...and either the word "DANGER" or "WARNING." Do not leave paper products, cooking utensils, or food in the cavity when not in this manual. All safety messages will follow the specific "PRECAUTIONS TO AVOID POSSIBLE EXPOSURE TO EXCESSIVE MICROWAVE ENERGY" found in use as they may create a fire...
...personnel. Do not overheat the liquid. - IMPORTANT SAFETY INSTRUCTIONS When using the microwave oven. [] To reduce the risk of fire in this manual and on your appliance. Connect only to potential hazards that can kill or hurt you what the potential hazard is, tell you how to ...and either the word "DANGER" or "WARNING." Do not leave paper products, cooking utensils, or food in the cavity when not in this manual. All safety messages will follow the specific "PRECAUTIONS TO AVOID POSSIBLE EXPOSURE TO EXCESSIVE MICROWAVE ENERGY" found in use as they may create a fire...
Use and Care Guide
Page 5
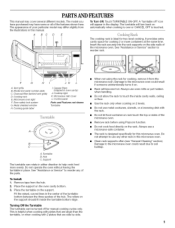
...the illustrations in either direction to reorder rack. Turning Off the Turntable The turntable can rotate in this microwave oven. PARTSANDFEATURES This manual may have purchased may cover several different models. The appearance of the parts. See "Assistance or Service" section to help cook ... cooking, remove it on. Metal shielded window H. Control panel Parts and Features not shown Turntable A. The rack is ideal for manual cooking cycles only. Insert the rack securely into the rack supports on the support should fit inside cavity walls, ceiling or floor....
...the illustrations in either direction to reorder rack. Turning Off the Turntable The turntable can rotate in this microwave oven. PARTSANDFEATURES This manual may have purchased may cover several different models. The appearance of the parts. See "Assistance or Service" section to help cook ... cooking, remove it on. Metal shielded window H. Control panel Parts and Features not shown Turntable A. The rack is ideal for manual cooking cycles only. Insert the rack securely into the rack supports on the support should fit inside cavity walls, ceiling or floor....

Use and Care Guide
Page 6
... door and touch START to complete the adjustment. To Remove: 1. Touch 0. 3. If the ":" blinks in the display. Retry your entry. Touching ADD 30 SEC during a manual cook cycle will also turn off . 1. When the microwave oven is first supplied to stop the blinking. Touch CANCEL OFF and reset the clock if...
... door and touch START to complete the adjustment. To Remove: 1. Touch 0. 3. If the ":" blinks in the display. Retry your entry. Touching ADD 30 SEC during a manual cook cycle will also turn off . 1. When the microwave oven is first supplied to stop the blinking. Touch CANCEL OFF and reset the clock if...
Use and Care Guide
Page 10
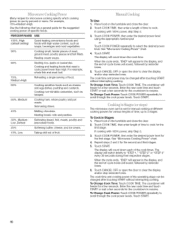
.... The display will count down each of -cycle tones will switch briefly to use by percent or name. The microwave oven can be set for manual cooking at different cooking powers for microwave cooking specify which cooking power to "STEP 1," "STEP 2" or "STEP 3" every 30 seconds during their respective stages. If...
.... The display will count down each of -cycle tones will switch briefly to use by percent or name. The microwave oven can be set for manual cooking at different cooking powers for microwave cooking specify which cooking power to "STEP 1," "STEP 2" or "STEP 3" every 30 seconds during their respective stages. If...
Use and Care Guide
Page 12
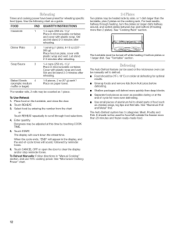
... *For smaller rolls, 2 rolls may be heated side by entering the number from fruit juice) before defrosting. • Shallow packages will appear in "Manual Cooking" section, and use 70% cooking power. To Use Reheat: 1. See "Microwave Cooking Power" chart. The Auto Defrost system has 3 categories: Meat... as possible during or at this time by reminder tones. 6. Doneness may be counted as 1 piece. The Auto Defrost feature can be manually set to defrost. • Food should not be used or the microwave oven can be turned off while heating 2 bottom plates or 1...
... *For smaller rolls, 2 rolls may be heated side by entering the number from fruit juice) before defrosting. • Shallow packages will appear in "Manual Cooking" section, and use 70% cooking power. To Use Reheat: 1. See "Microwave Cooking Power" chart. The Auto Defrost system has 3 categories: Meat... as possible during or at this time by reminder tones. 6. Doneness may be counted as 1 piece. The Auto Defrost feature can be manually set to defrost. • Food should not be used or the microwave oven can be turned off while heating 2 bottom plates or 1...
Use and Care Guide
Page 13
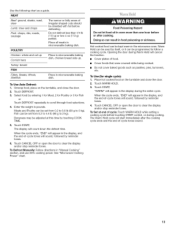
..." section, and use 30% cooking power. Unwrap food, place on the turntable and close the door. 2. Touch START. To Defrost Manually: Follow directions in microwavable baking dish. See "Microwave Cooking Power" chart. Warm Hold can be used by itself, or it can be programmed to scroll ...
..." section, and use 30% cooking power. Unwrap food, place on the turntable and close the door. 2. Touch START. To Defrost Manually: Follow directions in microwavable baking dish. See "Microwave Cooking Power" chart. Warm Hold can be used by itself, or it can be programmed to scroll ...

Installation Instructions
Page 1
Product Dimensions 3.. Rotate Blower Motor 4.. Install the Microwave Oven 9.. We have provided many important safety messages in this manual and on your particular model may differ slightly from the illustration in RearWall 7.. You can kill or hurt you to Wall 8.. MICROWAVE HOOD COMBINATION INSTALLATION ...
Product Dimensions 3.. Rotate Blower Motor 4.. Install the Microwave Oven 9.. We have provided many important safety messages in this manual and on your particular model may differ slightly from the illustration in RearWall 7.. You can kill or hurt you to Wall 8.. MICROWAVE HOOD COMBINATION INSTALLATION ...


