

Installation Instructions
Page 1
Table of the installer. • Product failure due to Wall 8.. Product Dimensions 3.. Locate Wall Stud(s 6.. Mark RearWall 7... Install the Microwave Oven 9.. Complete Installation 1. 0 VENTING DESIGN SPECIFICATIONS 11 ASSISTANCE 1.2 Replacement Par_s 1.2 Accessories 1.2 MICROWAVE HOOD COMBINATION SAFETY Your safety ...
Table of the installer. • Product failure due to Wall 8.. Product Dimensions 3.. Locate Wall Stud(s 6.. Mark RearWall 7... Install the Microwave Oven 9.. Complete Installation 1. 0 VENTING DESIGN SPECIFICATIONS 11 ASSISTANCE 1.2 Replacement Par_s 1.2 Accessories 1.2 MICROWAVE HOOD COMBINATION SAFETY Your safety ...
Installation Instructions
Page 2
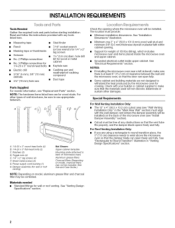
...x 2" lag screws (4) F. Ai A 1/4-20 x 3" round-head bolts (4) B. 1/4-20x3" flat-head bolts (2) C. Power supply cord bushing (1) H. See "Installation Dimensions" illustration. • Minimum one 2" x 4" (50.8 x 101.6 mm) wood wall stud and minimum 3/8" (9.5 mm) thickness drywall or plaster/lath within cabinet opening...Parts Supplied For reorder information, see "Install Damper Assembly" section). • Cutout must provide: • Minimum installation dimensions. For other damages. Damper assembly (for wall or roof venting) Not Shown: Upper cabinet template Mounting plate (attached...
...x 2" lag screws (4) F. Ai A 1/4-20 x 3" round-head bolts (4) B. 1/4-20x3" flat-head bolts (2) C. Power supply cord bushing (1) H. See "Installation Dimensions" illustration. • Minimum one 2" x 4" (50.8 x 101.6 mm) wood wall stud and minimum 3/8" (9.5 mm) thickness drywall or plaster/lath within cabinet opening...Parts Supplied For reorder information, see "Install Damper Assembly" section). • Cutout must provide: • Minimum installation dimensions. For other damages. Damper assembly (for wall or roof venting) Not Shown: Upper cabinet template Mounting plate (attached...

Installation Instructions
Page 3
...grounded 3 prong outlet. A. 2" x 4" wall stud B. Grounded 3 prong outlet *30" (76.2 cm) is typical for the electric current. Exact dimensions may vary depending on type of the grounding plug can result in a risk of electric shock by providing an escape wire for 66" (167.6 cm... and grounded. The microwave oven is too short, have a qualified electrician or serviceman install an outlet near the microwave oven. Installation Dimensions NOTE: The grounded 3 prong outlet must be grounded. Consult a qualified electrician or serviceman if the grounding instructions are not completely understood...
...grounded 3 prong outlet. A. 2" x 4" wall stud B. Grounded 3 prong outlet *30" (76.2 cm) is typical for the electric current. Exact dimensions may vary depending on type of the grounding plug can result in a risk of electric shock by providing an escape wire for 66" (167.6 cm... and grounded. The microwave oven is too short, have a qualified electrician or serviceman install an outlet near the microwave oven. Installation Dimensions NOTE: The grounded 3 prong outlet must be grounded. Consult a qualified electrician or serviceman if the grounding instructions are not completely understood...

Installation Instructions
Page 8
.... Insert lag screws into the remaining 2 corner holes. 6. Disconnect power to use as at all lag screws and bolts. Make sure the 10" (25.4 cm) dimension from the rear wall to points "D" and "E" on bolts from the back of mounting plate, making sure it fits inside the frame, against the rear...
.... Insert lag screws into the remaining 2 corner holes. 6. Disconnect power to use as at all lag screws and bolts. Make sure the 10" (25.4 cm) dimension from the rear wall to points "D" and "E" on bolts from the back of mounting plate, making sure it fits inside the frame, against the rear...

