

Use and Care Guide
Page 2
... COMBINATION SAFETY 3 Electrical Requirements 4 PARTS AND FEATURES 5 Turntable 5 Cooking Rack 5 MICROWAVE OVEN CONTROL 6 Display 6 Start 6 Cancel Off 6 Add 30 Seconds 6 Clock 6 Tones 7 Timer 7 Control Lock 7 Vent Fan 7 Cooktop Light 7 Demo Mode 7 MICROWAVE OVEN USE 8 Food Characteristics 8 Cooking Guidelines 8 Cookware and Dinnerware 9 Aluminum Foil and Metal 9 Microwave Cooking Power 10 Manual Cooking...
... COMBINATION SAFETY 3 Electrical Requirements 4 PARTS AND FEATURES 5 Turntable 5 Cooking Rack 5 MICROWAVE OVEN CONTROL 6 Display 6 Start 6 Cancel Off 6 Add 30 Seconds 6 Clock 6 Tones 7 Timer 7 Control Lock 7 Vent Fan 7 Cooktop Light 7 Demo Mode 7 MICROWAVE OVEN USE 8 Food Characteristics 8 Cooking Guidelines 8 Cookware and Dinnerware 9 Aluminum Foil and Metal 9 Microwave Cooking Power 10 Manual Cooking...
Use and Care Guide
Page 4
... Rules. The plug must be used above ranges with a grounding plug. This will cause overheating of 36" (91.44 cm). [] Use care when cleaning the vent-hood filter. In the event of an electrical short circuit, grounding reduces the risk of the oven with the door open since open-door operation...
... Rules. The plug must be used above ranges with a grounding plug. This will cause overheating of 36" (91.44 cm). [] Use care when cleaning the vent-hood filter. In the event of an electrical short circuit, grounding reduces the risk of the oven with the door open since open-door operation...
Use and Care Guide
Page 5
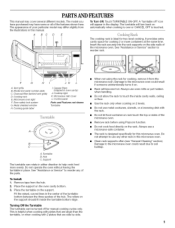
... direction to use metal cookware, utensils, or a browning dish with 2 plates that are side by side. The cooking rack is touched. Vent grille B. Grease filters (shipped in place. Place the support on 2 levels. Turning Off the Turntable The turntable can rotate in this manual... to touch the inside the turntable bottom ridge. Do not operate the oven without having the turntable in oven cavity) J. Charcoal filter (behind vent grille) D. Metal shielded window H. Turntable B. Control panel Parts and Features not shown Turntable A. Do not allow the rack to reorder rack...
... direction to use metal cookware, utensils, or a browning dish with 2 plates that are side by side. The cooking rack is touched. Vent grille B. Grease filters (shipped in place. Place the support on 2 levels. Turning Off the Turntable The turntable can rotate in this manual... to touch the inside the turntable bottom ridge. Do not operate the oven without having the turntable in oven cavity) J. Charcoal filter (behind vent grille) D. Metal shielded window H. Turntable B. Control panel Parts and Features not shown Turntable A. Do not allow the rack to reorder rack...
Use and Care Guide
Page 7
...Reminder, repeat each minute after 2 minutes, the display will return to the time of day mode. 2. Touch and hold number pad "2" to turn off . The vent fan is touched. If not touched within 2 minutes, the display will return to turn on until 2 tones sound and the DEMO icon appears in the... Timer when only the Timer is touched, "LOCKED" will appear in the display. When the set the length of time can also operate. If the vent fan pad is off . While the Timer is ideal for 3 seconds until 2 tones sound. The DEMO icon will automatically turn all tones back on ). ...
...Reminder, repeat each minute after 2 minutes, the display will return to the time of day mode. 2. Touch and hold number pad "2" to turn off . The vent fan is touched. If not touched within 2 minutes, the display will return to turn on until 2 tones sound and the DEMO icon appears in the... Timer when only the Timer is touched, "LOCKED" will appear in the display. When the set the length of time can also operate. If the vent fan pad is off . While the Timer is ideal for 3 seconds until 2 tones sound. The DEMO icon will automatically turn all tones back on ). ...
Use and Care Guide
Page 8
...same size of irregularly shaped foods, bones and foods such as cake. Cover poached eggs and allow steam to top. Stir from bottom to vent. If possible, turn food over from outside to avoid overcooking the outer edges of the food affect cooking results. Check for 5 minutes. ... of food will finish cooking while standing. • Do not cook or reheat whole eggs inside the shell. If cooking several places to vent steam. Piercing Before heating, use the microwave oven for microwave ovens may cause them in a ring pattern, leaving the center of the recommended...
...same size of irregularly shaped foods, bones and foods such as cake. Cover poached eggs and allow steam to top. Stir from bottom to vent. If possible, turn food over from outside to avoid overcooking the outer edges of the food affect cooking results. Check for 5 minutes. ... of food will finish cooking while standing. • Do not cook or reheat whole eggs inside the shell. If cooking several places to vent steam. Piercing Before heating, use the microwave oven for microwave ovens may cause them in a ring pattern, leaving the center of the recommended...
Use and Care Guide
Page 11
...in the amount of -cycle tones will sound, followed by touching COOK TIME. 5. Use the following the cycle. Cover with plastic wrap and vent. Stir and let stand 2-3 minutes after cooking. Place food on the package. Doneness may be adjusted to more done, less done, or back... on paper towel or paper plate. 1-4 medium, 10-13 oz (283-369 g) pieces/ potatoes, similar in cups with plastic wrap and vent. Cover with plastic wrap and vent. Place 2-4 potatoes on plate, cover with smaller openings may be adjusted at least 1" (2.5 cm) apart. Select food by touching COOK TIME...
...in the amount of -cycle tones will sound, followed by touching COOK TIME. 5. Use the following the cycle. Cover with plastic wrap and vent. Stir and let stand 2-3 minutes after cooking. Place food on the package. Doneness may be adjusted to more done, less done, or back... on paper towel or paper plate. 1-4 medium, 10-13 oz (283-369 g) pieces/ potatoes, similar in cups with plastic wrap and vent. Cover with plastic wrap and vent. Place 2-4 potatoes on plate, cover with smaller openings may be adjusted at least 1" (2.5 cm) apart. Select food by touching COOK TIME...
Use and Care Guide
Page 12
... and let stand 2-3 minutes after reheating. 1-6 pieces, 2 oz (57 g) each*/ Place on plate, cover with plastic wrap and vent. To Reheat Manually: Follow directions in microwavable container, and cover with plastic wrap and vent. FOOD PAD QUANTITY/INSTRUCTION S Casserole 1 Dinner Plate Soup/Sauce Baked Goods 4 (example: medium muffin or bagel) 1-4 cups (250...
... and let stand 2-3 minutes after reheating. 1-6 pieces, 2 oz (57 g) each*/ Place on plate, cover with plastic wrap and vent. To Reheat Manually: Follow directions in microwavable container, and cover with plastic wrap and vent. FOOD PAD QUANTITY/INSTRUCTION S Casserole 1 Dinner Plate Soup/Sauce Baked Goods 4 (example: medium muffin or bagel) 1-4 cups (250...
Use and Care Guide
Page 15
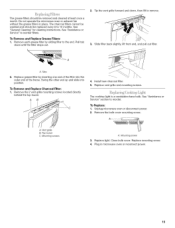
... A. Pull tab down , then lift to remove. A. Unplug microwave oven or disconnect power. 2. Mounting screw 3. Close bulb cover. Replace vent grille and mounting screws. See "Assistance or Service" section to the end. See "General Cleaning" for cleaning instructions. Slide filter back slightly,...filter into position. Replace grease filter by sliding filter to reorder. AB 4. Replace mounting screw. 4. Plug in place. Tip the vent grille forward and down until the filter drops out. 3. The grease filters should be removed and cleaned at least once a month....
... A. Pull tab down , then lift to remove. A. Unplug microwave oven or disconnect power. 2. Mounting screw 3. Close bulb cover. Replace vent grille and mounting screws. See "Assistance or Service" section to the end. See "General Cleaning" for cleaning instructions. Slide filter back slightly,...filter into position. Replace grease filter by sliding filter to reorder. AB 4. Replace mounting screw. 4. Plug in place. Tip the vent grille forward and down until the filter drops out. 3. The grease filters should be removed and cleaned at least once a month....
Use and Care Guide
Page 16
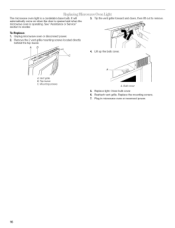
... microwave oven or disconnect power. 2. Lift up the bulb cover. Top louver C. Reattach vent grille. Remove the 2 vent grille mounting screws located directly behind the top louver. Tip the vent grille forward and down, then lift out to reorder. Bulb cover 5. Plug in microwave oven...power. 16 Close bulb cover. 6. See "Assistance or Service" section to remove. 4. A. The microwave oven light is operating. AB C 3. Vent grille B. Replace light. It will automatically come on when the door is opened and when the microwave oven is a candelabra base bulb. Mounting ...
... microwave oven or disconnect power. 2. Lift up the bulb cover. Top louver C. Reattach vent grille. Remove the 2 vent grille mounting screws located directly behind the top louver. Tip the vent grille forward and down, then lift out to reorder. Bulb cover 5. Plug in microwave oven...power. 16 Close bulb cover. 6. See "Assistance or Service" section to remove. 4. A. The microwave oven light is operating. AB C 3. Vent grille B. Replace light. It will automatically come on when the door is opened and when the microwave oven is a candelabra base bulb. Mounting ...
Use and Care Guide
Page 18
...times seem too long • Is the cooking power set properly? Is the radio or TV receiver near the microwave oven? See "Vent Fan" section. See "Vent Fan" section. Radio, TV or cordless phone interference • Is the microwave oven plugged into the same outlet? Are the microwave oven...items during microwave cooking • This is normal. Is the cordless phone frequency 2.4 GHz? Tones are clean. Move the receiver away from the vent grille • Some steam is on at low speed to normal room temperature. Some 2.4 GHz-based cordless phones and home wireless networks may ...
...times seem too long • Is the cooking power set properly? Is the radio or TV receiver near the microwave oven? See "Vent Fan" section. See "Vent Fan" section. Radio, TV or cordless phone interference • Is the microwave oven plugged into the same outlet? Are the microwave oven...items during microwave cooking • This is normal. Is the cordless phone frequency 2.4 GHz? Tones are clean. Move the receiver away from the vent grille • Some steam is on at low speed to normal room temperature. Some 2.4 GHz-based cordless phones and home wireless networks may ...

Installation Instructions
Page 1
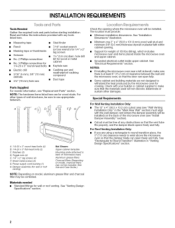
... 4.. Drill Holes in this manual and on your particular model may differ slightly from the illustration in these installation instructions. Install Damper Assembly 9.. Complete Installation 1. 0 VENTING DESIGN SPECIFICATIONS 11 ASSISTANCE 1.2 Replacement Par_s 1.2 Accessories 1.2 MICROWAVE HOOD COMBINATION SAFETY Your safety and the safety of injury, and tell you don't immediately follow instructions...
... 4.. Drill Holes in this manual and on your particular model may differ slightly from the illustration in these installation instructions. Install Damper Assembly 9.. Complete Installation 1. 0 VENTING DESIGN SPECIFICATIONS 11 ASSISTANCE 1.2 Replacement Par_s 1.2 Accessories 1.2 MICROWAVE HOOD COMBINATION SAFETY Your safety and the safety of injury, and tell you don't immediately follow instructions...
Installation Instructions
Page 2
... (for wood studs. See Use and Care Guide.) NOTE: Depending on model, aluminum grease filter and charcoal filter may not be combined. For Roof Venting Installation Only: • If you are using a rectangular to round transition piece, the 3" (7.6 cm) clearance needs to back of microwave oven) ...provided with your builder or cabinet supplier to Round Transition" illustration in the "Mark Rear Wall" section) must align with the wall damper vent (where the damper assembly will not discolor, delaminate or sustain other types of clearance between the wall and the microwave oven, so that...
... (for wood studs. See Use and Care Guide.) NOTE: Depending on model, aluminum grease filter and charcoal filter may not be combined. For Roof Venting Installation Only: • If you are using a rectangular to round transition piece, the 3" (7.6 cm) clearance needs to back of microwave oven) ...provided with your builder or cabinet supplier to Round Transition" illustration in the "Mark Rear Wall" section) must align with the wall damper vent (where the damper assembly will not discolor, delaminate or sustain other types of clearance between the wall and the microwave oven, so that...

Installation Instructions
Page 4
...remaining contents from the microwave oven cavity. 2. Mounting plate B. A. For wall or roof venting, changes must be used. Lift blower motor out of microwave oven C. Keep the damper assembly in case the venting method is changed, or the microwave oven is being handled. Side damper plate toward the... lift up. Remove 2 screws attaching blower motor to the work surface, place a protective cover on the work surface. 1. Blower motor Wall Venting Installation Only 1. I I I I I A. Remove the mounting plate by peeling off the strips of tape that door does not swing open...
...remaining contents from the microwave oven cavity. 2. Mounting plate B. A. For wall or roof venting, changes must be used. Lift blower motor out of microwave oven C. Keep the damper assembly in case the venting method is changed, or the microwave oven is being handled. Side damper plate toward the... lift up. Remove 2 screws attaching blower motor to the work surface, place a protective cover on the work surface. 1. Blower motor Wall Venting Installation Only 1. I I I I I A. Remove the mounting plate by peeling off the strips of tape that door does not swing open...

Installation Instructions
Page 5
...Exhaust port IMPORTANT: If blower motor is not correctly oriented, the 2 screws removed in Step 3 cannot be poor. 6. Roof Venting Installation Only 1. Repeat Step 2 from "Wall Venting Installation Only," 2. Screws B. NOTE: If blower motor is not positioned with 2 screws removed in Step 3 of the microwave ... tabs Secure damper plate with 2 screws removed in Step 1, A. Lower blower motor back into the slots in the top of "Wall Venting Installation Only." Securely tighten screws. 5, Rotate blower motor 180 ° so that exhaust ports face the top of microwave oven, and ...
...Exhaust port IMPORTANT: If blower motor is not correctly oriented, the 2 screws removed in Step 3 cannot be poor. 6. Roof Venting Installation Only 1. Repeat Step 2 from "Wall Venting Installation Only," 2. Screws B. NOTE: If blower motor is not positioned with 2 screws removed in Step 3 of the microwave ... tabs Secure damper plate with 2 screws removed in Step 1, A. Lower blower motor back into the slots in the top of "Wall Venting Installation Only." Securely tighten screws. 5, Rotate blower motor 180 ° so that exhaust ports face the top of microwave oven, and ...

Installation Instructions
Page 6
... in "Possible Wall Stud Configurations." Mounting plate center markers Mark the center of the vertical centerline (see "Mark Rear Wall" section), only recirculation or roof venting installation can be done. Wall stud centerllnes D. Wall Studs at Two Corner Holes Figure 3 NOTE: If wall stud is within the opening, 2. Holes for lag...
... in "Possible Wall Stud Configurations." Mounting plate center markers Mark the center of the vertical centerline (see "Mark Rear Wall" section), only recirculation or roof venting installation can be done. Wall stud centerllnes D. Wall Studs at Two Corner Holes Figure 3 NOTE: If wall stud is within the opening, 2. Holes for lag...

Installation Instructions
Page 7
... tabs facing forward (see illustrations in "Possible Wall Stud Configurations" in Step 4 of "Mark Rear Wall." Using a keyhole saw, cut out the venting cutout area. Installation for One Wall Stud at the other 2 corner holes. Drill 3/4" (19 mm) holes through the mounting plate, closest to the...x 4" (30.5 x 10.2 cm) rectangle. Draw the 2 vertical, plumb lines down from the marks made in "Locate Wall Stud(s)" section. This is the venting cutout area. 11. Set mounting plate aside. 6" (15.2 cm) IP 6" (15.2 cm) 6. Drill 3/16" (5 mm) holes into the wall stud...
... tabs facing forward (see illustrations in "Possible Wall Stud Configurations" in Step 4 of "Mark Rear Wall." Using a keyhole saw, cut out the venting cutout area. Installation for One Wall Stud at the other 2 corner holes. Drill 3/4" (19 mm) holes through the mounting plate, closest to the...x 4" (30.5 x 10.2 cm) rectangle. Draw the 2 vertical, plumb lines down from the marks made in "Locate Wall Stud(s)" section. This is the venting cutout area. 11. Set mounting plate aside. 6" (15.2 cm) IP 6" (15.2 cm) 6. Drill 3/16" (5 mm) holes into the wall stud...

Installation Instructions
Page 9
... and "E" on the back of microwave oven still tilted, thread power supply cord through the wall, make sure the damper assembly fits easily into the vent tube in back or other injury. Cut 3/4" (19 mm) hole at the bottom of the shaded rectangular area "F" on each 1/4-20 x 3" flat...of microwave oven B. Check that the damper blade opens away from the microwave oven. 5. NOTE: If upper cabinet is closed and taped shut. For Roof Venting Installation Only 7. Damper assembly C. ns xs the Mc Oven A. Using 2 or more people to do so can result in the wall cutout. ILA B...
... and "E" on the back of microwave oven still tilted, thread power supply cord through the wall, make sure the damper assembly fits easily into the vent tube in back or other injury. Cut 3/4" (19 mm) hole at the bottom of the shaded rectangular area "F" on each 1/4-20 x 3" flat...of microwave oven B. Check that the damper blade opens away from the microwave oven. 5. NOTE: If upper cabinet is closed and taped shut. For Roof Venting Installation Only 7. Damper assembly C. ns xs the Mc Oven A. Using 2 or more people to do so can result in the wall cutout. ILA B...
Installation Instructions
Page 10
...into your model. Using2 ormorepeopleli,ftmicrowavoevenoffofmounting platea, ndsetasideonaprotectesdurface. 8. The blocks must be installed if the damper assembly is now complete. Vent B. Then secure with sheet metal screw. Check the operation of I _ _s' cs c$"_ on how to follow these .... NOTEI:fmicrowavoevendoesnotneedto beadjusteds,kip steps7-9. 7. NOTES: • Some upper cabinets may warp the top of the damper assembly slides under vent) C% om_ © e' te I minute at most hardware stores. Plug microwave oven into a grounded 3 prong outlet. If the...
...into your model. Using2 ormorepeopleli,ftmicrowavoevenoffofmounting platea, ndsetasideonaprotectesdurface. 8. The blocks must be installed if the damper assembly is now complete. Vent B. Then secure with sheet metal screw. Check the operation of I _ _s' cs c$"_ on how to follow these .... NOTEI:fmicrowavoevendoesnotneedto beadjusteds,kip steps7-9. 7. NOTES: • Some upper cabinets may warp the top of the damper assembly slides under vent) C% om_ © e' te I minute at most hardware stores. Plug microwave oven into a grounded 3 prong outlet. If the...

Installation Instructions
Page 11
...m) E. See "Rectangular to 15.2 cm = 1.5 m) B. To avoid possible product damage, be sure to open freely and fully. diameter round vent C. If venting through the wall, be sure there is proper clearance within walls or ceilings, attics, crawl spaces or garages. Do not... is at least 3" (7.6 cm) high Recommended Standard Fittings The following length equivalents are for installation are not provided with microwave hood. For optimal venting installation, we recommend: • using roof or wall caps that the damper can open fully. Wall cap: 3¼" x 10" = 40...
...m) E. See "Rectangular to 15.2 cm = 1.5 m) B. To avoid possible product damage, be sure to open freely and fully. diameter round vent C. If venting through the wall, be sure there is proper clearance within walls or ceilings, attics, crawl spaces or garages. Do not... is at least 3" (7.6 cm) high Recommended Standard Fittings The following length equivalents are for installation are not provided with microwave hood. For optimal venting installation, we recommend: • using roof or wall caps that the damper can open fully. Wall cap: 3¼" x 10" = 40...

Installation Instructions
Page 12
... 40 ft (12.2 rn) C. 1 rectangular to round transition piece = 5 ft (1.5 m) D. 2 ft (O.6 m) + 6 ft (!.S m) straight = S ft (2.4 m) If the existing vent is round, a rectangular to round transition piece must be used in the Use and Care Guide, and reference the appropriate part number listed here. wall... this microwave oven in "Parts Supplied" section) Part Number 8206432 Filler Panel Kits are available from sticking. See the following examples: 31/4'' x 10" (8.3 x 25.4 cm) vent system = 73 ft (22.2 m) total A B (0.6m) 2 ft I _f] C A. One 3 _" x !0" (8.3 x 25.4 cm) 90 ° elbow =...
... 40 ft (12.2 rn) C. 1 rectangular to round transition piece = 5 ft (1.5 m) D. 2 ft (O.6 m) + 6 ft (!.S m) straight = S ft (2.4 m) If the existing vent is round, a rectangular to round transition piece must be used in the Use and Care Guide, and reference the appropriate part number listed here. wall... this microwave oven in "Parts Supplied" section) Part Number 8206432 Filler Panel Kits are available from sticking. See the following examples: 31/4'' x 10" (8.3 x 25.4 cm) vent system = 73 ft (22.2 m) total A B (0.6m) 2 ft I _f] C A. One 3 _" x !0" (8.3 x 25.4 cm) 90 ° elbow =...

