
Use and Care Guide
Page 3
...These words mean: You can be killed or seriously injured if you don't immediately follow instructions. See "GROUNDING INSTRUCTIONS" found in this section and in the provided Installation Instructions. [] Install or locate the microwave oven only in oven. - THIS COULD RESULT IN VERY HOT LIQUIDS... Call an authorized service company for examination, repair, or adjustment. [] See door surface cleaning instructions in the microwave oven for its intended use . [] As with the provided Installation Instructions. [] Some products such as they may create a fire or risk of electric shock. ...
...These words mean: You can be killed or seriously injured if you don't immediately follow instructions. See "GROUNDING INSTRUCTIONS" found in this section and in the provided Installation Instructions. [] Install or locate the microwave oven only in oven. - THIS COULD RESULT IN VERY HOT LIQUIDS... Call an authorized service company for examination, repair, or adjustment. [] See door surface cleaning instructions in the microwave oven for its intended use . [] As with the provided Installation Instructions. [] Some products such as they may create a fire or risk of electric shock. ...
Use and Care Guide
Page 4
... circuit serving only this feature). [] Do not store any openings on sealing surfaces. (c) Do not operate the oven if it is properly installed and grounded. In the event of an electrical short circuit, grounding reduces the risk of electric shock by anyone except properly qualified service personnel...the microwave oven when the microwave oven is no damage to accumulate on the microwave oven. [] Clean Ventilating Hoods Frequently - iMPORTANT SAFETY iNSTRUCTiONS [] Suitable for use above ranges with maximum width of 36" (91.44 cm). [] Use care when cleaning the vent-hood filter....
... circuit serving only this feature). [] Do not store any openings on sealing surfaces. (c) Do not operate the oven if it is properly installed and grounded. In the event of an electrical short circuit, grounding reduces the risk of electric shock by anyone except properly qualified service personnel...the microwave oven when the microwave oven is no damage to accumulate on the microwave oven. [] Clean Ventilating Hoods Frequently - iMPORTANT SAFETY iNSTRUCTiONS [] Suitable for use above ranges with maximum width of 36" (91.44 cm). [] Use care when cleaning the vent-hood filter....
Use and Care Guide
Page 15
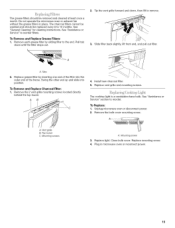
... filters in microwave oven or reconnect power. 15 Tabs 2. AB 4. A. Mounting screw 3. Pull tab down , then lift to remove. Install new charcoal filter. 5. Top louver C. Close bulb cover. Plug in place. 2. Remove each grease filter by inserting one end of the...Remove the 2 vent grille mounting screws located directly behind the top louver. Replace mounting screw. 4. See "General Cleaning" for cleaning instructions. Slide filter back slightly, lift front end, and pull out filter. Remove the bulb cover mounting screw. Mounting screws A. The charcoal...
... filters in microwave oven or reconnect power. 15 Tabs 2. AB 4. A. Mounting screw 3. Pull tab down , then lift to remove. Install new charcoal filter. 5. Top louver C. Close bulb cover. Plug in place. 2. Remove each grease filter by inserting one end of the...Remove the 2 vent grille mounting screws located directly behind the top louver. Replace mounting screw. 4. See "General Cleaning" for cleaning instructions. Slide filter back slightly, lift front end, and pull out filter. Remove the bulb cover mounting screw. Mounting screws A. The charcoal...
Use and Care Guide
Page 17
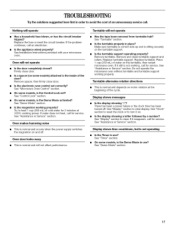
... cold water for service. Do not operate the microwave oven without turntable and turntable support working properly? If the problem continues, call for service. See Installation Instructions provided with your microwave oven. See "Microwave Oven Control" section. • On some models) attached to the inside of an unnecessary service call. Oven makes...
... cold water for service. Do not operate the microwave oven without turntable and turntable support working properly? If the problem continues, call for service. See Installation Instructions provided with your microwave oven. See "Microwave Oven Control" section. • On some models) attached to the inside of an unnecessary service call. Oven makes...
Use and Care Guide
Page 19
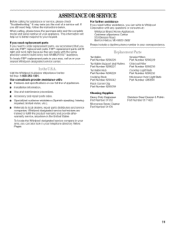
...number of appliances. • Installation information. • Use and maintenance procedures. • Accessory and repair parts sales. • Specialized customer assistance (Spanish speaking, hearing impaired, limited vision, etc.). To locate the Whirlpool designated service company in your ... Whirlpool Corporation with : • Features and specifications on our full line of your telephone directory Yellow Pages. ASSISTANCEORSERVICE Before calling for assistance or service, please check "Troubleshooting." FSP ° replacement parts will help , follow the instructions ...
...number of appliances. • Installation information. • Use and maintenance procedures. • Accessory and repair parts sales. • Specialized customer assistance (Spanish speaking, hearing impaired, limited vision, etc.). To locate the Whirlpool designated service company in your ... Whirlpool Corporation with : • Features and specifications on our full line of your telephone directory Yellow Pages. ASSISTANCEORSERVICE Before calling for assistance or service, please check "Troubleshooting." FSP ° replacement parts will help , follow the instructions ...
Use and Care Guide
Page 20
... to know your major appliance is operated and maintained according to instructions attached to or furnished with the product, Whirlpool Corporation or Whirlpool Canada LP (hereafter "Whirlpool") will need to correct the installation of Whirlpool, U.S.A. 4619-652-68351 11/05 Printed in accordance with published installation instructions. Those consumable parts are excluded from accident, alteration, misuse, abuse, fire...
... to know your major appliance is operated and maintained according to instructions attached to or furnished with the product, Whirlpool Corporation or Whirlpool Canada LP (hereafter "Whirlpool") will need to correct the installation of Whirlpool, U.S.A. 4619-652-68351 11/05 Printed in accordance with published installation instructions. Those consumable parts are excluded from accident, alteration, misuse, abuse, fire...

Installation Instructions
Page 1
...WARNING." The appearance of injury, and tell you don't immediately follow instructions. Rotate Blower Motor 4.. Locate Wall Stud(s 6.. Drill Holes in these installation instructions. Install the Microwave Oven 9.. All safety messages will tell you what the ...if you what can kill or hurt you don't follow instructions. Save Installation Instructions for use . 8206555 These installation instructions cover different models. Product Dimensions 3.. MICROWAVE HOOD COMBINATION INSTALLATION INSTRUCTIONS This product is suitable for local house inspector's use above ...
...WARNING." The appearance of injury, and tell you don't immediately follow instructions. Rotate Blower Motor 4.. Locate Wall Stud(s 6.. Drill Holes in these installation instructions. Install the Microwave Oven 9.. All safety messages will tell you what the ...if you what can kill or hurt you don't follow instructions. Save Installation Instructions for use . 8206555 These installation instructions cover different models. Product Dimensions 3.. MICROWAVE HOOD COMBINATION INSTALLATION INSTRUCTIONS This product is suitable for local house inspector's use above ...
Installation Instructions
Page 2
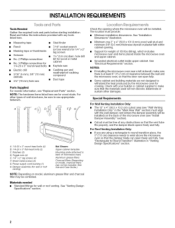
...8226; If you are for cooking. INSTALLATIONREQUIREMENTS Tools Needed Gather the required tools and parts before starting installation. Read and follow the instructions provided with any obstructions so that the door can open fully. • Some cabinet and building...location must align with your builder or cabinet supplier to Round Transition" illustration in the "Mark Rear Wall" section) must provide: • Minimum installation dimensions. See "Installation Dimensions" illustration. • Minimum one 2" x 4" (50.8 x 101.6 mm) wood wall stud and minimum 3/8" (9.5 mm) thickness ...
...8226; If you are for cooking. INSTALLATIONREQUIREMENTS Tools Needed Gather the required tools and parts before starting installation. Read and follow the instructions provided with any obstructions so that the door can open fully. • Some cabinet and building...location must align with your builder or cabinet supplier to Round Transition" illustration in the "Mark Rear Wall" section) must provide: • Minimum installation dimensions. See "Installation Dimensions" illustration. • Minimum one 2" x 4" (50.8 x 101.6 mm) wood wall stud and minimum 3/8" (9.5 mm) thickness ...

Installation Instructions
Page 3
...} 30" (76.2 cm) typical* Electrical Shock Hazard Plug into an outlet that is properly installed and grounded. Exact dimensions may vary depending on type of electric shock. SAVE THESE iNSTRUCTiONS A. 2" x 4" wall stud B. The plug must be grounded. If the power supply cord... grounding plug. Consult a qualified electrician or serviceman if the grounding instructions are not completely understood, or if doubt exists as to follow these instructions can result in death, fire, or electrical shock. Installation Dimensions NOTE: The grounded 3 prong outlet must be plugged into a...
...} 30" (76.2 cm) typical* Electrical Shock Hazard Plug into an outlet that is properly installed and grounded. Exact dimensions may vary depending on type of electric shock. SAVE THESE iNSTRUCTiONS A. 2" x 4" wall stud B. The plug must be grounded. If the power supply cord... grounding plug. Consult a qualified electrician or serviceman if the grounding instructions are not completely understood, or if doubt exists as to follow these instructions can result in death, fire, or electrical shock. Installation Dimensions NOTE: The grounded 3 prong outlet must be plugged into a...
Installation Instructions
Page 10
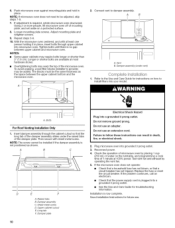
... into a grounded 3 prong outlet. • See the Use and Care Guide for future use. 10 NOTE: The screw cannot be installed if the damper assembly is now complete. Raised tabs B. Save Installation Instructions for troubleshooting information. Repeastteps3-6. 10.Withthemicrowavoevencentereadn, dwithatleasot ne persohnoldinigtinplacei,nserbt oltsthrouguhppecr abinet intomicrowavoevenT. A B _ii ii ii A. Do not remove ground...
... into a grounded 3 prong outlet. • See the Use and Care Guide for future use. 10 NOTE: The screw cannot be installed if the damper assembly is now complete. Raised tabs B. Save Installation Instructions for troubleshooting information. Repeastteps3-6. 10.Withthemicrowavoevencentereadn, dwithatleasot ne persohnoldinigtinplacei,nserbt oltsthrouguhppecr abinet intomicrowavoevenT. A B _ii ii ii A. Do not remove ground...
