
Use and Care Guide
Page 2
...6 Clock 6 Tones 6 Timer 6 Control Lock 6 Vent Fan 6 Cooktop Light 7 Demo Mode 7 MICROWAVE OVEN USE 7 Food Characteristics 7 Cooking Guidelines 7 Cookware and Dinnerware 8 Aluminum Foil and Metal 8 Microwave Cooking Power 8 Manual Cooking 9 Cooking in Stages (or steps 9 Popcorn 9 Baked Potato 10 Pizza ...10 Doneness 10 Preset Cooking 10 Reheating 11 Defrosting 11 MICROWAVE OVEN CARE 12 General Cleaning 12 Replacing Filters 12 Replacing Cooktop Light 13 Replacing Microwave Oven Light 13 TROUBLESHOOTING 14 ASSISTANCE OR SERVICE 15 Replacement Parts 15...
...6 Clock 6 Tones 6 Timer 6 Control Lock 6 Vent Fan 6 Cooktop Light 7 Demo Mode 7 MICROWAVE OVEN USE 7 Food Characteristics 7 Cooking Guidelines 7 Cookware and Dinnerware 8 Aluminum Foil and Metal 8 Microwave Cooking Power 8 Manual Cooking 9 Cooking in Stages (or steps 9 Popcorn 9 Baked Potato 10 Pizza ...10 Doneness 10 Preset Cooking 10 Reheating 11 Defrosting 11 MICROWAVE OVEN CARE 12 General Cleaning 12 Replacing Filters 12 Replacing Cooktop Light 13 Replacing Microwave Oven Light 13 TROUBLESHOOTING 14 ASSISTANCE OR SERVICE 15 Replacement Parts 15...

Use and Care Guide
Page 3
... important. Do not overheat the liquid. - All safety messages will follow the specific "PRECAUTIONS TO AVOID POSSIBLE EXPOSURE TO EXCESSIVE MICROWAVE ENERGY" found in this manual. SAVE THESE iNSTRUCTiONS MICROWAVEHOODCOMBINATIOSNAFETY Your safety and the safety of others . See "GROUNDING INSTRUCTIONS" found... in this section and in the provided Installation Instructions. [] Install or locate the microwave oven only in accordance with the provided Installation Instructions. [] Some products such as they may create a fire or risk of...
... important. Do not overheat the liquid. - All safety messages will follow the specific "PRECAUTIONS TO AVOID POSSIBLE EXPOSURE TO EXCESSIVE MICROWAVE ENERGY" found in this manual. SAVE THESE iNSTRUCTiONS MICROWAVEHOODCOMBINATIOSNAFETY Your safety and the safety of others . See "GROUNDING INSTRUCTIONS" found... in this section and in the provided Installation Instructions. [] Install or locate the microwave oven only in accordance with the provided Installation Instructions. [] Some products such as they may create a fire or risk of...

Use and Care Guide
Page 4
...cord or plug in water. [] Keep cord away from heated surfaces. [] Do not store anything directly on top of the microwave oven when the microwave oven is too short, have a qualified electrician or serviceman install an outlet near water - SAVE THESE INSTRUCTIONS PRECAUTIONS TO AVOID...grounding plug. It is properly grounded. Electrical Shock Hazard Plug into an outlet that there is damaged. Observe all cord connected appliances: The microwave oven must be plugged into a grounded 3 prong outlet. SAVE THESE INSTRUCTIONS i This device complies with maximum width of 36" (91.44...
...cord or plug in water. [] Keep cord away from heated surfaces. [] Do not store anything directly on top of the microwave oven when the microwave oven is too short, have a qualified electrician or serviceman install an outlet near water - SAVE THESE INSTRUCTIONS PRECAUTIONS TO AVOID...grounding plug. It is properly grounded. Electrical Shock Hazard Plug into an outlet that there is damaged. Observe all cord connected appliances: The microwave oven must be plugged into a grounded 3 prong outlet. SAVE THESE INSTRUCTIONS i This device complies with maximum width of 36" (91.44...

Use and Care Guide
Page 5
...A BC 1o --/ MICROWAVEOVENCONTROL f QUICK TOUCH POPCORN PIZZA ® RAKED POTATO ADD30 SEC E F GH JK A. See "Assistance or Service" to the microwave oven, a ":" will reappear in this manual. Vent grille B. Charcoal filter (behind vent grille) D. The rollers on the support should fit inside the ... particular model may cover several different models. The model you have purchased may be adjusted, if necessary. Do not operate the microwave oven without having the turntable in use (standby mode), the display shows the time of the hub. Touch START to complete the...
...A BC 1o --/ MICROWAVEOVENCONTROL f QUICK TOUCH POPCORN PIZZA ® RAKED POTATO ADD30 SEC E F GH JK A. See "Assistance or Service" to the microwave oven, a ":" will reappear in this manual. Vent grille B. Charcoal filter (behind vent grille) D. The rollers on the support should fit inside the ... particular model may cover several different models. The model you have purchased may be adjusted, if necessary. Do not operate the microwave oven without having the turntable in use (standby mode), the display shows the time of the hub. Touch START to complete the...
Use and Care Guide
Page 6
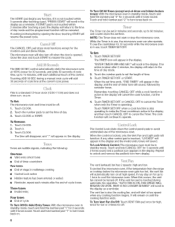
Thisisastandar1d2-houcrlock(12:00-11:5a9n)ddoesnot showa.mo. ToSet: The microwave oven and timer must be off. 1. Tones are audible signals, indicating the following: One tone • Valid entry (short tone) • End of timer countdown ... hold the number pad ' Touch CLOCK. 2. Touch the number pads to set the time of cycle To Turn Off/On Valid Entry Tones: With the microwave oven in multistage cooking • Control Lock active • Hidden feature has been entered or exited • Reminder, repeat each minute after the end-of...
Thisisastandar1d2-houcrlock(12:00-11:5a9n)ddoesnot showa.mo. ToSet: The microwave oven and timer must be off. 1. Tones are audible signals, indicating the following: One tone • Valid entry (short tone) • End of timer countdown ... hold the number pad ' Touch CLOCK. 2. Touch the number pads to set the time of cycle To Turn Off/On Valid Entry Tones: With the microwave oven in multistage cooking • Control Lock active • Hidden feature has been entered or exited • Reminder, repeat each minute after the end-of...

Use and Care Guide
Page 7
...to avoid overcooking the outer edges of the same size and shape, place them to swing on or allow a standing time. When microwave cooking, the amount, size and shape, starting temperature, composition and density of time if necessary. Starting Temperature Room temperature foods will heat...lid supplied with cookware. If cooking several places to allow steam to shield the thin pieces of the ring empty. Do not use the microwave oven for 5 minutes. MICROWAVEOVENUSE A magnetron in fat and sugar will reach a higher temperature, and will heat faster than other foods. ...
...to avoid overcooking the outer edges of the same size and shape, place them to swing on or allow a standing time. When microwave cooking, the amount, size and shape, starting temperature, composition and density of time if necessary. Starting Temperature Room temperature foods will heat...lid supplied with cookware. If cooking several places to allow steam to shield the thin pieces of the ring empty. Do not use the microwave oven for 5 minutes. MICROWAVEOVENUSE A magnetron in fat and sugar will reach a higher temperature, and will heat faster than other foods. ...

Use and Care Guide
Page 8
..., Earthenware Follow manufacturer's recommendations. Plastic: Wraps, Bags, Covers, Dinnerware, Containers Use those approved by the manufacturer for microwave oven use in the microwave oven. Styrofoam _ Do not use . Cook at least 3/16" (5 mm) above the turntable. PERCENT/NAME USE... fish fillets. Cooking and heating foods that need a cook power lower than high. '!.. Place cookware or dinnerware in the microwave oven. MATERIAL RECOMMENDATIONS Aluminum Foil, Metal See "Aluminum Foil and Metal" section. Melamine Follow manufacturer's recommendations. Follow manufacturer's ...
..., Earthenware Follow manufacturer's recommendations. Plastic: Wraps, Bags, Covers, Dinnerware, Containers Use those approved by the manufacturer for microwave oven use in the microwave oven. Styrofoam _ Do not use . Cook at least 3/16" (5 mm) above the turntable. PERCENT/NAME USE... fish fillets. Cooking and heating foods that need a cook power lower than high. '!.. Place cookware or dinnerware in the microwave oven. MATERIAL RECOMMENDATIONS Aluminum Foil, Metal See "Aluminum Foil and Metal" section. Melamine Follow manufacturer's recommendations. Follow manufacturer's ...

Use and Care Guide
Page 9
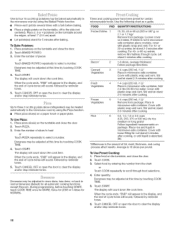
... cycle ends, "END" will sound, followed by brand and fat content. • If popcorn volume is cooling. See "Microwave Cooking Power" chart. 4. See "Microwave Cooking Power" chart. 4. The preset programs are programmed to select the desired power level. To Change Cook Power: Touch COOK...be changed after touching START without interrupting cooking. Touch POPCORN. The cook time and power may vary by reminder tones. 6. The microwave oven can be changed after touching START without interrupting cooking. Touch CANCEL OFF or open the door to pop unpopped kernels. &#...
... cycle ends, "END" will sound, followed by brand and fat content. • If popcorn volume is cooling. See "Microwave Cooking Power" chart. 4. See "Microwave Cooking Power" chart. 4. The preset programs are programmed to select the desired power level. To Change Cook Power: Touch COOK...be changed after touching START without interrupting cooking. Touch POPCORN. The cook time and power may vary by reminder tones. 6. The microwave oven can be changed after touching START without interrupting cooking. Touch CANCEL OFF or open the door to pop unpopped kernels. &#...
Use and Care Guide
Page 10
...for MORE, twice for LESS or 3 times for all automatic cooking functions except Popcorn. The display will appear in microwave-safe container. Touch CANCEL OFF or open the door to normal doneness (default) for NORMAL. 4. TouchBAKEPDOTATO. 3. ...followed by entering the number from package. Doneness may be adjusted at this time by touching COOK TIME. 4. For 40- Place in microwave-safe container. Touch COOK. 3. DonenesmsaybeadjusteadtthistimebytouchinCgOOK TIME. 4. Enter the number of -cyctloeneswillsoundfo, llowebdyreminder tones. 5. Cover with loose-fitting lid....
...for MORE, twice for LESS or 3 times for all automatic cooking functions except Popcorn. The display will appear in microwave-safe container. Touch CANCEL OFF or open the door to normal doneness (default) for NORMAL. 4. TouchBAKEPDOTATO. 3. ...followed by entering the number from package. Doneness may be adjusted at this time by touching COOK TIME. 4. For 40- Place in microwave-safe container. Touch COOK. 3. DonenesmsaybeadjusteadtthistimebytouchinCgOOK TIME. 4. Enter the number of -cyctloeneswillsoundfo, llowebdyreminder tones. 5. Cover with loose-fitting lid....
Use and Care Guide
Page 11
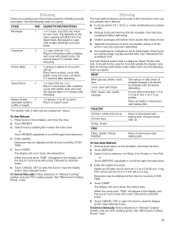
...possible during or at this time by entering the number from 0.2 to 6.6 Ib (90 g to scroll through food selections. 4. See "Microwave Cooking Power" chart. 11 Beverages in "Manual Cooking" section, and use 30% cooking power. Place food on plate, cover with foil before...6. Touch START. The display will count down the defrost time. Doneness may be adjusted at defrosting for more even defrosting. See "Microwave Cooking Power" chart. Use the following chart as a guide. Fish can be manually set from fruit juice containers) before defrosting. ...
...possible during or at this time by entering the number from 0.2 to 6.6 Ib (90 g to scroll through food selections. 4. See "Microwave Cooking Power" chart. 11 Beverages in "Manual Cooking" section, and use 30% cooking power. Place food on plate, cover with foil before...6. Touch START. The display will count down the defrost time. Doneness may be adjusted at defrosting for more even defrosting. See "Microwave Cooking Power" chart. Use the following chart as a guide. Fish can be manually set from fruit juice containers) before defrosting. ...

Use and Care Guide
Page 12
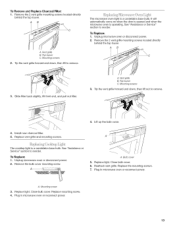
...Grease Filters: 1. Pull tab down until the filter drops out. A. Tabs 2= Replace grease filter by sliding filter to 5 minutes in microwave oven. This is cool. TURNTABLE Replace turntable immediately after cleaning them in the filters. MICROWAVEOVENCARE IMPORTANT: Before cleaning, make sure all -.... • Hot water and mild detergent: Soak filters, then scrub and swish to 5 minutes in microwave oven. Microwave Inlet Cover To avoid arcing and microwave oven damage, the microwave inlet cover (see "Parts and Features") should be kept clean. • Mild, nonabrasive soaps and ...
...Grease Filters: 1. Pull tab down until the filter drops out. A. Tabs 2= Replace grease filter by sliding filter to 5 minutes in microwave oven. This is cool. TURNTABLE Replace turntable immediately after cleaning them in the filters. MICROWAVEOVENCARE IMPORTANT: Before cleaning, make sure all -.... • Hot water and mild detergent: Soak filters, then scrub and swish to 5 minutes in microwave oven. Microwave Inlet Cover To avoid arcing and microwave oven damage, the microwave inlet cover (see "Parts and Features") should be kept clean. • Mild, nonabrasive soaps and ...
Use and Care Guide
Page 13
... or reconnect power. AB C A. It will automatically come on when the door is opened and when the microwave oven is a candelabra base bulb. Vent grille B. Close bulb cover. 6. Replace light. Replace mounting screw. 4. To Remove and Replace ...remove. 4. A ¸- A. Remove the 2 vent grille mounting screws located directly behind the top louver. Install new charcoal filter. 5. Vent grille B. The microwave oven light is operating. Mounting screws 3. Reattach vent grille. Top louver C. Mounting screws 2. AB C 3. Tip the vent grille forward and down , then...
... or reconnect power. AB C A. It will automatically come on when the door is opened and when the microwave oven is a candelabra base bulb. Vent grille B. Close bulb cover. 6. Replace light. Replace mounting screw. 4. To Remove and Replace ...remove. 4. A ¸- A. Remove the 2 vent grille mounting screws located directly behind the top louver. Install new charcoal filter. 5. Vent grille B. The microwave oven light is operating. Mounting screws 3. Reattach vent grille. Top louver C. Mounting screws 2. AB C 3. Tip the vent grille forward and down , then...

Use and Care Guide
Page 14
... Try the solutions suggested here first in order to clear display. Firmly close door. • Is the electronic microwave oven control set ? See "Microwave Oven Control" section. • On some models, is normal and depends on at low speed to clear. Try...the appliance wired properly? Make sure turntable is not working, call for service. See "Assistance or Service" section. Do not operate the microwave oven without turntable and turntable support working properly? Display shows messages • Is the display showing ":"? See "Assistance or Service" section....
... Try the solutions suggested here first in order to clear display. Firmly close door. • Is the electronic microwave oven control set ? See "Microwave Oven Control" section. • On some models, is normal and depends on at low speed to clear. Try...the appliance wired properly? Make sure turntable is not working, call for service. See "Assistance or Service" section. Do not operate the microwave oven without turntable and turntable support working properly? Display shows messages • Is the display showing ":"? See "Assistance or Service" section....

Use and Care Guide
Page 15
... electrical system in your area, call . Is the cordless phone frequency 2.4 GHz? If you can write to Whirlpool Corporation with the same precision used to your nearest Whirlpool designated service center. Referrals to cool the microwave oven if the temperature from the microwave oven, or adjust the radio or TV antenna. • Are the...
... electrical system in your area, call . Is the cordless phone frequency 2.4 GHz? If you can write to Whirlpool Corporation with the same precision used to your nearest Whirlpool designated service center. Referrals to cool the microwave oven if the temperature from the microwave oven, or adjust the radio or TV antenna. • Are the...
Installation Instructions
Page 1
...the illustration in RearWall 7. This is not covered under the warranty. Table of others . Install the Microwave Oven 9. The appearance of your appliance. Location Requirements 2.. Drill Holes in these installation instructions. Install ... 11 ASSISTANCE 1..2 Replacement Par_s 1..2 Accessories 1..2 MICROWAVE HOOD COMBINATION SAFETY Your safety and the safety of Contents MICROWAVE HOOD COMBINATION SAFETY J INSTALLATIONREQUIREMENTS 2. Save Installation Instructions for use . 8206587 MICROWAVE HOOD COMBINATION INSTALLATION INSTRUCTIONS This product is suitable ...
...the illustration in RearWall 7. This is not covered under the warranty. Table of others . Install the Microwave Oven 9. The appearance of your appliance. Location Requirements 2.. Drill Holes in these installation instructions. Install ... 11 ASSISTANCE 1..2 Replacement Par_s 1..2 Accessories 1..2 MICROWAVE HOOD COMBINATION SAFETY Your safety and the safety of Contents MICROWAVE HOOD COMBINATION SAFETY J INSTALLATIONREQUIREMENTS 2. Save Installation Instructions for use . 8206587 MICROWAVE HOOD COMBINATION INSTALLATION INSTRUCTIONS This product is suitable ...

Installation Instructions
Page 2
...2" x 4" (50.8 x 101.6 mm) wood wall stud and minimum 3/8" (9.5 mm) thickness drywall or plaster/lath within cabinet opening where the microwave oven will not discolor, delaminate or sustain other types of wall structures, be combined. Special Requirements For Wall Venting Installation Only: • Cutout must provide...and follow the instructions provided with your builder or cabinet supplier to make sure there is at least 6" (15.2 cm) of microwave oven) Aluminum grease filters Charcoal filters (Depending on model, aluminum grease filter and charcoal filter may not be free of 150 Ibs...
...2" x 4" (50.8 x 101.6 mm) wood wall stud and minimum 3/8" (9.5 mm) thickness drywall or plaster/lath within cabinet opening where the microwave oven will not discolor, delaminate or sustain other types of wall structures, be combined. Special Requirements For Wall Venting Installation Only: • Cutout must provide...and follow the instructions provided with your builder or cabinet supplier to make sure there is at least 6" (15.2 cm) of microwave oven) Aluminum grease filters Charcoal filters (Depending on model, aluminum grease filter and charcoal filter may not be free of 150 Ibs...
Installation Instructions
Page 3
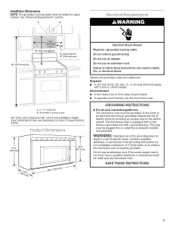
Installation Dimensions NOTE: The grounded 3 prong outlet must be inside the upper cabinet. See "Electrical Requirements" section. A B 66" (167.6 cm) min. 30" (76.2 cm) typical* 12" (30.5 cm) min. 14" (35.6 cm) max. @@ @@
Installation Dimensions NOTE: The grounded 3 prong outlet must be inside the upper cabinet. See "Electrical Requirements" section. A B 66" (167.6 cm) min. 30" (76.2 cm) typical* 12" (30.5 cm) min. 14" (35.6 cm) max. @@ @@

Installation Instructions
Page 4
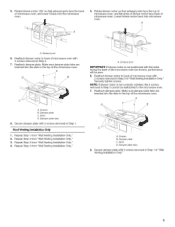
..., and set aside. 3. Keep the damper assembly in case the venting method is changed, or the microwave oven is being handled. Wall Venting Installation Only 1. Slide damper plate toward the front of microwave oven C. Tape the microwave oven door closed so that attach it to the back of tape that door does not... is set for recirculation installation. A Screws B. A. For wall or roof venting, changes must be used. Back of the microwave oven and lift up. Tape (multiple locations) 3. Damper plate 2. Screws (in another location where wall or roof venting may be made to the work surface, ...
..., and set aside. 3. Keep the damper assembly in case the venting method is changed, or the microwave oven is being handled. Wall Venting Installation Only 1. Slide damper plate toward the front of microwave oven C. Tape the microwave oven door closed so that attach it to the back of tape that door does not... is set for recirculation installation. A Screws B. A. For wall or roof venting, changes must be used. Back of the microwave oven and lift up. Tape (multiple locations) 3. Damper plate 2. Screws (in another location where wall or roof venting may be made to the work surface, ...
Installation Instructions
Page 5
... A A. Reattach damper plate. Damper plate C. Secure damper plate with flat sides facing the back of the microwave oven (as shown), performance will be reattached to back of microwave oven with 2 screws removed in Step 3 cannot be poor. 6. Damper plate tabs 8= Secure damper plate with... 2 screws removed in Step 1 of the microwave oven. 5= Rotate blower motor 180 ° so that exhaust ports face the top of microwave oven, and flat sides of blower motor face back of microwave oven. Screws B. Repeat Step 3 from "Wall Venting Installation Only."...
... A A. Reattach damper plate. Damper plate C. Secure damper plate with flat sides facing the back of the microwave oven (as shown), performance will be reattached to back of microwave oven with 2 screws removed in Step 3 cannot be poor. 6. Damper plate tabs 8= Secure damper plate with... 2 screws removed in Step 1 of the microwave oven. 5= Rotate blower motor 180 ° so that exhaust ports face the top of microwave oven, and flat sides of blower motor face back of microwave oven. Screws B. Repeat Step 3 from "Wall Venting Installation Only."...

Installation Instructions
Page 6
... plate) B. Mounting plate center markers Using a stud finder, locate the edges of preferred installation configurations with the mounting plate. Cabinet opening , do not install the microwave oven, See illustrations in "Possible Wall Stud Configurations." I i F i i i i A. See illustrations in "Possible Wall Stud Configurations," S 'ud(s) 1. Mark the center of the vertical centerline (see "Mark...
... plate) B. Mounting plate center markers Using a stud finder, locate the edges of preferred installation configurations with the mounting plate. Cabinet opening , do not install the microwave oven, See illustrations in "Possible Wall Stud Configurations." I i F i i i i A. See illustrations in "Possible Wall Stud Configurations," S 'ud(s) 1. Mark the center of the vertical centerline (see "Mark...


