Use and Care Guide
Page 2
TABLE OF CONTENTS DRYER SAFETY 3 INSTALLATION REQUIREMENTS 4 Tools and Parts 4 Options 4 Location Requirements 4 Electrical Requirements 6 Venting Requirements 7 INSTALLATION INSTRUCTIONS 8 Electrical Connection 8 Plan Vent System 11 Install Vent System 12 Connect Vent 12 Level Dryer 13 Complete Installation 13 DRYER USE 14 Starting Your Dryer 14 Stopping and Restarting 14 Changing Cycles and Temperatures 14 Controls 15 Drying, Cycle and Temperature Tips 15...
TABLE OF CONTENTS DRYER SAFETY 3 INSTALLATION REQUIREMENTS 4 Tools and Parts 4 Options 4 Location Requirements 4 Electrical Requirements 6 Venting Requirements 7 INSTALLATION INSTRUCTIONS 8 Electrical Connection 8 Plan Vent System 11 Install Vent System 12 Connect Vent 12 Level Dryer 13 Complete Installation 13 DRYER USE 14 Starting Your Dryer 14 Stopping and Restarting 14 Changing Cycles and Temperatures 14 Controls 15 Drying, Cycle and Temperature Tips 15...
Use and Care Guide
Page 3
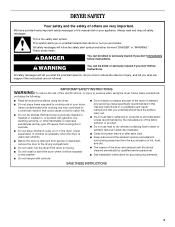
... hazards that you don't immediately follow instructions. s The interior of the dryer and exhaust vent should be killed or seriously injured if you and others are not followed. IMPORTANT SAFETY INSTRUCTIONS WARNING: To reduce the risk of fire, electric shock, or injury to carry out.... INSTRUCTIONS 3 DRYER SAFETY Your safety and the safety of others . s Do not install or store the dryer where it will be killed or seriously injured if you understand and have provided many important safety messages in this Use and Care Guide or in your appliance. s See installation instructions...
... hazards that you don't immediately follow instructions. s The interior of the dryer and exhaust vent should be killed or seriously injured if you and others are not followed. IMPORTANT SAFETY INSTRUCTIONS WARNING: To reduce the risk of fire, electric shock, or injury to carry out.... INSTRUCTIONS 3 DRYER SAFETY Your safety and the safety of others . s Do not install or store the dryer where it will be killed or seriously injured if you understand and have provided many important safety messages in this Use and Care Guide or in your appliance. s See installation instructions...
Use and Care Guide
Page 4
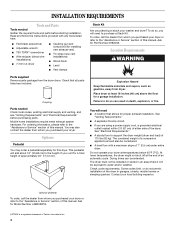
...(7ºC). Check code requirements. s Flat-blade screwdriver s Adjustable wrench s T20 TORX®† screwdriver s Wire stripper (direct wire installations) s 7 mm nut driver s Caulking gun and compound (for Model Number LAB0050PQ. †®TORX is a registered trademark of...of 1" (2.5 cm) under entire dryer. At lower temperatures, the dryer might not shut off at the end of the dryer. Coupling Parts needed Gather the required tools and parts before purchasing parts. See "Electrical Requirements." Read and follow the instructions provided with a maximum slope of ...
...(7ºC). Check code requirements. s Flat-blade screwdriver s Adjustable wrench s T20 TORX®† screwdriver s Wire stripper (direct wire installations) s 7 mm nut driver s Caulking gun and compound (for Model Number LAB0050PQ. †®TORX is a registered trademark of...of 1" (2.5 cm) under entire dryer. At lower temperatures, the dryer might not shut off at the end of the dryer. Coupling Parts needed Gather the required tools and parts before purchasing parts. See "Electrical Requirements." Read and follow the instructions provided with a maximum slope of ...
Use and Care Guide
Page 6
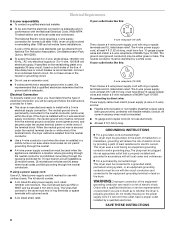
... standards can result in a risk of the terminal block, the dryer cabinet is manufactured ready to install with a 3-wire electrical supply connection. Grounding through the neutral conductors. If using and follow the instructions provided for it here. The ground wire (ground conductor) may ...amp power supply cord, rated 120/240 volt minimum. GROUNDING INSTRUCTIONS s For a grounded, cord-connected dryer: This dryer must be sure that connect to the equipment-grounding terminal or lead on both sides of electrical connection you must end in ring terminals or spade terminals ...
... standards can result in a risk of the terminal block, the dryer cabinet is manufactured ready to install with a 3-wire electrical supply connection. Grounding through the neutral conductors. If using and follow the instructions provided for it here. The ground wire (ground conductor) may ...amp power supply cord, rated 120/240 volt minimum. GROUNDING INSTRUCTIONS s For a grounded, cord-connected dryer: This dryer must be sure that connect to the equipment-grounding terminal or lead on both sides of electrical connection you must end in ring terminals or spade terminals ...
Use and Care Guide
Page 7
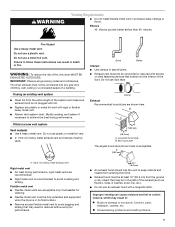
...Clean lint from entering the home. s Do not use a metal foil vent. Failure to follow these instructions can cause moisture and lint to seal all governing codes and ordinances. s Rigid metal vent is in .... Flexible metal vent s Flexible metal vents are shown here. WARNING Venting Requirements s Do not install flexible metal vent in death or fire. IMPORTANT: Observe all joints. Elbows 45° elbows provide...elbows. s Exhaust vent must be in reduced airflow and poor performance. If this dryer MUST BE EXHAUSTED OUTDOORS. Do not use plastic or metal foil vent. s Flexible metal...
...Clean lint from entering the home. s Do not use a metal foil vent. Failure to follow these instructions can cause moisture and lint to seal all governing codes and ordinances. s Rigid metal vent is in .... Flexible metal vent s Flexible metal vents are shown here. WARNING Venting Requirements s Do not install flexible metal vent in death or fire. IMPORTANT: Observe all joints. Elbows 45° elbows provide...elbows. s Exhaust vent must be in reduced airflow and poor performance. If this dryer MUST BE EXHAUSTED OUTDOORS. Do not use plastic or metal foil vent. s Flexible metal...
Use and Care Guide
Page 8
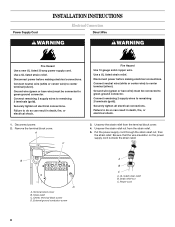
... relief. Ground wire (green or bare wire) must be connected to green ground connector. Disconnect power before making electrical connections. Power cord 8 Use a UL listed strain relief. A C 3. Strain relief nut C. Power Supply Cord INSTALLATION INSTRUCTIONS Electrical Connection Direct Wire WARNING WARNING Fire Hazard Use a new UL listed 30 amp power supply cord. Disconnect power...
... relief. Ground wire (green or bare wire) must be connected to green ground connector. Disconnect power before making electrical connections. Power cord 8 Use a UL listed strain relief. A C 3. Strain relief nut C. Power Supply Cord INSTALLATION INSTRUCTIONS Electrical Connection Direct Wire WARNING WARNING Fire Hazard Use a new UL listed 30 amp power supply cord. Disconnect power...
Use and Care Guide
Page 9
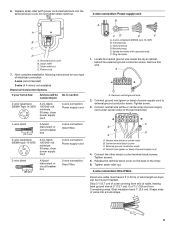
...prong E. Tighten screws. 5. Power cord 7. Ring terminals 1. Locate the neutral ground wire inside the dryer cabinet, behind the external ground conductor screw. Do not tighten strain relief nut. 4-wire connection: Power...ground wire at 5" (12.7 cm). Now complete installation following instructions for your home has: And you will be moved if needed.... Center terminal block screw C. Connect ground wire (green or bare) of electrical connection: 4-wire (recommended) 3-wire (if 4-wire is not available) Electrical...
...prong E. Tighten screws. 5. Power cord 7. Ring terminals 1. Locate the neutral ground wire inside the dryer cabinet, behind the external ground conductor screw. Do not tighten strain relief nut. 4-wire connection: Power...ground wire at 5" (12.7 cm). Now complete installation following instructions for your home has: And you will be moved if needed.... Center terminal block screw C. Connect ground wire (green or bare) of electrical connection: 4-wire (recommended) 3-wire (if 4-wire is not available) Electrical...
Use and Care Guide
Page 11
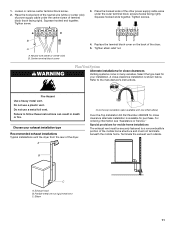
... block (hook facing right). Replace the terminal block cover on the back of the dryer. Plan Vent System Alternate installations for your exhaust installation type Recommended exhaust installations Typical installations vent the dryer from the rear of the dryer. 5. Refer to follow these instructions can result in many varieties. Exhaust hood B. Place the hooked end of the neutral...
... block (hook facing right). Replace the terminal block cover on the back of the dryer. Plan Vent System Alternate installations for your exhaust installation type Recommended exhaust installations Typical installations vent the dryer from the rear of the dryer. 5. Refer to follow these instructions can result in many varieties. Exhaust hood B. Place the hooked end of the neutral...
Use and Care Guide
Page 18
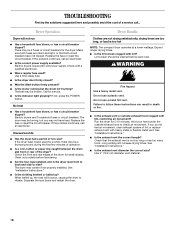
.... No heat s Has a household fuse blown, or has a circuit breaker tripped? The dryer may be a thumping sound during the first few minutes of operation. See "Installation Instructions." s Is the exhaust vent diameter the correct size? There may be cleaned before laundering. Electric dryers require 240-volt power supply. The belt may be 2 fuses or circuit...
.... No heat s Has a household fuse blown, or has a circuit breaker tripped? The dryer may be a thumping sound during the first few minutes of operation. See "Installation Instructions." s Is the exhaust vent diameter the correct size? There may be cleaned before laundering. Electric dryers require 240-volt power supply. The belt may be 2 fuses or circuit...

Use and Care Guide
Page 19
...Automatic Cycles. s Accessory and repair parts sales. To locate the Whirlpool designated service company in your area, you need help us or your request. See "Installation Instructions." Failure to Whirlpool Corporation with the same precision used for assistance or service, please ...electric heating element may not be contacting the sensor strips. Change the dryness level setting on our full line of your dryer is recommended for a garage installation. FSP® replacement parts will change the amount of the door. The load may have ventilation openings at : Whirlpool...
...Automatic Cycles. s Accessory and repair parts sales. To locate the Whirlpool designated service company in your area, you need help us or your request. See "Installation Instructions." Failure to Whirlpool Corporation with the same precision used for assistance or service, please ...electric heating element may not be contacting the sensor strips. Change the dryness level setting on our full line of your dryer is recommended for a garage installation. FSP® replacement parts will change the amount of the door. The load may have ventilation openings at : Whirlpool...
Use and Care Guide
Page 20
...electrical or plumbing codes, or use of products not approved by calling Whirlpool. WHIRLPOOL CORPORATION MAJOR APPLIANCE WARRANTY ONE YEAR LIMITED WARRANTY For one year from the date of purchase, when this major appliance is operated and maintained according to instructions attached to or furnished with the product, Whirlpool Corporation or Whirlpool... Purchase date 8578567 © 2005 Whirlpool Corporation. If you ever need it is installed in an inaccessible location or is not installed in accordance with published installation instructions. You will pay for units operated...
...electrical or plumbing codes, or use of products not approved by calling Whirlpool. WHIRLPOOL CORPORATION MAJOR APPLIANCE WARRANTY ONE YEAR LIMITED WARRANTY For one year from the date of purchase, when this major appliance is operated and maintained according to instructions attached to or furnished with the product, Whirlpool Corporation or Whirlpool... Purchase date 8578567 © 2005 Whirlpool Corporation. If you ever need it is installed in an inaccessible location or is not installed in accordance with published installation instructions. You will pay for units operated...


