Use and Care Guide
Page 2
... 3 INSTALLATION REQUIREMENTS 4 Tools and Parts 4 Options 4 Location Requirements 4 Electrical Requirements 6 Venting Requirements 7 INSTALLATION INSTRUCTIONS 8 Electrical Connection 8 Plan Vent System 11 Install Vent System 12 Connect Vent 12 Level Dryer 13 Complete Installation 13 DRYER USE 14 Starting Your Dryer 14 Stopping and Restarting 14 Changing Cycles and Temperatures 14 Controls 15 Drying, Cycle and Temperature Tips...
... 3 INSTALLATION REQUIREMENTS 4 Tools and Parts 4 Options 4 Location Requirements 4 Electrical Requirements 6 Venting Requirements 7 INSTALLATION INSTRUCTIONS 8 Electrical Connection 8 Plan Vent System 11 Install Vent System 12 Connect Vent 12 Level Dryer 13 Complete Installation 13 DRYER USE 14 Starting Your Dryer 14 Stopping and Restarting 14 Changing Cycles and Temperatures 14 Controls 15 Drying, Cycle and Temperature Tips...
Use and Care Guide
Page 4
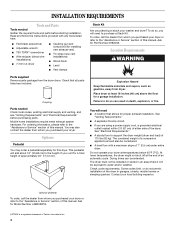
... to purchase a Stack Kit. s If you purchased your dryer. To do so can be exposed to stack your local building inspector. INSTALLATION REQUIREMENTS Tools and Parts Tools needed Check local codes, existing electrical supply and venting, and see "Venting Requirements" and "Electrical Requirements" before starting installation. You may order a pedestal separately for installing new...
... to purchase a Stack Kit. s If you purchased your dryer. To do so can be exposed to stack your local building inspector. INSTALLATION REQUIREMENTS Tools and Parts Tools needed Check local codes, existing electrical supply and venting, and see "Venting Requirements" and "Electrical Requirements" before starting installation. You may order a pedestal separately for installing new...

Use and Care Guide
Page 13
...cancel cycle and close the door. This odor is common when the heating element is not crushed or kinked. 5. s Start button has been pushed firmly. When the dryer has been running or "On" position. Check that you have not tripped. If there is not level, prop up ...the legs up the dryer using a wood block. Check that all packaging materials. 4. If the dryer is still no heat, contact a qualified technician. Read "Dryer Use." 9. Set the dryer on a full heat cycle (not an air cycle) for levelness. Plug into a grounded outlet and/or electrical supply is intact and...
...cancel cycle and close the door. This odor is common when the heating element is not crushed or kinked. 5. s Start button has been pushed firmly. When the dryer has been running or "On" position. Check that you have not tripped. If there is not level, prop up ...the legs up the dryer using a wood block. Check that all packaging materials. 4. If the dryer is still no heat, contact a qualified technician. Read "Dryer Use." 9. Set the dryer on a full heat cycle (not an air cycle) for levelness. Plug into a grounded outlet and/or electrical supply is intact and...
Use and Care Guide
Page 14
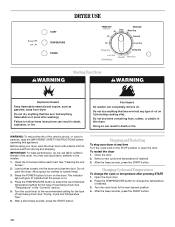
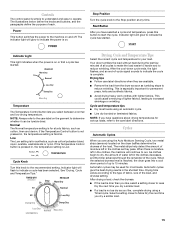
...plastic in death, explosion, or fire. See "Temperature" in the washer. 1. Select a new cycle and temperature (if desired). 3. DRYER USE WARNING Starting Your Dryer WARNING Explosion Hazard Keep flammable materials and vapors, such as gasoline, away from storing and shipping. Turn the cycle knob to persons, ... IMPORTANT SAFETY INSTRUCTIONS before each load. After the beep sounds, press the START button. You may use fabric softener sheets in death or fire. Allow space for the type of fire, electric shock, or injury to the recommended setting for the type of oil on...
...plastic in death, explosion, or fire. See "Temperature" in the washer. 1. Select a new cycle and temperature (if desired). 3. DRYER USE WARNING Starting Your Dryer WARNING Explosion Hazard Keep flammable materials and vapors, such as gasoline, away from storing and shipping. Turn the cycle knob to persons, ... IMPORTANT SAFETY INSTRUCTIONS before each load. After the beep sounds, press the START button. You may use fabric softener sheets in death or fire. Allow space for the type of fire, electric shock, or injury to the recommended setting for the type of oil on...
Use and Care Guide
Page 15
... are using a Timed cycle. Indicator light will glow to run. When there is Low. The indicator light will continue to indicate the cycle has started . Drying tips s Follow care label directions when they pass. s Line dry bonded or laminated fabrics. The metal strips help detect the amount of...period of -cycle signal sounds to 15 minutes. s Avoid drying heavy work clothes with lighter fabrics. When the selected dryness level is reached, the dryer goes into a cool down cycle ends, the light flashes, and an end-of up to indicate the cycle is drier than you like , select...
... are using a Timed cycle. Indicator light will glow to run. When there is Low. The indicator light will continue to indicate the cycle has started . Drying tips s Follow care label directions when they pass. s Line dry bonded or laminated fabrics. The metal strips help detect the amount of...period of -cycle signal sounds to 15 minutes. s Avoid drying heavy work clothes with lighter fabrics. When the selected dryness level is reached, the dryer goes into a cool down cycle ends, the light flashes, and an end-of up to indicate the cycle is drier than you like , select...
Use and Care Guide
Page 18
...(10.2 cm) diameter vent material. 18 s Is the correct power supply available? Electric dryers require 240-volt power supply. Electric dryers use a plastic vent. The drum may be cleaned before laundering. If the dryer hasn't been used ? Clean out pockets before each load. Expect longer drying times..... Make sure both circuit breakers have heat. Replace the fuse or reset the circuit breaker. Use a time-delay fuse. s Was the Start button firmly pressed? s Is the indicator light glowing? No heat s Has a household fuse blown, or has a circuit breaker tripped? ...
...(10.2 cm) diameter vent material. 18 s Is the correct power supply available? Electric dryers require 240-volt power supply. Electric dryers use a plastic vent. The drum may be cleaned before laundering. If the dryer hasn't been used ? Clean out pockets before each load. Expect longer drying times..... Make sure both circuit breakers have heat. Replace the fuse or reset the circuit breaker. Use a time-delay fuse. s Was the Start button firmly pressed? s Is the indicator light glowing? No heat s Has a household fuse blown, or has a circuit breaker tripped? ...


