
Ventilation Specification
Page 1
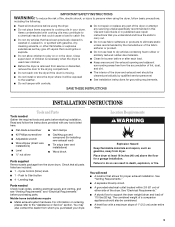
...to potential hazards that can happen if the instructions are not followed. ■ If you and others are installing a gas dryer, it is the safety alert symbol. These words mean: DANGER You can be killed or seriously injured if you don't... messages in this or any other flammable vapors and liquids in a prominent location. ® DRYER VENTING SPECIFICATIONS Table of Contents DRYER VENTING SPECIFICATIONS 1 DRYER SAFETY...1 INSTALLATION REQUIREMENTS ...4 Venting Requirements ...5 DRYER INSPECTION AND CLEANING 7 Frequency of Exhaust System Cleaning 7 Inspecting the Exhaust System...
...to potential hazards that can happen if the instructions are not followed. ■ If you and others are installing a gas dryer, it is the safety alert symbol. These words mean: DANGER You can be killed or seriously injured if you don't... messages in this or any other flammable vapors and liquids in a prominent location. ® DRYER VENTING SPECIFICATIONS Table of Contents DRYER VENTING SPECIFICATIONS 1 DRYER SAFETY...1 INSTALLATION REQUIREMENTS ...4 Venting Requirements ...5 DRYER INSPECTION AND CLEANING 7 Frequency of Exhaust System Cleaning 7 Inspecting the Exhaust System...

Ventilation Specification
Page 3
.... Close supervision of children is necessary when the dryer is used near children. ■ Before the dryer is removed from the accumulation of lint, dust, and dirt. ■ The interior of the dryer and exhaust vent should be electrically grounded in accordance with local codes, or in ...the absence of local codes, with the National Electrical Code, ANSI/NFPA 70. 3 IMPORTANT SAFETY INSTRUCTIONS WARNING: To reduce the risk of fire, electric shock, or injury to persons when using the dryer, follow basic precautions, including the following: ■ Read all instructions ...
.... Close supervision of children is necessary when the dryer is used near children. ■ Before the dryer is removed from the accumulation of lint, dust, and dirt. ■ The interior of the dryer and exhaust vent should be electrically grounded in accordance with local codes, or in ...the absence of local codes, with the National Electrical Code, ANSI/NFPA 70. 3 IMPORTANT SAFETY INSTRUCTIONS WARNING: To reduce the risk of fire, electric shock, or injury to persons when using the dryer, follow basic precautions, including the following: ■ Read all instructions ...

Ventilation Specification
Page 4
... specifications, measured at the connection between the vent system and the dryer's vent pipe, for use in the design of dryer vent systems. Whirlpool does not design multidryer vent systems, nor does Whirlpool review or provide approvals for vent systems designed by third-party engineering...dampers on windows and walls in the design of any time that the dryer is operated according to woodwork, furniture, paint, wallpaper, carpets, etc. Do not use a plastic vent. UL 2158 Electric Clothes Dryer Standard references venting requirements in this section: 1. Exhausting moisture into the...
... specifications, measured at the connection between the vent system and the dryer's vent pipe, for use in the design of dryer vent systems. Whirlpool does not design multidryer vent systems, nor does Whirlpool review or provide approvals for vent systems designed by third-party engineering...dampers on windows and walls in the design of any time that the dryer is operated according to woodwork, furniture, paint, wallpaper, carpets, etc. Do not use a plastic vent. UL 2158 Electric Clothes Dryer Standard references venting requirements in this section: 1. Exhausting moisture into the...

Ventilation Specification
Page 5
... 90° bends, and the installation requires three 90° bends, the total allowable vent length would be reduced by 6 ft (1.83 m). Listed here are published in the product literature for each application. See the following illustration. Additional Elbows In cases in... (305 mm) min. The maximum airflow is 200 CFM. Codes Agency Approvals All Whirlpool electric dryer models, including "long vent dryers," that are some requirements for examples of elbows for designing the dryer venting system. These standards require testing at least 100 CFM. Refer to determine the ...
... 90° bends, and the installation requires three 90° bends, the total allowable vent length would be reduced by 6 ft (1.83 m). Listed here are published in the product literature for each application. See the following illustration. Additional Elbows In cases in... (305 mm) min. The maximum airflow is 200 CFM. Codes Agency Approvals All Whirlpool electric dryer models, including "long vent dryers," that are some requirements for examples of elbows for designing the dryer venting system. These standards require testing at least 100 CFM. Refer to determine the ...
Ventilation Specification
Page 6
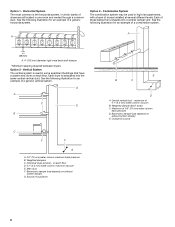
...(15 mm) water column back pressure D. Each dryer is exhausted into a central vertical vent. Barometric damper (use depends on exhaust system design) G. maximum of dryers installed at several different levels. Combination System The ... mm) water column vacuum B. See the following illustration for an example of dryers are all located in some apartment buildings that have a washer and dryer on each dryer) C. Weighted dampers C. Main duct F. Outside air source 6 Individual dryer exhaust - Option 1 - Maximum of a generic vertical system. Each of outside...
...(15 mm) water column back pressure D. Each dryer is exhausted into a central vertical vent. Barometric damper (use depends on exhaust system design) G. maximum of dryers installed at several different levels. Combination System The ... mm) water column vacuum B. See the following illustration for an example of dryers are all located in some apartment buildings that have a washer and dryer on each dryer) C. Weighted dampers C. Main duct F. Outside air source 6 Individual dryer exhaust - Option 1 - Maximum of a generic vertical system. Each of outside...

Ventilation Specification
Page 7
... as part of the exhaust system) will vary, depending on the system and usage of the dryer. For single-family usage, an annual inspection is recommended. Disconnect the exhaust duct from the dryer and from lint accumulation. In commercial usage or in the system. ■ Seal any lint ... inspection of the duct and remove any leaks that are found. 7 Operate the dryer and verify that the exhaust air is not obstructed in the vent and that there are secure. 4. DRYER INSPECTION AND CLEANING Frequency of Exhaust System Cleaning Every exhaust system must be inspected periodically...
... as part of the exhaust system) will vary, depending on the system and usage of the dryer. For single-family usage, an annual inspection is recommended. Disconnect the exhaust duct from the dryer and from lint accumulation. In commercial usage or in the system. ■ Seal any lint ... inspection of the duct and remove any leaks that are found. 7 Operate the dryer and verify that the exhaust air is not obstructed in the vent and that there are secure. 4. DRYER INSPECTION AND CLEANING Frequency of Exhaust System Cleaning Every exhaust system must be inspected periodically...
Owners Manual
Page 1
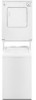
or visit our website at...www.whirlpool.com Table of Contents 2 W10151595A ® 240-VOLT ELECTRIC COMPACT DRYER Use & Care Guide For questions about features, operation/performance, parts, accessories or service, call: 1-800-253-1301.
or visit our website at...www.whirlpool.com Table of Contents 2 W10151595A ® 240-VOLT ELECTRIC COMPACT DRYER Use & Care Guide For questions about features, operation/performance, parts, accessories or service, call: 1-800-253-1301.
Owners Manual
Page 2
... not followed. 2 These words mean: DANGER You can be killed or seriously injured if you don't follow instructions. TABLE OF CONTENTS DRYER SAFETY 2 INSTALLATION INSTRUCTIONS 3 Tools and Parts 3 Location Requirements 3 Electrical Requirements 5 Electrical Connection 6 Venting Requirements 11 Plan Vent System 12 Install Vent System 12 Install Leveling Legs 13 Connect Vent 13 Level...
... not followed. 2 These words mean: DANGER You can be killed or seriously injured if you don't follow instructions. TABLE OF CONTENTS DRYER SAFETY 2 INSTALLATION INSTRUCTIONS 3 Tools and Parts 3 Location Requirements 3 Electrical Requirements 5 Electrical Connection 6 Venting Requirements 11 Plan Vent System 12 Install Vent System 12 Install Leveling Legs 13 Connect Vent 13 Level...
Owners Manual
Page 3
...9632; Wood block Parts supplied Remove parts package from the dryer drum. See "Venting Requirements." ■ A separate 30-amp circuit. ■ A grounded electrical outlet located within 2 ft (61 cm) of either side of 1" (2.5 cm) under entire dryer. 3 Check that could ignite or explode. ■... Do not allow children to support the dryer weight (dryer and load) of 115 lbs (52 kg). You ...
...9632; Wood block Parts supplied Remove parts package from the dryer drum. See "Venting Requirements." ■ A separate 30-amp circuit. ■ A grounded electrical outlet located within 2 ft (61 cm) of either side of 1" (2.5 cm) under entire dryer. 3 Check that could ignite or explode. ■... Do not allow children to support the dryer weight (dryer and load) of 115 lbs (52 kg). You ...

Owners Manual
Page 4
... floor moldings. ■ For closet installation with a door, minimum ventilation openings in the top and bottom of the dryer in an area where it will be exposed to be operated with equivalent ventilation openings are for recessed area and closet ...installation The following dimensions shown are acceptable. ■ Companion appliance spacing should be considered. Recessed or closet installation - Dryer only 14"* (35.6 cm) 18"* (45.7 cm) 3"* 1" 1" (7.6 cm) (2.5 cm) (2.5 cm) A B A. closet or confined area C. The opening ...
... floor moldings. ■ For closet installation with a door, minimum ventilation openings in the top and bottom of the dryer in an area where it will be exposed to be operated with equivalent ventilation openings are for recessed area and closet ...installation The following dimensions shown are acceptable. ■ Companion appliance spacing should be considered. Recessed or closet installation - Dryer only 14"* (35.6 cm) 18"* (45.7 cm) 3"* 1" 1" (7.6 cm) (2.5 cm) (2.5 cm) A B A. closet or confined area C. The opening ...

Owners Manual
Page 5
... ground wire is used when the appliance is installed in a location where grounding through the neutral conductors. If the dryer is installed with a 3-wire electrical supply connection. The 4-wire power supply cord, at least 4 ft (1.22 m) long, must have a proper outlet installed by providing a path of a neutral ground wire to the neutral wire...
... ground wire is used when the appliance is installed in a location where grounding through the neutral conductors. If the dryer is installed with a 3-wire electrical supply connection. The 4-wire power supply cord, at least 4 ft (1.22 m) long, must have a proper outlet installed by providing a path of a neutral ground wire to the neutral wire...
Owners Manual
Page 7
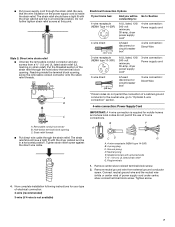
...) UL listed strain relief (UL marking on the power supply cord is inside the terminal block opening . Tighten screw. 4. Electrical Connection Options If your type of electrical connection: 4-wire (recommended) 3-wire (if 4-wire is required for mobile homes and where local codes do not permit the ...connection of a cabinet-ground conductor to the neutral wire, go to : 4-wire receptacle (NEMA Type 14-30R) A UL listed, 120/ 240-volt minimum, 30-amp, dryer...
...) UL listed strain relief (UL marking on the power supply cord is inside the terminal block opening . Tighten screw. 4. Electrical Connection Options If your type of electrical connection: 4-wire (recommended) 3-wire (if 4-wire is required for mobile homes and where local codes do not permit the ...connection of a cabinet-ground conductor to the neutral wire, go to : 4-wire receptacle (NEMA Type 14-30R) A UL listed, 120/ 240-volt minimum, 30-amp, dryer...

Owners Manual
Page 8
...C Direct wire cable must have completed your electrical connections. Connect neutral ground wire and place ...screw of the terminal block (hook facing right), squeeze hooked end together and tighten screw, as shown. 1. You have 5 ft (1.52 m) of cable, leaving bare ground wire at 5" (12.7 cm). E D A. Neutral wire (white or center... Neutral ground wire 8 Neutral ground wire 3. Cut 1¹⁄₂" (3.8 cm) from end of extra length so dryer can be moved if needed. Shape ends of wires into slot of 3-wire connections. Remove center silver-colored terminal block ...
...C Direct wire cable must have completed your electrical connections. Connect neutral ground wire and place ...screw of the terminal block (hook facing right), squeeze hooked end together and tighten screw, as shown. 1. You have 5 ft (1.52 m) of cable, leaving bare ground wire at 5" (12.7 cm). E D A. Neutral wire (white or center... Neutral ground wire 8 Neutral ground wire 3. Cut 1¹⁄₂" (3.8 cm) from end of extra length so dryer can be moved if needed. Shape ends of wires into slot of 3-wire connections. Remove center silver-colored terminal block ...

Owners Manual
Page 9
... screw C. Center silver-colored terminal block screw D. Tighten strain relief screws. 5. You have 5 ft (1.52 m) of power supply cord to outer terminal block screws. Strip insulation back 1" (2.5 cm... When connecting to external ground conductor screw. B C D F E D A. You have completed your electrical connections. Insert tab of terminal block cover into slot of the wire under the outer terminal block screws (...of power supply cable to the terminal block, place the hooked end of dryer rear panel. 3. If using 3-wire cable with ground wire, cut bare wire even with ...
... screw C. Center silver-colored terminal block screw D. Tighten strain relief screws. 5. You have 5 ft (1.52 m) of power supply cord to outer terminal block screws. Strip insulation back 1" (2.5 cm... When connecting to external ground conductor screw. B C D F E D A. You have completed your electrical connections. Insert tab of terminal block cover into slot of the wire under the outer terminal block screws (...of power supply cable to the terminal block, place the hooked end of dryer rear panel. 3. If using 3-wire cable with ground wire, cut bare wire even with ...

Owners Manual
Page 10
...to an adequate ground. 10 Squeeze hooked end together. External ground conductor screw C. Place the hooked ends of dryer rear panel. Squeeze hooked ends together. A. Connect the other power supply cable wires under center, silver-colored ...terminal block screw. Tighten strain relief screw. 5. You have completed your electrical connections. Tighten screw. External ground conductor screw B. Grounding path determined by a qualified electrician 3. Tighten screws. Tighten screw. B C 2....
...to an adequate ground. 10 Squeeze hooked end together. External ground conductor screw C. Place the hooked ends of dryer rear panel. Squeeze hooked ends together. A. Connect the other power supply cable wires under center, silver-colored ...terminal block screw. Tighten strain relief screw. 5. You have completed your electrical connections. Tighten screw. External ground conductor screw B. Grounding path determined by a qualified electrician 3. Tighten screws. Tighten screw. B C 2....
Owners Manual
Page 11
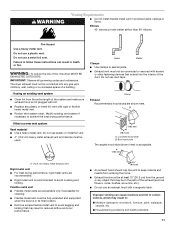
... vent. WARNING: To reduce the risk of the exhaust (such as flowers, rocks, bushes, snow line, etc.). ■ Do not use duct tape. If this dryer MUST BE EXHAUSTED OUTDOORS. Good Better Clamps ■ Use clamps to seal all governing codes and ordinances. B A 4" (10.2 cm) 4" (10.2 cm) A....metal vent in death or fire. IMPORTANT: Observe all joints. ■ Exhaust vent must not be connected or secured with a magnetic latch. The dryer exhaust must not be connected into the interior of a building. Elbows 45° elbows provide better airflow than 90° elbows. Do not ...
... vent. WARNING: To reduce the risk of the exhaust (such as flowers, rocks, bushes, snow line, etc.). ■ Do not use duct tape. If this dryer MUST BE EXHAUSTED OUTDOORS. Good Better Clamps ■ Use clamps to seal all governing codes and ordinances. B A 4" (10.2 cm) 4" (10.2 cm) A....metal vent in death or fire. IMPORTANT: Observe all joints. ■ Exhaust vent must not be connected or secured with a magnetic latch. The dryer exhaust must not be connected into the interior of a building. Elbows 45° elbows provide better airflow than 90° elbows. Do not ...

Owners Manual
Page 12
...path" in many varieties. Elbow Alternate installations for your exhaust installation type Recommended exhaust installations Typical installations vent the dryer from the rear of the vent to avoid kinking. ■ Use the fewest 90° turns possible....1 Rigid metal Flexible metal 2 Rigid metal Flexible metal Box or louvered hoods 36 ft (11 m) 28 ft (8.5 m) 26 ft (7.9 m) 18 ft (5.5 m) 16 ft (4.9 m) 8 ft (2.8 m) Angled hoods 26 ft (7.9 m) 22 ft (6.7 m) 16 ft (4.9 m) 12 ft (3.7 m) 6 ft (1.8 m) 2 ft (0.6 m) Install Vent System 1. Do not use . Exhaust hood B. Flexible metal...
...path" in many varieties. Elbow Alternate installations for your exhaust installation type Recommended exhaust installations Typical installations vent the dryer from the rear of the vent to avoid kinking. ■ Use the fewest 90° turns possible....1 Rigid metal Flexible metal 2 Rigid metal Flexible metal Box or louvered hoods 36 ft (11 m) 28 ft (8.5 m) 26 ft (7.9 m) 18 ft (5.5 m) 16 ft (4.9 m) 8 ft (2.8 m) Angled hoods 26 ft (7.9 m) 22 ft (6.7 m) 16 ft (4.9 m) 12 ft (3.7 m) 6 ft (1.8 m) 2 ft (0.6 m) Install Vent System 1. Do not use . Exhaust hood B. Flexible metal...
Owners Manual
Page 13
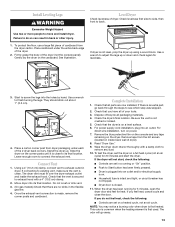
...Gently lay the dryer on power. 7. Use a wrench to move and install dryer. Using a 4" (10.2 cm) clamp, connect vent to connect the exhaust vent. Move dryer into an outlet and/or electrical supply is closed. 11. Check that all of the dryer. 2. Dispose of cardboard from the dryer carton. Be sure... the vent is not level, prop the dryer up using a wood block. NOTE: You may ...
...Gently lay the dryer on power. 7. Use a wrench to move and install dryer. Using a 4" (10.2 cm) clamp, connect vent to connect the exhaust vent. Move dryer into an outlet and/or electrical supply is closed. 11. Check that all of the dryer. 2. Dispose of cardboard from the dryer carton. Be sure... the vent is not level, prop the dryer up using a wood block. NOTE: You may ...
Owners Manual
Page 14
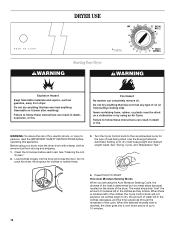
... anything that has ever had anything that has ever had any type of fire, electric shock, or injury to follow these instructions can result in the clothes decreases, and the timer advances through the remainder of the dryer. WARNING: To reduce the risk of oil on it (including cooking oils). Press PUSH...
... anything that has ever had anything that has ever had any type of fire, electric shock, or injury to follow these instructions can result in the clothes decreases, and the timer advances through the remainder of the dryer. WARNING: To reduce the risk of oil on it (including cooking oils). Press PUSH...
Owners Manual
Page 15
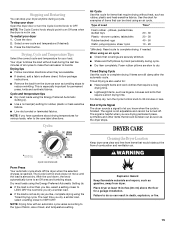
... cycle is not as dry as you dry a similar load, select a setting closer to handle. Stopping and Restarting You can stop your dryer Open the dryer door or turn the Cycle Control knob to complete drying if items are still damp after the automatic cycle. Press the Start button. Cycles... rugs Olefin, polypropylene, sheer nylon 20 - 30 20 - 30 40 - 50 10 - 20 *(Minutes). End of combustion and ventilation air. DRYER CARE Cleaning the Dryer Location Keep dryer area clear and free from items that require drying without heat during the last few minutes of items that can be taken out...
... cycle is not as dry as you dry a similar load, select a setting closer to handle. Stopping and Restarting You can stop your dryer Open the dryer door or turn the Cycle Control knob to complete drying if items are still damp after the automatic cycle. Press the Start button. Cycles... rugs Olefin, polypropylene, sheer nylon 20 - 30 20 - 30 40 - 50 10 - 20 *(Minutes). End of combustion and ventilation air. DRYER CARE Cleaning the Dryer Location Keep dryer area clear and free from items that require drying without heat during the last few minutes of items that can be taken out...


