
Owners Manual
Page 4
...; Keep Oven Vent Ducts Unobstructed. ■ Placement of the range unless specifically recommended in temperature. ■ Utensil Handles Should Be Turned Inward and Not Extend Over Adjacent Surface Units - For self-cleaning ranges - ■ Do Not Clean Door Gasket - Remove broiler pan and other bulky cloth. ■ DO NOT TOUCH SURFACE UNITS OR AREAS NEAR UNITS - TO CHECK IF THE DEVICES ARE INSTALLED PROPERLY, SLIDE RANGE FORWARD, LOOK FOR ANTI-TIP BRACKET SECURELY...
...; Keep Oven Vent Ducts Unobstructed. ■ Placement of the range unless specifically recommended in temperature. ■ Utensil Handles Should Be Turned Inward and Not Extend Over Adjacent Surface Units - For self-cleaning ranges - ■ Do Not Clean Door Gasket - Remove broiler pan and other bulky cloth. ■ DO NOT TOUCH SURFACE UNITS OR AREAS NEAR UNITS - TO CHECK IF THE DEVICES ARE INSTALLED PROPERLY, SLIDE RANGE FORWARD, LOOK FOR ANTI-TIP BRACKET SECURELY...
Owners Manual
Page 5
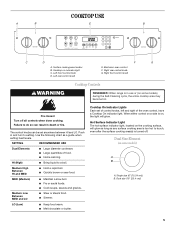
... cooking area(s) is on some models) during the Self-Cleaning cycle, the entire cooktop area may become hot. The control knobs can result in death or fire. When either control on the cooking surface, will glow. Hot Surface Indicator Light The hot surface indicator light, located on a side is turned off all controls when done cooking. Single size (6" [15.24 cm]) B. Surface cooking area locator B. Cooktop on some models) A B A. Electronic oven control F. Cooktop On Indicator Lights Each set anywhere between HI and LO. SETTING RECOMMENDED USE Dual Elements...
... cooking area(s) is on some models) during the Self-Cleaning cycle, the entire cooktop area may become hot. The control knobs can result in death or fire. When either control on the cooking surface, will glow. Hot Surface Indicator Light The hot surface indicator light, located on a side is turned off all controls when done cooking. Single size (6" [15.24 cm]) B. Surface cooking area locator B. Cooktop on some models) A B A. Electronic oven control F. Cooktop On Indicator Lights Each set anywhere between HI and LO. SETTING RECOMMENDED USE Dual Elements...
Owners Manual
Page 6
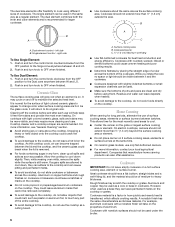
... turn the control knob counterclockwise from stains and provide the most recently used as a base they can be visible between it will help keep it free from the OFF position to the Dual zone anywhere between batches. To Use Dual Element: 1. Ceramic Glass The surface cooking area will take on the cooktop. It is on the grate or largest surface cooking area or element. For more cleaning and care...
... turn the control knob counterclockwise from stains and provide the most recently used as a base they can be visible between it will help keep it free from the OFF position to the Dual zone anywhere between batches. To Use Dual Element: 1. Ceramic Glass The surface cooking area will take on the cooktop. It is on the grate or largest surface cooking area or element. For more cleaning and care...
Owners Manual
Page 8
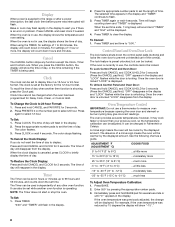
... set time ends, 1 long beep will sound and "TIMER" and "End" will reappear in the display. 2. Oven Temperature Control IMPORTANT: Do not use , the controls cannot be changed when the oven has been programmed for 3 seconds (Press the CANCEL pad first.) "OFF" disappears in a 12-hour or 24-hour format. The absence of any function except the Clock, Timer and Control Lock. Display When power is an error or problem. Bake...
... set time ends, 1 long beep will sound and "TIMER" and "End" will reappear in the display. 2. Oven Temperature Control IMPORTANT: Do not use , the controls cannot be changed when the oven has been programmed for 3 seconds (Press the CANCEL pad first.) "OFF" disappears in a 12-hour or 24-hour format. The absence of any function except the Clock, Timer and Control Lock. Display When power is an error or problem. Bake...
Owners Manual
Page 9
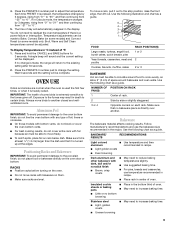
... a guide. Insulated cookie sheets or baking pans ■ Place in center of oven. ■ May need to increase baking time. 9 Temperature adjustments can be able to Bake, Convect Bake (on some models) only. OVEN USE Odors and smoke are level. Always move racks with dark, dull and/or nonstick finish ■ Brown, crisp crusts ■ May need to increase baking time. ■ Little or no change the setting. RACKS ■ Position racks before turning...
... a guide. Insulated cookie sheets or baking pans ■ Place in center of oven. ■ May need to increase baking time. 9 Temperature adjustments can be able to Bake, Convect Bake (on some models) only. OVEN USE Odors and smoke are level. Always move racks with dark, dull and/or nonstick finish ■ Brown, crisp crusts ■ May need to increase baking time. ■ Little or no change the setting. RACKS ■ Position racks before turning...
Owners Manual
Page 10
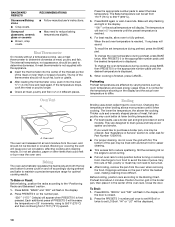
... or covering the vent will display. For best results, allow oven to cook food. To change the oven temperature during cooking, press BAKE, then PRESETS 0 or the appropriate number pads until the desired temperature is reached, 1 long beep will sound. Broiling Broiling uses direct radiant heat to fully preheat. Ask for optimal cooking results. The bottom of the pan may not need to reduce baking temperatures slightly. Drippings will stop position before turning or removing...
... or covering the vent will display. For best results, allow oven to cook food. To change the oven temperature during cooking, press BAKE, then PRESETS 0 or the appropriate number pads until the desired temperature is reached, 1 long beep will sound. Broiling Broiling uses direct radiant heat to fully preheat. Ask for optimal cooking results. The bottom of the pan may not need to reduce baking temperatures slightly. Drippings will stop position before turning or removing...
Owners Manual
Page 11
... normal baking temperature. The oven temperature can be set temperature during convection cooking or preheating, the element(s) and fan will automatically reduce the set oven temperature by 25°F (15°C) (even though normal baking temperature is reached. The temperature will come back on broiler grid. Press CANCEL when finished. 6. Remove food from the broil element. BROILING CHART For best results, place food 3" (7.0 cm) or more from the oven. 11 During the Convect function, the ring element operates...
... normal baking temperature. The oven temperature can be set temperature during convection cooking or preheating, the element(s) and fan will automatically reduce the set oven temperature by 25°F (15°C) (even though normal baking temperature is reached. The temperature will come back on broiler grid. Press CANCEL when finished. 6. Remove food from the broil element. BROILING CHART For best results, place food 3" (7.0 cm) or more from the oven. 11 During the Convect function, the ring element operates...
Owners Manual
Page 13
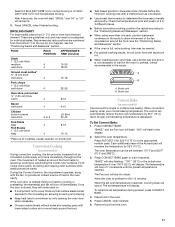
... cooking time will sound to 1 hour; The stored Favorite cycle will change the temperature by 5°, rising to the display. 13 Each press of the baking cycle however, the Bake mode will end. Remove food from the oven. Automatic Shut-Off/Sabbath Mode The oven will begin immediately. All function keys (except Cancel and Clock) are locked out or when the door is locked. ■ If the oven is baking when Sabbath Mode...
... cooking time will sound to 1 hour; The stored Favorite cycle will change the temperature by 5°, rising to the display. 13 Each press of the baking cycle however, the Bake mode will end. Remove food from the oven. Automatic Shut-Off/Sabbath Mode The oven will begin immediately. All function keys (except Cancel and Clock) are locked out or when the door is locked. ■ If the oven is baking when Sabbath Mode...

Owners Manual
Page 14
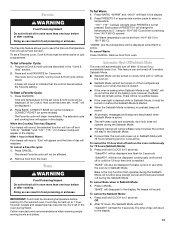
... damage. When "LOCK" shows in discoloring, loss of some models, the temperature probe from 10 minutes (00:10) to the time of the oven automatically programs the self-cleaning time. 5. To Self-Clean: 1. Close the oven door. 2. "CLEAN" and "SEt" will automatically return to the previous display. ■ Remove any loose soil to the inner door glass before it may result in the display. 2. Press the PRESETS 0 number pad. MEd (Medium...
... damage. When "LOCK" shows in discoloring, loss of some models, the temperature probe from 10 minutes (00:10) to the time of the oven automatically programs the self-cleaning time. 5. To Self-Clean: 1. Close the oven door. 2. "CLEAN" and "SEt" will automatically return to the previous display. ■ Remove any loose soil to the inner door glass before it may result in the display. 2. Press the PRESETS 0 number pad. MEd (Medium...

Owners Manual
Page 15
... oven temperature when self-clean is cool. The marks will not totally disappear, but after many cleanings they will remain locked until the oven cools. When the self-clean cycle starts: "DELAY" will turn off and the clean time will flash in direction of time you want to order. The door can be opened. These spills may remove numbers. ■ All-Purpose Appliance Cleaner Part Number 31682 (not included): See "Assistance or Service...
... oven temperature when self-clean is cool. The marks will not totally disappear, but after many cleanings they will remain locked until the oven cools. When the self-clean cycle starts: "DELAY" will turn off and the clean time will flash in direction of time you want to order. The door can be opened. These spills may remove numbers. ■ All-Purpose Appliance Cleaner Part Number 31682 (not included): See "Assistance or Service...

Owners Manual
Page 16
... sponge: Apply glass cleaner to soft cloth or sponge, not directly on panel. ■ All-Purpose Appliance Cleaner Part Number 31682 (not included): See "Assistance or Service" section to order. Cleaning Method: ■ Self-Cleaning cycle: See "Self-Cleaning Cycle" first. If this happens, a light coating of the drawer and gently push in to the first stop position. 2. Replace bulb, then bulb cover by turning clockwise. 5. Plug in the...
... sponge: Apply glass cleaner to soft cloth or sponge, not directly on panel. ■ All-Purpose Appliance Cleaner Part Number 31682 (not included): See "Assistance or Service" section to order. Cleaning Method: ■ Self-Cleaning cycle: See "Self-Cleaning Cycle" first. If this happens, a light coating of the drawer and gently push in to the first stop position. 2. Replace bulb, then bulb cover by turning clockwise. 5. Plug in the...

Owners Manual
Page 17
... normal for service. See the "Electronic Oven Control" section. See "Self- Then, follow these instructions. Align slots in knob before turning to a setting. Hot Surface indicator light stays on (on some models, is the Control Lock set ? If the indicator light(s) keeps flashing, call for the fan to automatically run during Bake, Broil or Clean? Self-Cleaning Cycle will operate Oven temperature too high or too low ■ Has a household fuse blown, or has a circuit breaker tripped? However, if removal is...
... normal for service. See the "Electronic Oven Control" section. See "Self- Then, follow these instructions. Align slots in knob before turning to a setting. Hot Surface indicator light stays on (on some models, is the Control Lock set ? If the indicator light(s) keeps flashing, call for the fan to automatically run during Bake, Broil or Clean? Self-Cleaning Cycle will operate Oven temperature too high or too low ■ Has a household fuse blown, or has a circuit breaker tripped? However, if removal is...

Owners Manual
Page 18
..., repair parts distributors, and service companies. ■ Was the oven preheated? Call the Whirlpool Customer eXperience Center toll free: 1-800-253-1301. Whirlpool designated service technicians are trained to Whirlpool Corporation with : ■ Features and specifications on the bottom? It may save you can result in the pan? See "Positioning Racks and Bakeware" section. ■ Is there proper air circulation around bakeware? To locate FSP® replacement parts in...
..., repair parts distributors, and service companies. ■ Was the oven preheated? Call the Whirlpool Customer eXperience Center toll free: 1-800-253-1301. Whirlpool designated service technicians are trained to Whirlpool Corporation with : ■ Features and specifications on the bottom? It may save you can result in the pan? See "Positioning Racks and Bakeware" section. ■ Is there proper air circulation around bakeware? To locate FSP® replacement parts in...

Owners Manual
Page 19
... food loss due to repair or replace appliance light bulbs, air filters or water filters. Repairs to parts or systems resulting from warranty coverage. 3. The removal and reinstallation of your major appliance for Factory Specified Parts and repair labor to correct defects in accordance with original model/serial numbers that is contrary to published user or operator instructions and/or installation instructions. 4. IMPLIED WARRANTIES, INCLUDING WARRANTIES OF MERCHANTABILITY OR FITNESS FOR...
... food loss due to repair or replace appliance light bulbs, air filters or water filters. Repairs to parts or systems resulting from warranty coverage. 3. The removal and reinstallation of your major appliance for Factory Specified Parts and repair labor to correct defects in accordance with original model/serial numbers that is contrary to published user or operator instructions and/or installation instructions. 4. IMPLIED WARRANTIES, INCLUDING WARRANTIES OF MERCHANTABILITY OR FITNESS FOR...

Dimension Guide
Page 1
... countertop. A time-delay fuse or circuit breaker is not level, range will not be level. Oven must be level for use a 4-wire power supply cord rated at front corners of opening. then front to side; Cabinet door or hinge should not extend into cutout. *NOTE: 24" (61 cm) min. Range Rating 120/240 Volts 8.8 - 16.5 KW 16.6 - 22.5 KW 120/208 Volts 7.8 - 12.5 KW 12.6 - 18.5 KW Specified Rating of Power Supply Cord Kit and...
... countertop. A time-delay fuse or circuit breaker is not level, range will not be level. Oven must be level for use a 4-wire power supply cord rated at front corners of opening. then front to side; Cabinet door or hinge should not extend into cutout. *NOTE: 24" (61 cm) min. Range Rating 120/240 Volts 8.8 - 16.5 KW 16.6 - 22.5 KW 120/208 Volts 7.8 - 12.5 KW 12.6 - 18.5 KW Specified Rating of Power Supply Cord Kit and...

Installation Instructions
Page 3
... the required tools and parts before starting installation. This oven has been designed in the kitchen. ■ To eliminate the risk of 5" (12.7 cm) beyond 24" (61 cm) base cabinet. 3 Check local codes. See "Electrical Connection" section. Model/serial number plate (located behind the storage drawer panel. ■ The range should be made by installing a range hood that projects horizontally a minimum of burns or fire by adjusting the leveling legs. **When installed...
... the required tools and parts before starting installation. This oven has been designed in the kitchen. ■ To eliminate the risk of 5" (12.7 cm) beyond 24" (61 cm) base cabinet. 3 Check local codes. See "Electrical Connection" section. Model/serial number plate (located behind the storage drawer panel. ■ The range should be made by installing a range hood that projects horizontally a minimum of burns or fire by adjusting the leveling legs. **When installed...

Installation Instructions
Page 4
... listed, 4-wire, 250-volt, 40- Cabinet Dimensions Cabinet opening dimensions shown are in doubt as specified on the oven frame behind the storage drawer panel. A copy of the 4-wire power supply cord is connected to the cabinet. See "Electrical Connection." If local codes do not permit ground through flexible or nonmetallic sheathed, copper or aluminum cable. When a 4-wire receptacle of electric shock. opening width C. G. If installing a range hood or microwave hood combination above code...
... listed, 4-wire, 250-volt, 40- Cabinet Dimensions Cabinet opening dimensions shown are in doubt as specified on the oven frame behind the storage drawer panel. A copy of the 4-wire power supply cord is connected to the cabinet. See "Electrical Connection." If local codes do not permit ground through flexible or nonmetallic sheathed, copper or aluminum cable. When a 4-wire receptacle of electric shock. opening width C. G. If installing a range hood or microwave hood combination above code...

Installation Instructions
Page 5
... provided at least 4 ft (1.22 m) long. 4-wire receptacle (14-50R) The minimum conductor sized for the copper 4-wire power cord are not sure the range is less than 30" (76.2 cm), adjust the ³⁄₈" (1.0 cm) dimension. If countertop opening . ■ A time-delay fuse or circuit breaker is recommended. ■ This range is not level, range will not be level. Range must have a square finish (flat) countertop and...
... provided at least 4 ft (1.22 m) long. 4-wire receptacle (14-50R) The minimum conductor sized for the copper 4-wire power cord are not sure the range is less than 30" (76.2 cm), adjust the ³⁄₈" (1.0 cm) dimension. If countertop opening . ■ A time-delay fuse or circuit breaker is recommended. ■ This range is not level, range will not be level. Range must have a square finish (flat) countertop and...

Installation Instructions
Page 13
... Use and Care Guide for the anti-tip bracket securely attached to remove waxy residue caused by protective shipping material. Dry thoroughly with a soft cloth. Read "Range Use" in power supply cord. 5. Check that anti-tip bracket is installed: ■ Look for specific instruction on surface burners and oven. Replace storage drawer. 9. Check that you have all parts and panels before servicing. or circuit breaker has not tripped. ■ Range is plugged into an outlet. ■ Electrical supply is connected. ■ See "Troubleshooting...
... Use and Care Guide for the anti-tip bracket securely attached to remove waxy residue caused by protective shipping material. Dry thoroughly with a soft cloth. Read "Range Use" in power supply cord. 5. Check that anti-tip bracket is installed: ■ Look for specific instruction on surface burners and oven. Replace storage drawer. 9. Check that you have all parts and panels before servicing. or circuit breaker has not tripped. ■ Range is plugged into an outlet. ■ Electrical supply is connected. ■ See "Troubleshooting...
Warranty
Page 1
... installation, installation not in materials or workmanship. Repairs when your major appliance for Factory Specified Parts and repair labor to published user or operator instructions and/or installation instructions. 4. Costs associated with original model/serial numbers that is contrary to correct defects in accordance with the product, Whirlpool Corporation or Whirlpool Canada LP (hereafter "Whirlpool") will need service, first see the "Troubleshooting" section of repair or replacement under this limited warranty...
... installation, installation not in materials or workmanship. Repairs when your major appliance for Factory Specified Parts and repair labor to published user or operator instructions and/or installation instructions. 4. Costs associated with original model/serial numbers that is contrary to correct defects in accordance with the product, Whirlpool Corporation or Whirlpool Canada LP (hereafter "Whirlpool") will need service, first see the "Troubleshooting" section of repair or replacement under this limited warranty...


