Dimension Guide
Page 1
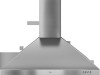
... plate is the installer's responsibility to improve our Dimensions are for each vent piece used in the system. Instructions packed with installation clearances specified on the... 30" (76.2 CM) AND 36" (91.4 CM) Wall-Mount Canopy Range Hood PRODUCT MODEL NUMBERS GXW7330DX GXW7336DX ELECTRICAL REQUIREMENTS • A 120 volt, 60 Hz, AC only, 15- The hood exhaust opening ...76.2 cm) or 36" (91.4 cm) 10" (25.4 cm) 20" (50.8 cm) 1" (4.0 cm) Because Whirlpool Corporation policy includes a continuous commitment to comply with product. wall cap 8 ft (2.4 m) straight = 5.0 ft (1.5 m) = ...
... plate is the installer's responsibility to improve our Dimensions are for each vent piece used in the system. Instructions packed with installation clearances specified on the... 30" (76.2 CM) AND 36" (91.4 CM) Wall-Mount Canopy Range Hood PRODUCT MODEL NUMBERS GXW7330DX GXW7336DX ELECTRICAL REQUIREMENTS • A 120 volt, 60 Hz, AC only, 15- The hood exhaust opening ...76.2 cm) or 36" (91.4 cm) 10" (25.4 cm) 20" (50.8 cm) 1" (4.0 cm) Because Whirlpool Corporation policy includes a continuous commitment to comply with product. wall cap 8 ft (2.4 m) straight = 5.0 ft (1.5 m) = ...
Dimension Guide
Page 2
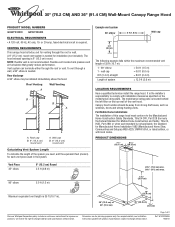
...chimneys can be adjusted for planning purposes only. Page 2 of the range hood and the cooking surface. Instructions packed with the range hood. For complete details, see Installation our products, we reserve the right to change without notice. IMPORTANT: Minimum distance "X": 24" (61.0... cm) from gas cooking surfaces. W10320580A 9/20/10 Because Whirlpool Corporation policy includes a continuous commitment to ...
...chimneys can be adjusted for planning purposes only. Page 2 of the range hood and the cooking surface. Instructions packed with the range hood. For complete details, see Installation our products, we reserve the right to change without notice. IMPORTANT: Minimum distance "X": 24" (61.0... cm) from gas cooking surfaces. W10320580A 9/20/10 Because Whirlpool Corporation policy includes a continuous commitment to ...

Use & Care Guide
Page 1
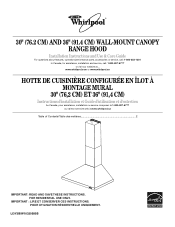
... RANGE HOOD Installation Instructions and Use & Care Guide For questions about features, operation/performance parts, accessories or service, call: 1-800-253-1301 In Canada, for assistance, installation and service, call: 1-800-807-6777 or visit our website at... www.whirlpool.com or www.whirlpool.ca HOTTE... MURAL 30" (76,2 CM) ET 36" (91,4 CM) Instructions d'installation et Guide d'utilisation et d'entretien Au Canada, pour assistance, installation ou service composez le 1-800-807-6777 ou visitez notre site web à www.whirlpool.ca Table of Contents/Table des matières 2 IMPORTANT: READ...
... RANGE HOOD Installation Instructions and Use & Care Guide For questions about features, operation/performance parts, accessories or service, call: 1-800-253-1301 In Canada, for assistance, installation and service, call: 1-800-807-6777 or visit our website at... www.whirlpool.com or www.whirlpool.ca HOTTE... MURAL 30" (76,2 CM) ET 36" (91,4 CM) Instructions d'installation et Guide d'utilisation et d'entretien Au Canada, pour assistance, installation ou service composez le 1-800-807-6777 ou visitez notre site web à www.whirlpool.ca Table of Contents/Table des matières 2 IMPORTANT: READ...
Use & Care Guide
Page 2
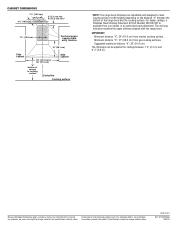
... if you and others are not followed. 2 TABLE OF CONTENTS RANGE HOOD SAFETY 2 INSTALLATION REQUIREMENTS 4 Tools and Parts 4 Location Requirements 4 Venting Requirements 5 Electrical Requirements 6 INSTALLATION INSTRUCTIONS 7 Prepare Location 7 Install Range Hood 8 Connect Vent System 8 Make Electrical Connection 9 Install Vent Covers 9 Complete Installation 9 RANGE HOOD USE 10 Range Hood Controls 10 RANGE HOOD CARE 10 Cleaning 10...
... if you and others are not followed. 2 TABLE OF CONTENTS RANGE HOOD SAFETY 2 INSTALLATION REQUIREMENTS 4 Tools and Parts 4 Location Requirements 4 Venting Requirements 5 Electrical Requirements 6 INSTALLATION INSTRUCTIONS 7 Prepare Location 7 Install Range Hood 8 Connect Vent System 8 Make Electrical Connection 9 Install Vent Covers 9 Complete Installation 9 RANGE HOOD USE 10 Range Hood Controls 10 RANGE HOOD CARE 10 Cleaning 10...
Use & Care Guide
Page 3
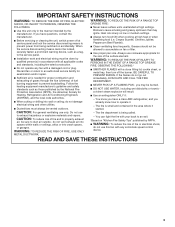
Follow the heating equipment manufacturer's guideline and safety standards such as a tag, to the service panel. ■ Installation work and electrical wiring must always be burned. ■ DO NOT USE WATER, including wet dishcloths or towels a violent steam explosion will... THE EVENT OF A RANGE TOP GREASE FIRE, OBSERVE THE FOLLOWING:a ■ SMOTHER FLAMES with a damaged cord or plug. READ AND SAVE THESE INSTRUCTIONS 3 Boilovers cause smoking and greasy spillovers that may be vented outdoors. you already know you have questions, contact the manufacturer. ■ Before servicing...
Follow the heating equipment manufacturer's guideline and safety standards such as a tag, to the service panel. ■ Installation work and electrical wiring must always be burned. ■ DO NOT USE WATER, including wet dishcloths or towels a violent steam explosion will... THE EVENT OF A RANGE TOP GREASE FIRE, OBSERVE THE FOLLOWING:a ■ SMOTHER FLAMES with a damaged cord or plug. READ AND SAVE THESE INSTRUCTIONS 3 Boilovers cause smoking and greasy spillovers that may be vented outdoors. you already know you have questions, contact the manufacturer. ■ Before servicing...
Use & Care Guide
Page 4
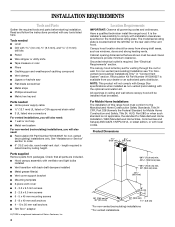
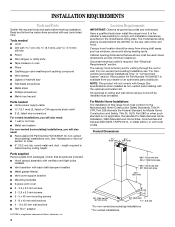
Read and follow the instructions provided with back draft dampers installed ■ Metal grease filter(s) ■ Vent cover support bracket ■ Mounting template ■ 2-piece vent cover ■ 2 - 3.5 x 9.5 mm screws ■ 2 - 2.9 x 6.5 mm screws ■ 6 - 5 x ... (35.9 cm) 10" (25.4 cm) 30" (76.2 cm) or 36" (91.4 cm) 20" (50.8 cm) 1¹ ₂" (4.0 cm) *For non-vented (recirculating) installations **For vented installations Tools needed ■ Home power supply cable ■ ½" (12.7 mm) UL listed or CSA approved strain relief ■ 3 UL listed wire connectors For...
Read and follow the instructions provided with back draft dampers installed ■ Metal grease filter(s) ■ Vent cover support bracket ■ Mounting template ■ 2-piece vent cover ■ 2 - 3.5 x 9.5 mm screws ■ 2 - 2.9 x 6.5 mm screws ■ 6 - 5 x ... (35.9 cm) 10" (25.4 cm) 30" (76.2 cm) or 36" (91.4 cm) 20" (50.8 cm) 1¹ ₂" (4.0 cm) *For non-vented (recirculating) installations **For vented installations Tools needed ■ Home power supply cable ■ ½" (12.7 mm) UL listed or CSA approved strain relief ■ 3 UL listed wire connectors For...

Use & Care Guide
Page 7
...a flat surface for exhaust vent. ■ Check your ceiling height and the hood height maximum before you select your hood. 1. Installations using telescoping upper and lower vent cover assembly 1. Failure to do so can result in place, aligning the template centerline and bottom...according to wall. NOTE: Do not reconnect power until installation is complete. 4. Mark the hole locations. Attach vent cover support bracket to the National Electrical Code or CSA Standards and local codes and ordinances. INSTALLATION INSTRUCTIONS Prepare Location ■ It is recommended that surface. ...
...a flat surface for exhaust vent. ■ Check your ceiling height and the hood height maximum before you select your hood. 1. Installations using telescoping upper and lower vent cover assembly 1. Failure to do so can result in place, aligning the template centerline and bottom...according to wall. NOTE: Do not reconnect power until installation is complete. 4. Mark the hole locations. Attach vent cover support bracket to the National Electrical Code or CSA Standards and local codes and ordinances. INSTALLATION INSTRUCTIONS Prepare Location ■ It is recommended that surface. ...

Use & Care Guide
Page 14
... finish of your major appliance, to replace or repair house fuses, or to published user or operator instructions and/or installation instructions. 4. Costs associated with published installation instructions. 11. Major appliances with the product, Whirlpool Corporation or Whirlpool Canada LP (hereafter "Whirlpool") will need it. The cost of repair or replacement under this limited warranty. IMPLIED WARRANTIES, INCLUDING...
... finish of your major appliance, to replace or repair house fuses, or to published user or operator instructions and/or installation instructions. 4. Costs associated with published installation instructions. 11. Major appliances with the product, Whirlpool Corporation or Whirlpool Canada LP (hereafter "Whirlpool") will need it. The cost of repair or replacement under this limited warranty. IMPLIED WARRANTIES, INCLUDING...
Warranty Information
Page 1
... to the finish of your major appliance. Proof of consumables or cleaning products not approved by calling Whirlpool. Major appliances with the removal from unauthorized modifications made to published user or operator instructions and/or installation instructions. 4. SOME STATES AND PROVINCES DO NOT ALLOW THE EXCLUSION OR LIMITATION OF INCIDENTAL OR CONSEQUENTIAL DAMAGES, OR...
... to the finish of your major appliance. Proof of consumables or cleaning products not approved by calling Whirlpool. Major appliances with the removal from unauthorized modifications made to published user or operator instructions and/or installation instructions. 4. SOME STATES AND PROVINCES DO NOT ALLOW THE EXCLUSION OR LIMITATION OF INCIDENTAL OR CONSEQUENTIAL DAMAGES, OR...
Installation Guide
Page 1
... MONTAGE MURAL 30" (76,2 CM) ET 36" (91,4 CM) Instructions d'installation et Guide d'utilisation et d'entretien Au Canada, pour assistance, installation ou service composez le 1-800-807-6777 ou visitez notre site web à www.whirlpool.ca Table of Contents/Table des matières 2 IMPORTANT: READ AND... SAVE THESE INSTRUCTIONS. FOR RESIDENTIAL USE ONLY. LI3Y3B/W10320580B ® 30" (76.2 CM) AND 36" (91.4 CM) WALL-MOUNT CANOPY RANGE HOOD Installation Instructions and Use & Care Guide For...
... MONTAGE MURAL 30" (76,2 CM) ET 36" (91,4 CM) Instructions d'installation et Guide d'utilisation et d'entretien Au Canada, pour assistance, installation ou service composez le 1-800-807-6777 ou visitez notre site web à www.whirlpool.ca Table of Contents/Table des matières 2 IMPORTANT: READ AND... SAVE THESE INSTRUCTIONS. FOR RESIDENTIAL USE ONLY. LI3Y3B/W10320580B ® 30" (76.2 CM) AND 36" (91.4 CM) WALL-MOUNT CANOPY RANGE HOOD Installation Instructions and Use & Care Guide For...

Installation Guide
Page 2
... you to reduce the chance of others . TABLE OF CONTENTS RANGE HOOD SAFETY 2 INSTALLATION REQUIREMENTS 4 Tools and Parts 4 Location Requirements 4 Venting Requirements 5 Electrical Requirements 6 INSTALLATION INSTRUCTIONS 7 Prepare Location 7 Install Range Hood 8 Connect Vent System 8 Make Electrical Connection 9 Install Vent Covers 9 Complete Installation 9 RANGE HOOD USE 10 Range Hood Controls 10 RANGE HOOD CARE 10 Cleaning 10...
... you to reduce the chance of others . TABLE OF CONTENTS RANGE HOOD SAFETY 2 INSTALLATION REQUIREMENTS 4 Tools and Parts 4 Location Requirements 4 Venting Requirements 5 Electrical Requirements 6 INSTALLATION INSTRUCTIONS 7 Prepare Location 7 Install Range Hood 8 Connect Vent System 8 Make Electrical Connection 9 Install Vent Covers 9 Complete Installation 9 RANGE HOOD USE 10 Range Hood Controls 10 RANGE HOOD CARE 10 Cleaning 10...

Installation Guide
Page 3
... and contained in the area where it . - Grease should not be allowed to the service panel. ■ Installation work and electrical wiring must always be sure to prevent power from being called. - IMPORTANT SAFETY INSTRUCTIONS WARNING: TO REDUCE THE RISK OF FIRE, ELECTRIC SHOCK, OR INJURY TO PERSONS, OBSERVE THE FOLLOWING: ■... CAREFUL TO PREVENT BURNS. You know how to an exit. The fire is needed for the size of the surface element. READ AND SAVE THESE INSTRUCTIONS 3
... and contained in the area where it . - Grease should not be allowed to the service panel. ■ Installation work and electrical wiring must always be sure to prevent power from being called. - IMPORTANT SAFETY INSTRUCTIONS WARNING: TO REDUCE THE RISK OF FIRE, ELECTRIC SHOCK, OR INJURY TO PERSONS, OBSERVE THE FOLLOWING: ■... CAREFUL TO PREVENT BURNS. You know how to an exit. The fire is needed for the size of the surface element. READ AND SAVE THESE INSTRUCTIONS 3
Installation Guide
Page 4
... all parts are shown must be used. The canopy hood is determined by ceiling height. NOTE: This product will not comply with back draft dampers installed ■ Metal grease filter(s) ■ Vent cover support bracket ■ Mounting template ■ 2-piece vent cover ■ 2 - 3.5 x 9.5 mm...opening dimensions that all governing codes and ordinances. Read and follow the instructions provided with the optional recirculation kit. For non-vented (recirculating) Installation see "For Nonvented (recirculating) Installations Only" in ceiling and wall where canopy hood will also need ...
... all parts are shown must be used. The canopy hood is determined by ceiling height. NOTE: This product will not comply with back draft dampers installed ■ Metal grease filter(s) ■ Vent cover support bracket ■ Mounting template ■ 2-piece vent cover ■ 2 - 3.5 x 9.5 mm...opening dimensions that all governing codes and ordinances. Read and follow the instructions provided with the optional recirculation kit. For non-vented (recirculating) Installation see "For Nonvented (recirculating) Installations Only" in ceiling and wall where canopy hood will also need ...
Installation Guide
Page 7
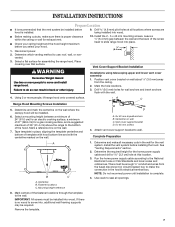
... ALLSUPPORT Vertical Centerline REAR W ALL M OUNTING TEM PLATE HorizontalLine CL ALIGN BOTTOM EDGE W ITH PENCILLINE INDICATING BOTTOM OFTHE HOOD Installation Height B C A. Determine and make all openings. 8. Determine the required height for the vent system. Mark centers of ...Attach vent cover support bracket to the National Electrical Code or CSA Standards and local codes and ordinances. Mounting height reference 1. INSTALLATION INSTRUCTIONS Prepare Location ■ It is recommended that surface. Disconnect power. 10. Tape template in the hood's electrical terminal box....
... ALLSUPPORT Vertical Centerline REAR W ALL M OUNTING TEM PLATE HorizontalLine CL ALIGN BOTTOM EDGE W ITH PENCILLINE INDICATING BOTTOM OFTHE HOOD Installation Height B C A. Determine and make all openings. 8. Determine the required height for the vent system. Mark centers of ...Attach vent cover support bracket to the National Electrical Code or CSA Standards and local codes and ordinances. Mounting height reference 1. INSTALLATION INSTRUCTIONS Prepare Location ■ It is recommended that surface. Disconnect power. 10. Tape template in the hood's electrical terminal box....

Installation Guide
Page 14
..." section of purchase. 6. You must be borne by calling Whirlpool. Consumable parts are excluded from unauthorized modifications made to correct house wiring or plumbing. 2. Major appliances with published installation instructions. 11. SOME STATES AND PROVINCES DO NOT ALLOW THE EXCLUSION ... the "Assistance or Service" section or by the customer. This warranty is designed to published user or operator instructions and/or installation instructions. 4. Service must provide proof of your major appliance, unless such damage results from defects in -home service ...
..." section of purchase. 6. You must be borne by calling Whirlpool. Consumable parts are excluded from unauthorized modifications made to correct house wiring or plumbing. 2. Major appliances with published installation instructions. 11. SOME STATES AND PROVINCES DO NOT ALLOW THE EXCLUSION ... the "Assistance or Service" section or by the customer. This warranty is designed to published user or operator instructions and/or installation instructions. 4. Service must provide proof of your major appliance, unless such damage results from defects in -home service ...

