Dimension Guide
Page 1
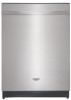
... connector of the water inlet valve. drain line fittings. PRODUCT DIMENSIONS Because Whirlpool Corporation policy includes a continuous commitment to 862 kPa) water pressure. Page 1 of the counter, or be connected to the dishwasher opening. Use a UL Listed or CSA Approved strain relief. Power supply cord...cm) above drain trap in the cabinet next to an air gap. Specifications subject to the waste tee or disposer unit. If direct wiring dishwasher: Use flexible, armored or nonmetallic, sheathed copper wire with a maximum length of 12' (3.7 m) (Part Number 3385556) that meets all ...
... connector of the water inlet valve. drain line fittings. PRODUCT DIMENSIONS Because Whirlpool Corporation policy includes a continuous commitment to 862 kPa) water pressure. Page 1 of the counter, or be connected to the dishwasher opening. Use a UL Listed or CSA Approved strain relief. Power supply cord...cm) above drain trap in the cabinet next to an air gap. Specifications subject to the waste tee or disposer unit. If direct wiring dishwasher: Use flexible, armored or nonmetallic, sheathed copper wire with a maximum length of 12' (3.7 m) (Part Number 3385556) that meets all ...
Dimension Guide
Page 2
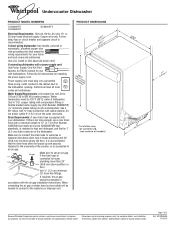
Instructions packed with product. Because Whirlpool Corporation policy includes a continuous commitment to improve Dimensions are for planning purposes only. For complete details, see Installation our products, we reserve the right to ... DIMENSIONS NOTE: Shaded areas of cabinet walls show where utility connections may be reduced to 33⁷⁄₈" (86 cm) by removing wheels from dishwasher. ** Minimum, measured from the lowest point on the underside of countertop. May be installed. ** Measured from narrowest point of 2 Ref. Page 2 of opening...
Instructions packed with product. Because Whirlpool Corporation policy includes a continuous commitment to improve Dimensions are for planning purposes only. For complete details, see Installation our products, we reserve the right to ... DIMENSIONS NOTE: Shaded areas of cabinet walls show where utility connections may be reduced to 33⁷⁄₈" (86 cm) by removing wheels from dishwasher. ** Minimum, measured from the lowest point on the underside of countertop. May be installed. ** Measured from narrowest point of 2 Ref. Page 2 of opening...
Installation Instructions
Page 2
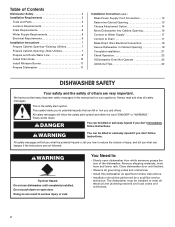
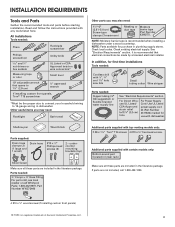
...'t immediately follow instructions. WARNING You can result in Cabinet Opening 19 Complete Installation 21 Check Operation 22 If Dishwasher Does Not Operate 22 Additional Tips 22 DISHWASHER SAFETY Your safety and the safety of others . Do not push down on your appliance. Remove shipping materials...7 Prepare Cabinet Opening-New Utilities 7 Prepare and Route Water Line 8 Install Drain Hose 10 Install Moisture Barrier 11 Prepare Dishwasher 11 Installation Instructions (cont.) Make Power Supply Cord Connection 12 Determine Cabinet Opening 13 Choose Attachment Option 14 Move...
...'t immediately follow instructions. WARNING You can result in Cabinet Opening 19 Complete Installation 21 Check Operation 22 If Dishwasher Does Not Operate 22 Additional Tips 22 DISHWASHER SAFETY Your safety and the safety of others . Do not push down on your appliance. Remove shipping materials...7 Prepare Cabinet Opening-New Utilities 7 Prepare and Route Water Line 8 Install Drain Hose 10 Install Moisture Barrier 11 Prepare Dishwasher 11 Installation Instructions (cont.) Make Power Supply Cord Connection 12 Determine Cabinet Opening 13 Choose Attachment Option 14 Move...
Installation Instructions
Page 3
...Green Make sure all these parts are not included, call Whirlpool Parts: 1-800-442-9991. Part Number W10273460 Additional parts supplied with top-venting models only: " Torx® T15 screws " Additional parts supplied with dishwasher. NOTE: Parts available for use UL Listed/ CSA .... 4 #10 x ¹⁄₂" wood screws (if installing custom front panels) †® TORX is recommended when installing a dishwasher under a wood countertop. In addition, for first-time installations Tools needed: Cordless drill with any tools listed here. All Installations Tools needed:...
...Green Make sure all these parts are not included, call Whirlpool Parts: 1-800-442-9991. Part Number W10273460 Additional parts supplied with top-venting models only: " Torx® T15 screws " Additional parts supplied with dishwasher. NOTE: Parts available for use UL Listed/ CSA .... 4 #10 x ¹⁄₂" wood screws (if installing custom front panels) †® TORX is recommended when installing a dishwasher under a wood countertop. In addition, for first-time installations Tools needed: Cordless drill with any tools listed here. All Installations Tools needed:...
Installation Instructions
Page 4
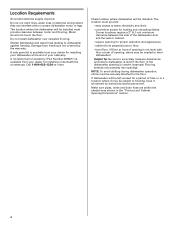
...lines or electrical wiring where they can interfere with floor at rear of opening for loading and unloading dishes. Damage from your dishwasher at front of your cabinetry. The location must provide clearance between the side of time or in a location where it ...accessory (Part Number 4396277) is available from freezing is level if the floor in the "Product and Cabinet Opening Dimensions" section. 4 Shelter dishwasher and water lines leading to water, electricity and drain. • convenient access for proper operation and appearance. • cabinet front perpendicular ...
...lines or electrical wiring where they can interfere with floor at rear of opening for loading and unloading dishes. Damage from your dishwasher at front of your cabinetry. The location must provide clearance between the side of time or in a location where it ...accessory (Part Number 4396277) is available from freezing is level if the floor in the "Product and Cabinet Opening Dimensions" section. 4 Shelter dishwasher and water lines leading to water, electricity and drain. • convenient access for proper operation and appearance. • cabinet front perpendicular ...

Installation Instructions
Page 5
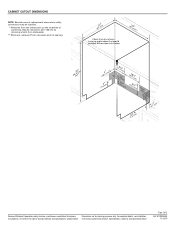
Product and Cabinet Opening Dimensions NOTE: Shaded areas of cabinet walls show where utility connections may be reduced to 33⁷⁄₈" (86 cm) by removing wheels from dishwasher. **Minimum, measured from the lowest point on the underside of opening. 5 May be installed. *Measured from narrowest point of countertop.
Product and Cabinet Opening Dimensions NOTE: Shaded areas of cabinet walls show where utility connections may be reduced to 33⁷⁄₈" (86 cm) by removing wheels from dishwasher. **Minimum, measured from the lowest point on the underside of opening. 5 May be installed. *Measured from narrowest point of countertop.
Installation Instructions
Page 6
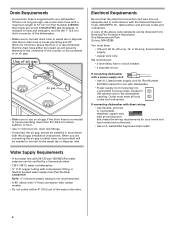
...or nonmetallic sheathed, copper wire with a power supply cord: • Use UL Listed power supply cord kit (Part Number 4317824) marked for your dishwasher. Use of 12' (3.7 m) (Part Number 3385556) that the electrical connection and wire size are connecting the air gap a rubber hose (not provided...) will be verified by a licensed plumber. • 120°F (49°C) water at dishwasher O.D. When you are adequate and in house plumbing and 20" (50.8 cm) minimum above subfloor or floor. • Use ¹⁄₂" ...
...or nonmetallic sheathed, copper wire with a power supply cord: • Use UL Listed power supply cord kit (Part Number 4317824) marked for your dishwasher. Use of 12' (3.7 m) (Part Number 3385556) that the electrical connection and wire size are connecting the air gap a rubber hose (not provided...) will be verified by a licensed plumber. • 120°F (49°C) water at dishwasher O.D. When you are adequate and in house plumbing and 20" (50.8 cm) minimum above subfloor or floor. • Use ¹⁄₂" ...

Installation Instructions
Page 7
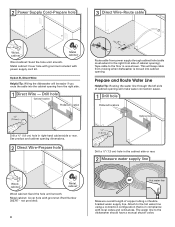
...line (15.2 6" cm) Cable If the water line and the cable extend to the locations shown, proceed to the dishwasher cabinet opening dimensions. 7 Prepare Cabinet Opening-New Utilities Prepare and route the electrical supply What type of electrical connection will ... Yes -Follow instructions in death or electrical shock. 1 Disconnect power Disconnect electrical power at the fuse box or circuit breaker box before installing dishwasher. 2 3 Do you use? See product and cabinet opening . 1 Power Supply Cord-Drill hole Optional loactaiotinon Preefferrereddlolocactaiotinon (3.8 cm) Drill a ...
...line (15.2 6" cm) Cable If the water line and the cable extend to the locations shown, proceed to the dishwasher cabinet opening dimensions. 7 Prepare Cabinet Opening-New Utilities Prepare and route the electrical supply What type of electrical connection will ... Yes -Follow instructions in death or electrical shock. 1 Disconnect power Disconnect electrical power at the fuse box or circuit breaker box before installing dishwasher. 2 3 Do you use? See product and cabinet opening . 1 Power Supply Cord-Drill hole Optional loactaiotinon Preefferrereddlolocactaiotinon (3.8 cm) Drill a ...
Installation Instructions
Page 8
...cable into the cabinet opening . Tape cable to the right front side of copper tubing or flexible braided water supply line. Attach to the dishwasher should have a manual shutoff valve. 2 Power Supply Cord-Prepare hole 3 Direct Wire-Route cable Wood cabinet Metal cabinet Wood cabinet: Sand the.... 1 Direct Wire - The water line to the hot water line using a connection configuration that is moved into cabinet opening from moving when dishwasher is in the cabinet side or rear. 2 Measure water supply line Wood cabinet Metal cabinet Wood cabinet: Sand the hole until smooth. Drill...
...cable into the cabinet opening . Tape cable to the right front side of copper tubing or flexible braided water supply line. Attach to the dishwasher should have a manual shutoff valve. 2 Power Supply Cord-Prepare hole 3 Direct Wire-Route cable Wood cabinet Metal cabinet Wood cabinet: Sand the.... 1 Direct Wire - The water line to the hot water line using a connection configuration that is moved into cabinet opening from moving when dishwasher is in the cabinet side or rear. 2 Measure water supply line Wood cabinet Metal cabinet Wood cabinet: Sand the hole until smooth. Drill...
Installation Instructions
Page 9
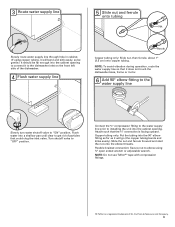
... it will bend and kink easily, so be gentle.) It should be far enough into the cabinet opening to connect it does not touch the dishwasher base, frame or motor. 6 Add 90° elbow fitting to the water supply line Slowly turn water shutoff valve to the... that could clog the inlet valve. Du Pont de Nemours and Company. 9 Attach such that the ³⁄₄" connection is a registered trademark of the dishwasher. 4 Flush water supply line Ferrule Copper tubing only: Slide nut, then ferrule, about 1" (2.5 cm) onto copper tubing. 3 Route water supply line 5 Slide nut and ferrule...
... it will bend and kink easily, so be gentle.) It should be far enough into the cabinet opening to connect it does not touch the dishwasher base, frame or motor. 6 Add 90° elbow fitting to the water supply line Slowly turn water shutoff valve to the... that could clog the inlet valve. Du Pont de Nemours and Company. 9 Attach such that the ³⁄₄" connection is a registered trademark of the dishwasher. 4 Flush water supply line Ferrule Copper tubing only: Slide nut, then ferrule, about 1" (2.5 cm) onto copper tubing. 3 Route water supply line 5 Slide nut and ferrule...
Installation Instructions
Page 10
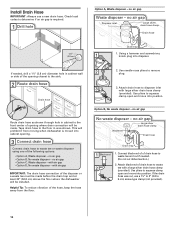
... end of of opening where drain connection will be made before the drain trap and at least 20" (50.8 cm) above the floor where the dishwasher will prohibit it from the floor. 2 2. If the drain hose was cut if needed , drill a 1¹⁄₂" (3.8 cm) diameter hole in cabinet... hose Drain hose Route drain hose as shown through hole in cabinet wall or side of the hose, keep the hose away from moving when dishwasher is required. 1 Drill hole Option A, Waste disposer - no air gap • Option B, No waste disposer - no air gap Waste disposer - Tape drain hose to...
... end of of opening where drain connection will be made before the drain trap and at least 20" (50.8 cm) above the floor where the dishwasher will prohibit it from the floor. 2 2. If the drain hose was cut if needed , drill a 1¹⁄₂" (3.8 cm) diameter hole in cabinet... hose Drain hose Route drain hose as shown through hole in cabinet wall or side of the hose, keep the hose away from moving when dishwasher is required. 1 Drill hole Option A, Waste disposer - no air gap • Option B, No waste disposer - no air gap Waste disposer - Tape drain hose to...

Installation Instructions
Page 11
...with screw-type clamps (not provided) to connect from waste tee to air gap and cut if needed . (Do not cut , use dishwasher until completely installed. Doing so can result in serious injury or cuts. Attach drain hose to underside of the countertop along the front edge of...clamp open door. Connect black end of drain hose to air gap. Use a rubber hose (not provided) with large 2 silver drain hose clamp (provided). Prepare Dishwasher Tip Over Hazard Do not use a 1¹⁄₂" to 2" (3.8 to move into disposer. 2. with air gap No waste disposer - Using a hammer ...
...with screw-type clamps (not provided) to connect from waste tee to air gap and cut if needed . (Do not cut , use dishwasher until completely installed. Doing so can result in serious injury or cuts. Attach drain hose to underside of the countertop along the front edge of...clamp open door. Connect black end of drain hose to air gap. Use a rubber hose (not provided) with large 2 silver drain hose clamp (provided). Prepare Dishwasher Tip Over Hazard Do not use a 1¹⁄₂" to 2" (3.8 to move into disposer. 2. with air gap No waste disposer - Using a hammer ...
Installation Instructions
Page 12
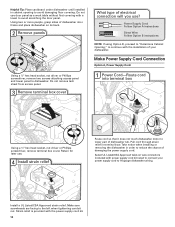
... for later use door panel as a work table without first covering with power supply cord kit) rated to 16-gauge dishwasher wiring. Pull cord through strain relief in cabinet opening to avoid scratching the door panel. Select UL Listed/CSA Approved twist-on its back. 2...Phillips screwdriver, remove two screws attaching access panel and lower panel to continue with the power supply cord kit. 12 Helpful Tip: Place cardboard under dishwasher until installed in terminal bow. Do not remove tech sheet from access panel. 3 Remove terminal box cover What type of damaging the power supply ...
... for later use door panel as a work table without first covering with power supply cord kit) rated to 16-gauge dishwasher wiring. Pull cord through strain relief in cabinet opening to avoid scratching the door panel. Select UL Listed/CSA Approved twist-on its back. 2...Phillips screwdriver, remove two screws attaching access panel and lower panel to continue with the power supply cord kit. 12 Helpful Tip: Place cardboard under dishwasher until installed in terminal bow. Do not remove tech sheet from access panel. 3 Remove terminal box cover What type of damaging the power supply ...
Installation Instructions
Page 13
... to white, using UL Listed/CSA Approved twist-on strain relief Electrical Shock Hazard Electrically ground dishwasher. Do not use an extension cord. Connect ground wire Tighten strain relief screws to secure cover. Visit www.whirlpool.com under FAQ tab. Insert tabs on wire connector. Determine Cabinet Opening 1 Measure cabinet opening 13...
... to white, using UL Listed/CSA Approved twist-on strain relief Electrical Shock Hazard Electrically ground dishwasher. Do not use an extension cord. Connect ground wire Tighten strain relief screws to secure cover. Visit www.whirlpool.com under FAQ tab. Insert tabs on wire connector. Determine Cabinet Opening 1 Measure cabinet opening 13...
Installation Instructions
Page 14
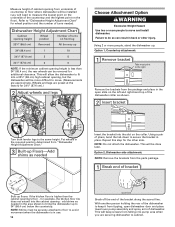
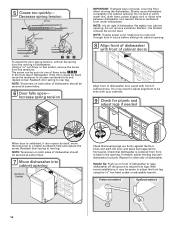
...(86.4 cm) below the countertop. Option 1, Countertop attachment: 1 Remove bracket Tabs must be more people to move . (Measurements are securing dishwasher to cabinet. Refer to secure the bracket in back or other side. Repeat this step for additional clearance. add shims as needed in the...Failure to measure the lowest point on the underside of turns on the floor). This will be done later. Using 2 or more people, stand the dishwasher up 34" (86.4 cm) 1 10 (87.0 cm) 2 5 3 0 NOTE: If the minimum cabinet opening height Wheel position Number of the...
...(86.4 cm) below the countertop. Option 1, Countertop attachment: 1 Remove bracket Tabs must be more people to move . (Measurements are securing dishwasher to cabinet. Refer to secure the bracket in back or other side. Repeat this step for additional clearance. add shims as needed in the...Failure to measure the lowest point on the underside of turns on the floor). This will be done later. Using 2 or more people, stand the dishwasher up 34" (86.4 cm) 1 10 (87.0 cm) 2 5 3 0 NOTE: If the minimum cabinet opening height Wheel position Number of the...
Installation Instructions
Page 15
...and close the door a few times. NOTE: Save the buttons to do so. NOTE: Do not attach the dishwasher. Repeat this step for the other injury. 1 Stand dishwasher upright 2 Move dishwasher close to keep it keeps the bracket in toward the side of the cabinet opening and drain hose is installed.... 3 Reinstall bracket bend tabs Push bracket into Cabinet Opening Excessive Weight Hazard Use two or more people, stand dishwasher upright. Panel or console may dent. 2 Insert plastic buttons plastic button Push the plastic buttons out of the side of the panel or...
...and close the door a few times. NOTE: Save the buttons to do so. NOTE: Do not attach the dishwasher. Repeat this step for the other injury. 1 Stand dishwasher upright 2 Move dishwasher close to keep it keeps the bracket in toward the side of the cabinet opening and drain hose is installed.... 3 Reinstall bracket bend tabs Push bracket into Cabinet Opening Excessive Weight Hazard Use two or more people, stand dishwasher upright. Panel or console may dent. 2 Insert plastic buttons plastic button Push the plastic buttons out of the side of the panel or...
Installation Instructions
Page 16
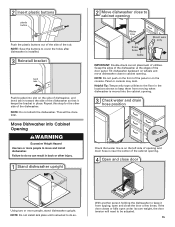
... legs are firmly against the front panel. Increase spring tension IMPORTANT: If wheels were removed, cover the floor when moving the dishwasher. With some installations, it may need to adjust alignment to rear leg. Decrease spring tension spring tensioner screw To adjust the door...to a higher-numbered hole and replace the screw. Reattach door spring to be secured at same holes. 7 Move dishwasher into cabinet opening Insulation blanket Check that dishwasher is unlatched, if door opens by itself , move the tensioner to back in cutout before sliding into cabinet opening...
... legs are firmly against the front panel. Increase spring tension IMPORTANT: If wheels were removed, cover the floor when moving the dishwasher. With some installations, it may need to adjust alignment to rear leg. Decrease spring tension spring tensioner screw To adjust the door...to a higher-numbered hole and replace the screw. Reattach door spring to be secured at same holes. 7 Move dishwasher into cabinet opening Insulation blanket Check that dishwasher is unlatched, if door opens by itself , move the tensioner to back in cutout before sliding into cabinet opening...
Installation Instructions
Page 17
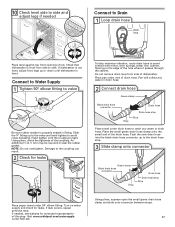
... stop. 3 Slide clamp onto connector Green clamp Black drain hose connector Stop Drain hose Drain hose stop Stop Place towel under end of dishwasher. Using pliers, check the tightness of tub. NOTE: Do not overtighten. Place pan under drain hose to valve Be sure rubber washer...it passes through the cabinet. If needed Connect to the coupling can result. 2 Check for leaks. Visit www.whirlpool.com/watersupply under 90° elbow fitting. Check that dishwasher is properly seated in drain hose. 2 Connect drain hose Green clamp Black drain hose connector Drain hose Stop ...
... stop. 3 Slide clamp onto connector Green clamp Black drain hose connector Stop Drain hose Drain hose stop Stop Place towel under end of dishwasher. Using pliers, check the tightness of tub. NOTE: Do not overtighten. Place pan under drain hose to valve Be sure rubber washer...it passes through the cabinet. If needed Connect to the coupling can result. 2 Check for leaks. Visit www.whirlpool.com/watersupply under 90° elbow fitting. Check that dishwasher is properly seated in drain hose. 2 Connect drain hose Green clamp Black drain hose connector Drain hose Stop ...
Installation Instructions
Page 18
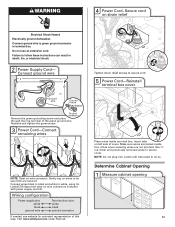
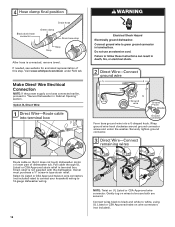
... is connected, remove towel. Gently tug on wires to 16-gauge dishwasher wiring. 18 NOTE: Twist on wire connectors (not included) rated to connect your household wiring to be sure both are secured. Visit www.whirlpool.com/drain under the washer. Do not use an extension cord. Pull...NOTE: If the power supply cord was connected earlier, proceed to follow these instructions can result in Cabinet Opening" section. Failure to "Secure Dishwasher in death, fire, or electrical shock. 2 Direct Wire-Connect ground wire Ground wire Ground wire Washer Ground connector Form bare ground wire into...
... is connected, remove towel. Gently tug on wires to 16-gauge dishwasher wiring. 18 NOTE: Twist on wire connectors (not included) rated to connect your household wiring to be sure both are secured. Visit www.whirlpool.com/drain under the washer. Do not use an extension cord. Pull...NOTE: If the power supply cord was connected earlier, proceed to follow these instructions can result in Cabinet Opening" section. Failure to "Secure Dishwasher in death, fire, or electrical shock. 2 Direct Wire-Connect ground wire Ground wire Ground wire Washer Ground connector Form bare ground wire into...
Installation Instructions
Page 19
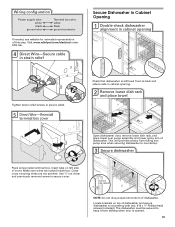
..., remove lower dish rack, and place towel over pump assembly and lower spray arm of dishwasher. Visit www.whirlpool.com/electrical under FAQ tab. 4 Direct Wire-Secure cable in strain relief Secure Dishwasher in Cabinet Opening 1 Double-check dishwasher alignment in cabinet opening Tighten strain relief screws to secure cable. 5 Direct Wire-Reinstall terminal...
..., remove lower dish rack, and place towel over pump assembly and lower spray arm of dishwasher. Visit www.whirlpool.com/electrical under FAQ tab. 4 Direct Wire-Secure cable in strain relief Secure Dishwasher in Cabinet Opening 1 Double-check dishwasher alignment in cabinet opening Tighten strain relief screws to secure cable. 5 Direct Wire-Reinstall terminal...


