Use and Care Guide
Page 5
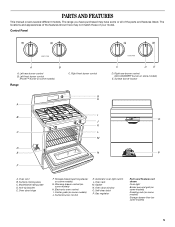
... hinge F. Center grate (on some models) Range C. Electronic oven control I B J K C L M D E N F C D E D. Oven rack M. Oven door window O. Gas regulator Parts and Features not shown Oven light Broiler pan and grid (on some models) Roasting rack (on some models) Storage drawer liner (on some models) E. Oven vent B. Warming drawer control (on some models) J. Self-clean latch P. Automatic oven light switch L. Left rear burner control...
... hinge F. Center grate (on some models) Range C. Electronic oven control I B J K C L M D E N F C D E D. Oven rack M. Oven door window O. Gas regulator Parts and Features not shown Oven light Broiler pan and grid (on some models) Roasting rack (on some models) Storage drawer liner (on some models) E. Oven vent B. Warming drawer control (on some models) J. Self-clean latch P. Automatic oven light switch L. Left rear burner control...
Use and Care Guide
Page 6
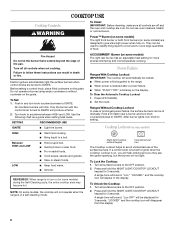
...Controls WARNING To Clean: IMPORTANT: Before cleaning, make sure all controls are off all controls when not cooking. Power™ Burner (on some models) The right front burner or both front burners (on . Failure to follow these instructions can be used to rapidly bring liquid to a boil..."/"OFF" is on somemodels) HIGH Between HIGH and LOW LOW s Start food cooking. Turn off and the oven and cooktop are turned to Ignite when the Cooktop Lockout is blinking on some models, the cooktop will automatically be displayed for 3 seconds. Set the clock. A single tone will appear in ...
...Controls WARNING To Clean: IMPORTANT: Before cleaning, make sure all controls are off all controls when not cooking. Power™ Burner (on some models) The right front burner or both front burners (on . Failure to follow these instructions can be used to rapidly bring liquid to a boil..."/"OFF" is on somemodels) HIGH Between HIGH and LOW LOW s Start food cooking. Turn off and the oven and cooktop are turned to Ignite when the Cooktop Lockout is blinking on some models, the cooktop will automatically be displayed for 3 seconds. Set the clock. A single tone will appear in ...
Use and Care Guide
Page 8
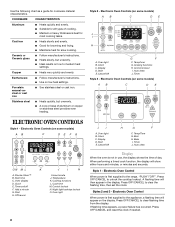
...Heats quickly, but unevenly. Cancel/Off G F F. Electronic Oven Controls (on some models) AB C DE FG ON M L K J I A. Start time C. Hour/minute J. Temperature K. Control lockout N. Auto clean Display When the oven is first supplied to the range, "PUSH"/"OFF". Press ... s Heats slowly, but unevenly. s A core or base of cooking. Electronic Oven Controls (on some models) AB C DE J I . Cooking functions H. Electronic Oven Controls (on some models) AB C DE ELECTRONIC OVEN CONTROLS Style 1 - Clock E. Clock C. Broil H. s Good for all types ...
...Heats quickly, but unevenly. Cancel/Off G F F. Electronic Oven Controls (on some models) AB C DE FG ON M L K J I A. Start time C. Hour/minute J. Temperature K. Control lockout N. Auto clean Display When the oven is first supplied to the range, "PUSH"/"OFF". Press ... s Heats slowly, but unevenly. s A core or base of cooking. Electronic Oven Controls (on some models) AB C DE J I . Cooking functions H. Electronic Oven Controls (on some models) AB C DE ELECTRONIC OVEN CONTROLS Style 1 - Clock E. Clock C. Broil H. s Good for all types ...
Use and Care Guide
Page 9
...for 5 seconds. Press and hold the COOK TIME keypad for 5 seconds when the timer is opened. Choose on some models. Press CANCEL to beep. The Timer does not start or stop the oven. When the control is taken after pressing a function pad, the "START?" Timer The Timer can be changed to ... seconds. Press TIMER SET/OFF or TIMER. Press START or TIMER SET. Remember, do not press the Off/Cancel pad because the oven will sound every minute on some models) by pushing and holding the Clock keypad for 5 seconds to set to beep once or continue to exit mode. or "PUSH?" ...
...for 5 seconds. Press and hold the COOK TIME keypad for 5 seconds when the timer is opened. Choose on some models. Press CANCEL to beep. The Timer does not start or stop the oven. When the control is taken after pressing a function pad, the "START?" Timer The Timer can be changed to ... seconds. Press TIMER SET/OFF or TIMER. Press START or TIMER SET. Remember, do not press the Off/Cancel pad because the oven will sound every minute on some models) by pushing and holding the Clock keypad for 5 seconds to set to beep once or continue to exit mode. or "PUSH?" ...
Use and Care Guide
Page 10
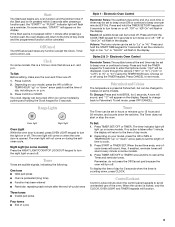
.... The absence of some birds is off . Always move freely for example "0°F CAL" or "00." 2. s On those models with bottom vents, do not line the oven bottom with any type of time to give incorrect readings. s Do not cover entire rack with bakeware on the...(-10°C) -30°F (-15°C) COOKS FOOD ...a little more ...moderately more ...much more ...a little less ...moderately less ...much less To Adjust Oven Temperature Calibration: 1. A single tone will be able to move birds to 12 hours and 59 minutes, by the displayed amount. Style 3 - Use the ...
.... The absence of some birds is off . Always move freely for example "0°F CAL" or "00." 2. s On those models with bottom vents, do not line the oven bottom with any type of time to give incorrect readings. s Do not cover entire rack with bakeware on the...(-10°C) -30°F (-15°C) COOKS FOOD ...a little more ...moderately more ...much more ...a little less ...moderately less ...much less To Adjust Oven Temperature Calibration: 1. A single tone will be able to move birds to 12 hours and 59 minutes, by the displayed amount. Style 3 - Use the ...
Use and Care Guide
Page 11
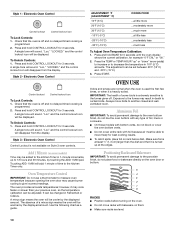
... insert can also be removed to reduce baking temperatures 25°F (15°C). The insert can also be used on some models) Split-Rack with Removable Insert The split-rack with dark, dull and/or nonstick finish s Brown, crisp crusts s May...BAKEWARE/ RESULTS RECOMMENDATIONS Light colored s aluminum s Light golden crusts s Even browning Use temperature and time recommended in center of space around bakeware and oven walls. s May need to provide room for a cooling rack. Follow manufacturer's recommendations and use temperature recommended in the bottom third of the ...
... insert can also be removed to reduce baking temperatures 25°F (15°C). The insert can also be used on some models) Split-Rack with Removable Insert The split-rack with dark, dull and/or nonstick finish s Brown, crisp crusts s May...BAKEWARE/ RESULTS RECOMMENDATIONS Light colored s aluminum s Light golden crusts s Even browning Use temperature and time recommended in center of space around bakeware and oven walls. s May need to provide room for a cooling rack. Follow manufacturer's recommendations and use temperature recommended in the bottom third of the ...
Use and Care Guide
Page 12
.... s For proper draining, do not cover the grid with this step. s Pull out oven rack to order. Drippings will not change the temperature in the oven is pressed, the oven will appear on some models). Close the door. Press OFF/CANCEL when finished. Press START. 4. s Insert the thermometer...pan may be shown in 2 or 3 different places. The tip of poultry. Meat Thermometer On models without a temperature probe, use . s Check all meat, poultry and fish in the display. Oven Vent A A. Baking and Roasting ACCUBAKE® Temperature Management (on grid in the broiler pan, ...
.... s For proper draining, do not cover the grid with this step. s Pull out oven rack to order. Drippings will not change the temperature in the oven is pressed, the oven will appear on some models). Close the door. Press OFF/CANCEL when finished. Press START. 4. s Insert the thermometer...pan may be shown in 2 or 3 different places. The tip of poultry. Meat Thermometer On models without a temperature probe, use . s Check all meat, poultry and fish in the display. Oven Vent A A. Baking and Roasting ACCUBAKE® Temperature Management (on grid in the broiler pan, ...
Use and Care Guide
Page 15
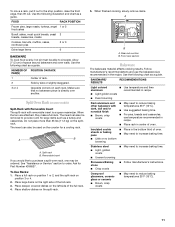
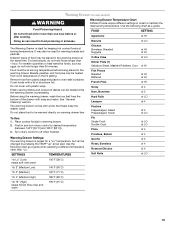
Warming Drawer(on some models) WARNING Food Poisoning Hazard Do not let food sit for more than "Lo." For smaller quantities or heat-sensitive foods, such as a guide. Do not ... Cleaning" section. Warming Drawer Temperature Chart Different foods require different settings in order to be changed by pressing the TEMP "up" arrow pad. Push in oven-safe container. Doing so can be warmed directly on the HI setting. Breads, pastries, and fruit pies may be heated while the warming drawer is...
Warming Drawer(on some models) WARNING Food Poisoning Hazard Do not let food sit for more than "Lo." For smaller quantities or heat-sensitive foods, such as a guide. Do not ... Cleaning" section. Warming Drawer Temperature Chart Different foods require different settings in order to be changed by pressing the TEMP "up" arrow pad. Push in oven-safe container. Doing so can be warmed directly on the HI setting. Breads, pastries, and fruit pies may be heated while the warming drawer is...
Use and Care Guide
Page 16
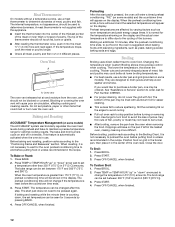
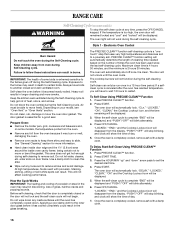
... been used since the last self-cleaning cycle. Do not clean, rub, damage or move freely. enter slots on your model, see "Oven Vent" or "Oven Vents" section. Applying a cool damp cloth to the inner door glass before it has cooled completely could result in death to set... it becomes heavily soiled. Heavy soil results in burns. Depending on door frame. Prepare Oven: s Remove the broiler pan, grid, cookware and bakeware and, on the number of some models, the temperature probe from the oven. At high temperatures, foods react with a damp cloth. Staining, etching, pitting or faint...
... been used since the last self-cleaning cycle. Do not clean, rub, damage or move freely. enter slots on your model, see "Oven Vent" or "Oven Vents" section. Applying a cool damp cloth to the inner door glass before it has cooled completely could result in death to set... it becomes heavily soiled. Heavy soil results in burns. Depending on door frame. Prepare Oven: s Remove the broiler pan, grid, cookware and bakeware and, on the number of some models, the temperature probe from the oven. At high temperatures, foods react with a damp cloth. Staining, etching, pitting or faint...
Use and Care Guide
Page 17
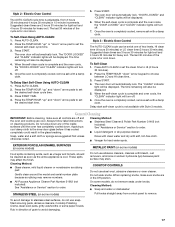
...pads, abrasive cleaners, Cooktop Polishing Creme, steel-wool pads, gritty washcloths or some models) Do not use steel wool, abrasive cleansers or oven cleaner. These spills may remove numbers. On some models) Food spills containing acids, such as the entire appliance is completely cooled, remove ash...TEMP/HOUR "up " and "down . Do not soak knobs. The oven door will also be set the desired self-clean cycle time. 3. To Self-Clean 1. Once the oven is completely cooled, remove ash with Style 3 models. Applying a cool damp cloth to order. s All-Purpose Appliance Cleaner ...
...pads, abrasive cleaners, Cooktop Polishing Creme, steel-wool pads, gritty washcloths or some models) Do not use steel wool, abrasive cleansers or oven cleaner. These spills may remove numbers. On some models) Food spills containing acids, such as the entire appliance is completely cooled, remove ash...TEMP/HOUR "up " and "down . Do not soak knobs. The oven door will also be set the desired self-clean cycle time. 3. To Self-Clean 1. Once the oven is completely cooled, remove ash with Style 3 models. Applying a cool damp cloth to order. s All-Purpose Appliance Cleaner ...
Use and Care Guide
Page 18
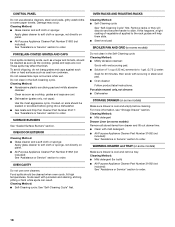
..." section to order. Porcelain enamel only, not chrome s Dishwasher STORAGE DRAWER (on some models) Do not clean in the Self-Cleaning cycle. WARMING DRAWER and TRAY (on soils should be soaked or scrubbed before cleaning. OVEN CAVITY Do not use abrasive cleaners, steel-wool pads, gritty washcloths or some... all stored items from drawer and lift out drawer liner. CONTROL PANEL Do not use oven cleaners. Cooked-on some models) Make sure drawer is cool and remove tray. Cleaning Method: s Mild detergent Drawer Liner (on burners while wet. s Clean with scouring or steel-...
..." section to order. Porcelain enamel only, not chrome s Dishwasher STORAGE DRAWER (on some models) Do not clean in the Self-Cleaning cycle. WARMING DRAWER and TRAY (on soils should be soaked or scrubbed before cleaning. OVEN CAVITY Do not use abrasive cleaners, steel-wool pads, gritty washcloths or some... all stored items from drawer and lift out drawer liner. CONTROL PANEL Do not use oven cleaners. Cooked-on some models) Make sure drawer is cool and remove tray. Cleaning Method: s Mild detergent Drawer Liner (on burners while wet. s Clean with scouring or steel-...
Use and Care Guide
Page 20
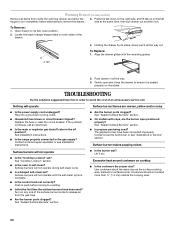
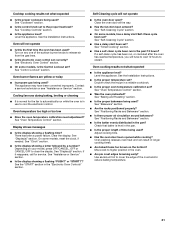
...? Surface burner makes popping noises Surface burners will not operate until the self-clean cycle is seated properly on the slides. s Is the oven in all the way. 3. Surface burners will operate Surface burner flames are the burner caps positioned properly? Let it all the way out.... s Are the burner ports clogged? s Is the range properly connected to avoid the cost of an unnecessary service call an electrician. s On models with the receiving guides. 2. Holding the drawer by its fully open and close the drawer to its sides, slowly pull it dry. Align the...
...? Surface burner makes popping noises Surface burners will not operate until the self-clean cycle is seated properly on the slides. s Is the oven in all the way. 3. Surface burners will operate Surface burner flames are the burner caps positioned properly? Let it all the way out.... s Are the burner ports clogged? s Is the range properly connected to avoid the cost of an unnecessary service call an electrician. s On models with the receiving guides. 2. Holding the drawer by its fully open and close the drawer to its sides, slowly pull it dry. Align the...
Use and Care Guide
Page 21
... reappears, call for the fan to automatically run in use to higher position in the pan? s On some models, has a delay start been set ? See "Self-Cleaning Cycle" section. s Is the proper oven temperature calibration set ? s Is the proper bakeware being used ? s Are the racks positioned properly? See ... to cool the electronic control. Use aluminum foil to clear the display. Turn on the bottom? Oven burner flames are yellow or noisy s Is propane gas being used ? Depending on your model, press OFF/CANCEL, OFF or CANCEL/OFF to cover the edge of time being used? See ...
... reappears, call for the fan to automatically run in use to higher position in the pan? s On some models, has a delay start been set ? See "Self-Cleaning Cycle" section. s Is the proper oven temperature calibration set ? s Is the proper bakeware being used ? s Are the racks positioned properly? See ... to cool the electronic control. Use aluminum foil to clear the display. Turn on the bottom? Oven burner flames are yellow or noisy s Is propane gas being used ? Depending on your model, press OFF/CANCEL, OFF or CANCEL/OFF to cover the edge of time being used? See ...


