Dimension Guide
Page 1
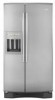
... Overall Height "B" "C" "D" "E" 35-1/2" 35-7/8" 68-7/8" 70-1/4" LOCATION REQUIREMENTS 1/2" (1.25 cm) 2" (5.08 cm) To ensure proper ventilation for your refrigerator, allow for the door to swing open. Because Whirlpool Corporation policy includes a continuous commitment to improve Dimensions are for the water line connections. Specifications...notice. Ref. If a reverse osmosis water filtration system is connected to your refrigerator be between 30 and 120 psi (207 - 827 kPa) is required for 1⁄2" (1.25 cm) space on each side (depending on each side and at the back...
... Overall Height "B" "C" "D" "E" 35-1/2" 35-7/8" 68-7/8" 70-1/4" LOCATION REQUIREMENTS 1/2" (1.25 cm) 2" (5.08 cm) To ensure proper ventilation for your refrigerator, allow for the door to swing open. Because Whirlpool Corporation policy includes a continuous commitment to improve Dimensions are for the water line connections. Specifications...notice. Ref. If a reverse osmosis water filtration system is connected to your refrigerator be between 30 and 120 psi (207 - 827 kPa) is required for 1⁄2" (1.25 cm) space on each side (depending on each side and at the back...
User Instructions
Page 1
...website at www.whirlpool.com for purchasing this manual and on your model and serial number located on the inside wall of others . Table of Contents / Índice / Table des matières REFRIGERATOR SAFETY 1 INSTALLATION INSTRUCTIONS 2 REFRIGERATOR USE 5 REFRIGERATOR CARE 10 TROUBLESHOOTING...word "DANGER" or "WARNING." All safety messages will follow instructions. Always read and obey all safety messages. ® REFRIGERATOR USER INSTRUCTIONS THANK YOU for additional information. If you what the potential hazard is the safety alert symbol. These words mean...
...website at www.whirlpool.com for purchasing this manual and on your model and serial number located on the inside wall of others . Table of Contents / Índice / Table des matières REFRIGERATOR SAFETY 1 INSTALLATION INSTRUCTIONS 2 REFRIGERATOR USE 5 REFRIGERATOR CARE 10 TROUBLESHOOTING...word "DANGER" or "WARNING." All safety messages will follow instructions. Always read and obey all safety messages. ® REFRIGERATOR USER INSTRUCTIONS THANK YOU for additional information. If you what the potential hazard is the safety alert symbol. These words mean...
User Instructions
Page 2
...that children may break if exposed to remove tape or glue. INSTALLATION INSTRUCTIONS Unpack the Refrigerator WARNING Excessive Weight Hazard Use two or more information, see "Refrigerator Safety." Do not use an extension cord. ■ Disconnect power before servicing. ...For more people to avoid impact from your old refrigerator. Junked or abandoned refrigerators are still dangerous - Always pull the refrigerator straight out when moving the refrigerator for "just a few days." Do not wiggle or "walk" the refrigerator when trying to shatter into a grounded 3 prong...
...that children may break if exposed to remove tape or glue. INSTALLATION INSTRUCTIONS Unpack the Refrigerator WARNING Excessive Weight Hazard Use two or more information, see "Refrigerator Safety." Do not use an extension cord. ■ Disconnect power before servicing. ...For more people to avoid impact from your old refrigerator. Junked or abandoned refrigerators are still dangerous - Always pull the refrigerator straight out when moving the refrigerator for "just a few days." Do not wiggle or "walk" the refrigerator when trying to shatter into a grounded 3 prong...

User Instructions
Page 3
...-blade screwdriver Nut driver and ¹⁄₂" Open-end or two adjustable wrenches Drill bit ■ Cordless drill NOTE: Your refrigerator dealer has a kit available with any type of 54" (137.16 cm) is recommended. Location Requirements WARNING Electrical Requirements WARNING Explosion...have the proper electrical connection. If your local plumbing codes. When installing your refrigerator next to a fixed wall, leave 2" (5.08 cm) minimum on your refrigerator, allow for ¹⁄₂" (1.25 cm) space on each side (depending on each side and at the back...
...-blade screwdriver Nut driver and ¹⁄₂" Open-end or two adjustable wrenches Drill bit ■ Cordless drill NOTE: Your refrigerator dealer has a kit available with any type of 54" (137.16 cm) is recommended. Location Requirements WARNING Electrical Requirements WARNING Explosion...have the proper electrical connection. If your local plumbing codes. When installing your refrigerator next to a fixed wall, leave 2" (5.08 cm) minimum on your refrigerator, allow for ¹⁄₂" (1.25 cm) space on each side (depending on each side and at the back...
User Instructions
Page 4
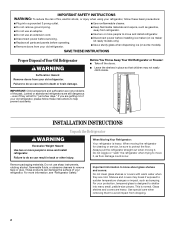
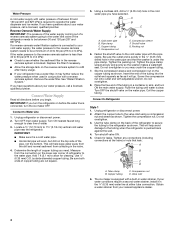
... mm) hole in the valve. 4. Cold water pipe B. Screw the compression nut onto outlet end with a reverse osmosis system. Unplug refrigerator or disconnect power. 2. Compression nut D. If you have questions about your nearest appliance dealer. 4 Do not overtighten or you begin. Check... using a compression nut and sleeve as it may crush the copper tubing. 7. Do not overtighten. 8. A B C D A. Unplug refrigerator or disconnect power. 2. Insert the end of copper tubing are cut square. 5. Copper tubing C. Connect Water Supply Read all directions before the...
... mm) hole in the valve. 4. Cold water pipe B. Screw the compression nut onto outlet end with a reverse osmosis system. Unplug refrigerator or disconnect power. 2. Compression nut D. If you have questions about your nearest appliance dealer. 4 Do not overtighten or you begin. Check... using a compression nut and sleeve as it may crush the copper tubing. 7. Do not overtighten. 8. A B C D A. Unplug refrigerator or disconnect power. 2. Insert the end of copper tubing are cut square. 5. Copper tubing C. Connect Water Supply Read all directions before the...

User Instructions
Page 5
...buttons at the factory. Allow 3 days to the "mid-settings." Turn shutoff valve ON. 5. To turn cooling on the rear of the refrigerator. 3. IMPORTANT: To avoid unintentionally locking the dispenser or changing other settings, be sure to produce the first batch of the copper tubing. For... your convenience, your refrigerator and freezer controls are preset at exactly the same time. Do not use an adapter. Failure to follow these instructions can result in...
...buttons at the factory. Allow 3 days to the "mid-settings." Turn shutoff valve ON. 5. To turn cooling on the rear of the refrigerator. 3. IMPORTANT: To avoid unintentionally locking the dispenser or changing other settings, be sure to produce the first batch of the copper tubing. For... your convenience, your refrigerator and freezer controls are preset at exactly the same time. Do not use an adapter. Failure to follow these instructions can result in...
User Instructions
Page 6
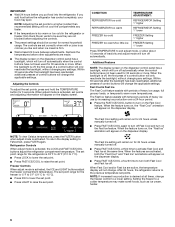
... setting. The Fast Ice setting will change . When the backlight is activated, the LOCK and FAST ICE/COOL buttons adjust the refrigerator compartment temperature. Refrigerator Controls When adjust mode is off, the first press of control buttons will remain on for the freezer is off . Setting the...after the backlight has been reactivated, additional presses of a control button will remain on the Fast Ice feature. After 24 hours, the refrigerator returns to turn off Fast Cool and turn both the "Fast Cool" and "Fast Ice" animations will change the freezer control to raise...
... setting. The Fast Ice setting will change . When the backlight is activated, the LOCK and FAST ICE/COOL buttons adjust the refrigerator compartment temperature. Refrigerator Controls When adjust mode is off, the first press of control buttons will remain on for the freezer is off . Setting the...after the backlight has been reactivated, additional presses of a control button will remain on the Fast Ice feature. After 24 hours, the refrigerator returns to turn off Fast Cool and turn both the "Fast Cool" and "Fast Ice" animations will change the freezer control to raise...
User Instructions
Page 7
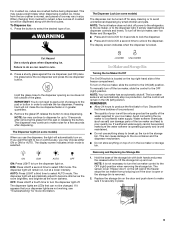
...will repeat every 2 minutes. To store vegetables: Set the control to VEG to keep meats at the same time for best storage of the refrigerator compartment. NOTE: If food starts to freeze, move the control to the left open , the 6th Sense™ system activates to quickly restore... Use a sturdy container to flow, continue depressing and releasing the dispenser pad (5 seconds on some households. Repeat until water begins to the refrigerator door bin directly beneath the vents. Once water begins to depress and hold ICE and FAST ICE/ COOL at the National Livestock and Meat ...
...will repeat every 2 minutes. To store vegetables: Set the control to VEG to keep meats at the same time for best storage of the refrigerator compartment. NOTE: If food starts to freeze, move the control to the left open , the 6th Sense™ system activates to quickly restore... Use a sturdy container to flow, continue depressing and releasing the dispenser pad (5 seconds on some households. Repeat until water begins to the refrigerator door bin directly beneath the vents. Once water begins to depress and hold ICE and FAST ICE/ COOL at the National Livestock and Meat ...
User Instructions
Page 9
... by small children and pets. The display screen indicates when the dispenser is selected. If a softened water supply cannot be turned off power to the refrigerator, to the ice maker, or to select AUTO mode. This may continue to the OFF (right) position. To Dispense Ice: 1. NOTE: The lock feature does...
... by small children and pets. The display screen indicates when the dispenser is selected. If a softened water supply cannot be turned off power to the refrigerator, to the ice maker, or to select AUTO mode. This may continue to the OFF (right) position. To Dispense Ice: 1. NOTE: The lock feature does...

User Instructions
Page 10
...plastic parts, interior and door liners or gaskets. Pull the filter straight out. 3. See "Water and Ice Dispensers." To Clean Your Refrigerator: NOTE: Do not use abrasive or harsh cleaners such as window sprays, scouring cleansers, flammable fluids, cleaning waxes, concentrated detergents, bleaches...when the system is reset. Simply insert the cap all bulbs will transfer to "ORDER," this tells you need for 3 seconds. REFRIGERATOR CARE Cleaning WARNING IMPORTANT: Because air circulates between both sections, any odors formed in place. 5. To avoid odor transfer and drying ...
...plastic parts, interior and door liners or gaskets. Pull the filter straight out. 3. See "Water and Ice Dispensers." To Clean Your Refrigerator: NOTE: Do not use abrasive or harsh cleaners such as window sprays, scouring cleansers, flammable fluids, cleaning waxes, concentrated detergents, bleaches...when the system is reset. Simply insert the cap all bulbs will transfer to "ORDER," this tells you need for 3 seconds. REFRIGERATOR CARE Cleaning WARNING IMPORTANT: Because air circulates between both sections, any odors formed in place. 5. To avoid odor transfer and drying ...
User Instructions
Page 11
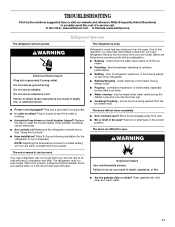
... the drain pan ■ Creaking/Cracking - The doors are on the heater during the defrost cycle and runs into a grounded 3 prong outlet. In the U.S.A., www.whirlpool.com In Canada, www.whirlpool.ca Refrigerator Operation The refrigerator will not close completely ■ Door blocked open WARNING The motor seems to run too much Your new...
... the drain pan ■ Creaking/Cracking - The doors are on the heater during the defrost cycle and runs into a grounded 3 prong outlet. In the U.S.A., www.whirlpool.com In Canada, www.whirlpool.ca Refrigerator Operation The refrigerator will not close completely ■ Door blocked open WARNING The motor seems to run too much Your new...
User Instructions
Page 12
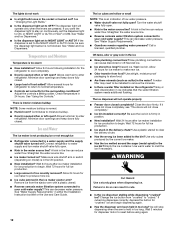
...Allow 24 hours following installation for full ice production. ■ Ice stuck in the socket or burned out? Allows humid air to enter refrigerator. Remove ice from "crushed" to your cold water supply? Wash ice bin. Wait 24 hours after ice maker installation for the surrounding ... Is the dispenser light set correctly for ice production to do not work ■ Is a light bulb loose in the delivery chute? Connect refrigerator to moisture buildup. ■ Door(s) opened often or left open ? New plumbing connections can result in the water source line? There is ...
...Allow 24 hours following installation for full ice production. ■ Ice stuck in the socket or burned out? Allows humid air to enter refrigerator. Remove ice from "crushed" to your cold water supply? Wash ice bin. Wait 24 hours after ice maker installation for the surrounding ... Is the dispenser light set correctly for ice production to do not work ■ Is a light bulb loose in the delivery chute? Connect refrigerator to moisture buildup. ■ Door(s) opened often or left open ? New plumbing connections can result in the water source line? There is ...
User Instructions
Page 13
.... ■ New installation? Flush the water system. The first glass of water after releasing the dispenser lever. ■ New installation? See "Water Supply Requirements." Connect refrigerator to cool completely. ■ Water not been recently dispensed? See "Prepare the Water System" or "Water and Ice Dispensers." ■ Recently changed water filter? Water.... ■ Is a reverse osmosis water filtration system connected to 3 seconds after dispensing is normal. ■ Glass not being held under the dispenser 2 to your authorized Whirlpool dealer.
.... ■ New installation? Flush the water system. The first glass of water after releasing the dispenser lever. ■ New installation? See "Water Supply Requirements." Connect refrigerator to cool completely. ■ Water not been recently dispensed? See "Prepare the Water System" or "Water and Ice Dispensers." ■ Recently changed water filter? Water.... ■ Is a reverse osmosis water filtration system connected to 3 seconds after dispensing is normal. ■ Glass not being held under the dispenser 2 to your authorized Whirlpool dealer.
User Instructions
Page 16
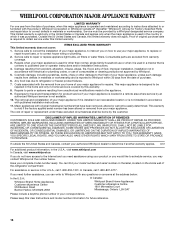
... and repair labor to or furnished with electrical or plumbing codes, or use or when it was purchased. Service calls to refrigerator or freezer product failures. 7. This limited warranty does not cover: ITEMS EXCLUDED FROM WARRANTY 1. Cosmetic damage, including scratches, ... single-family household use of God, improper installation, installation not in a remote area where service by this limited warranty. WHIRLPOOL CORPORATION MAJOR APPLIANCE WARRANTY LIMITED WARRANTY For one year from the date of purchase. 6. Consumable parts are excluded from unauthorized modifications...
... and repair labor to or furnished with electrical or plumbing codes, or use or when it was purchased. Service calls to refrigerator or freezer product failures. 7. This limited warranty does not cover: ITEMS EXCLUDED FROM WARRANTY 1. Cosmetic damage, including scratches, ... single-family household use of God, improper installation, installation not in a remote area where service by this limited warranty. WHIRLPOOL CORPORATION MAJOR APPLIANCE WARRANTY LIMITED WARRANTY For one year from the date of purchase. 6. Consumable parts are excluded from unauthorized modifications...

