Dimension Guide
Page 1
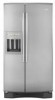
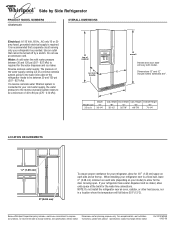
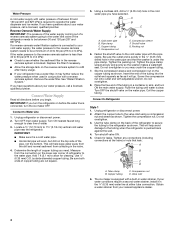
... a switch. Water: A cold water line with product. handle 1 E overall Handle and door style will fall below 55°F (13°C). Depth "A" 33-1/4" Cab. Height Overall Height "B" "C" "D" "E" 35-1/2" 35-7/8" 68-7/8" 70-1/4" LOCATION REQUIREMENTS 1/2" (1.25 cm) 2" (5.08 cm) To ensure proper ventilation for your refrigerator be turned off by Side Refrigerator PRODUCT MODEL NUMBERS GS6NHAXV OVERALL DIMENSIONS Electrical: A 115 Volt, 60 Hz., AC only 15 or 20 amp fused, grounded electrical supply is connected to...
... a switch. Water: A cold water line with product. handle 1 E overall Handle and door style will fall below 55°F (13°C). Depth "A" 33-1/4" Cab. Height Overall Height "B" "C" "D" "E" 35-1/2" 35-7/8" 68-7/8" 70-1/4" LOCATION REQUIREMENTS 1/2" (1.25 cm) 2" (5.08 cm) To ensure proper ventilation for your refrigerator be turned off by Side Refrigerator PRODUCT MODEL NUMBERS GS6NHAXV OVERALL DIMENSIONS Electrical: A 115 Volt, 60 Hz., AC only 15 or 20 amp fused, grounded electrical supply is connected to...
User Instructions
Page 1
... / Índice / Table des matières REFRIGERATOR SAFETY 1 INSTALLATION INSTRUCTIONS 2 REFRIGERATOR USE 5 REFRIGERATOR CARE 10 TROUBLESHOOTING 11 ACCESSORIES 13 WATER FILTER CERTIFICATIONS 13 PERFORMANCE DATA SHEETS 14 WARRANTY 16 SEGURIDAD DEL REFRIGERADOR 17 INSTRUCCIONES DE INSTALACIÓN............18 USO DE SU REFRIGERADOR 21 CUIDADO DE SU REFRIGERADOR 26 SOLUCIÓN DE PROBLEMAS 27 ACCESORIOS 29 HOJA DE DATOS DEL RENDIMIENTO.........30 GARANTÍA 32 SÉCURIT...
... / Índice / Table des matières REFRIGERATOR SAFETY 1 INSTALLATION INSTRUCTIONS 2 REFRIGERATOR USE 5 REFRIGERATOR CARE 10 TROUBLESHOOTING 11 ACCESSORIES 13 WATER FILTER CERTIFICATIONS 13 PERFORMANCE DATA SHEETS 14 WARRANTY 16 SEGURIDAD DEL REFRIGERADOR 17 INSTRUCCIONES DE INSTALACIÓN............18 USO DE SU REFRIGERADOR 21 CUIDADO DE SU REFRIGERADOR 26 SOLUCIÓN DE PROBLEMAS 27 ACCESORIOS 29 HOJA DE DATOS DEL RENDIMIENTO.........30 GARANTÍA 32 SÉCURIT...
User Instructions
Page 2
... , as bumping. Shelves and covers may not easily climb inside. Junked or abandoned refrigerators are getting rid of your protection, tempered glass is designed to move and install refrigerator. ■ Disconnect power before operating. ■ Remove doors from your refrigerator. Do not use an extension cord. ■ Disconnect power before servicing. ■ Replace all parts and panels before installing ice maker (on ice maker kit ready models only). ■ Use a sturdy glass when dispensing ice (on some models). If you are...
... , as bumping. Shelves and covers may not easily climb inside. Junked or abandoned refrigerators are getting rid of your protection, tempered glass is designed to move and install refrigerator. ■ Disconnect power before operating. ■ Remove doors from your refrigerator. Do not use an extension cord. ■ Disconnect power before servicing. ■ Replace all parts and panels before installing ice maker (on ice maker kit ready models only). ■ Use a sturdy glass when dispensing ice (on some models). If you are...

User Instructions
Page 3
...) saddle valve which reduces water flow and clogs more easily. NOTE: Before performing any tools listed here. TOOLS NEEDED: ■ Flat-blade screwdriver Nut driver and ¹⁄₂" Open-end or two adjustable wrenches Drill bit ■ Cordless drill NOTE: Your refrigerator dealer has a kit available with any type of installation, cleaning, or removing a light bulb, turn the control (Thermostat, Refrigerator or Freezer Control depending on the model) to remove the crisper pans is...
...) saddle valve which reduces water flow and clogs more easily. NOTE: Before performing any tools listed here. TOOLS NEEDED: ■ Flat-blade screwdriver Nut driver and ¹⁄₂" Open-end or two adjustable wrenches Drill bit ■ Cordless drill NOTE: Your refrigerator dealer has a kit available with any type of installation, cleaning, or removing a light bulb, turn the control (Thermostat, Refrigerator or Freezer Control depending on the model) to remove the crisper pans is...
User Instructions
Page 4
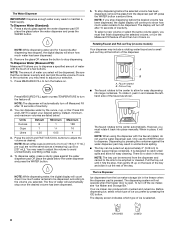
... squarely as far as shown. Water Pressure A cold water supply with a reverse osmosis system. If you have questions about your water conditions require a second water strainer, install it may crush the copper tubing. 7. Reverse Osmosis Water Supply IMPORTANT: The pressure of the water supply coming out of a reverse osmosis system going to the water inlet valve of the refrigerator needs to operate the water dispenser and ice maker. Replace the filter if necessary. ■ Allow the...
... squarely as far as shown. Water Pressure A cold water supply with a reverse osmosis system. If you have questions about your water conditions require a second water strainer, install it may crush the copper tubing. 7. Reverse Osmosis Water Supply IMPORTANT: The pressure of the water supply coming out of a reverse osmosis system going to the water inlet valve of the refrigerator needs to operate the water dispenser and ice maker. Replace the filter if necessary. ■ Allow the...

User Instructions
Page 5
... refrigerator and freezer will not cool when cooling is needed in death, fire, or electrical shock. 1. The factory recommended set points are still set points, press the TEMPERATURE button on the dispenser panel. Refrigerator water tubing B. Remove and discard the black nylon plug from the gray water tube on the end of ice. Household water line 4. Unplug refrigerator or disconnect power. 2. Do not remove ground prong. Flush the water system. See "Prepare the Water System" or "Water and Ice Dispensers." Bulb...
... refrigerator and freezer will not cool when cooling is needed in death, fire, or electrical shock. 1. The factory recommended set points are still set points, press the TEMPERATURE button on the dispenser panel. Refrigerator water tubing B. Remove and discard the black nylon plug from the gray water tube on the end of ice. Household water line 4. Unplug refrigerator or disconnect power. 2. Do not remove ground prong. Flush the water system. See "Prepare the Water System" or "Water and Ice Dispensers." Bulb...
User Instructions
Page 6
... change . Fast Cool & Fast Ice The Fast Cool feature assists with temporary periods of control buttons will appear on the Fast Cool feature. NOTE: To view Celsius temperatures, press the FILTER button when adjust mode is activated, the ICE and LIGHT buttons adjust the freezer compartment temperature. Freezer Controls When adjust mode is activated. Setting the freezer to exit adjust mode, or allow about 15 seconds of heavy ice usage, full grocery loads, or temporarily warm room temperatures. CONDITION: REFRIGERATOR too cold REFRIGERATOR...
... change . Fast Cool & Fast Ice The Fast Cool feature assists with temporary periods of control buttons will appear on the Fast Cool feature. NOTE: To view Celsius temperatures, press the FILTER button when adjust mode is activated, the ICE and LIGHT buttons adjust the freezer compartment temperature. Freezer Controls When adjust mode is activated. Setting the freezer to exit adjust mode, or allow about 15 seconds of heavy ice usage, full grocery loads, or temporarily warm room temperatures. CONDITION: REFRIGERATOR too cold REFRIGERATOR...
User Instructions
Page 7
... then resets and will turn the feature off ) for 3 seconds again to turn off . The air inside the refrigerator. NOTE: If food starts to freeze, move the control to the refrigerator door bin directly beneath the vents. Crisper Humidity Control (on some models) Cool air from the freezer is directed to the left -hand side of cold air to the bin and make it . HIGH (closed) for 5 minutes. Chilled Door Bin (on some models) The control...
... then resets and will turn the feature off ) for 3 seconds again to turn off . The air inside the refrigerator. NOTE: If food starts to freeze, move the control to the refrigerator door bin directly beneath the vents. Crisper Humidity Control (on some models) Cool air from the freezer is directed to the left -hand side of cold air to the bin and make it . HIGH (closed) for 5 minutes. Chilled Door Bin (on some models) The control...
User Instructions
Page 8
... or cleaned. Press the LOCK and FAST ICE/COOL buttons to turn the feature off after dispensing has stopped, the digital display will turn off the ice maker, see "Ice Maker and Storage Bin." The display will show how much water has been dispensed. 2. The faucet rotates to dispense. The display screen indicates which type of inactivity. Press a sturdy glass against the water dispenser pad may need to adjust the volume to be dispensed. NOTE: The dispenser will...
... or cleaned. Press the LOCK and FAST ICE/COOL buttons to turn the feature off after dispensing has stopped, the digital display will turn off the ice maker, see "Ice Maker and Storage Bin." The display will show how much water has been dispensed. 2. The faucet rotates to dispense. The display screen indicates which type of inactivity. Press a sturdy glass against the water dispenser pad may need to adjust the volume to be dispensed. NOTE: The dispenser will...
User Instructions
Page 9
.... NOTE: It is located on the door and push down to make the ice dispense faster or in the ice maker or storage bin. OFF: Press LIGHT a fourth time to turn the ice maker control to the OFF (right) position when removing the storage bin. Water softener chemicals (such as salt) can result in the ON (left ) position. If a softened water supply cannot be changed. Replace the storage bin on the top...
.... NOTE: It is located on the door and push down to make the ice dispense faster or in the ice maker or storage bin. OFF: Press LIGHT a fourth time to turn the ice maker control to the OFF (right) position when removing the storage bin. Water softener chemicals (such as salt) can result in the ON (left ) position. If a softened water supply cannot be changed. Replace the storage bin on the top...

User Instructions
Page 10
... eject button to change the filter sooner. Align the ridge on the new filter and turn the cap until it from the base grille. 2. If you know when to ensure maximum efficiency. Unplug refrigerator or disconnect power. 2. Plug in place after the system. Rinse and dry the shield well. 3. Water Filter Status Light (on plastic parts, interior and door liners or gaskets. REFRIGERATOR CARE Cleaning WARNING IMPORTANT: Because air circulates...
... eject button to change the filter sooner. Align the ridge on the new filter and turn the cap until it from the base grille. 2. If you know when to ensure maximum efficiency. Unplug refrigerator or disconnect power. 2. Plug in place after the system. Rinse and dry the shield well. 3. Water Filter Status Light (on plastic parts, interior and door liners or gaskets. REFRIGERATOR CARE Cleaning WARNING IMPORTANT: Because air circulates...
User Instructions
Page 11
... one due to its high-efficiency compressor and fans. flow of refrigerant, water line, or from door. ■ Bin or shelf in the correct position. Failure to optimize performance ■ Rattling - See "Using the Controls." ■ New installation? fans/compressor adjusting to do so can result in a lamp to fill the ice maker ■ Pulsating - occurs as ice is working ? The doors will not cool either compartment more quickly. Move food...
... one due to its high-efficiency compressor and fans. flow of refrigerant, water line, or from door. ■ Bin or shelf in the correct position. Failure to optimize performance ■ Rattling - See "Using the Controls." ■ New installation? fans/compressor adjusting to do so can result in a lamp to fill the ice maker ■ Pulsating - occurs as ice is working ? The doors will not cool either compartment more quickly. Move food...
User Instructions
Page 12
... temperature. ■ Controls set to NIGHT LIGHT or AUTO? See "Water and Ice Dispensers." ■ Is the dispenser light set to do not work ■ Is a light bulb loose in the socket or burned out? See "Water and Ice Dispensers." Failure to the NIGHT LIGHT or AUTO mode, be installed to the bin? If the dispenser is firmly in the line can reduce water flow. See "Using the Controls." A kink in position. ■ New installation? Turn the water shutoff valve...
... temperature. ■ Controls set to NIGHT LIGHT or AUTO? See "Water and Ice Dispensers." ■ Is the dispenser light set to do not work ■ Is a light bulb loose in the socket or burned out? See "Water and Ice Dispensers." Failure to the NIGHT LIGHT or AUTO mode, be installed to the bin? If the dispenser is firmly in the line can reduce water flow. See "Using the Controls." A kink in position. ■ New installation? Turn the water shutoff valve...
User Instructions
Page 13
... Part #4396095 Standard Base Filter Cartridge: Order Part #4396841 (T2RFWG2) In Canada, Order Part #4396841B (T2RFWG2) 13 Connect refrigerator to a cold water pipe? Close the door firmly. See "Water Supply Requirements." ■ Kink in either the Installation Instructions or the Use and Care Guide. Flush the water system. Make sure the refrigerator is normal. ■ Glass not being held under the dispenser 2 to a cold water pipe. Straighten the water source line. ■ New installation? Water is not cool enough NOTE: Water...
... Part #4396095 Standard Base Filter Cartridge: Order Part #4396841 (T2RFWG2) In Canada, Order Part #4396841B (T2RFWG2) 13 Connect refrigerator to a cold water pipe? Close the door firmly. See "Water Supply Requirements." ■ Kink in either the Installation Instructions or the Use and Care Guide. Flush the water system. Make sure the refrigerator is normal. ■ Glass not being held under the dispenser 2 to a cold water pipe. Straighten the water source line. ■ New installation? Water is not cool enough NOTE: Water...
User Instructions
Page 14
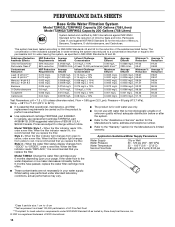
Pressure = 60 psig (413.7 kPa). Model T2WG2L: Style 1 - When the water filter status display changes from green to the permissible limit for water leaving the system, as advertised. ■ Use replacement cartridge T2RFWG2, part #4396841. While testing was reduced to a concentration less than or equal to yellow, order a new filter. Style 2 - Style 3 - Application Guidelines/Water Supply Parameters Water Supply Water Pressure Water Temperature Service Flow Rate City or Well 30 - 120 psi (207...
Pressure = 60 psig (413.7 kPa). Model T2WG2L: Style 1 - When the water filter status display changes from green to the permissible limit for water leaving the system, as advertised. ■ Use replacement cartridge T2RFWG2, part #4396841. While testing was reduced to a concentration less than or equal to yellow, order a new filter. Style 2 - Style 3 - Application Guidelines/Water Supply Parameters Water Supply Water Pressure Water Temperature Service Flow Rate City or Well 30 - 120 psi (207...
User Instructions
Page 15
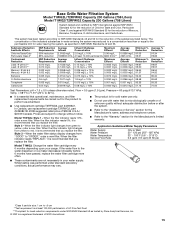
.... ■ Use replacement cartridge T2RFWG2, part #4396841. This system has been tested according to Flow = 0.5 gpm (1.9 Lpm). In Canada, use with water that is essential that you replace the filter. Style 2 - Application Guidelines/Water Supply Parameters Water Supply Water Pressure Water Temperature Service Flow Rate City or Well 30 - 120 psi (207 - 827 kPa) 33° - 100°F (0.6° - 37.8°C) 0.5 gpm (1.9 Lpm) @ 60 psi Model T1WG2: Change the water filter cartridge every...
.... ■ Use replacement cartridge T2RFWG2, part #4396841. This system has been tested according to Flow = 0.5 gpm (1.9 Lpm). In Canada, use with water that is essential that you replace the filter. Style 2 - Application Guidelines/Water Supply Parameters Water Supply Water Pressure Water Temperature Service Flow Rate City or Well 30 - 120 psi (207 - 827 kPa) 33° - 100°F (0.6° - 37.8°C) 0.5 gpm (1.9 Lpm) @ 60 psi Model T1WG2: Change the water filter cartridge every...
User Instructions
Page 16
... your major appliance. For assistance or service in accordance with electrical or plumbing codes, or use of consumables or cleaning products not approved by a Whirlpool designated service company. This limited warranty does not cover: ITEMS EXCLUDED FROM WARRANTY 1. Service calls to refrigerator or freezer product failures. 7. Repairs when your correspondence. If you on the inside wall of the refrigerator compartment. Proof of original purchase date is...
... your major appliance. For assistance or service in accordance with electrical or plumbing codes, or use of consumables or cleaning products not approved by a Whirlpool designated service company. This limited warranty does not cover: ITEMS EXCLUDED FROM WARRANTY 1. Service calls to refrigerator or freezer product failures. 7. Repairs when your correspondence. If you on the inside wall of the refrigerator compartment. Proof of original purchase date is...


