
Use & Care Guide
Page 2
...ENTRETIEN DE LA TABLE DE CUISSON 25 Nettoyage général 25 DÉPANNAGE 26 ASSISTANCE OU SERVICE 27 GARANTIE 28 COOKTOP SAFETY Your safety and the safety of injury, and tell you don't immediately follow instructions. We have provided many important safety... important. Always read and obey all safety messages. TABLE OF CONTENTS COOKTOP SAFETY 2 PARTS AND FEATURES TOUCH-ACTIVATED CONTROLS 4 COOKTOP CONTROLS TOUCH-ACTIVATED CONTROLS 5 Dual Element 6 Control Lock/All Off 6 WARM HI /LO Function 6 PARTS AND FEATURES - This is , tell you how to potential hazards ...
...ENTRETIEN DE LA TABLE DE CUISSON 25 Nettoyage général 25 DÉPANNAGE 26 ASSISTANCE OU SERVICE 27 GARANTIE 28 COOKTOP SAFETY Your safety and the safety of injury, and tell you don't immediately follow instructions. We have provided many important safety... important. Always read and obey all safety messages. TABLE OF CONTENTS COOKTOP SAFETY 2 PARTS AND FEATURES TOUCH-ACTIVATED CONTROLS 4 COOKTOP CONTROLS TOUCH-ACTIVATED CONTROLS 5 Dual Element 6 Control Lock/All Off 6 WARM HI /LO Function 6 PARTS AND FEATURES - This is , tell you how to potential hazards ...

Use & Care Guide
Page 3
... surface units. The use aluminum foil to line surface unit drip bowls, except as suggested in a risk of electric shock, or fire. s Glazed Cooking Utensils - s Clean Cooktop With Caution - Absence of these liners may ignite. Improper installation of these pans or bowls during cooking may become...be hot even though they have had sufficient time to cool. s Wear Proper Apparel - Do not repair or replace any part of the cooktop unless specifically recommended in burns from steam. All other flammable materials contact surface units or areas near units until they are the...
... surface units. The use aluminum foil to line surface unit drip bowls, except as suggested in a risk of electric shock, or fire. s Glazed Cooking Utensils - s Clean Cooktop With Caution - Absence of these liners may ignite. Improper installation of these pans or bowls during cooking may become...be hot even though they have had sufficient time to cool. s Wear Proper Apparel - Do not repair or replace any part of the cooktop unless specifically recommended in burns from steam. All other flammable materials contact surface units or areas near units until they are the...

Use & Care Guide
Page 4
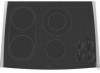
... FE A. Left rear touch control (simmer function; warming function) F. Control lock/All off H. Right front touch control (simmer function; The cooktop you have some or all of your model. Right rear touch control (simmer function; Left front touch control (simmer function; Model and serial ...number plate (located underneath cooktop on metal cabinet) PARTS AND FEATURES - warming function) B. Increase/decrease temperature touch control Cooktops 36" (91.4 cm) Touch-Activated Electronic Control Model shown B C D ...
... FE A. Left rear touch control (simmer function; warming function) F. Control lock/All off H. Right front touch control (simmer function; The cooktop you have some or all of your model. Right rear touch control (simmer function; Left front touch control (simmer function; Model and serial ...number plate (located underneath cooktop on metal cabinet) PARTS AND FEATURES - warming function) B. Increase/decrease temperature touch control Cooktops 36" (91.4 cm) Touch-Activated Electronic Control Model shown B C D ...

Use & Care Guide
Page 7
PARTS AND FEATURES - KNOB CONTROLS This manual covers different models. The locations and appearances of the features shown here may have some models) C E. ACCUSIMMER® control knob G. ACCUSIMMER® control knob D. Ceramic glass cooktop B. Center rear surface cooking area (with dual-size element) F ... (Warm zone control on metal cabinet) 7 Left rear single surface cooking area C. Model and serial number plate (located underneath cooktop on some models) E. Left rear control knob B. Center rear control knob (dual-size element) C. Right rear surface cooking ...
PARTS AND FEATURES - KNOB CONTROLS This manual covers different models. The locations and appearances of the features shown here may have some models) C E. ACCUSIMMER® control knob G. ACCUSIMMER® control knob D. Ceramic glass cooktop B. Center rear surface cooking area (with dual-size element) F ... (Warm zone control on metal cabinet) 7 Left rear single surface cooking area C. Model and serial number plate (located underneath cooktop on some models) E. Left rear control knob B. Center rear control knob (dual-size element) C. Right rear surface cooking ...

Use & Care Guide
Page 10
...pots and pans are allowed to cool down slightly. On electric cooktops, canners should be used as a core or base in how quickly and evenly heat is recommended. Companies that cannot be used areas to the cooktop and can adhere to cool. Wiping off to change ...cooktop. Cookware should be shortened. Cookware with a nonstick finish will help keep it and the cookware. s Make sure the bottoms of aluminum. 10 Aluminum and copper may require more than ½" (1.3 cm) outside the area. Cookware material is a factor in cookware. s Do not cook popcorn in any part...
...pots and pans are allowed to cool down slightly. On electric cooktops, canners should be used as a core or base in how quickly and evenly heat is recommended. Companies that cannot be used areas to the cooktop and can adhere to cool. Wiping off to change ...cooktop. Cookware should be shortened. Cookware with a nonstick finish will help keep it and the cookware. s Make sure the bottoms of aluminum. 10 Aluminum and copper may require more than ½" (1.3 cm) outside the area. Cookware material is a factor in cookware. s Do not cook popcorn in any part...

Use & Care Guide
Page 11
... so. It may occur. s Use on surface and scrape. Cooktop Scraper Part Number 3183488 is still warm. Store razor blades out of the reach of aluminum or copper on soil s Cooktop Polishing Creme and Cooktop Scraper: Rub creme into surface with damp paper towel. Light to... noted. s Soap and water or dishwasher: Pull knobs straight away from aluminum and copper s Cooktop Polishing Creme: Clean as soon as possible on low heat settings. Cooktop Cleaner Part Number 31464 is still warm. Continue rubbing until white film disappears. Scratches and abrasions do not...
... so. It may occur. s Use on surface and scrape. Cooktop Scraper Part Number 3183488 is still warm. Store razor blades out of the reach of aluminum or copper on soil s Cooktop Polishing Creme and Cooktop Scraper: Rub creme into surface with damp paper towel. Light to... noted. s Soap and water or dishwasher: Pull knobs straight away from aluminum and copper s Cooktop Polishing Creme: Clean as soon as possible on low heat settings. Cooktop Cleaner Part Number 31464 is still warm. Continue rubbing until white film disappears. Scratches and abrasions do not...

Use & Care Guide
Page 13
... models) Order Part Number 242905 Cooktop Cleaner (ceramic glass models) Order Part Number 31464 Cooktop Protectant (ceramic glass models) Order Part Number 31463 Cooktop Care Kit (includes cleaner, protectant, and applicator pads) Order Part Number 31605 Cooktop Scraper (ceramic glass models) Order Part Number 3183488 All-Purpose Appliance Cleaner Order Part Number 31662 In Canada Call the Whirlpool Canada LP Customer...
... models) Order Part Number 242905 Cooktop Cleaner (ceramic glass models) Order Part Number 31464 Cooktop Protectant (ceramic glass models) Order Part Number 31463 Cooktop Care Kit (includes cleaner, protectant, and applicator pads) Order Part Number 31605 Cooktop Scraper (ceramic glass models) Order Part Number 3183488 All-Purpose Appliance Cleaner Order Part Number 31662 In Canada Call the Whirlpool Canada LP Customer...

Use & Care Guide
Page 14
...light bulbs, air filters or water filters. Major appliances with original model/serial numbers that is not installed in accordance with electrical or plumbing codes, or use or when it is used in which it . The cost of repair or replacement under ... use of consumables or cleaning products not approved by Whirlpool. 5. Costs associated with the product, Whirlpool Corporation or Whirlpool Canada LP (hereafter "Whirlpool") will need it was purchased. Expenses for travel and transportation for Factory Specified Parts and repair labor to correct the installation of original ...
...light bulbs, air filters or water filters. Major appliances with original model/serial numbers that is not installed in accordance with electrical or plumbing codes, or use or when it is used in which it . The cost of repair or replacement under ... use of consumables or cleaning products not approved by Whirlpool. 5. Costs associated with the product, Whirlpool Corporation or Whirlpool Canada LP (hereafter "Whirlpool") will need it was purchased. Expenses for travel and transportation for Factory Specified Parts and repair labor to correct the installation of original ...
Installation Guide
Page 1
ELECTRIC COOKTOP INSTALLATION INSTRUCTIONS INSTRUCTIONS D'INSTALLATION DE LA TABLE DE CUISSON ÉLECTRIQUE Table of Contents / Table des matières COOKTOP SAFETY 1 INSTALLATION REQUIREMENTS 2 Tools and Parts 2 Location Requirements 2 Electrical Requirements 3 INSTALLATION INSTRUCTIONS 4 Prepare Cooktop for Installation 4 Install Cooktop 5 Make Electrical Connection 6 Attach Cooktop... if the instructions are very important. Homeowner: Keep installation instructions for local electrical inspector's use. We have provided many important safety messages in this manual ...
ELECTRIC COOKTOP INSTALLATION INSTRUCTIONS INSTRUCTIONS D'INSTALLATION DE LA TABLE DE CUISSON ÉLECTRIQUE Table of Contents / Table des matières COOKTOP SAFETY 1 INSTALLATION REQUIREMENTS 2 Tools and Parts 2 Location Requirements 2 Electrical Requirements 3 INSTALLATION INSTRUCTIONS 4 Prepare Cooktop for Installation 4 Install Cooktop 5 Make Electrical Connection 6 Attach Cooktop... if the instructions are very important. Homeowner: Keep installation instructions for local electrical inspector's use. We have provided many important safety messages in this manual ...
Installation Guide
Page 2
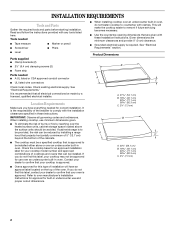
....1 cm) 36 92.3 cm) C. 2⁷⁄₈" (7.3 cm) 2 Check existing electrical supply. Check the cooktop base for an approved installation label for correct installation. See "Electrical Requirements" section. Tools needed ■ Tape measure ■ Marker or pencil ■ Screwdriver ■ Pliers ■ Level Parts supplied ■ Clamp brackets (2) ■ 2¹⁄₂" (6.4 cm) clamping...
....1 cm) 36 92.3 cm) C. 2⁷⁄₈" (7.3 cm) 2 Check existing electrical supply. Check the cooktop base for an approved installation label for correct installation. See "Electrical Requirements" section. Tools needed ■ Tape measure ■ Marker or pencil ■ Screwdriver ■ Pliers ■ Level Parts supplied ■ Clamp brackets (2) ■ 2¹⁄₂" (6.4 cm) clamping...
Installation Guide
Page 4
...; A UL listed or CSA approved conduit connector must determine the type of cooktop, flush with the National Electrical Code, ANSI/NFPA 70-latest edition or CSA Standards C22.1-94, Canadian Electrical Code, Part 1 and C22.2 No. Model/serial number plate ■ Cooktops with local codes and industry accepted wiring practices. A listed conduit connector is for...
...; A UL listed or CSA approved conduit connector must determine the type of cooktop, flush with the National Electrical Code, ANSI/NFPA 70-latest edition or CSA Standards C22.1-94, Canadian Electrical Code, Part 1 and C22.2 No. Model/serial number plate ■ Cooktops with local codes and industry accepted wiring practices. A listed conduit connector is for...
Installation Guide
Page 8
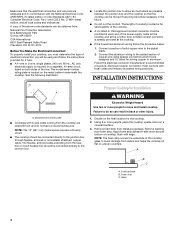
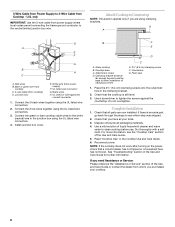
...Use a screwdriver to the neutral (white) junction box wire. Complete Installation 1. Check that the cooktop is an extra part, go back through the steps to the white (neutral) wire in the cooktop Use and Care Guide. 6. Dry thoroughly with a soft cloth. Reconnect power. If you need..." section of the Use and Care Guide. 5. Foam seal 1. If there is still level. 3. Dispose of/recycle all parts are using the UL listed wire connectors. 4. Read "Cooktop Use" in the junction box using clamping brackets. UL listed wire connector G. Connect the 2 black wires together using the UL listed ...
...Use a screwdriver to the neutral (white) junction box wire. Complete Installation 1. Check that the cooktop is an extra part, go back through the steps to the white (neutral) wire in the cooktop Use and Care Guide. 6. Dry thoroughly with a soft cloth. Reconnect power. If you need..." section of the Use and Care Guide. 5. Foam seal 1. If there is still level. 3. Dispose of/recycle all parts are using the UL listed wire connectors. 4. Read "Cooktop Use" in the junction box using clamping brackets. UL listed wire connector G. Connect the 2 black wires together using the UL listed ...
Warranty Information
Page 1
... appliance, to instruct you on the product. Repairs to parts or systems resulting from accident, alteration, misuse, abuse, fire, flood, acts of God, improper installation, installation not in a remote area where service by a Whirlpool designated service company. DISCLAIMER OF IMPLIED WARRANTIES; You must be...limited warranty does not apply. If outside the 50 United States and Canada, contact your major appliance is used in accordance with electrical or plumbing codes, or use of repair or replacement under this limited warranty. In Canada, call 1-800-253-1301. Costs ...
... appliance, to instruct you on the product. Repairs to parts or systems resulting from accident, alteration, misuse, abuse, fire, flood, acts of God, improper installation, installation not in a remote area where service by a Whirlpool designated service company. DISCLAIMER OF IMPLIED WARRANTIES; You must be...limited warranty does not apply. If outside the 50 United States and Canada, contact your major appliance is used in accordance with electrical or plumbing codes, or use of repair or replacement under this limited warranty. In Canada, call 1-800-253-1301. Costs ...


