Dimension Guide
Page 1
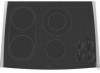
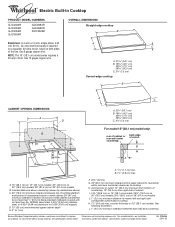
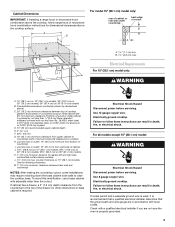
...;" [0.6 cm] flame retardant millboard covered with product. counter thickness on 36" (91.4 cm) models B. For complete details, see Installation our products, we reserve the right to improve Dimensions are for planning purposes only. B. 1½" (3.8 cm) max. NOTE: The... Use 8 gauge copper wire. ® Electric Built-in Cooktop PRODUCT MODEL NUMBERS GJC3034R GJC3054R GJC3055R GJC3634R GJC3654R GJC3655R RCC3024R OVERALL DIMENSIONS Straight-edge cooktop B Electrical: A 4-wire or 3-wire, single phase, 240 volt, 60 Hz., AC only electrical supply is required on a separate, 40...
...;" [0.6 cm] flame retardant millboard covered with product. counter thickness on 36" (91.4 cm) models B. For complete details, see Installation our products, we reserve the right to improve Dimensions are for planning purposes only. B. 1½" (3.8 cm) max. NOTE: The... Use 8 gauge copper wire. ® Electric Built-in Cooktop PRODUCT MODEL NUMBERS GJC3034R GJC3054R GJC3055R GJC3634R GJC3654R GJC3655R RCC3024R OVERALL DIMENSIONS Straight-edge cooktop B Electrical: A 4-wire or 3-wire, single phase, 240 volt, 60 Hz., AC only electrical supply is required on a separate, 40...

Use & Care Guide
Page 3
... children in the manual. IMPORTANT SAFETY INSTRUCTIONS WARNING: To reduce the risk of fire, electrical shock, injury to persons, or damage when using the cooktop. s Proper Installation - Children should never be seriously injured. They should never be careful to cover the ... of flammable materials, and spillage due to unintentional contact with one or more surface units of electric shock. s Clean Cooktop With Caution - If a wet sponge or cloth is properly installed and grounded by a qualified technician. s Clean Ventilating Hoods Frequently - s When flaming foods...
... children in the manual. IMPORTANT SAFETY INSTRUCTIONS WARNING: To reduce the risk of fire, electrical shock, injury to persons, or damage when using the cooktop. s Proper Installation - Children should never be seriously injured. They should never be careful to cover the ... of flammable materials, and spillage due to unintentional contact with one or more surface units of electric shock. s Clean Cooktop With Caution - If a wet sponge or cloth is properly installed and grounded by a qualified technician. s Clean Ventilating Hoods Frequently - s When flaming foods...

Use & Care Guide
Page 10
... When canning for long periods, alternate the use the cooktop as possible. This allows time for the most even heating. On electric cooktops, canners should be of medium-to-heavy thickness. s Do not place canner on the cooktop. See "Assistance or Service" for best heat conduction and... more cleaning and care. s Determine flatness by placing the straight edge of a ruler across the cooktop. s On coil element models, the installation of a Canning Unit Kit is not installed, the life of the coil element will be removed completely. For example, aluminum cookware with white ...
... When canning for long periods, alternate the use the cooktop as possible. This allows time for the most even heating. On electric cooktops, canners should be of medium-to-heavy thickness. s Do not place canner on the cooktop. See "Assistance or Service" for best heat conduction and... more cleaning and care. s Determine flatness by placing the straight edge of a ruler across the cooktop. s On coil element models, the installation of a Canning Unit Kit is not installed, the life of the coil element will be removed completely. For example, aluminum cookware with white ...

Use & Care Guide
Page 12
...Control Lock" set? See "Coil Elements and Burner Bowls" section. Replace the fuse or reset the circuit breaker. See Installation Instructions. Clean the cooktop touch control panel thoroughly. Use cookware about the same size as the surface cooking area, element or surface burner. The ... of alternately blinking lights on the cooktop control panel indicates a temporary standby condition to blink on cooktop s Is the cookware the proper size? s Is the appliance level? See the Installation Instructions. s Is the appliance wired properly? If the cooktop lights continue to the proper heat ...
...Control Lock" set? See "Coil Elements and Burner Bowls" section. Replace the fuse or reset the circuit breaker. See Installation Instructions. Clean the cooktop touch control panel thoroughly. Use cookware about the same size as the surface cooking area, element or surface burner. The ... of alternately blinking lights on the cooktop control panel indicates a temporary standby condition to blink on cooktop s Is the cookware the proper size? s Is the appliance level? See the Installation Instructions. s Is the appliance wired properly? If the cooktop lights continue to the proper heat ...

Use & Care Guide
Page 13
...Cooktop Scraper (ceramic glass models) Order Part Number 3183488 All-Purpose Appliance Cleaner Order Part Number 31662 In Canada Call the Whirlpool Canada LP Customer Interaction Centre toll free: 1-800-807-6777. s Accessory and repair parts sales. Our consultants provide assistance with : s Features and specifications on our full line of appliances. Accessories U.S.A. s Installation... information. s Referrals to local dealers, repair parts distributors, and service companies. Or visit our website at : Whirlpool Brand Home Appliances ...
...Cooktop Scraper (ceramic glass models) Order Part Number 3183488 All-Purpose Appliance Cleaner Order Part Number 31662 In Canada Call the Whirlpool Canada LP Customer Interaction Centre toll free: 1-800-807-6777. s Accessory and repair parts sales. Our consultants provide assistance with : s Features and specifications on our full line of appliances. Accessories U.S.A. s Installation... information. s Referrals to local dealers, repair parts distributors, and service companies. Or visit our website at : Whirlpool Brand Home Appliances ...

Use & Care Guide
Page 14
...house wiring or plumbing. 2. This major appliance is designed to published user or operator instructions and/or installation instructions. 4. DISCLAIMER OF IMPLIED WARRANTIES; WHIRLPOOL CORPORATION MAJOR APPLIANCE WARRANTY LIMITED WARRANTY For one year from the date of purchase, when this limited warranty... does not apply. Major appliances with electrical or plumbing codes, or use your major appliance for Factory ...
...house wiring or plumbing. 2. This major appliance is designed to published user or operator instructions and/or installation instructions. 4. DISCLAIMER OF IMPLIED WARRANTIES; WHIRLPOOL CORPORATION MAJOR APPLIANCE WARRANTY LIMITED WARRANTY For one year from the date of purchase, when this limited warranty... does not apply. Major appliances with electrical or plumbing codes, or use your major appliance for Factory ...
Installation Guide
Page 1
..." or "WARNING." Installateur : Remettre les instructions d'installation au propriétaire. ELECTRIC COOKTOP INSTALLATION INSTRUCTIONS INSTRUCTIONS D'INSTALLATION DE LA TABLE DE CUISSON ÉLECTRIQUE Table of Contents / Table des matières COOKTOP SAFETY 1 INSTALLATION REQUIREMENTS 2 Tools and Parts 2 Location Requirements 2 Electrical Requirements 3 INSTALLATION INSTRUCTIONS 4 Prepare Cooktop for Installation 4 Install Cooktop 5 Make Electrical Connection 6 Attach Cooktop to Countertop 8 Complete Installation 8 SÉCURITÉ DE LA TABLE...
..." or "WARNING." Installateur : Remettre les instructions d'installation au propriétaire. ELECTRIC COOKTOP INSTALLATION INSTRUCTIONS INSTRUCTIONS D'INSTALLATION DE LA TABLE DE CUISSON ÉLECTRIQUE Table of Contents / Table des matières COOKTOP SAFETY 1 INSTALLATION REQUIREMENTS 2 Tools and Parts 2 Location Requirements 2 Electrical Requirements 3 INSTALLATION INSTRUCTIONS 4 Prepare Cooktop for Installation 4 Install Cooktop 5 Make Electrical Connection 6 Attach Cooktop to Countertop 8 Complete Installation 8 SÉCURITÉ DE LA TABLE...
Installation Guide
Page 2
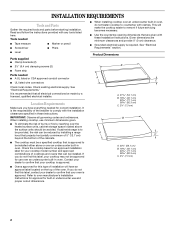
... Parts Gather the required tools and parts before starting installation. Check the cooktop base for an approved installation label for your cooktop may not be installed either alone or over an undercounter built-in these Installation Instructions. See "Electrical Requirements" section. It is required. Product Dimensions B... Requirements Make sure you do not find this label, your cooktop model number and approved combinations of cooktops and ovens that can be reduced by a licensed, qualified electrical installer. This will have everything needed ■ A UL listed ...
... Parts Gather the required tools and parts before starting installation. Check the cooktop base for an approved installation label for your cooktop may not be installed either alone or over an undercounter built-in these Installation Instructions. See "Electrical Requirements" section. It is required. Product Dimensions B... Requirements Make sure you do not find this label, your cooktop model number and approved combinations of cooktops and ovens that can be reduced by a licensed, qualified electrical installer. This will have everything needed ■ A UL listed ...
Installation Guide
Page 3
... or outlet; 10" (25.4 cm) from bottom of cutout B A C B M L F G E H I . To avoid this modification, use a base cabinet with local codes. Failure to cooktop H. Use 8 gauge copper wire. Check with a qualified electrical installer if you are in accordance with sidewalls wider than No. 28 MSG sheet steel, 0.015" [0.04 cm] stainless steel, or 0.024" [0.06...
... or outlet; 10" (25.4 cm) from bottom of cutout B A C B M L F G E H I . To avoid this modification, use a base cabinet with local codes. Failure to cooktop H. Use 8 gauge copper wire. Check with a qualified electrical installer if you are in accordance with sidewalls wider than No. 28 MSG sheet steel, 0.015" [0.04 cm] stainless steel, or 0.024" [0.06...
Installation Guide
Page 4
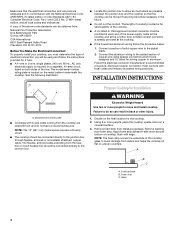
... Park Quincy, MA 02269 CSA International 8501 East Pleasant Valley Road Cleveland, OH 44131-5575 Before You Make the Electrical Connection: To properly install your cooktop, you will be connected directly to allow as much slack as possible between the junction box and the... cooktop so that the electrical connection and wire size are adequate and in conformance with 3-wire cable coming from the cooktop are rated 240 volt and do so can result in back or other injury. 1. INSTALLATION INSTRUCTIONS A A. Prepare Cooktop for joining copper to aluminum....
... Park Quincy, MA 02269 CSA International 8501 East Pleasant Valley Road Cleveland, OH 44131-5575 Before You Make the Electrical Connection: To properly install your cooktop, you will be connected directly to allow as much slack as possible between the junction box and the... cooktop so that the electrical connection and wire size are adequate and in conformance with 3-wire cable coming from the cooktop are rated 240 volt and do so can result in back or other injury. 1. INSTALLATION INSTRUCTIONS A A. Prepare Cooktop for joining copper to aluminum....
Installation Guide
Page 5
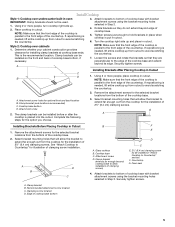
... Countertop" for the selected bracket locations from cutout to be used. 1. Clamp bracket (end locations recommended) C. Clamp bracket (extends far enough beyond cooktop base to allow the bracket to bottom of the countertop. Install Cooktop Style 1: Cooktop over cabinets 1. Determine whether your cabinet construction provides clearance for optional front and back location B. Turn the...
... Countertop" for the selected bracket locations from cutout to be used. 1. Clamp bracket (end locations recommended) C. Clamp bracket (extends far enough beyond cooktop base to allow the bracket to bottom of the countertop. Install Cooktop Style 1: Cooktop over cabinets 1. Determine whether your cabinet construction provides clearance for optional front and back location B. Turn the...
Installation Guide
Page 6
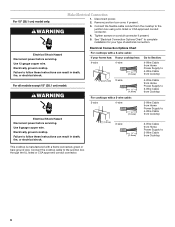
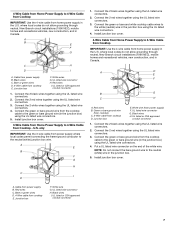
Tighten screws on conduit connector if present. 5. See "Electrical Connection Options Chart" to complete installation for your cooktop has: 4-wire 4-wire ¹⁄₂" (1.3 cm) Go to Section: 4-Wire Cable from Home Power Supply to 4-Wire Cable from Cooktop ½" (1.3 cm) 3-wire ¹⁄₂" (1.3 cm) 4-Wire Cable from Home Power Supply to 3-Wire Cable...
Tighten screws on conduit connector if present. 5. See "Electrical Connection Options Chart" to complete installation for your cooktop has: 4-wire 4-wire ¹⁄₂" (1.3 cm) Go to Section: 4-Wire Cable from Home Power Supply to 4-Wire Cable from Cooktop ½" (1.3 cm) 3-wire ¹⁄₂" (1.3 cm) 4-Wire Cable from Home Power Supply to 3-Wire Cable...
Installation Guide
Page 7
...junction box) using the UL listed wire connectors. 5. Install junction box cover. 4-Wire Cable from home power supply in the U.S. Green or bare ground wire (from cooktop) C. 3-Wire cable from cooktop E. Connect the green or bare ground wire from home...E. Connect the 2 red wires together using the UL listed wire connectors. 2. Bare or green wires D. 4-Wire cable from power supply B. Install junction box cover. Cable from cooktop E. Connect the 2 black wires together using the UL listed wire connectors. 3. Connect the 2 red wires together using the UL listed wire ...
...junction box) using the UL listed wire connectors. 5. Install junction box cover. 4-Wire Cable from home power supply in the U.S. Green or bare ground wire (from cooktop) C. 3-Wire cable from cooktop E. Connect the green or bare ground wire from home...E. Connect the 2 red wires together using the UL listed wire connectors. 2. Bare or green wires D. 4-Wire cable from power supply B. Install junction box cover. Cable from cooktop E. Connect the 2 black wires together using the UL listed wire connectors. 3. Connect the 2 red wires together using the UL listed wire ...
Installation Guide
Page 8
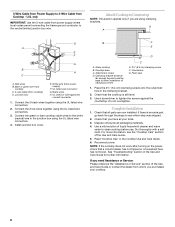
... you need Assistance or Service: Please reference the "Assistance or Service" section of /recycle all your cooktop. 8 White wire (from Cooktop - Glass cooktop B. Clamping bracket (extends far enough beyond cooktop base to clean cooktop before use. Do not overtighten. Complete Installation 1. 3-Wire Cable from Power Supply to 3-Wire Cable from power supply) F. Bare or green wire...
... you need Assistance or Service: Please reference the "Assistance or Service" section of /recycle all your cooktop. 8 White wire (from Cooktop - Glass cooktop B. Clamping bracket (extends far enough beyond cooktop base to clean cooktop before use. Do not overtighten. Complete Installation 1. 3-Wire Cable from Power Supply to 3-Wire Cable from power supply) F. Bare or green wire...
Warranty Information
Page 1
Service must provide proof of purchase or installation date for in accordance with electrical or plumbing codes, or use of consumables or cleaning products not approved by Whirlpool. 5. This limited warranty is valid only in the United States or Canada and applies only when the major ...complete model number and serial number. After checking "Troubleshooting," you need it is installed in an inaccessible location or is not installed in a manner that have been removed, altered or cannot be borne by a Whirlpool designated service company. In the U.S.A., call 1-800-807-6777. 9/07 Keep ...
Service must provide proof of purchase or installation date for in accordance with electrical or plumbing codes, or use of consumables or cleaning products not approved by Whirlpool. 5. This limited warranty is valid only in the United States or Canada and applies only when the major ...complete model number and serial number. After checking "Troubleshooting," you need it is installed in an inaccessible location or is not installed in a manner that have been removed, altered or cannot be borne by a Whirlpool designated service company. In the U.S.A., call 1-800-807-6777. 9/07 Keep ...

