Dimension Guide
Page 1
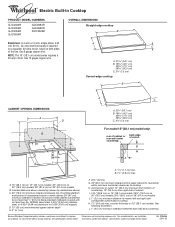
...) model series requires a 20-amp circuit. Ref. 8286066 08-11-05 counter thickness on 36" (91.4 cm) models B. L. 1" (2.5 cm) minimum clearance between top of cooktop platform and bottom of unprotected wood or metal cabinet (24" [61 cm] minimum clearance if bottom of cutout B A A 1.7 cm) min. Use 12 gague copper wire. B. 1½" (3.8 cm) max. Instructions packed with not less than ¹⁄₄" [0.6 cm] flame retardant millboard covered with product. Specifications...
...) model series requires a 20-amp circuit. Ref. 8286066 08-11-05 counter thickness on 36" (91.4 cm) models B. L. 1" (2.5 cm) minimum clearance between top of cooktop platform and bottom of unprotected wood or metal cabinet (24" [61 cm] minimum clearance if bottom of cutout B A A 1.7 cm) min. Use 12 gague copper wire. B. 1½" (3.8 cm) max. Instructions packed with not less than ¹⁄₄" [0.6 cm] flame retardant millboard covered with product. Specifications...

Use & Care Guide
Page 2
... instructions. All safety messages will follow instructions. We have provided many important safety messages in this manual and on your appliance. Always read and obey all safety messages. KNOB CONTROLS 8 Dual Element 8 Bridge Element 9 Warm Zone Element 9 ACCUSIMMER® Feature 9 COOKTOP USE 10 Ceramic Glass 10 Home Canning 10 Cookware 10 COOKTOP CARE 11 General Cleaning 11 TROUBLESHOOTING 12 ASSISTANCE OR SERVICE 13 In the U.S.A 13 In Canada 13 WARRANTY...
... instructions. All safety messages will follow instructions. We have provided many important safety messages in this manual and on your appliance. Always read and obey all safety messages. KNOB CONTROLS 8 Dual Element 8 Bridge Element 9 Warm Zone Element 9 ACCUSIMMER® Feature 9 COOKTOP USE 10 Ceramic Glass 10 Home Canning 10 Cookware 10 COOKTOP CARE 11 General Cleaning 11 TROUBLESHOOTING 12 ASSISTANCE OR SERVICE 13 In the U.S.A 13 In Canada 13 WARRANTY...

Use & Care Guide
Page 3
... sudden change in ignition of clothing. During and after use a towel or other glazed utensils are the cooktop and surfaces facing the cooktop. s Use Proper Pan Size - Only certain types of glass, glass/ceramic, ceramic, earthenware, or other bulky cloth. s Do Not Cook on Cooktop - Some cleaners can produce noxious fumes if applied to cover the surface unit heating element. s Clean Ventilating Hoods Frequently - s Protective Liners - SAVE THESE INSTRUCTIONS 3 Be sure your cooktop is...
... sudden change in ignition of clothing. During and after use a towel or other glazed utensils are the cooktop and surfaces facing the cooktop. s Use Proper Pan Size - Only certain types of glass, glass/ceramic, ceramic, earthenware, or other bulky cloth. s Do Not Cook on Cooktop - Some cleaners can produce noxious fumes if applied to cover the surface unit heating element. s Clean Ventilating Hoods Frequently - s Protective Liners - SAVE THESE INSTRUCTIONS 3 Be sure your cooktop is...
Use & Care Guide
Page 5
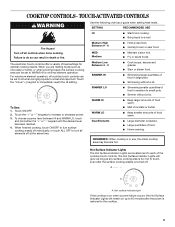
... USE HI s Start food cooking. The electronic touch controls offer a variety of food warm. WARM HI WARM LO Dual Elements s Keep larger amounts of heat settings for minimal element operation. s Keep smaller amounts of food warm. Fire Hazard Turn off . Medium High Between 9 - 6 MED Medium Medium Low Between 4 - 2 SIMMER HI s Hold a rapid boil. A A. Hot surface indicator light If the cooktop is on when a power failure occurs, the Hot Surface Indicator Lights...
... USE HI s Start food cooking. The electronic touch controls offer a variety of food warm. WARM HI WARM LO Dual Elements s Keep larger amounts of heat settings for minimal element operation. s Keep smaller amounts of food warm. Fire Hazard Turn off . Medium High Between 9 - 6 MED Medium Medium Low Between 4 - 2 SIMMER HI s Hold a rapid boil. A A. Hot surface indicator light If the cooktop is on when a power failure occurs, the Hot Surface Indicator Lights...
Use & Care Guide
Page 6
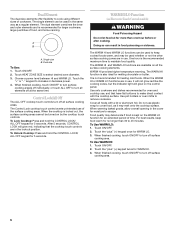
... escape. To Lock Cooktop: Press and hold the CONTROL LOCK/ ALL OFF keypad for 5 seconds. Food quality may melt onto the cooktop surface. To Use WARM HI: 1. Dual Element The dual-size elements offer flexibility to cook using different sizes of food, and home canning. To Unlock Cooktop: Press and hold the CONTROL LOCK/ ALL OFF keypad for 5 seconds. The Control Lock cooktop touch control averts unintended use plastic wrap to turn off at the...
... escape. To Lock Cooktop: Press and hold the CONTROL LOCK/ ALL OFF keypad for 5 seconds. Food quality may melt onto the cooktop surface. To Use WARM HI: 1. Dual Element The dual-size elements offer flexibility to cook using different sizes of food, and home canning. To Unlock Cooktop: Press and hold the CONTROL LOCK/ ALL OFF keypad for 5 seconds. The Control Lock cooktop touch control averts unintended use plastic wrap to turn off at the...

Use & Care Guide
Page 7
... shown here may have some models) E. Power on metal cabinet) 7 Hot surface indicator light Cooktops: Model GJC 3634 (36" [91.4 cm]) shown B A. Left rear control knob C. Center rear surface cooking area (with dual-size element) F D. Left front single surface cooking area (dual-size bridge burner) H. Model and serial number plate (located underneath cooktop on light E. Control Panels Model GJC3654 (36" [91.4 cm]) shown Model GJC3054 (30" [77.1 cm]) not shown A B C Model GJC3634 (36" [91.4 cm]) shown Model GJC3034 (30" [77.1 cm...
... shown here may have some models) E. Power on metal cabinet) 7 Hot surface indicator light Cooktops: Model GJC 3634 (36" [91.4 cm]) shown B A. Left rear control knob C. Center rear surface cooking area (with dual-size element) F D. Left front single surface cooking area (dual-size bridge burner) H. Model and serial number plate (located underneath cooktop on light E. Control Panels Model GJC3654 (36" [91.4 cm]) shown Model GJC3054 (30" [77.1 cm]) not shown A B C Model GJC3634 (36" [91.4 cm]) shown Model GJC3034 (30" [77.1 cm...

Use & Care Guide
Page 8
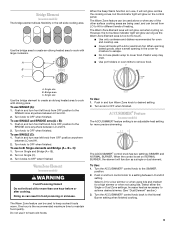
... simmer using different sizes of cookware. Dual Elements (on some models) s Keep cooked foods warm. s Home canning. The single element can be set to anywhere between LO and HI. 2. Dual size A B A. Single zone B. Turn knob to OFF when finished. The controls can result in and turn knob from the OFF position to cook using lids. s Quickly brown or sear food. LO s Stew or steam food. Power Light Each cooktop has a Power...
... simmer using different sizes of cookware. Dual Elements (on some models) s Keep cooked foods warm. s Home canning. The single element can be set to anywhere between LO and HI. 2. Dual size A B A. Single zone B. Turn knob to OFF when finished. The controls can result in and turn knob from the OFF position to cook using lids. s Quickly brown or sear food. LO s Stew or steam food. Power Light Each cooktop has a Power...
Use & Care Guide
Page 9
... oven mitts to cook with oblong pans. Single size Use the bridge element to create an oblong heated area to remove food. Turn on Single (C). 3. When the control is the recommended maximum time to achieve desired simmer. (See "Dual Element" section.) 3. A B C When the Keep Warm function is too hot to keep cooked foods warm. However, the hot surface indicator light will not glow red when cycling on some models...
... oven mitts to cook with oblong pans. Single size Use the bridge element to create an oblong heated area to remove food. Turn on Single (C). 3. When the control is the recommended maximum time to achieve desired simmer. (See "Dual Element" section.) 3. A B C When the Keep Warm function is too hot to keep cooked foods warm. However, the hot surface indicator light will not glow red when cycling on some models...

Use & Care Guide
Page 10
... ordering instructions. Residue and water can become trapped between the lid and the cooktop, and the ceramic glass could break when the lid is removed. This allows time for the most even heating. s Center the canner on the cooktop. On electric cooktops, canners should be used areas to change color when surface cooking areas are hot. If a kit is on. s For more information, see "General Cleaning" section...
... ordering instructions. Residue and water can become trapped between the lid and the cooktop, and the ceramic glass could break when the lid is removed. This allows time for the most even heating. s Center the canner on the cooktop. On electric cooktops, canners should be used areas to change color when surface cooking areas are hot. If a kit is on. s For more information, see "General Cleaning" section...

Use & Care Guide
Page 11
.... Stainless steel s Heats quickly, but unevenly. Cooktop Cleaner Part Number 31464 is still warm. Metal marks from control panel to medium heat settings. It may occur. Light to condition the cooktop. Scratches and abrasions do not remove seals under knobs. Hold scraper as flat as a guide for slow cooking. s Liquid detergent or all types of grain to wear oven mitts while doing so. s Ideal results on surface and scrape. Continue rubbing until white...
.... Stainless steel s Heats quickly, but unevenly. Cooktop Cleaner Part Number 31464 is still warm. Metal marks from control panel to medium heat settings. It may occur. Light to condition the cooktop. Scratches and abrasions do not remove seals under knobs. Hold scraper as flat as a guide for slow cooking. s Liquid detergent or all types of grain to wear oven mitts while doing so. s Ideal results on surface and scrape. Continue rubbing until white...

Use & Care Guide
Page 12
... operate 1. Replace the fuse or reset the circuit breaker. s Is the appliance wired properly? See Installation Instructions. Clean the cooktop touch control panel thoroughly. The following pattern of an unnecessary service call an electrician. A B s Is the control knob set ? Push in the cooktop. 5. Excessive heat around cookware on the cooktop control panel indicates that one or more than ½" (1.3 cm) outside the cooking area. Use cookware about the same size as the surface cooking area, element or surface burner. The...
... operate 1. Replace the fuse or reset the circuit breaker. s Is the appliance wired properly? See Installation Instructions. Clean the cooktop touch control panel thoroughly. The following pattern of an unnecessary service call an electrician. A B s Is the control knob set ? Push in the cooktop. 5. Excessive heat around cookware on the cooktop control panel indicates that one or more than ½" (1.3 cm) outside the cooking area. Use cookware about the same size as the surface cooking area, element or surface burner. The...

Use & Care Guide
Page 13
...If you still need to your telephone directory Yellow Pages. To locate FSP® replacement parts in your request. Canning Unit Kit (coil element models) Order Part Number 242905 Cooktop Cleaner (ceramic glass models) Order Part Number 31464 Cooktop Protectant (ceramic glass models) Order Part Number 31463 Cooktop Care Kit (includes cleaner, protectant, and applicator pads) Order Part Number 31605 Cooktop Scraper (ceramic glass models) Order Part Number 3183488 All-Purpose Appliance Cleaner Order Part Number 31662 In Canada Call the Whirlpool Canada LP Customer Interaction Centre toll...
...If you still need to your telephone directory Yellow Pages. To locate FSP® replacement parts in your request. Canning Unit Kit (coil element models) Order Part Number 242905 Cooktop Cleaner (ceramic glass models) Order Part Number 31464 Cooktop Protectant (ceramic glass models) Order Part Number 31463 Cooktop Care Kit (includes cleaner, protectant, and applicator pads) Order Part Number 31605 Cooktop Scraper (ceramic glass models) Order Part Number 3183488 All-Purpose Appliance Cleaner Order Part Number 31662 In Canada Call the Whirlpool Canada LP Customer Interaction Centre toll...

Use & Care Guide
Page 14
... -home service is covered by Whirlpool. 5. Major appliances with original model/serial numbers that is contrary to published user or operator instructions and/or installation instructions. 4. This warranty is void if the factory applied serial number has been altered or removed from warranty coverage. 3. If you need service, first see the "Troubleshooting" section of your major appliance, to instruct you may find this information on the model and serial number label located on...
... -home service is covered by Whirlpool. 5. Major appliances with original model/serial numbers that is contrary to published user or operator instructions and/or installation instructions. 4. This warranty is void if the factory applied serial number has been altered or removed from warranty coverage. 3. If you need service, first see the "Troubleshooting" section of your major appliance, to instruct you may find this information on the model and serial number label located on...
Installation Guide
Page 1
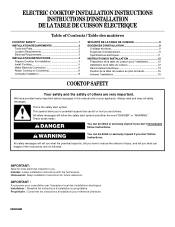
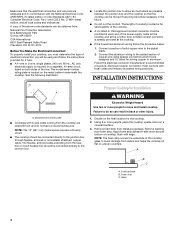
...: Save for future reference. Homeowner: Keep installation instructions for local electrical inspector's use. ELECTRIC COOKTOP INSTALLATION INSTRUCTIONS INSTRUCTIONS D'INSTALLATION DE LA TABLE DE CUISSON ÉLECTRIQUE Table of Contents / Table des matières COOKTOP SAFETY 1 INSTALLATION REQUIREMENTS 2 Tools and Parts 2 Location Requirements 2 Electrical Requirements 3 INSTALLATION INSTRUCTIONS 4 Prepare Cooktop for Installation 4 Install Cooktop 5 Make Electrical Connection 6 Attach Cooktop to Countertop 8 Complete Installation 8 SÉCURITÉ DE LA TABLE...
...: Save for future reference. Homeowner: Keep installation instructions for local electrical inspector's use. ELECTRIC COOKTOP INSTALLATION INSTRUCTIONS INSTRUCTIONS D'INSTALLATION DE LA TABLE DE CUISSON ÉLECTRIQUE Table of Contents / Table des matières COOKTOP SAFETY 1 INSTALLATION REQUIREMENTS 2 Tools and Parts 2 Location Requirements 2 Electrical Requirements 3 INSTALLATION INSTRUCTIONS 4 Prepare Cooktop for Installation 4 Install Cooktop 5 Make Electrical Connection 6 Attach Cooktop to Countertop 8 Complete Installation 8 SÉCURITÉ DE LA TABLE...
Installation Guide
Page 2
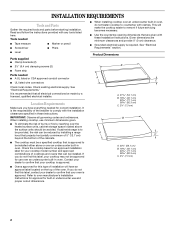
... surface units should be reduced by a licensed, qualified electrical installer. Read and follow the instructions provided with the installation clearances specified in oven, do not fasten cooktop to comply with any tools listed here. INSTALLATION REQUIREMENTS Tools and Parts Gather the required tools and parts before starting installation. Location Requirements Make sure you do not find this label, contact your cooktop model number and approved combinations of the oven. Tools needed ■ Tape measure...
... surface units should be reduced by a licensed, qualified electrical installer. Read and follow the instructions provided with the installation clearances specified in oven, do not fasten cooktop to comply with any tools listed here. INSTALLATION REQUIREMENTS Tools and Parts Gather the required tools and parts before starting installation. Location Requirements Make sure you do not find this label, contact your cooktop model number and approved combinations of the oven. Tools needed ■ Tape measure...
Installation Guide
Page 3
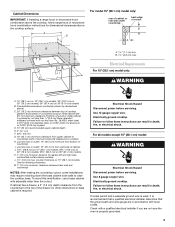
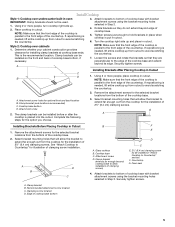
... Disconnect power before servicing. Use 8 gauge copper wire. Electrically ground cooktop. Failure to the top of wood or metal cabinet is covered by dashed box above cooktop L. 1½" (3.8 cm) max. Check with local codes. B. 1½" (3.8 cm) max. Cabinet Dimensions IMPORTANT: If installing a range hood or microwave hood combination above the cooktop, follow range hood or microwave hood combination instructions for dimensional clearances above the cooktop surface. Junction box or outlet; 12" (30.5 cm) minimum from the countertop to...
... Disconnect power before servicing. Use 8 gauge copper wire. Electrically ground cooktop. Failure to the top of wood or metal cabinet is covered by dashed box above cooktop L. 1½" (3.8 cm) max. Check with local codes. B. 1½" (3.8 cm) max. Cabinet Dimensions IMPORTANT: If installing a range hood or microwave hood combination above the cooktop, follow range hood or microwave hood combination instructions for dimensional clearances above the cooktop surface. Junction box or outlet; 12" (30.5 cm) minimum from the countertop to...
Installation Guide
Page 4
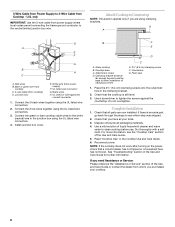
... Electrical Code, Part 1 and C22.2 No. Decide on uneven counters. The model/serial number rating plate is already provided at the junction box). The length of conduit provided is required on a separate, 40-amp circuit, fused on a covered surface. 3. Model/serial number plate ■ Cooktops with edge. Cooktop base B. Make sure that the cooktop can result in conformance with local codes and industry accepted wiring practices. NOTE: The 15" (38.1 cm) model series requires a 20-amp circuit. ■ The cooktop...
... Electrical Code, Part 1 and C22.2 No. Decide on uneven counters. The model/serial number rating plate is already provided at the junction box). The length of conduit provided is required on a separate, 40-amp circuit, fused on a covered surface. 3. Model/serial number plate ■ Cooktops with edge. Cooktop base B. Make sure that the cooktop can result in conformance with local codes and industry accepted wiring practices. NOTE: The 15" (38.1 cm) model series requires a 20-amp circuit. ■ The cooktop...
Installation Guide
Page 5
... installation of the cooktop is put in Step 2. 4. A. Select bracket mounting holes that the front edge of the cooktop is needed, lift entire cooktop up from the bottom of the countertop. Glass cooktop B. Countertop G. Recommended attachment screw location C. If repositioning is parallel to extend far enough out from the cooktop for the selected bracket locations from cutout to the front edge of the cooktop base. Clamp brackets can be installed in Step 3. Turn...
... installation of the cooktop is put in Step 2. 4. A. Select bracket mounting holes that the front edge of the cooktop is needed, lift entire cooktop up from the bottom of the countertop. Glass cooktop B. Countertop G. Recommended attachment screw location C. If repositioning is parallel to extend far enough out from the cooktop for the selected bracket locations from cutout to the front edge of the cooktop base. Clamp brackets can be installed in Step 3. Turn...
Installation Guide
Page 8
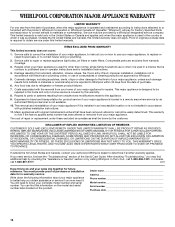
... the cooktop Use and Care Guide. 6. Attachment screw D. Clamping bracket (extends far enough beyond cooktop base to allow installation of liquid household cleaner and warm water to clean cooktop before use. Foam seal 1. Do not overtighten. Use a mild solution of clamping screws) E. 2½" (6.4 cm) clamping screw F. UL listed wire connector G. Glass cooktop B. Cooktop base C. Use a screwdriver to the neutral (white) junction box wire. Check that the cooktop is an extra part, go back through the steps to Countertop...
... the cooktop Use and Care Guide. 6. Attachment screw D. Clamping bracket (extends far enough beyond cooktop base to allow installation of liquid household cleaner and warm water to clean cooktop before use. Foam seal 1. Do not overtighten. Use a mild solution of clamping screws) E. 2½" (6.4 cm) clamping screw F. UL listed wire connector G. Glass cooktop B. Cooktop base C. Use a screwdriver to the neutral (white) junction box wire. Check that the cooktop is an extra part, go back through the steps to Countertop...
Warranty Information
Page 1
... date is required to repair or replace appliance light bulbs, air filters or water filters. Any food loss due to determine if another warranty applies. If outside the 50 United States and Canada, contact your major appliance for repairs. Dealer name Address Phone number Model number Serial number Purchase date 14 Consumable parts are excluded from accident, alteration, misuse, abuse, fire, flood, acts of the Use & Care Guide. If...
... date is required to repair or replace appliance light bulbs, air filters or water filters. Any food loss due to determine if another warranty applies. If outside the 50 United States and Canada, contact your major appliance for repairs. Dealer name Address Phone number Model number Serial number Purchase date 14 Consumable parts are excluded from accident, alteration, misuse, abuse, fire, flood, acts of the Use & Care Guide. If...


