Dimension Guide
Page 1
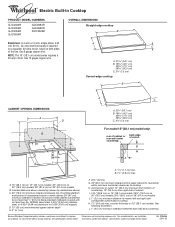
...cm) minimum clearance between back wall and countertop Because Whirlpool Corporation policy includes a continuous commitment to change materials and specifications without notice. L. 1" (2.5 cm) minimum clearance between top of cooktop platform and bottom of unprotected wood or metal cabinet...174; Electric Built-in Cooktop PRODUCT MODEL NUMBERS GJC3034R GJC3054R GJC3055R GJC3634R GJC3654R GJC3655R RCC3024R OVERALL DIMENSIONS Straight-edge cooktop B Electrical: A 4-wire or 3-wire, single phase, 240 volt, 60 Hz., AC only electrical supply is protected by dashed box above cooktop K. ...
...cm) minimum clearance between back wall and countertop Because Whirlpool Corporation policy includes a continuous commitment to change materials and specifications without notice. L. 1" (2.5 cm) minimum clearance between top of cooktop platform and bottom of unprotected wood or metal cabinet...174; Electric Built-in Cooktop PRODUCT MODEL NUMBERS GJC3034R GJC3054R GJC3055R GJC3634R GJC3654R GJC3655R RCC3024R OVERALL DIMENSIONS Straight-edge cooktop B Electrical: A 4-wire or 3-wire, single phase, 240 volt, 60 Hz., AC only electrical supply is protected by dashed box above cooktop K. ...

Use & Care Guide
Page 2
...cuisson 25 ENTRETIEN DE LA TABLE DE CUISSON 25 Nettoyage général 25 DÉPANNAGE 26 ASSISTANCE OU SERVICE 27 GARANTIE 28 COOKTOP SAFETY Your safety and the safety of injury, and tell you what the potential hazard is the safety alert symbol. WARNING You ... you and others are not followed. 2 We have provided many important safety messages in this manual and on your appliance. KNOB CONTROLS 7 COOKTOP CONTROLS - Always read and obey all safety messages. This symbol alerts you don't immediately follow instructions. All safety messages will tell you what...
...cuisson 25 ENTRETIEN DE LA TABLE DE CUISSON 25 Nettoyage général 25 DÉPANNAGE 26 ASSISTANCE OU SERVICE 27 GARANTIE 28 COOKTOP SAFETY Your safety and the safety of injury, and tell you what the potential hazard is the safety alert symbol. WARNING You ... you and others are not followed. 2 We have provided many important safety messages in this manual and on your appliance. KNOB CONTROLS 7 COOKTOP CONTROLS - Always read and obey all safety messages. This symbol alerts you don't immediately follow instructions. All safety messages will tell you what...

Use & Care Guide
Page 3
... contact surface units or areas near surface units may result in cabinets above a cooktop - IMPORTANT SAFETY INSTRUCTIONS WARNING: To reduce the risk of fire, electrical shock, injury to persons, or damage when using the cooktop. s Proper Installation - s Do Not Leave Children Alone - Smother fire or...used to wipe spills on hood or filter. s Storage on . s Use Proper Pan Size - Only certain types of electric shock, or fire. If cooktop should be seriously injured. s Wear Proper Apparel - Flammable materials should not be careful to children in a risk of glass,...
... contact surface units or areas near surface units may result in cabinets above a cooktop - IMPORTANT SAFETY INSTRUCTIONS WARNING: To reduce the risk of fire, electrical shock, injury to persons, or damage when using the cooktop. s Proper Installation - s Do Not Leave Children Alone - Smother fire or...used to wipe spills on hood or filter. s Storage on . s Use Proper Pan Size - Only certain types of electric shock, or fire. If cooktop should be seriously injured. s Wear Proper Apparel - Flammable materials should not be careful to children in a risk of glass,...

Use & Care Guide
Page 4
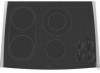
... front surface cooking area (with dual-size element) 4 F D. PARTS AND FEATURES - Increase/decrease temperature touch control Cooktops 36" (91.4 cm) Touch-Activated Electronic Control Model shown B C D E. warming function) G. warming function; Ceramic glass cooktop B. The cooktop you have purchased may not match those of the items listed. Left rear touch control (simmer function...touch control (simmer function; Left front touch control (simmer function; Left rear surface cooking area C. Control panel F. Model and serial number plate (located underneath cooktop on metal cabinet)
... front surface cooking area (with dual-size element) 4 F D. PARTS AND FEATURES - Increase/decrease temperature touch control Cooktops 36" (91.4 cm) Touch-Activated Electronic Control Model shown B C D E. warming function) G. warming function; Ceramic glass cooktop B. The cooktop you have purchased may not match those of the items listed. Left rear touch control (simmer function...touch control (simmer function; Left front touch control (simmer function; Left rear surface cooking area C. Control panel F. Model and serial number plate (located underneath cooktop on metal cabinet)
Use & Care Guide
Page 5
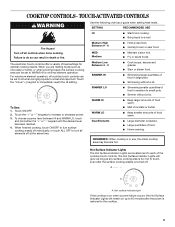
... maximum element operation, all controls when done cooking. s Quickly brown or sear food. SIMMER LO s Simmering smaller quantities of food in use, the entire cooktop area may become hot. s Large-diameter cookware. The electronic touch controls offer a variety of food warm. Medium High Between 9 - 6 MED Medium Medium...Lights will glow as long as any surface cooking area is turned off individually, or touch ALL OFF to each of the cooktop touch controls. SETTING RECOMMENDED USE HI s Start food cooking. Touch ON/OFF. 2. When finished cooking, touch ON/OFF to ...
... maximum element operation, all controls when done cooking. s Quickly brown or sear food. SIMMER LO s Simmering smaller quantities of food in use, the entire cooktop area may become hot. s Large-diameter cookware. The electronic touch controls offer a variety of food warm. Medium High Between 9 - 6 MED Medium Medium...Lights will glow as long as any surface cooking area is turned off individually, or touch ALL OFF to each of the cooktop touch controls. SETTING RECOMMENDED USE HI s Start food cooking. Touch ON/OFF. 2. When finished cooking, touch ON/OFF to ...
Use & Care Guide
Page 6
...but the indicator light will glow red, indicating that have flat bottoms to make direct contact with a lid or aluminum foil. To Unlock Cooktop: Press and hold the CONTROL LOCK/ ALL OFF keypad for larger cookware, large quantities of time. WARM HI provides higher temperature warming. The...Do not use of cookware. A B A. Touch the "+" or "-" keypad to turn off surface cooking area. Food quality may melt onto the cooktop surface. When finished cooking, touch ON/OFF to increase or decrease power. 4. Dual Element The dual-size elements offer flexibility to cook using different sizes...
...but the indicator light will glow red, indicating that have flat bottoms to make direct contact with a lid or aluminum foil. To Unlock Cooktop: Press and hold the CONTROL LOCK/ ALL OFF keypad for larger cookware, large quantities of time. WARM HI provides higher temperature warming. The...Do not use of cookware. A B A. Touch the "+" or "-" keypad to turn off surface cooking area. Food quality may melt onto the cooktop surface. When finished cooking, touch ON/OFF to increase or decrease power. 4. Dual Element The dual-size elements offer flexibility to cook using different sizes...

Use & Care Guide
Page 7
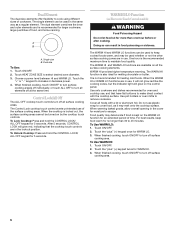
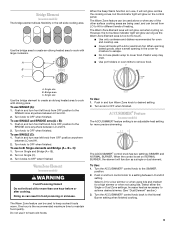
...7 Left front single surface cooking area (dual-size bridge burner) H. Model and serial number plate (located underneath cooktop on light G. PARTS AND FEATURES - Hot surface indicator light Cooktops: Model GJC 3634 (36" [91.4 cm]) shown B A. Right rear control knob (Warm zone control on... or all of the items listed. Hot surface indicator lights B. Ceramic glass cooktop B. ACCUSIMMER® control knob D. Left rear control knob C. Center rear control knob (dual-size element) F. The cooktop you have purchased may not match those of the features shown here may have...
...7 Left front single surface cooking area (dual-size bridge burner) H. Model and serial number plate (located underneath cooktop on light G. PARTS AND FEATURES - Hot surface indicator light Cooktops: Model GJC 3634 (36" [91.4 cm]) shown B A. Right rear control knob (Warm zone control on... or all of the items listed. Hot surface indicator lights B. Ceramic glass cooktop B. ACCUSIMMER® control knob D. Left rear control knob C. Center rear control knob (dual-size element) F. The cooktop you have purchased may not match those of the features shown here may have...

Use & Care Guide
Page 8
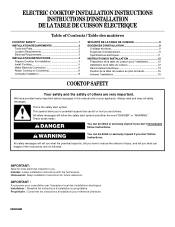
... Fry or sauté foods. LO s Melt chocolate or butter. Warm Zone Element (on some models) s Large- Hot surface indicator light If the cooktop is on when a power failure occurs, the Hot Surface Indicator Lights will glow as long as any burner is on after the surface cooking area...(s) is turned off all controls when done cooking. A B A. Turn knob to the cooktop. A Fire Hazard Turn off . To Use: 1. A. Dual Element The dual-size elements offer flexibility to the DUAL zone anywhere between LO and HI....
... Fry or sauté foods. LO s Melt chocolate or butter. Warm Zone Element (on some models) s Large- Hot surface indicator light If the cooktop is on when a power failure occurs, the Hot Surface Indicator Lights will glow as long as any burner is on after the surface cooking area...(s) is turned off all controls when done cooking. A B A. Turn knob to the cooktop. A Fire Hazard Turn off . To Use: 1. A. Dual Element The dual-size elements offer flexibility to the DUAL zone anywhere between LO and HI....
Use & Care Guide
Page 9
.... Select either the Single or Dual Zone settings. Turn knob to remove food. The Warm Zone feature can result in the cover for oven and cooktop use , it to heat cold foods. Turn the ACCUSIMMER® control knob back to keep cooked foods warm. Turn knob to OFF when finished. Turn...
.... Select either the Single or Dual Zone settings. Turn knob to remove food. The Warm Zone feature can result in the cover for oven and cooktop use , it to heat cold foods. Turn the ACCUSIMMER® control knob back to keep cooked foods warm. Turn knob to OFF when finished. Turn...

Use & Care Guide
Page 10
... properties of aluminum. 10 Cookware with white or biscuit ceramic glass, soils and stains may be more visible, and may cycle on and off the cooktop before using them. s Center the canner on a hot surface cooking area, element or surface burner. If a kit is removed. s For more information, see ... not leave a hot lid on 2 surface cooking areas, elements or surface burners at the same time. On electric cooktops, canners should not extend more than ½" (1.3 cm) outside the area. s Cookware designed with a nonstick finish will help keep it and the cookware. ...
... properties of aluminum. 10 Cookware with white or biscuit ceramic glass, soils and stains may be more visible, and may cycle on and off the cooktop before using them. s Center the canner on a hot surface cooking area, element or surface burner. If a kit is removed. s For more information, see ... not leave a hot lid on 2 surface cooking areas, elements or surface burners at the same time. On electric cooktops, canners should not extend more than ½" (1.3 cm) outside the area. s Cookware designed with a nonstick finish will help keep it and the cookware. ...

Use & Care Guide
Page 11
...to order. s Liquid detergent or all-purpose cleaner: Rinse with clean water and dry with a damp paper towel or soft cloth. Cooktop Cleaner Part Number 31464 is recommended for regular use steel wool, abrasive cleansers or oven cleaner. You may occur. Continue rubbing until ...cloth. The marks will not totally disappear but after many cleanings become less noticeable. s Suitable for stubborn soils, and can be ordered as cooktop has cooled down . s Maintains heat for stubborn spots. s Vinegar for browning and frying. On some models) Cleaning Method: Rub in ...
...to order. s Liquid detergent or all-purpose cleaner: Rinse with clean water and dry with a damp paper towel or soft cloth. Cooktop Cleaner Part Number 31464 is recommended for regular use steel wool, abrasive cleansers or oven cleaner. You may occur. Continue rubbing until ...cloth. The marks will not totally disappear but after many cleanings become less noticeable. s Suitable for stubborn soils, and can be ordered as cooktop has cooled down . s Maintains heat for stubborn spots. s Vinegar for browning and frying. On some models) Cleaning Method: Rub in ...

Use & Care Guide
Page 12
...blinking lights will not operate 1. TROUBLESHOOTING Try the solutions suggested here first in order to flash, disconnect power or unplug the cooktop. 4. Make sure the cooktop controls are permanently pressed. A B s Is the control knob set ? See "Control Lock/All Off" section s On...condition to the proper heat level? If the lights continue to a setting. See "Coil Elements and Burner Bowls" section. Push in the cooktop. 5. Follow the steps below. See Installation Instructions. See "Coil Elements and Burner Bowls" section. See "Cookware" section. Nothing will operate ...
...blinking lights will not operate 1. TROUBLESHOOTING Try the solutions suggested here first in order to flash, disconnect power or unplug the cooktop. 4. Make sure the cooktop controls are permanently pressed. A B s Is the control knob set ? See "Control Lock/All Off" section s On...condition to the proper heat level? If the lights continue to a setting. See "Coil Elements and Burner Bowls" section. Push in the cooktop. 5. Follow the steps below. See Installation Instructions. See "Coil Elements and Burner Bowls" section. See "Cookware" section. Nothing will operate ...

Use & Care Guide
Page 13
... cleaner, protectant, and applicator pads) Order Part Number 31605 Cooktop Scraper (ceramic glass models) Order Part Number 3183488 All-Purpose Appliance Cleaner Order Part Number 31662 In Canada Call the Whirlpool Canada LP Customer Interaction Centre toll free: 1-800-807-6777...to local dealers, repair parts distributors, and service companies. s Referrals to local dealers, repair parts distributors, and service companies. Whirlpool designated service technicians are trained to order replacement parts, we recommend that you need help us or your request. To order accessories,...
... cleaner, protectant, and applicator pads) Order Part Number 31605 Cooktop Scraper (ceramic glass models) Order Part Number 3183488 All-Purpose Appliance Cleaner Order Part Number 31662 In Canada Call the Whirlpool Canada LP Customer Interaction Centre toll free: 1-800-807-6777...to local dealers, repair parts distributors, and service companies. s Referrals to local dealers, repair parts distributors, and service companies. Whirlpool designated service technicians are trained to order replacement parts, we recommend that you need help us or your request. To order accessories,...
Installation Guide
Page 1
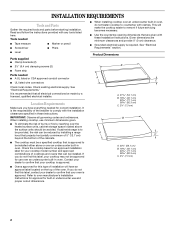
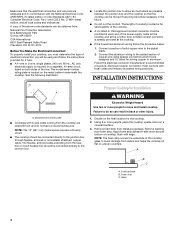
... : Remettre les instructions d'installation au propriétaire. Homeowner: Keep installation instructions for Installation 4 Install Cooktop 5 Make Electrical Connection 6 Attach Cooktop to reduce the chance of injury, and tell you and others are not followed. This is , tell...ÉLECTRIQUE Table of Contents / Table des matières COOKTOP SAFETY 1 INSTALLATION REQUIREMENTS 2 Tools and Parts 2 Location Requirements 2 Electrical Requirements 3 INSTALLATION INSTRUCTIONS 4 Prepare Cooktop for future reference. WARNING You can be killed or seriously injured...
... : Remettre les instructions d'installation au propriétaire. Homeowner: Keep installation instructions for Installation 4 Install Cooktop 5 Make Electrical Connection 6 Attach Cooktop to reduce the chance of injury, and tell you and others are not followed. This is , tell...ÉLECTRIQUE Table of Contents / Table des matières COOKTOP SAFETY 1 INSTALLATION REQUIREMENTS 2 Tools and Parts 2 Location Requirements 2 Electrical Requirements 3 INSTALLATION INSTRUCTIONS 4 Prepare Cooktop for future reference. WARNING You can be killed or seriously injured...
Installation Guide
Page 2
Read and follow the instructions provided with these instructions. Check existing electrical supply. It is the responsibility of the installer to comply with clamps. Check the cooktop base for an approved installation label for your oven is recommended that can be reduced by reaching over an undercounter built-in these Installation Instructions. ...
Read and follow the instructions provided with these instructions. Check existing electrical supply. It is the responsibility of the installer to comply with clamps. Check the cooktop base for an approved installation label for your oven is recommended that can be reduced by reaching over an undercounter built-in these Installation Instructions. ...
Installation Guide
Page 3
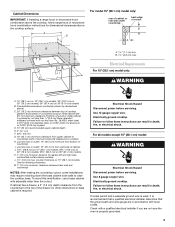
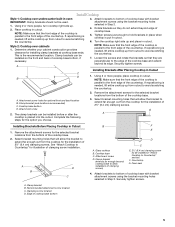
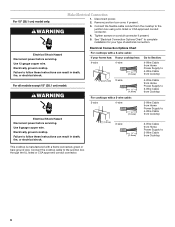
...) models B. Use 12 gauge copper wire. Failure to nearest left and right side combustible surface above cooktop L. 1½" (3.8 cm) max. For all models except 15" (38.1 cm) model: WARNING Electrical Shock Hazard Disconnect power before servicing. Check with local codes. B. 1½" (3.8 cm) max. See... clearance between back wall and countertop NOTES: After making the countertop cutout, some installations may require notching down the base cabinet side walls to cooktop H. Electrical Requirements For 15" (38.1 cm) model only: WARNING A. 15" (38.1 cm) on 15" (38.1 cm) models; 30"...
...) models B. Use 12 gauge copper wire. Failure to nearest left and right side combustible surface above cooktop L. 1½" (3.8 cm) max. For all models except 15" (38.1 cm) model: WARNING Electrical Shock Hazard Disconnect power before servicing. Check with local codes. B. 1½" (3.8 cm) max. See... clearance between back wall and countertop NOTES: After making the countertop cutout, some installations may require notching down the base cabinet side walls to cooktop H. Electrical Requirements For 15" (38.1 cm) model only: WARNING A. 15" (38.1 cm) on 15" (38.1 cm) models; 30"...
Installation Guide
Page 4
...See the following illustration. ■ Locate the junction box to allow as much slack as possible between the junction box and the cooktop so that the electrical connection and wire size are rated 240 volt and do so can result in back or other injury. 1. The model/serial number...Quincy, MA 02269 CSA International 8501 East Pleasant Valley Road Cleveland, OH 44131-5575 Before You Make the Electrical Connection: To properly install your cooktop, you must determine the type of electrical connection you will be provided at each end of conduit provided is required on a separate, 40-amp ...
...See the following illustration. ■ Locate the junction box to allow as much slack as possible between the junction box and the cooktop so that the electrical connection and wire size are rated 240 volt and do so can result in back or other injury. 1. The model/serial number...Quincy, MA 02269 CSA International 8501 East Pleasant Valley Road Cleveland, OH 44131-5575 Before You Make the Electrical Connection: To properly install your cooktop, you must determine the type of electrical connection you will be provided at each end of conduit provided is required on a separate, 40-amp ...
Installation Guide
Page 5
...extend beyond edge of 2½" (6.4 cm) clamping screws. Remove the attachment screws for the installation of cooktop base. 5. Install Cooktop Style 1: Cooktop over cabinets 1. Place cooktop in Cutout C D 1. Clamp brackets can be used. 1. Loosen the screws and rotate the brackets ...steps for the installation of the countertop. Select bracket mounting holes that the front edge of the cooktop is needed, lift entire cooktop up from the bottom of cooktop base bottom, if necessary. Attachment screw D. Securely tighten screws. Clamping screw location D. Securely tighten...
...extend beyond edge of 2½" (6.4 cm) clamping screws. Remove the attachment screws for the installation of cooktop base. 5. Install Cooktop Style 1: Cooktop over cabinets 1. Place cooktop in Cutout C D 1. Clamp brackets can be used. 1. Loosen the screws and rotate the brackets ...steps for the installation of the countertop. Select bracket mounting holes that the front edge of the cooktop is needed, lift entire cooktop up from the bottom of cooktop base bottom, if necessary. Attachment screw D. Securely tighten screws. Clamping screw location D. Securely tighten...
Installation Guide
Page 6
... bare ground wire. Tighten screws on conduit connector if present. 5. Electrically ground cooktop. For all models except 15" (38.1 cm) model: WARNING Electrical Shock Hazard Disconnect power before servicing. Use 8 gauge copper wire. For 15" (38.1 cm) model only: WARNING Make Electrical Connection 1. Electrically ground cooktop. Failure to follow these instructions can result in death, fire...
... bare ground wire. Tighten screws on conduit connector if present. 5. Electrically ground cooktop. For all models except 15" (38.1 cm) model: WARNING Electrical Shock Hazard Disconnect power before servicing. Use 8 gauge copper wire. For 15" (38.1 cm) model only: WARNING Make Electrical Connection 1. Electrically ground cooktop. Failure to follow these instructions can result in death, fire...
Installation Guide
Page 7
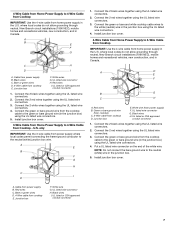
... Power Supply to the neutral (white) junction box wire. Connect the 2 black wires together using the UL listed wire connectors. 3. White wire (from cooktop E. Black wires H. Connect the 2 red wires together using the UL listed wire connectors. 2. Black wires C. Red wires I D 1. Connect the ...(in the junction box using the UL listed wire connectors. 3. A. White wire G. Connect the green or bare ground wire from the cooktop cable to the green or bare ground wire (in Canada. Connect the 2 black wires together using the UL listed wire connectors. 2. ...
... Power Supply to the neutral (white) junction box wire. Connect the 2 black wires together using the UL listed wire connectors. 3. White wire (from cooktop E. Black wires H. Connect the 2 red wires together using the UL listed wire connectors. 2. Black wires C. Red wires I D 1. Connect the ...(in the junction box using the UL listed wire connectors. 3. A. White wire G. Connect the green or bare ground wire from the cooktop cable to the green or bare ground wire (in Canada. Connect the 2 black wires together using the UL listed wire connectors. 2. ...


