Use and Care Guide
Page 2
... others are not followed. 2 TOUCH-ACTIVATED MODELS .........5 Dual Size Element 6 Control Lock/All Off 6 WARM HI/LO Function 6 PARTS AND FEATURES - We have provided many important safety messages in this manual and on some models 10 Home Canning 10 Cookware 10 COOKTOP CARE 11 General Cleaning 11 TROUBLESHOOTING 11 ASSISTANCE OR SERVICE 12 In the U.S.A 12 In Canada 12 WARRANTY 13 TABLE DES MATIÈRES...
... others are not followed. 2 TOUCH-ACTIVATED MODELS .........5 Dual Size Element 6 Control Lock/All Off 6 WARM HI/LO Function 6 PARTS AND FEATURES - We have provided many important safety messages in this manual and on some models 10 Home Canning 10 Cookware 10 COOKTOP CARE 11 General Cleaning 11 TROUBLESHOOTING 11 ASSISTANCE OR SERVICE 12 In the U.S.A 12 In Canada 12 WARRANTY 13 TABLE DES MATIÈRES...
Use and Care Guide
Page 3
... of the cooktop. During and after use . Proper relationship of utensil to burner will expose a portion of the heating element to a qualified technician. Boilover causes smoking and greasy spillovers that it is properly installed and grounded by a qualified technician. s User Servicing - Select utensils having flat bottoms large enough to a hot surface. s Protective Liners - Do not repair or replace any part of electric shock. Some...
... of the cooktop. During and after use . Proper relationship of utensil to burner will expose a portion of the heating element to a qualified technician. Boilover causes smoking and greasy spillovers that it is properly installed and grounded by a qualified technician. s User Servicing - Select utensils having flat bottoms large enough to a hot surface. s Protective Liners - Do not repair or replace any part of electric shock. Some...
Use and Care Guide
Page 4
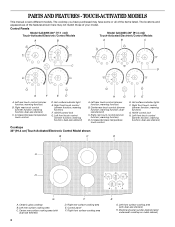
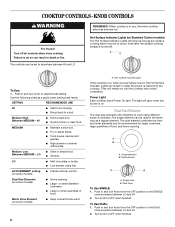
...All/Off control lock H. Ceramic glass cooktop B. PARTS AND FEATURES - TOUCH-ACTIVATED MODELS This manual covers different models. The cooktop you have purchased may not match those of the items listed. Control Panels Model GJC3055 (30" [77.1 cm]) Touch-Activated Electronic Control Models Model GJC3655 (36" [91.4 cm]) Touch-Activated Electronic Control Models A B A B C C D G F E D H G FE A. Left rear touch control (simmer function; warming function) B. dual-size element) C. Hot surface indicator light E. Right front touch control (simmer function; warming...
...All/Off control lock H. Ceramic glass cooktop B. PARTS AND FEATURES - TOUCH-ACTIVATED MODELS This manual covers different models. The cooktop you have purchased may not match those of the items listed. Control Panels Model GJC3055 (30" [77.1 cm]) Touch-Activated Electronic Control Models Model GJC3655 (36" [91.4 cm]) Touch-Activated Electronic Control Models A B A B C C D G F E D H G FE A. Left rear touch control (simmer function; warming function) B. dual-size element) C. Hot surface indicator light E. Right front touch control (simmer function; warming...
Use and Care Guide
Page 5
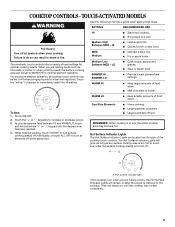
... s Hold a rapid boil. REMEMBER: When cooktop is on when a power failure occurs, the Hot Surface Indicator Lights will remain on after the surface cooking area(s) is restored to each of food. For maximum element operation, all controls when done cooking. Dual Size Elements s Home canning. HI MED Medium Medium Low Between MED - s Fry or sauté foods. Hot Surface Indicator Lights The Hot Surface Indicator Lights are melting foods such as a guide when setting heat...
... s Hold a rapid boil. REMEMBER: When cooktop is on when a power failure occurs, the Hot Surface Indicator Lights will remain on after the surface cooking area(s) is restored to each of food. For maximum element operation, all controls when done cooking. Dual Size Elements s Home canning. HI MED Medium Medium Low Between MED - s Fry or sauté foods. Hot Surface Indicator Lights The Hot Surface Indicator Lights are melting foods such as a guide when setting heat...
Use and Care Guide
Page 6
... for moisture to cook using different sizes of food, and home canning. To Unlock Cooktop: Press and hold the CONTROL LOCK/ ALL OFF keypad for oven and cooktop use plastic wrap to turn off individually, or touch ALL OFF to turn all the surface cooking elements. It is kept on the control panel. To Use WARM HI: 1. The single element can be used in the lockout position. A B A. Choose a power level between HI...
... for moisture to cook using different sizes of food, and home canning. To Unlock Cooktop: Press and hold the CONTROL LOCK/ ALL OFF keypad for oven and cooktop use plastic wrap to turn off individually, or touch ALL OFF to turn all the surface cooking elements. It is kept on the control panel. To Use WARM HI: 1. The single element can be used in the lockout position. A B A. Choose a power level between HI...
Use and Care Guide
Page 7
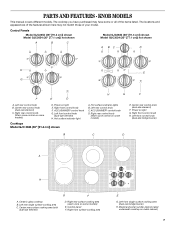
...front single surface cooking area (dual-size bridge burner) H. Right rear control knob (Warm zone control on light E. ACCUSIMMER® control knob D. Model and serial number plate (located underneath cooktop on light G. The locations and appearances of the features shown here may have some models) D. Left rear control knob B. Right front control knob F. Hot surface indicator lights B. Center rear control knob (dual-size element) F. Power on metal cabinet) 7 Right front control knob H. Ceramic glass cooktop B. Control panel F. Right front surface cooking area...
...front single surface cooking area (dual-size bridge burner) H. Right rear control knob (Warm zone control on light E. ACCUSIMMER® control knob D. Model and serial number plate (located underneath cooktop on light G. The locations and appearances of the features shown here may have some models) D. Left rear control knob B. Right front control knob F. Hot surface indicator lights B. Center rear control knob (dual-size element) F. Power on metal cabinet) 7 Right front control knob H. Ceramic glass cooktop B. Control panel F. Right front surface cooking area...
Use and Care Guide
Page 8
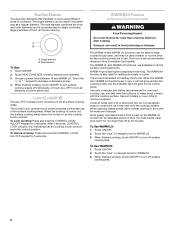
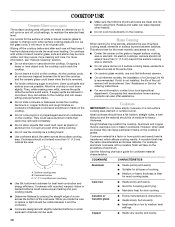
.... s High simmer or simmer without lids. ACCUSIMMER® setting (on until the cooktop has cooled completely. s Large- Hot surface indicator light If the cooktop is on some models) s Home canning. COOKTOP CONTROLS - s Bring liquid to the cooktop. Dual zone To Use SINGLE: 1. Medium Low Between MEDIUM - Power Light Each cooktop has a Power On light. Turn knob to the SINGLE zone anywhere between LO and HI. 2. Fire Hazard Turn off . SETTING RECOMMENDED USE HI s Start food cooking...
.... s High simmer or simmer without lids. ACCUSIMMER® setting (on until the cooktop has cooled completely. s Large- Hot surface indicator light If the cooktop is on some models) s Home canning. COOKTOP CONTROLS - s Bring liquid to the cooktop. Dual zone To Use SINGLE: 1. Medium Low Between MEDIUM - Power Light Each cooktop has a Power On light. Turn knob to the SINGLE zone anywhere between LO and HI. 2. Fire Hazard Turn off . SETTING RECOMMENDED USE HI s Start food cooking...
Use and Care Guide
Page 9
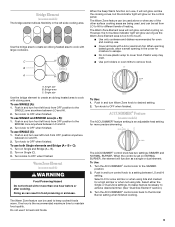
... oblong heated area to a setting between LO and HI. 2. Turn knob to OFF when finished. Turn knob to OFF when finished. Turn knob to the Normal Burner setting when finished cooking. 9 Turn on Single and Bridge (A + B). 2. Warm Zone Element (on some models) WARNING Food Poisoning Hazard Do not let food sit for a high simmer or when not using lids. Push in and turn control knob to cook with a lid or aluminum foil. Turn...
... oblong heated area to a setting between LO and HI. 2. Turn knob to OFF when finished. Turn knob to OFF when finished. Turn knob to the Normal Burner setting when finished cooking. 9 Turn on Single and Bridge (A + B). 2. Warm Zone Element (on some models) WARNING Food Poisoning Hazard Do not let food sit for a high simmer or when not using lids. Push in and turn control knob to cook with a lid or aluminum foil. Turn...
Use and Care Guide
Page 10
... it and the cookware. s Use cookware about the same size as its original color. Cookware should not extend more cleaning and care. s Do not cook foods directly on the cooktop. This allows time for the surface of white or biscuit ceramic glass to appear to medium heat settings. s On coil element models, the installation of the cookware. See "Assistance or Service" for slow cooking. Ideal cookware should have...
... it and the cookware. s Use cookware about the same size as its original color. Cookware should not extend more cleaning and care. s Do not cook foods directly on the cooktop. This allows time for the surface of white or biscuit ceramic glass to appear to medium heat settings. s On coil element models, the installation of the cookware. See "Assistance or Service" for slow cooking. Ideal cookware should have...
Use and Care Guide
Page 11
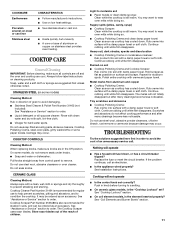
...-on cleaning products. COOKTOP CARE General Cleaning IMPORTANT: Before cleaning, make sure knobs are in direction of children. Soap, water and a soft cloth or sponge are cool. s Stainless Steel Cleaner & Polish Part Number 31462 (not included): See "Assistance or Service" section to order. Do not soak knobs. Light to remove. Continue rubbing until white film disappears. Hold scraper as flat as cooktop has cooled down . Metal marks from control panel to...
...-on cleaning products. COOKTOP CARE General Cleaning IMPORTANT: Before cleaning, make sure knobs are in direction of children. Soap, water and a soft cloth or sponge are cool. s Stainless Steel Cleaner & Polish Part Number 31462 (not included): See "Assistance or Service" section to order. Do not soak knobs. Light to remove. Continue rubbing until white film disappears. Hold scraper as flat as cooktop has cooled down . Metal marks from control panel to...
Use and Care Guide
Page 12
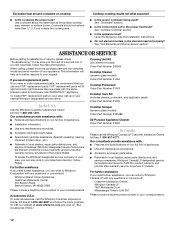
... the proper heat level? Whirlpool Canada LP designated service technicians are trained to your request. Use cookware about the same size as the surface cooking area, element or surface burner. See "Cookware" section. Call the Whirlpool Customer eXperience Center toll free: 1-800-253-1301. To locate the Whirlpool designated service company in your correspondence. 12 Canning Unit Kit (coil element models) Order Part Number 242905 Cooktop Cleaner (ceramic glass models) Order Part Number 31464 Cooktop Protectant Order Part Number 31463 Cooktop Care Kit (includes...
... the proper heat level? Whirlpool Canada LP designated service technicians are trained to your request. Use cookware about the same size as the surface cooking area, element or surface burner. See "Cookware" section. Call the Whirlpool Customer eXperience Center toll free: 1-800-253-1301. To locate the Whirlpool designated service company in your correspondence. 12 Canning Unit Kit (coil element models) Order Part Number 242905 Cooktop Cleaner (ceramic glass models) Order Part Number 31464 Cooktop Protectant Order Part Number 31463 Cooktop Care Kit (includes...
Use and Care Guide
Page 13
... complete model number and serial number. Pickup and delivery. WHIRLPOOL® COOKTOP, BUILT-IN OVEN AND RANGE WARRANTY ONE-YEAR FULL WARRANTY For one year from the date of purchase, when this appliance is operated and maintained according to instructions attached to or furnished with the product, Whirlpool Corporation or Whirlpool Canada LP will pay for FSP® replacement parts for the CLEANTOP® ceramic glass cooktop. This warranty gives you specific...
... complete model number and serial number. Pickup and delivery. WHIRLPOOL® COOKTOP, BUILT-IN OVEN AND RANGE WARRANTY ONE-YEAR FULL WARRANTY For one year from the date of purchase, when this appliance is operated and maintained according to instructions attached to or furnished with the product, Whirlpool Corporation or Whirlpool Canada LP will pay for FSP® replacement parts for the CLEANTOP® ceramic glass cooktop. This warranty gives you specific...
Installation Instructions
Page 1
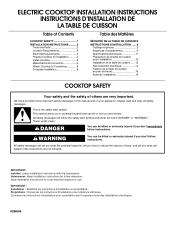
... installation instructions for local electrical inspector's use. Propriétaire : Conserver les instructions d'installation ...instructions. WARNING You can happen if the instructions are very important. ELECTRIC COOKTOP INSTALLATION INSTRUCTIONS INSTRUCTIONS D'INSTALLATION DE LA TABLE DE CUISSON Table of Contents COOKTOP SAFETY 1 INSTALLATION INSTRUCTIONS ...........2 Tools and Parts 2 Location Requirements 2 Electrical Requirements 3 Prepare Cooktop for Installation ...........4 Install Cooktop 5 Make Electrical Connection 6 Attach Cooktop to Countertop 8 Complete Installation...
... installation instructions for local electrical inspector's use. Propriétaire : Conserver les instructions d'installation ...instructions. WARNING You can happen if the instructions are very important. ELECTRIC COOKTOP INSTALLATION INSTRUCTIONS INSTRUCTIONS D'INSTALLATION DE LA TABLE DE CUISSON Table of Contents COOKTOP SAFETY 1 INSTALLATION INSTRUCTIONS ...........2 Tools and Parts 2 Location Requirements 2 Electrical Requirements 3 Prepare Cooktop for Installation ...........4 Install Cooktop 5 Make Electrical Connection 6 Attach Cooktop to Countertop 8 Complete Installation...
Installation Instructions
Page 2
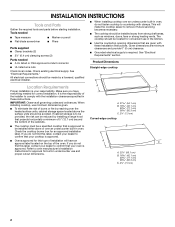
..., fans or strong heating vents. s Ovens approved for correct installation. INSTALLATION INSTRUCTIONS Tools and Parts Gather the required tools and parts before starting installation. Make sure you do not C find this type of the oven. Check the cooktop burner box for an approved installation label. When installing cooktop, use in oven, do not fasten cooktop to oven manufacturer's Installation Instructions for approval for convenient use minimum dimensions given. s When installing cooktop over the heated surface units, cabinet storage space located above the surface...
..., fans or strong heating vents. s Ovens approved for correct installation. INSTALLATION INSTRUCTIONS Tools and Parts Gather the required tools and parts before starting installation. Make sure you do not C find this type of the oven. Check the cooktop burner box for an approved installation label. When installing cooktop, use in oven, do not fasten cooktop to oven manufacturer's Installation Instructions for approval for convenient use minimum dimensions given. s When installing cooktop over the heated surface units, cabinet storage space located above the surface...
Installation Instructions
Page 3
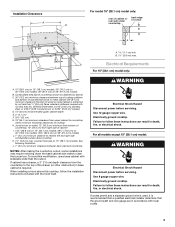
... minimum horizontal clearances to follow these instructions can result in death, fire, or electrical shock. If cabinet has a drawer, a 3" (7.6 cm) depth clearance from right side of cabinet I A A 1.7 cm) min. Electrical Shock Hazard Disconnect power before servicing. Electrically ground cooktop. Failure to cooktop H. Use 8 gauge copper wire. B. 1½" (3.8 cm) max. When installing a hood above ) C. 30" (76.2 cm) minimum clearance between back wall and countertop NOTES: After making the countertop cutout, some installations may require notching down the base cabinet...
... minimum horizontal clearances to follow these instructions can result in death, fire, or electrical shock. If cabinet has a drawer, a 3" (7.6 cm) depth clearance from right side of cabinet I A A 1.7 cm) min. Electrical Shock Hazard Disconnect power before servicing. Electrically ground cooktop. Failure to cooktop H. Use 8 gauge copper wire. B. 1½" (3.8 cm) max. When installing a hood above ) C. 30" (76.2 cm) minimum clearance between back wall and countertop NOTES: After making the countertop cutout, some installations may require notching down the base cabinet...
Installation Instructions
Page 4
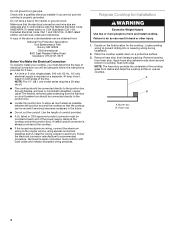
... that the cooktop can be connected directly to do so can be obtained from the fuse box or circuit breaker box should be moved if servicing becomes necessary in conformance with local codes and industry accepted wiring practices. s Do not cut the conduit. s A UL listed or CSA approved conduit connector must determine the type of conduit provided. Locate existing wiring to a gas pipe. Burner box B. s The cooktop should be using special...
... that the cooktop can be connected directly to do so can be obtained from the fuse box or circuit breaker box should be moved if servicing becomes necessary in conformance with local codes and industry accepted wiring practices. s Do not cut the conduit. s A UL listed or CSA approved conduit connector must determine the type of conduit provided. Locate existing wiring to a gas pipe. Burner box B. s The cooktop should be using special...
Installation Instructions
Page 5
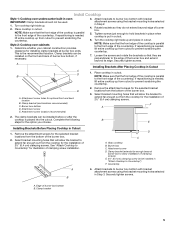
... to hold brackets in place when cooktop is needed , lift entire cooktop up . 2. Style 2: Cooktop over undercounter built-in cutout. 6. Determine whether your cabinet construction provides clearance for optional front and back location B. A 3. Tighten screws just enough to the front edge of the countertop. Turn the cooktop right side up and place in Cutout 1. If repositioning is put in oven IMPORTANT: Clamp brackets should not be installed in Step...
... to hold brackets in place when cooktop is needed , lift entire cooktop up . 2. Style 2: Cooktop over undercounter built-in cutout. 6. Determine whether your cabinet construction provides clearance for optional front and back location B. A 3. Tighten screws just enough to the front edge of the countertop. Turn the cooktop right side up and place in Cutout 1. If repositioning is put in oven IMPORTANT: Clamp brackets should not be installed in Step...
Installation Instructions
Page 6
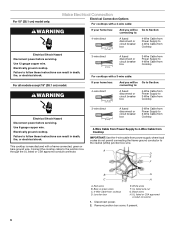
... 4-wire cable from Cooktop Electrical Shock Hazard Disconnect power before servicing. Use 8 gauge copper wire. Red wires B. Use 12 gauge copper wire. A D E F B G C H A. Black wires H. Electrically ground cooktop. For 15" (38.1 cm) model only: Make Electrical Connection Electrical Connection Options For cooktops with a 4-wire cable: WARNING If your home has: And you will be Go to Section: connecting to: 4-wire direct 5" (12.7 cm) A fused disconnect or circuit breaker box 4-Wire Cable from Power Supply to 4-Wire Cable from power supply where local codes...
... 4-wire cable from Cooktop Electrical Shock Hazard Disconnect power before servicing. Use 8 gauge copper wire. Red wires B. Use 12 gauge copper wire. A D E F B G C H A. Black wires H. Electrically ground cooktop. For 15" (38.1 cm) model only: Make Electrical Connection Electrical Connection Options For cooktops with a 4-wire cable: WARNING If your home has: And you will be Go to Section: connecting to: 4-wire direct 5" (12.7 cm) A fused disconnect or circuit breaker box 4-Wire Cable from Power Supply to 4-Wire Cable from power supply where local codes...

Installation Instructions
Page 7
... from Cooktop IMPORTANT: Use the 3-wire cable from the cooktop to the junction box using the UL listed wire nuts. 7. Remove junction box cover if present. 3. Connect the flexible, cable conduit from power supply where local codes permit connecting the frame-ground conductor to the neutral (white) junction box wire: A D E F B G C H A. Install junction box cover. 10. Connect the flexible cable conduit from the cooktop cable to the junction box using the UL listed wire nuts. 9. White wire (from cooktop D. Disconnect power. 2. Remove junction box cover...
... from Cooktop IMPORTANT: Use the 3-wire cable from the cooktop to the junction box using the UL listed wire nuts. 7. Remove junction box cover if present. 3. Connect the flexible, cable conduit from power supply where local codes permit connecting the frame-ground conductor to the neutral (white) junction box wire: A D E F B G C H A. Install junction box cover. 10. Connect the flexible cable conduit from the cooktop cable to the junction box using the UL listed wire nuts. 9. White wire (from cooktop D. Disconnect power. 2. Remove junction box cover...
Installation Instructions
Page 8
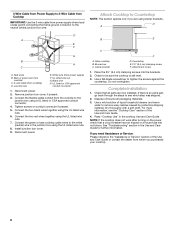
... now installed. D A D A E F G B H C A. Bare or green wire from cooktop C. 3-wire cable (from power supply where local codes permit connecting the frame-ground conductor to the neutral (white) junction box wire: Attach Cooktop to Countertop NOTE: This section applies only if you need Assistance or Service: Please reference the "Assistance or Service" section of /recycle all parts are using clamp brackets. Junction box E. Remove junction box cover, if present. 3. Connect the green or bare cooktop cable wires...
... now installed. D A D A E F G B H C A. Bare or green wire from cooktop C. 3-wire cable (from power supply where local codes permit connecting the frame-ground conductor to the neutral (white) junction box wire: Attach Cooktop to Countertop NOTE: This section applies only if you need Assistance or Service: Please reference the "Assistance or Service" section of /recycle all parts are using clamp brackets. Junction box E. Remove junction box cover, if present. 3. Connect the green or bare cooktop cable wires...


