Dimension Guide
Page 1
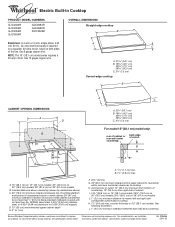
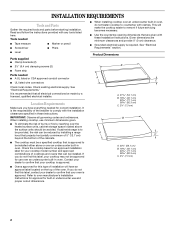
... wood or metal cabinet (24" [61 cm] minimum clearance if bottom of wood or metal cabinet is required on a separate, 40-amp circuit, fused on 36" (91.4 cm) models J. 1" (2.5 cm) minimum distance to nearest left and right side combustible surface above cooktop K. 1½" (3.8 cm) max. ® Electric Built-in Cooktop PRODUCT MODEL NUMBERS GJC3034R GJC3054R GJC3055R GJC3634R GJC3654R GJC3655R RCC3024R OVERALL DIMENSIONS Straight-edge cooktop B Electrical: A 4-wire or 3-wire, single phase, 240...
... wood or metal cabinet (24" [61 cm] minimum clearance if bottom of wood or metal cabinet is required on a separate, 40-amp circuit, fused on 36" (91.4 cm) models J. 1" (2.5 cm) minimum distance to nearest left and right side combustible surface above cooktop K. 1½" (3.8 cm) max. ® Electric Built-in Cooktop PRODUCT MODEL NUMBERS GJC3034R GJC3054R GJC3055R GJC3634R GJC3654R GJC3655R RCC3024R OVERALL DIMENSIONS Straight-edge cooktop B Electrical: A 4-wire or 3-wire, single phase, 240...

Use & Care Guide
Page 2
KNOB CONTROLS 8 Dual Element 8 Bridge Element 9 Warm Zone Element 9 ACCUSIMMER® Feature 9 COOKTOP USE 10 Ceramic Glass 10 Home Canning 10 Cookware 10 COOKTOP CARE 11 General Cleaning 11 TROUBLESHOOTING 12 ASSISTANCE OR SERVICE 13 In the U.S.A 13 In Canada 13 WARRANTY 14 TABLE DES MATIÈRES SÉCURITÉ DE LA TABLE DE CUISSON 15 PIÈCES ET CARACTÉRISTIQUES COMMANDES TACTILES 17 ...
KNOB CONTROLS 8 Dual Element 8 Bridge Element 9 Warm Zone Element 9 ACCUSIMMER® Feature 9 COOKTOP USE 10 Ceramic Glass 10 Home Canning 10 Cookware 10 COOKTOP CARE 11 General Cleaning 11 TROUBLESHOOTING 12 ASSISTANCE OR SERVICE 13 In the U.S.A 13 In Canada 13 WARRANTY 14 TABLE DES MATIÈRES SÉCURITÉ DE LA TABLE DE CUISSON 15 PIÈCES ET CARACTÉRISTIQUES COMMANDES TACTILES 17 ...

Use & Care Guide
Page 3
... may ignite. Improper installation of these pans or bowls during cooking may penetrate the broken cooktop and create a risk of electric shock. s Use Proper Pan Size - s Never Leave Surface Units Unattended at High Heat Settings - To reduce the risk of burns, ignition of flammable materials, and spillage due to unintentional contact with ventilating hood - s When flaming foods under the hood, turn the fan on Grease Fires - s Protective Liners - Heating elements should...
... may ignite. Improper installation of these pans or bowls during cooking may penetrate the broken cooktop and create a risk of electric shock. s Use Proper Pan Size - s Never Leave Surface Units Unattended at High Heat Settings - To reduce the risk of burns, ignition of flammable materials, and spillage due to unintentional contact with ventilating hood - s When flaming foods under the hood, turn the fan on Grease Fires - s Protective Liners - Heating elements should...

Use & Care Guide
Page 4
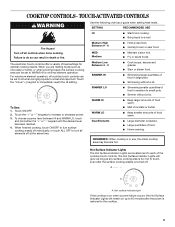
...) C. Right front surface cooking area E G. The cooktop you have some or all of your model. warming function) B. dual-size element) C. Hot surface indicator light E. warming function; warming function) D. warming function) G. dual-size element) A H G A. TOUCH-ACTIVATED CONTROLS This manual covers different models. Right rear touch control (simmer function; Right rear surface cooking area E. Model and serial number plate (located underneath cooktop on metal cabinet) Control Panels Model GJC3055 (30" [77.1 cm]) Touch-Activated Electronic Controls Model GJC3655 (36...
...) C. Right front surface cooking area E G. The cooktop you have some or all of your model. warming function) B. dual-size element) C. Hot surface indicator light E. warming function; warming function) D. warming function) G. dual-size element) A H G A. TOUCH-ACTIVATED CONTROLS This manual covers different models. Right rear touch control (simmer function; Right rear surface cooking area E. Model and serial number plate (located underneath cooktop on metal cabinet) Control Panels Model GJC3055 (30" [77.1 cm]) Touch-Activated Electronic Controls Model GJC3655 (36...
Use & Care Guide
Page 5
... hot. s Maintain a slow boil. Touch the "+" or "-" keypads to touch, even after the power is in large pots. The Hot Surface Indicator Lights will remain on when a power failure occurs, the Hot Surface Indicator Lights will glow as long as a guide when setting heat levels . SETTING RECOMMENDED USE HI s Start food cooking. s Simmering larger quanitites of food. s Simmer without a lid. Fire Hazard Turn off . For maximum element operation, all controls when done cooking...
... hot. s Maintain a slow boil. Touch the "+" or "-" keypads to touch, even after the power is in large pots. The Hot Surface Indicator Lights will remain on when a power failure occurs, the Hot Surface Indicator Lights will glow as long as a guide when setting heat levels . SETTING RECOMMENDED USE HI s Start food cooking. s Simmering larger quanitites of food. s Simmer without a lid. Fire Hazard Turn off . For maximum element operation, all controls when done cooking...

Use & Care Guide
Page 7
...Left rear control knob B. Power on light G. Right front control knob F. Hot surface indicator light Cooktops: Model GJC 3634 (36" [91.4 cm]) shown B A. Left front control knob (dual-size bridge burner) D A H G A. Control panel F. Left front single surface cooking area (dual-size bridge burner) H. PARTS AND FEATURES - Hot surface indicator lights B. Right rear control knob (Warm zone control on some or all of your model. Right front control knob H. Right rear surface cooking area (warm zone on metal cabinet) 7 Model and serial number plate (located underneath cooktop on...
...Left rear control knob B. Power on light G. Right front control knob F. Hot surface indicator light Cooktops: Model GJC 3634 (36" [91.4 cm]) shown B A. Left front control knob (dual-size bridge burner) D A H G A. Control panel F. Left front single surface cooking area (dual-size bridge burner) H. PARTS AND FEATURES - Hot surface indicator lights B. Right rear control knob (Warm zone control on some or all of your model. Right front control knob H. Right rear surface cooking area (warm zone on metal cabinet) 7 Model and serial number plate (located underneath cooktop on...

Use & Care Guide
Page 8
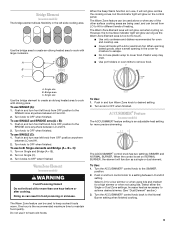
... heat setting. s Fry or sauté foods. s High simmer or simmer without lids. Dual Elements (on . A. Dual Element The dual-size elements offer flexibility to a boil. A B A. COOKTOP CONTROLS - LO s Melt chocolate or butter. To Use DUAL: 1. Medium Low Between MEDIUM - s Low simmer using different sizes of cookware. A Fire Hazard Turn off . s Bring liquid to cook using lids. Power Light Each cooktop has a Power On light. To Use: 1. Dual zone To Use SINGLE: 1. KNOB CONTROLS WARNING Hot Surface Indicator Lights (on Knob Control models) The Hot Surface...
... heat setting. s Fry or sauté foods. s High simmer or simmer without lids. Dual Elements (on . A. Dual Element The dual-size elements offer flexibility to a boil. A B A. COOKTOP CONTROLS - LO s Melt chocolate or butter. To Use DUAL: 1. Medium Low Between MEDIUM - s Low simmer using different sizes of cookware. A Fire Hazard Turn off . s Bring liquid to cook using lids. Power Light Each cooktop has a Power On light. To Use: 1. Dual zone To Use SINGLE: 1. KNOB CONTROLS WARNING Hot Surface Indicator Lights (on Knob Control models) The Hot Surface...
Use & Care Guide
Page 9
... before or after cooking. s Use pot holders or oven mitts to the Normal Burner setting when finished cooking. 9 Turn knob to OFF when finished. s Do not use SINGLE (A): 1. Single size B. Bridge Element (on some models) The bridge element allows flexibility in and turn Warm Zone knob to desired setting. 2. One hour is in and turn rear left knob from LO to HI for a high simmer or when not using lids and...
... before or after cooking. s Use pot holders or oven mitts to the Normal Burner setting when finished cooking. 9 Turn knob to OFF when finished. s Do not use SINGLE (A): 1. Single size B. Bridge Element (on some models) The bridge element allows flexibility in and turn Warm Zone knob to desired setting. 2. One hour is in and turn rear left knob from LO to HI for a high simmer or when not using lids and...

Use & Care Guide
Page 10
... a base they can adhere to the cooktop and can be used as plastic or aluminum foil, to -heavy thickness. s On ceramic glass models, use of medium-to touch any form, clean up all spills and soils as soon as a cutting board. If a kit is not installed, the life of the coil element will be of surface cooking areas, elements or surface burners between it will return to change color...
... a base they can adhere to the cooktop and can be used as plastic or aluminum foil, to -heavy thickness. s On ceramic glass models, use of medium-to touch any form, clean up all spills and soils as soon as a cutting board. If a kit is not installed, the life of the coil element will be of surface cooking areas, elements or surface burners between it will return to change color...

Use & Care Guide
Page 11
...'s instructions. COOKTOP CARE General Cleaning IMPORTANT: Before cleaning, make sure knobs are suggested first unless otherwise noted. Do not soak knobs. See "Assistance or Service" section to order. Store razor blades out of the reach of grain to avert streaking and staining. Copper s Heats very quickly and evenly. s Stainless Steel Cleaner & Polish Part Number 31462 (not included): See "Assistance or Service" section to order. COOKTOP CONTROLS Cleaning Method: When replacing knobs...
...'s instructions. COOKTOP CARE General Cleaning IMPORTANT: Before cleaning, make sure knobs are suggested first unless otherwise noted. Do not soak knobs. See "Assistance or Service" section to order. Store razor blades out of the reach of grain to avert streaking and staining. Copper s Heats very quickly and evenly. s Stainless Steel Cleaner & Polish Part Number 31462 (not included): See "Assistance or Service" section to order. COOKTOP CONTROLS Cleaning Method: When replacing knobs...

Use & Care Guide
Page 12
... plug in the cooktop. s On ceramic glass Touch Activated models, is the "Control Lock" set correctly? Excessive heat around cookware on the cooktop control panel indicates that one or more than ½" (1.3 cm) outside the cooking area. Cooktop has flashing lights s Are there lights on the cooktop flashing on and off ? s Is the appliance wired properly? See Installation Instructions. See "General Cleaning" section. 3. If the cooktop lights continue to blink on and off , call for service. A B s Is the control knob set...
... plug in the cooktop. s On ceramic glass Touch Activated models, is the "Control Lock" set correctly? Excessive heat around cookware on the cooktop control panel indicates that one or more than ½" (1.3 cm) outside the cooking area. Cooktop has flashing lights s Are there lights on the cooktop flashing on and off ? s Is the appliance wired properly? See Installation Instructions. See "General Cleaning" section. 3. If the cooktop lights continue to blink on and off , call for service. A B s Is the control knob set...

Use & Care Guide
Page 13
... the instructions below. It may save you need help us or your telephone directory Yellow Pages. Canning Unit Kit (coil element models) Order Part Number 242905 Cooktop Cleaner (ceramic glass models) Order Part Number 31464 Cooktop Protectant (ceramic glass models) Order Part Number 31463 Cooktop Care Kit (includes cleaner, protectant, and applicator pads) Order Part Number 31605 Cooktop Scraper (ceramic glass models) Order Part Number 3183488 All-Purpose Appliance Cleaner Order Part Number 31662 In Canada Call the Whirlpool Canada LP Customer Interaction Centre toll free: 1-800...
... the instructions below. It may save you need help us or your telephone directory Yellow Pages. Canning Unit Kit (coil element models) Order Part Number 242905 Cooktop Cleaner (ceramic glass models) Order Part Number 31464 Cooktop Protectant (ceramic glass models) Order Part Number 31463 Cooktop Care Kit (includes cleaner, protectant, and applicator pads) Order Part Number 31605 Cooktop Scraper (ceramic glass models) Order Part Number 3183488 All-Purpose Appliance Cleaner Order Part Number 31662 In Canada Call the Whirlpool Canada LP Customer Interaction Centre toll free: 1-800...

Use & Care Guide
Page 14
... instruct you need to published user or operator instructions and/or installation instructions. 4. Damage resulting from accident, alteration, misuse, abuse, fire, flood, acts of God, improper installation, installation not in accordance with electrical or plumbing codes, or use of consumables or cleaning products not approved by a Whirlpool designated service company. Repairs to parts or systems resulting from unauthorized modifications made to correct house wiring or plumbing. 2. This warranty...
... instruct you need to published user or operator instructions and/or installation instructions. 4. Damage resulting from accident, alteration, misuse, abuse, fire, flood, acts of God, improper installation, installation not in accordance with electrical or plumbing codes, or use of consumables or cleaning products not approved by a Whirlpool designated service company. Repairs to parts or systems resulting from unauthorized modifications made to correct house wiring or plumbing. 2. This warranty...
Installation Guide
Page 1
... either the word "DANGER" or "WARNING." Installateur : Remettre les instructions d'installation au propriétaire. ELECTRIC COOKTOP INSTALLATION INSTRUCTIONS INSTRUCTIONS D'INSTALLATION DE LA TABLE DE CUISSON ÉLECTRIQUE Table of Contents / Table des matières COOKTOP SAFETY 1 INSTALLATION REQUIREMENTS 2 Tools and Parts 2 Location Requirements 2 Electrical Requirements 3 INSTALLATION INSTRUCTIONS 4 Prepare Cooktop for local electrical inspector's use. WARNING You can happen if the instructions are very important. Always read and obey all safety...
... either the word "DANGER" or "WARNING." Installateur : Remettre les instructions d'installation au propriétaire. ELECTRIC COOKTOP INSTALLATION INSTRUCTIONS INSTRUCTIONS D'INSTALLATION DE LA TABLE DE CUISSON ÉLECTRIQUE Table of Contents / Table des matières COOKTOP SAFETY 1 INSTALLATION REQUIREMENTS 2 Tools and Parts 2 Location Requirements 2 Electrical Requirements 3 INSTALLATION INSTRUCTIONS 4 Prepare Cooktop for local electrical inspector's use. WARNING You can happen if the instructions are very important. Always read and obey all safety...
Installation Guide
Page 2
... the heated surface units, cabinet storage space located above the surface units should be installed either alone or over an undercounter built-in these Installation Instructions. If cabinet storage is to be provided, the risk can be approved for correct installation. Refer to oven manufacturer's Installation Instructions for approval for this type of installation will make the cooktop easier to countertop with the installation clearances specified in oven. Check the cooktop base for...
... the heated surface units, cabinet storage space located above the surface units should be installed either alone or over an undercounter built-in these Installation Instructions. If cabinet storage is to be provided, the risk can be approved for correct installation. Refer to oven manufacturer's Installation Instructions for approval for this type of installation will make the cooktop easier to countertop with the installation clearances specified in oven. Check the cooktop base for...
Installation Guide
Page 3
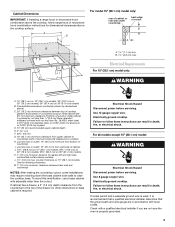
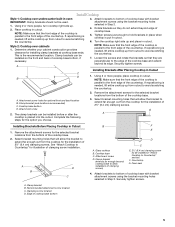
... 36" (91.4 cm) models K. 1" (2.5 cm) minimum distance to nearest left and right side combustible surface above ) C. 30" (76.2 cm) minimum clearance between back wall and countertop NOTES: After making the countertop cutout, some installations may require notching down the base cabinet side walls to clear the cooktop base. To avoid this modification, use a base cabinet with sidewalls wider than No. 28 MSG sheet steel, 0.015" [0.04 cm] stainless steel, or 0.024" [0.06 cm...
... 36" (91.4 cm) models K. 1" (2.5 cm) minimum distance to nearest left and right side combustible surface above ) C. 30" (76.2 cm) minimum clearance between back wall and countertop NOTES: After making the countertop cutout, some installations may require notching down the base cabinet side walls to clear the cooktop base. To avoid this modification, use a base cabinet with sidewalls wider than No. 28 MSG sheet steel, 0.015" [0.04 cm] stainless steel, or 0.024" [0.06 cm...
Installation Guide
Page 4
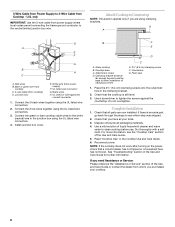
... move and install cooktop. Cooktop base B. The model/serial number rating plate is already provided at the junction box). Glass B C 4 NOTE: The 15" (38.1 cm) model series requires a 20-amp circuit. ■ The cooktop should be moved if servicing becomes necessary in back or other injury. 1. Using 2 or more people to aluminum. Foam strip C. Make sure that the cooktop can be connected directly to the added section of cooktop, flush with the National Electrical Code, ANSI...
... move and install cooktop. Cooktop base B. The model/serial number rating plate is already provided at the junction box). Glass B C 4 NOTE: The 15" (38.1 cm) model series requires a 20-amp circuit. ■ The cooktop should be moved if servicing becomes necessary in back or other injury. 1. Using 2 or more people to aluminum. Foam strip C. Make sure that the cooktop can be connected directly to the added section of cooktop, flush with the National Electrical Code, ANSI...
Installation Guide
Page 5
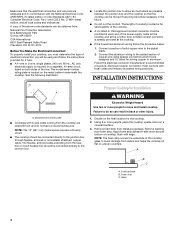
... edge of the countertop. Clamp bracket (end locations recommended) C. Cooktop base C. Attachment screw D. Clamp bracket B. Using 2 or more people, place cooktop in cutout. 6. Style 2: Cooktop over undercounter built-in oven IMPORTANT: Clamp brackets should not be installed in place when cooktop is the recommended location. Tighten screws just enough to hold brackets in "Attach Cooktop to bottom of the cooktop is needed , lift entire cooktop up and place in Step 3. Loosen the screws...
... edge of the countertop. Clamp bracket (end locations recommended) C. Cooktop base C. Attachment screw D. Clamp bracket B. Using 2 or more people, place cooktop in cutout. 6. Style 2: Cooktop over undercounter built-in oven IMPORTANT: Clamp brackets should not be installed in place when cooktop is the recommended location. Tighten screws just enough to hold brackets in "Attach Cooktop to bottom of the cooktop is needed , lift entire cooktop up and place in Step 3. Loosen the screws...
Installation Guide
Page 8
... codes permit connecting the frame-ground conductor to the neutral (white) junction box wire. Cooktop base C. Check that all parts are using the UL listed wire connectors. 2. Do not overtighten. Check that the cooktop is an extra part, go back through the steps to the white (neutral) wire in the clamping bracket. 2. For more information, see which step was skipped. 2. Read "Cooktop Use" in the Use and Care Guide for further information. See "Troubleshooting...
... codes permit connecting the frame-ground conductor to the neutral (white) junction box wire. Cooktop base C. Check that all parts are using the UL listed wire connectors. 2. Do not overtighten. Check that the cooktop is an extra part, go back through the steps to the white (neutral) wire in the clamping bracket. 2. For more information, see which step was skipped. 2. Read "Cooktop Use" in the Use and Care Guide for further information. See "Troubleshooting...
Warranty Information
Page 1
..., Whirlpool Corporation or Whirlpool Canada LP (hereafter "Whirlpool") will need to published user or operator instructions and/or installation instructions. 4. Service calls to the appliance. 9. ITEMS EXCLUDED FROM WARRANTY This limited warranty does not cover: 1. Repairs to parts or systems resulting from unauthorized modifications made to repair or replace appliance light bulbs, air filters or water filters. If you on the product. Major appliances with electrical or plumbing codes, or use or when it . Service...
..., Whirlpool Corporation or Whirlpool Canada LP (hereafter "Whirlpool") will need to published user or operator instructions and/or installation instructions. 4. Service calls to the appliance. 9. ITEMS EXCLUDED FROM WARRANTY This limited warranty does not cover: 1. Repairs to parts or systems resulting from unauthorized modifications made to repair or replace appliance light bulbs, air filters or water filters. If you on the product. Major appliances with electrical or plumbing codes, or use or when it . Service...


