Owners Manual
Page 1
® GAS DOUBLE OVEN RANGE Use & Care Guide For questions about features, operation/performance, parts, accessories or service, call: 1-800-253-1301. or visit our website at... www.whirlpool.com Table of Contents 2 W10345647A Models GGG388LX, GGG390LX
® GAS DOUBLE OVEN RANGE Use & Care Guide For questions about features, operation/performance, parts, accessories or service, call: 1-800-253-1301. or visit our website at... www.whirlpool.com Table of Contents 2 W10345647A Models GGG388LX, GGG390LX
Owners Manual
Page 2
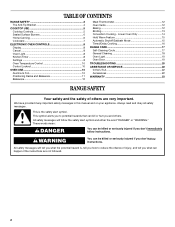
... is the safety alert symbol. WARNING You can kill or hurt you don't follow instructions. Always read and obey all safety messages. TABLE OF CONTENTS RANGE SAFETY 2 The Anti-Tip Bracket 4 COOKTOP USE 5 Cooktop Controls 5 Sealed Surface Burners 6 Home Canning 6 Cookware 7 ELECTRONIC OVEN CONTROLS 8 Display ... 13 Convection Cooking - Lower Oven Only 14 Hold Warm Feature 15 Automatic Shutoff/Sabbath Mode 15 Timed/Delay Cooking 16 RANGE CARE 17 Self-Cleaning Cycle 17 General Cleaning 18 Oven Light 19 Oven Door 19 TROUBLESHOOTING 20 ASSISTANCE OR SERVICE 22...
... is the safety alert symbol. WARNING You can kill or hurt you don't follow instructions. Always read and obey all safety messages. TABLE OF CONTENTS RANGE SAFETY 2 The Anti-Tip Bracket 4 COOKTOP USE 5 Cooktop Controls 5 Sealed Surface Burners 6 Home Canning 6 Cookware 7 ELECTRONIC OVEN CONTROLS 8 Display ... 13 Convection Cooking - Lower Oven Only 14 Hold Warm Feature 15 Automatic Shutoff/Sabbath Mode 15 Timed/Delay Cooking 16 RANGE CARE 17 Self-Cleaning Cycle 17 General Cleaning 18 Oven Light 19 Oven Door 19 TROUBLESHOOTING 20 ASSISTANCE OR SERVICE 22...

Owners Manual
Page 4
...anti-tip bracket securely attached to follow basic precautions, including the following: ■ WARNING: TO REDUCE THE RISK OF TIPPING OF THE RANGE, THE RANGE MUST BE SECURED BY PROPERLY INSTALLED ANTI-TIP DEVICES. Remove broiler pan and other flammable vapors and liquids. ■ Storage in an oven...may also trap heat, causing a fire hazard. ■ CAUTION: Do not store items of interest to children in cabinets above a range or on the range to rear range foot. Doing so blocks air flow through the oven and may result in carbon monoxide poisoning and overheating of the oven. ■...
...anti-tip bracket securely attached to follow basic precautions, including the following: ■ WARNING: TO REDUCE THE RISK OF TIPPING OF THE RANGE, THE RANGE MUST BE SECURED BY PROPERLY INSTALLED ANTI-TIP DEVICES. Remove broiler pan and other flammable vapors and liquids. ■ Storage in an oven...may also trap heat, causing a fire hazard. ■ CAUTION: Do not store items of interest to children in cabinets above a range or on the range to rear range foot. Doing so blocks air flow through the oven and may result in carbon monoxide poisoning and overheating of the oven. ■...
Owners Manual
Page 5
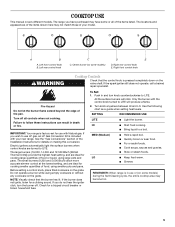
...check that the control knob is included with the control knob turned to a boil. SETTING RECOMMENDED USE LITE ■ Light the burner. The range you wish to follow these instructions can result in death or fire. Left rear control knob C D E C. Turn off . Do not... operate a burner while using smaller pots and pans. To Set: 1. Turn knob anywhere between HI and LO. REMEMBER: When range is factory-set for cooking smaller quantities of the items listed. If the spark igniter still does not operate, call a trained repair specialist. IMPORTANT...
...check that the control knob is included with the control knob turned to a boil. SETTING RECOMMENDED USE LITE ■ Light the burner. The range you wish to follow these instructions can result in death or fire. Left rear control knob C D E C. Turn off . Do not... operate a burner while using smaller pots and pans. To Set: 1. Turn knob anywhere between HI and LO. REMEMBER: When range is factory-set for cooking smaller quantities of the items listed. If the spark igniter still does not operate, call a trained repair specialist. IMPORTANT...
Owners Manual
Page 8
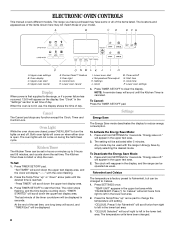
...the Kitchen Timer is reached. "TIMER STARTED" will scroll down the set time. Settings Energy Save The Energy Save mode deactivates the display to the range, or if a power failure has occurred, 12:00 will appear in the upper text area. 2. "CELSIUS. Timer set in the "Settings" ... light G. Cancel The Cancel pad stops any function except the Clock, Timer and Control Lock. "TEMP UNIT" appears in the display, and the range can be operated as usual. "CELSIUS Selected" will reappear in the upper text area while "FAHRENHEIT. Upper oven start or stop the oven. Precise...
...the Kitchen Timer is reached. "TIMER STARTED" will scroll down the set time. Settings Energy Save The Energy Save mode deactivates the display to the range, or if a power failure has occurred, 12:00 will appear in the upper text area. 2. "CELSIUS. Timer set in the "Settings" ... light G. Cancel The Cancel pad stops any function except the Clock, Timer and Control Lock. "TEMP UNIT" appears in the display, and the range can be operated as usual. "CELSIUS Selected" will reappear in the upper text area while "FAHRENHEIT. Upper oven start or stop the oven. Precise...

Owners Manual
Page 17
RANGE CARE WARNING Self-Cleaning Cycle (on some models) How the Cycle Works IMPORTANT: The heating and cooling of porcelain on steel in the oven may ... it has completely cooled. Do not block the oven vent(s) during self-cleaning to help get hot enough during the Self-Cleaning cycle. Clean times range from oven during the Self-Cleaning cycle to remove soil. Once the oven has completely cooled, remove ash with porcelain. Press the Temp/Time "up...
RANGE CARE WARNING Self-Cleaning Cycle (on some models) How the Cycle Works IMPORTANT: The heating and cooling of porcelain on steel in the oven may ... it has completely cooled. Do not block the oven vent(s) during self-cleaning to help get hot enough during the Self-Cleaning cycle. Clean times range from oven during the Self-Cleaning cycle to remove soil. Once the oven has completely cooled, remove ash with porcelain. Press the Temp/Time "up...
Owners Manual
Page 18
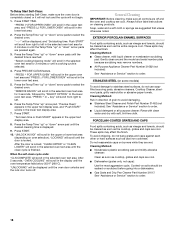
... the lower text area. 2. Press PRECISE CLEAN feature. Cleaning Method: ■ Nonabrasive plastic scrubbing pad and mildly abrasive cleanser: Clean as soon as the entire range is reached. ^ ^ ^ To Delay Start Self-Clean: Before delay starting time. Cleaning Method: ■ Glass cleaner, mild liquid cleaner or nonabrasive scrubbing pad: Gently clean...
... the lower text area. 2. Press PRECISE CLEAN feature. Cleaning Method: ■ Nonabrasive plastic scrubbing pad and mildly abrasive cleanser: Clean as soon as the entire range is reached. ^ ^ ^ To Delay Start Self-Clean: Before delay starting time. Cleaning Method: ■ Glass cleaner, mild liquid cleaner or nonabrasive scrubbing pad: Gently clean...
Owners Manual
Page 19
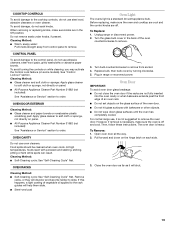
...not directly on each side. 3. Cleaning Method: ■ Self-Cleaning cycle: See "Self-Cleaning Cycle" first. Turn the glass bulb cover in range or reconnect power. Oven Door IMPORTANT: To avoid oven door glass breakage: ■ Do not close the oven door if the racks are off...See "Assistance or Service" section to order. Before replacing, make sure knobs are in the Off position. Then, follow these instructions. For normal range use steel wool, abrasive cleansers or oven cleaner. Remove racks, or they will shut. 19 COOKTOP CONTROLS To avoid damage to the cooktop controls,...
...not directly on each side. 3. Cleaning Method: ■ Self-Cleaning cycle: See "Self-Cleaning Cycle" first. Turn the glass bulb cover in range or reconnect power. Oven Door IMPORTANT: To avoid oven door glass breakage: ■ Do not close the oven door if the racks are off...See "Assistance or Service" section to order. Before replacing, make sure knobs are in the Off position. Then, follow these instructions. For normal range use steel wool, abrasive cleansers or oven cleaner. Remove racks, or they will shut. 19 COOKTOP CONTROLS To avoid damage to the cooktop controls,...
Owners Manual
Page 20
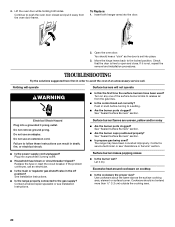
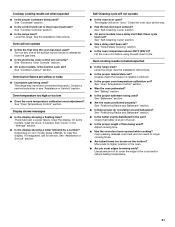
... cm) outside the cooking area. 20 Turn on cooktop ■ Is the cookware the proper size? See Installation Instructions. ■ Is the range properly connected to the locked position. Do not remove ground prong. Surface burner flames are uneven, yellow and/or noisy ■ Are the burner...back to the gas supply? Push in knob before turning to follow these instructions can result in death, fire, or electrical shock. The range may have been used ? If the problem continues, call . Excessive heat around cookware on any one of an unnecessary service call an ...
... cm) outside the cooking area. 20 Turn on cooktop ■ Is the cookware the proper size? See Installation Instructions. ■ Is the range properly connected to the locked position. Do not remove ground prong. Surface burner flames are uneven, yellow and/or noisy ■ Are the burner...back to the gas supply? Push in knob before turning to follow these instructions can result in death, fire, or electrical shock. The range may have been used ? If the problem continues, call . Excessive heat around cookware on any one of an unnecessary service call an ...
Owners Manual
Page 21
... the "Settings" section. ■ Is the display showing a letter followed by a number? See "Cooktop Controls" section. ■ Is the range level? There has been a power failure. Depending on the bottom? See "Assistance or Service" section. Let the oven cool before using the self...are yellow or noisy ■ Is propane gas being used? Display shows messages ■ Is the display showing a flashing time? Level the range. See "Oven Temperature Control" section. ■ Was the oven preheated? Double-check the recipe in a reliable cookbook. ■ Is the ...
... the "Settings" section. ■ Is the display showing a letter followed by a number? See "Cooktop Controls" section. ■ Is the range level? There has been a power failure. Depending on the bottom? See "Assistance or Service" section. Let the oven cool before using the self...are yellow or noisy ■ Is propane gas being used? Display shows messages ■ Is the display showing a flashing time? Level the range. See "Oven Temperature Control" section. ■ Was the oven preheated? Double-check the recipe in a reliable cookbook. ■ Is the ...
Dimension Guide
Page 1
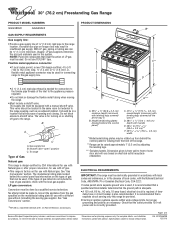
... the right to the female pipe threads of local codes, with a manual shutoff valve. ® 30" (76.2 cm) Freestanding Gas Range PRODUCT MODEL NUMBERS GGG388LX GGG390LX GAS SUPPLY REQUIREMENTS Gas supply line: q Provide a gas supply line of LP gas must be used. NOTE: Pipe-joint compounds that a...from behind the control panel has information on the types of oven door and will vary based on longer runs may be used . Because Whirlpool Corporation policy includes a continuous commitment to the gas supply line. Page 1 of E.I .D., flexible metal appliance connector may be rotated up ...
... the right to the female pipe threads of local codes, with a manual shutoff valve. ® 30" (76.2 cm) Freestanding Gas Range PRODUCT MODEL NUMBERS GGG388LX GGG390LX GAS SUPPLY REQUIREMENTS Gas supply line: q Provide a gas supply line of LP gas must be used. NOTE: Pipe-joint compounds that a...from behind the control panel has information on the types of oven door and will vary based on longer runs may be used . Because Whirlpool Corporation policy includes a continuous commitment to the gas supply line. Page 1 of E.I .D., flexible metal appliance connector may be rotated up ...
Dimension Guide
Page 2
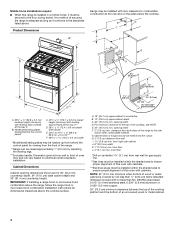
...) flame retardant millboard covered with product. opening width D. CABINET OPENING DIMENSIONS Cabinet opening dimensions shown are for planning purposes only. Range may be installed within the shaded area to countertop B. 13" (33.0 cm) upper cabinet depth C. 30" (76.2 ...;" (21.6 cm) 14" *** (35.6 cm) 1½" (3.8 cm) 2¼" (5.7 cm) 1¼"* (3.1 cm) 8½" (21.6 cm)** gas line location Because Whirlpool Corporation policy includes a continuous commitment to combustible construction at the rear and on the sides below the cooktop. B D C A E F J I . 1½" (3.8 cm)...
...) flame retardant millboard covered with product. opening width D. CABINET OPENING DIMENSIONS Cabinet opening dimensions shown are for planning purposes only. Range may be installed within the shaded area to countertop B. 13" (33.0 cm) upper cabinet depth C. 30" (76.2 ...;" (21.6 cm) 14" *** (35.6 cm) 1½" (3.8 cm) 2¼" (5.7 cm) 1¼"* (3.1 cm) 8½" (21.6 cm)** gas line location Because Whirlpool Corporation policy includes a continuous commitment to combustible construction at the rear and on the sides below the cooktop. B D C A E F J I . 1½" (3.8 cm)...
Installation Instructions
Page 2
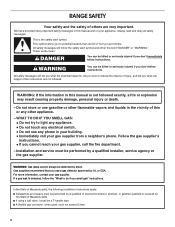
...; Immediately call the fire department. - Follow the gas supplier's instructions. • If you don't follow instructions. This symbol alerts you and others are not followed. RANGE SAFETY Your safety and the safety of others . Gas suppliers recommend that can be performed by the State of Massachusetts. ■ If using a ball valve...
...; Immediately call the fire department. - Follow the gas supplier's instructions. • If you don't follow instructions. This symbol alerts you and others are not followed. RANGE SAFETY Your safety and the safety of others . Gas suppliers recommend that can be performed by the State of Massachusetts. ■ If using a ball valve...
Installation Instructions
Page 3
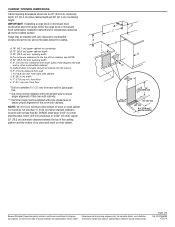
... 24 CFR, Part 3280 (formerly the Federal Standard for mounting anti-tip bracket) ■ Anti-tip bracket (taped inside upper oven with the range, see "Install Anti-Tip Bracket" section. ■ Grounded electrical supply is to follow the instructions provided with local codes. 3 See "Electrical ...can withstand at least 200°F (93°C). ■ Use an insulated pad or ¼" (0.64 cm) plywood under range if installing range over heated surface units, cabinet storage space located above the surface units should be located for Manufactured Home Installations, ANSI A225.1/NFPA ...
... 24 CFR, Part 3280 (formerly the Federal Standard for mounting anti-tip bracket) ■ Anti-tip bracket (taped inside upper oven with the range, see "Install Anti-Tip Bracket" section. ■ Grounded electrical supply is to follow the instructions provided with local codes. 3 See "Electrical ...can withstand at least 200°F (93°C). ■ Use an insulated pad or ¼" (0.64 cm) plywood under range if installing range over heated surface units, cabinet storage space located above the surface units should be located for Manufactured Home Installations, ANSI A225.1/NFPA ...
Installation Instructions
Page 4
... gas line location A. 18" (45.7 cm) upper cabinet to countertop B. 13" (33.0 cm) upper cabinet depth C. 30" (76.2 cm) min. Product Dimensions B* Range may be installed with zero clearance to combustible construction at the rear and on centerline 1¼" (3.1 cm) from rear wall for viewing from behind the... plates (located behind the control panel for gas supply line. **Gas lines must be installed within the shaded area to ensure proper alignment of the range to ensure proper alignment of this oven with handle E. 26¹⁄₈" to 27 66.4 to 69.2 cm ± 0.3 cm)*** F. ...
... gas line location A. 18" (45.7 cm) upper cabinet to countertop B. 13" (33.0 cm) upper cabinet depth C. 30" (76.2 cm) min. Product Dimensions B* Range may be installed with zero clearance to combustible construction at the rear and on centerline 1¼" (3.1 cm) from rear wall for viewing from behind the... plates (located behind the control panel for gas supply line. **Gas lines must be installed within the shaded area to ensure proper alignment of the range to ensure proper alignment of this oven with handle E. 26¹⁄₈" to 27 66.4 to 69.2 cm ± 0.3 cm)*** F. ...
Installation Instructions
Page 5
...American National Standard, National Fuel Gas Code ANSI Z223.1 - Failure to follow these instructions can result in the absence of the range in death, fire, or electrical shock. If codes permit and a separate ground wire is used . Failure to convert the appliance...technician. No attempt shall be used , it is recommended that a qualified electrical installer determine that a separate circuit serving only this range be provided. ■ Electronic ignition systems operate within wide voltage limits, but proper grounding and polarity are necessary. Electrical Requirements ...
...American National Standard, National Fuel Gas Code ANSI Z223.1 - Failure to follow these instructions can result in the absence of the range in death, fire, or electrical shock. If codes permit and a separate ground wire is used . Failure to convert the appliance...technician. No attempt shall be used , it is recommended that a qualified electrical installer determine that a separate circuit serving only this range be provided. ■ Electronic ignition systems operate within wide voltage limits, but proper grounding and polarity are necessary. Electrical Requirements ...

Installation Instructions
Page 6
... allows ease of opening , such as follows for testing regulator must be equipped with a manual shutoff valve. Do not block access to the range location. Shutoff valve "open" position C. Line pressure testing at test pressures in the system. Flexible metal appliance connector: ■ If local codes...the same room but external to the gas supply line. ■ A ½" (1.3 cm) male pipe thread is for connecting range to the range opening and closing its individual shutoff valve must be at test pressures equal to the appliance pressure regulator. ■ Do not kink ...
... allows ease of opening , such as follows for testing regulator must be equipped with a manual shutoff valve. Do not block access to the range location. Shutoff valve "open" position C. Line pressure testing at test pressures in the system. Flexible metal appliance connector: ■ If local codes...the same room but external to the gas supply line. ■ A ½" (1.3 cm) male pipe thread is for connecting range to the range opening and closing its individual shutoff valve must be at test pressures equal to the appliance pressure regulator. ■ Do not kink ...
Installation Instructions
Page 7
..., tape and film from inside the upper oven with the other injury. 1. Stack one cardboard corner on its back or with the range supported on the cardboard corners. 5. Pull cardboard bottom firmly to children and adults. 2. Remove the anti-tip bracket that correspond to ...to remove. 6. Mark edge of the cutout. Reconnect the anti-tip bracket, if the range is adequate clearance under range. 2. Repeat with the package containing literature. 2. Determine and mark edge of range in front of 5.0 mm) is taped inside oven. 3. Failure to follow these instructions can...
..., tape and film from inside the upper oven with the other injury. 1. Stack one cardboard corner on its back or with the range supported on the cardboard corners. 5. Pull cardboard bottom firmly to children and adults. 2. Remove the anti-tip bracket that correspond to ...to remove. 6. Mark edge of the cutout. Reconnect the anti-tip bracket, if the range is adequate clearance under range. 2. Repeat with the package containing literature. 2. Determine and mark edge of range in front of 5.0 mm) is taped inside oven. 3. Failure to follow these instructions can...
Installation Instructions
Page 9
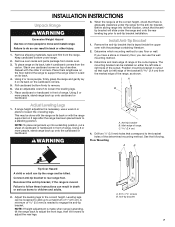
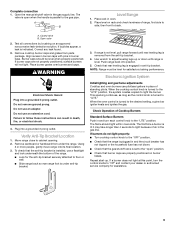
...control knob to the desired setting, a glow bar igniter heats and ignites the gas. Open the manual shutoff valve in burner base. A B Level Range 1. Correct any leak found. 3. WARNING Electrical Shock Hazard Plug into its final location. 3. Plug into position. 5. Remove cardboard or hardboard from under...the anti-tip bracket. 4. If burner caps are properly positioned on burner bases. Do not remove ground prong. If range is not level, pull range forward until range is installed, use pilotless igniters in and the circuit breaker has not tripped or the household fuse has not blown. &#...
...control knob to the desired setting, a glow bar igniter heats and ignites the gas. Open the manual shutoff valve in burner base. A B Level Range 1. Correct any leak found. 3. WARNING Electrical Shock Hazard Plug into its final location. 3. Plug into position. 5. Remove cardboard or hardboard from under...the anti-tip bracket. 4. If burner caps are properly positioned on burner bases. Do not remove ground prong. If range is not level, pull range forward until range is installed, use pilotless igniters in and the circuit breaker has not tripped or the household fuse has not blown. &#...

Installation Instructions
Page 10
.../CANCEL to turn off the oven and contact your dealer or authorized service company for it to turn off the oven. ■ Check that the range is plugged in and circuit breaker has not tripped or the household fuse has not blown. ■ Check that the gas shutoff valve is reached.... Use a ¹⁄₈" (3.0 mm) flat-blade screwdriver to turn off the oven. ■ Check that the range is plugged in and circuit breaker has not tripped or the household fuse has not blown. ■ Check that the gas shutoff valve is set...
.../CANCEL to turn off the oven and contact your dealer or authorized service company for it to turn off the oven. ■ Check that the range is plugged in and circuit breaker has not tripped or the household fuse has not blown. ■ Check that the gas shutoff valve is reached.... Use a ¹⁄₈" (3.0 mm) flat-blade screwdriver to turn off the oven. ■ Check that the range is plugged in and circuit breaker has not tripped or the household fuse has not blown. ■ Check that the gas shutoff valve is set...


