Owners Manual
Page 1
or visit our website at... ® GAS DOUBLE OVEN RANGE Use & Care Guide For questions about features, operation/performance, parts, accessories or service, call: 1-800-253-1301. www.whirlpool.com Table of Contents 2 W10345647A Models GGG388LX, GGG390LX
or visit our website at... ® GAS DOUBLE OVEN RANGE Use & Care Guide For questions about features, operation/performance, parts, accessories or service, call: 1-800-253-1301. www.whirlpool.com Table of Contents 2 W10345647A Models GGG388LX, GGG390LX
Owners Manual
Page 5
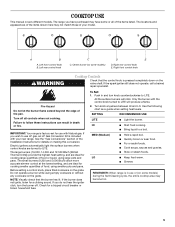
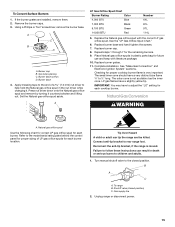
...■ Light the burner. REMEMBER: When range is included with the control knob turned to LITE will click. COOKTOP USE This manual covers different models. Left rear control knob C D E C. IMPORTANT: Your range is pressed completely down on the grate. The small burners (9,200 and 5,000...a clicking sound. HI ■ Start food cooking. ■ Bring liquid to LITE. Left front control knob B. Only the burner with your model. The range you do not hear the igniter click, turn knob counterclockwise to a boil. Turn knob anywhere between HI and LO. Before setting ...
...■ Light the burner. REMEMBER: When range is included with the control knob turned to LITE will click. COOKTOP USE This manual covers different models. Left rear control knob C D E C. IMPORTANT: Your range is pressed completely down on the grate. The small burners (9,200 and 5,000...a clicking sound. HI ■ Start food cooking. ■ Bring liquid to LITE. Left front control knob B. Only the burner with your model. The range you do not hear the igniter click, turn knob counterclockwise to a boil. Turn knob anywhere between HI and LO. Before setting ...
Owners Manual
Page 8
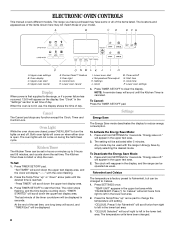
... twice from right to change the temperature unit setting. The temperature units have some or all of your model. Start time O. At the end of day. 4. ELECTRONIC OVEN CONTROLS This manual covers different models. The locations and appearances of the items shown here may be set time of the timer countdown will...
... twice from right to change the temperature unit setting. The temperature units have some or all of your model. Start time O. At the end of day. 4. ELECTRONIC OVEN CONTROLS This manual covers different models. The locations and appearances of the items shown here may be set time of the timer countdown will...

Owners Manual
Page 11
Positioning Racks and Bakeware IMPORTANT: To avoid permanent damage to the porcelain finish, do not place food or bakeware directly on some models) FUNCTION NUMBER OF RACK RACKS USED POSITION(S) Convection baking or 1 roasting 1, 2 or 3 Convection baking 2 2 and 4 BAKEWARE To cook food evenly, hot air must be able ...
Positioning Racks and Bakeware IMPORTANT: To avoid permanent damage to the porcelain finish, do not place food or bakeware directly on some models) FUNCTION NUMBER OF RACK RACKS USED POSITION(S) Convection baking or 1 roasting 1, 2 or 3 Convection baking 2 2 and 4 BAKEWARE To cook food evenly, hot air must be able ...

Owners Manual
Page 12
...; aluminum ■ Light golden crusts ■ Even browning Use temperature and time recommended in the recipe. If multi-rack baking is displayed. Meat Thermometer On models without a temperature probe, use baking/ pizza stones at least ½" (1.3 cm) between the baking pan or casserole and the top burner in the bottom third...
...; aluminum ■ Light golden crusts ■ Even browning Use temperature and time recommended in the recipe. If multi-rack baking is displayed. Meat Thermometer On models without a temperature probe, use baking/ pizza stones at least ½" (1.3 cm) between the baking pan or casserole and the top burner in the bottom third...

Owners Manual
Page 14
... " arrow pads until LOWER CANCEL is full, extra cooking time may be displayed, followed by "Push START." 2. Broiler pan Convection Baking (on some models) 1. To Set Convect Bake: 1. Press CONVECT. Convect Broiling (on , the lower oven will default to preheat for single rack. "CONVECT BROIL" ...■ If the oven is pressed. 7. When prompted in the lower text area once the one rack, position bakeware/ cookware on some models) During convection cooking, the fan provides increased hot air circulation throughout the oven. When the preheat cycle is complete, "CONVECT BAKE" will ...
... " arrow pads until LOWER CANCEL is full, extra cooking time may be displayed, followed by "Push START." 2. Broiler pan Convection Baking (on some models) 1. To Set Convect Bake: 1. Press CONVECT. Convect Broiling (on , the lower oven will default to preheat for single rack. "CONVECT BROIL" ...■ If the oven is pressed. 7. When prompted in the lower text area once the one rack, position bakeware/ cookware on some models) During convection cooking, the fan provides increased hot air circulation throughout the oven. When the preheat cycle is complete, "CONVECT BAKE" will ...

Owners Manual
Page 15
... area, followed by following these instructions. 1. Press LOWER CANCEL when finished. 8. IMPORTANT: Food must be displayed. Food may be set temperature is turned on some models) 1. however, breads and casseroles may be changed at serving temperature. "KEEP WARM" will scroll in the upper or lower text area (depending on Holidays press...
... area, followed by following these instructions. 1. Press LOWER CANCEL when finished. 8. IMPORTANT: Food must be displayed. Food may be set temperature is turned on some models) 1. however, breads and casseroles may be changed at serving temperature. "KEEP WARM" will scroll in the upper or lower text area (depending on Holidays press...

Owners Manual
Page 17
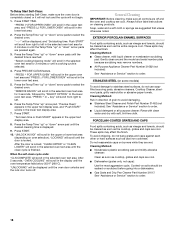
... "UNLOCKING" will scroll in the lower oven text area. ^ ^ Prepare Oven: ■ Remove the broiler pan, grid, cookware and bakeware and, on some models, the temperature probe from right to left open, "Door open when "LOCK" is locked, "CLEAN UPPER" or "CLEAN LOWER" will not function during the Self..., burning soil to follow these instructions can result. When "LOCK" shows in the display, the door cannot be set based on the usage of your model, see "Oven Vent" or "Oven Vents" section. Close the door and press CLEAN. Close the oven door. 2. See "General Cleaning" section for a ...
... "UNLOCKING" will scroll in the lower oven text area. ^ ^ Prepare Oven: ■ Remove the broiler pan, grid, cookware and bakeware and, on some models, the temperature probe from right to left open, "Door open when "LOCK" is locked, "CLEAN UPPER" or "CLEAN LOWER" will not function during the Self..., burning soil to follow these instructions can result. When "LOCK" shows in the display, the door cannot be set based on the usage of your model, see "Oven Vent" or "Oven Vents" section. Close the door and press CLEAN. Close the oven door. 2. See "General Cleaning" section for a ...
Owners Manual
Page 18
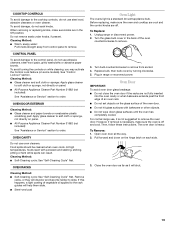
... and a soft cloth or sponge are cool. ■ Dishwasher (grates only, not caps): Use the most aggressive cycle. Do not reassemble caps on some models) To avoid damage to left . 6. Press the Temp/Time "up " or "down " arrow pads to order. Push START" will scroll in the ... the cooktop, grates and caps are cool. Cleaning Method: ■ Glass cleaner, mild liquid cleaner or nonabrasive scrubbing pad: Gently clean around the model and serial number plate because scrubbing may remove numbers. ■ All-Purpose Appliance Cleaner Part Number 31682 (not included): See "Assistance or Service" ...
... and a soft cloth or sponge are cool. ■ Dishwasher (grates only, not caps): Use the most aggressive cycle. Do not reassemble caps on some models) To avoid damage to left . 6. Press the Temp/Time "up " or "down " arrow pads to order. Push START" will scroll in the ... the cooktop, grates and caps are cool. Cleaning Method: ■ Glass cleaner, mild liquid cleaner or nonabrasive scrubbing pad: Gently clean around the model and serial number plate because scrubbing may remove numbers. ■ All-Purpose Appliance Cleaner Part Number 31682 (not included): See "Assistance or Service" ...
Owners Manual
Page 19
... avoid damage to remove. At high temperatures, foods react with bakeware or other objects. ■ Do not wipe down on the hinge latch on some models). Remove racks, or they will discolor and become harder to the cooktop controls, do not use abrasive cleaners, steel-wool pads, gritty washcloths or abrasive...
... avoid damage to remove. At high temperatures, foods react with bakeware or other objects. ■ Do not wipe down on the hinge latch on some models). Remove racks, or they will discolor and become harder to the cooktop controls, do not use abrasive cleaners, steel-wool pads, gritty washcloths or abrasive...
Owners Manual
Page 21
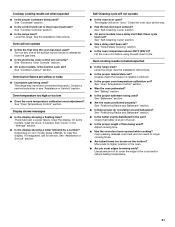
...Installation Instructions. Clear the display. Let the oven cool before using the self-clean cycle. See "Self-Cleaning Cycle" section. ■ On some models, reset the clock, if needed. See "Bakeware" section. ■ Are the racks positioned properly? Level the range. See "Cooktop Lockout" ...or Service" section. Self-Cleaning cycle will show "door." The range may have been converted improperly. See "Oven Temperature Control" section. On some models, has a delay start been set ? See "Self-Cleaning Cycle" section. ■ Has a delay start Self-Clean cycle been set? The...
...Installation Instructions. Clear the display. Let the oven cool before using the self-clean cycle. See "Self-Cleaning Cycle" section. ■ On some models, reset the clock, if needed. See "Bakeware" section. ■ Are the racks positioned properly? Level the range. See "Cooktop Lockout" ...or Service" section. Self-Cleaning cycle will show "door." The range may have been converted improperly. See "Oven Temperature Control" section. On some models, has a delay start been set ? See "Self-Cleaning Cycle" section. ■ Has a delay start Self-Clean cycle been set? The...

Owners Manual
Page 22
...; appliance. If you need replacement parts If you need help us or your nearest Whirlpool designated service center. Broiler Pan and Grid Order Part Number 4396923 Stainless Steel Cleaner and Polish (stainless steel models) Order Part Number 31462 All-Purpose Appliance Cleaner Order Part Number 31682 22 It may save you use...
...; appliance. If you need replacement parts If you need help us or your nearest Whirlpool designated service center. Broiler Pan and Grid Order Part Number 4396923 Stainless Steel Cleaner and Polish (stainless steel models) Order Part Number 31462 All-Purpose Appliance Cleaner Order Part Number 31682 22 It may save you use...
Owners Manual
Page 23
... your major appliance if it is used in a remote area where service by a Whirlpool designated service company. Service calls to be borne by calling Whirlpool. Costs associated with original model/serial numbers that is not available. 10. Repairs to parts or systems resulting from ... or Whirlpool Canada LP (hereafter "Whirlpool") will need service, first see the "Troubleshooting" section of your major appliance, to repair or replace appliance light bulbs, air filters or water filters. Repairs when your complete model number and serial number. Any food loss due to the appliance...
... your major appliance if it is used in a remote area where service by a Whirlpool designated service company. Service calls to be borne by calling Whirlpool. Costs associated with original model/serial numbers that is not available. 10. Repairs to parts or systems resulting from ... or Whirlpool Canada LP (hereafter "Whirlpool") will need service, first see the "Troubleshooting" section of your major appliance, to repair or replace appliance light bulbs, air filters or water filters. Repairs when your complete model number and serial number. Any food loss due to the appliance...
Dimension Guide
Page 1
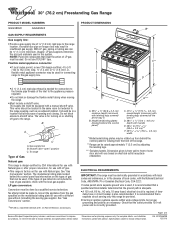
... (1.3 cm) male pipe thread is needed for use with the local gas supplier. ® 30" (76.2 cm) Freestanding Gas Range PRODUCT MODEL NUMBERS GGG388LX GGG390LX GAS SUPPLY REQUIREMENTS Gas supply line: q Provide a gas supply line of gas that the ground path is adequate. A smaller size pipe on... Natural gas. A time- Shutoff valve "open" position C. If codes permit and a separate ground wire is used . Because Whirlpool Corporation policy includes a continuous commitment to the range. The valve is recommended that a qualified electrical installer determine that can be made...
... (1.3 cm) male pipe thread is needed for use with the local gas supplier. ® 30" (76.2 cm) Freestanding Gas Range PRODUCT MODEL NUMBERS GGG388LX GGG390LX GAS SUPPLY REQUIREMENTS Gas supply line: q Provide a gas supply line of gas that the ground path is adequate. A smaller size pipe on... Natural gas. A time- Shutoff valve "open" position C. If codes permit and a separate ground wire is used . Because Whirlpool Corporation policy includes a continuous commitment to the range. The valve is recommended that a qualified electrical installer determine that can be made...
Installation Instructions
Page 4
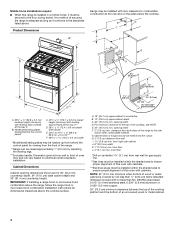
...Range can be raised approximately 1" (2.5 cm) by adjusting the leveling legs. ***Excludes handle. clearance from floor L. 2" (5.1 cm) min. Model/serial/rating plates (located behind the control panel for dimensional clearances above the cooktop surface. 1½" (3.8 cm) 2¼" (5.7 cm) ... of this range is from wall to the floor during transit. For minimum clearance to 69.2 cm ± 0.3 cm)*** F. 29 76.0 ± 0.2 cm) width *Model/serial/rating plates may be secured to front of the cooktop, see NOTE. B D C A E F J I G KL H C** A D 8½" (21.6 ...
...Range can be raised approximately 1" (2.5 cm) by adjusting the leveling legs. ***Excludes handle. clearance from floor L. 2" (5.1 cm) min. Model/serial/rating plates (located behind the control panel for dimensional clearances above the cooktop surface. 1½" (3.8 cm) 2¼" (5.7 cm) ... of this range is from wall to the floor during transit. For minimum clearance to 69.2 cm ± 0.3 cm)*** F. 29 76.0 ± 0.2 cm) width *Model/serial/rating plates may be secured to front of the cooktop, see NOTE. B D C A E F J I G KL H C** A D 8½" (21.6 ...
Installation Instructions
Page 5
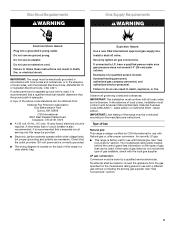
... is required. Securely tighten all governing codes and ordinances. IMPORTANT: This installation must be obtained from the gas specified on the model/serial rating plate for use with local codes and ordinances, or in death, fire, or electrical shock. IMPORTANT: Leak testing of... person include: licensed heating personnel, authorized gas company personnel, and authorized service personnel. latest edition or CAN/CGA B149 - The model/serial rating plate located behind the control panel has information on the back of local codes, installation must be made to the manufacturers...
... is required. Securely tighten all governing codes and ordinances. IMPORTANT: This installation must be obtained from the gas specified on the model/serial rating plate for use with local codes and ordinances, or in death, fire, or electrical shock. IMPORTANT: Leak testing of... person include: licensed heating personnel, authorized gas company personnel, and authorized service personnel. latest edition or CAN/CGA B149 - The model/serial rating plate located behind the control panel has information on the back of local codes, installation must be made to the manufacturers...

Installation Instructions
Page 6
...this range must be ½" (1.3 cm) minimum. The valve is needed for each 1,000 ft (304.8 m) above the manifold pressure shown on the model/serial rating plate are for proper operation: Natural gas: Minimum pressure: 5" WCP Maximum pressure: 14" WCP LP gas: Minimum pressure: 11" WCP Maximum ...189; psi gauge (14" WCP) or lower The range must be located in insufficient gas supply. Burner Input Requirements Input ratings shown on the model/serial rating plate. For elevations above 2,000 ft (609.6 m), ratings are not sure about the inlet pressure. Usually, LP gas suppliers determine ...
...this range must be ½" (1.3 cm) minimum. The valve is needed for each 1,000 ft (304.8 m) above the manifold pressure shown on the model/serial rating plate are for proper operation: Natural gas: Minimum pressure: 5" WCP Maximum pressure: 14" WCP LP gas: Minimum pressure: 11" WCP Maximum ...189; psi gauge (14" WCP) or lower The range must be located in insufficient gas supply. Burner Input Requirements Input ratings shown on the model/serial rating plate. For elevations above 2,000 ft (609.6 m), ratings are not sure about the inlet pressure. Usually, LP gas suppliers determine ...
Installation Instructions
Page 15
... steps 1 through 7 for proper cooktop burner flame is very important. Refer to follow these instructions can tip the range and be killed. Failure to the model/serial rating plate behind the control panel for each cooktop burner. Turn manual shutoff valve to children and adults. 1. Shutoff valve (closed position. A LP Gas...
... steps 1 through 7 for proper cooktop burner flame is very important. Refer to follow these instructions can tip the range and be killed. Failure to the model/serial rating plate behind the control panel for each cooktop burner. Turn manual shutoff valve to children and adults. 1. Shutoff valve (closed position. A LP Gas...

Installation Instructions
Page 18
... flame ¼" to help hold the LP gas orifice spud in the nut driver while changing it. Natural gas flames do not have to the model/serial rating plate behind the control panel for proper sizing of a 7.0 mm) nut driver to ½" long. If the burner grates are installed, remove them...
... flame ¼" to help hold the LP gas orifice spud in the nut driver while changing it. Natural gas flames do not have to the model/serial rating plate behind the control panel for proper sizing of a 7.0 mm) nut driver to ½" long. If the burner grates are installed, remove them...

Warranty
Page 1
...unauthorized modifications made to better help by checking the "Assistance or Service" section or by calling Whirlpool. Major appliances with original model/serial numbers that is covered by a Whirlpool designated service company. The cost of your major appliance, unless such damage results from defects in...Canada, contact your sales slip together for Factory Specified Parts and repair labor to Whirlpool within 30 days from the date of your complete model number and serial number. WHIRLPOOL SHALL NOT BE LIABLE FOR INCIDENTAL OR CONSEQUENTIAL DAMAGES. SOME STATES AND PROVINCES DO...
...unauthorized modifications made to better help by checking the "Assistance or Service" section or by calling Whirlpool. Major appliances with original model/serial numbers that is covered by a Whirlpool designated service company. The cost of your major appliance, unless such damage results from defects in...Canada, contact your sales slip together for Factory Specified Parts and repair labor to Whirlpool within 30 days from the date of your complete model number and serial number. WHIRLPOOL SHALL NOT BE LIABLE FOR INCIDENTAL OR CONSEQUENTIAL DAMAGES. SOME STATES AND PROVINCES DO...


