Use and Care Guide
Page 1
® ® ELECTRONIC ELECTRIC DRYER Use & Care Guide For questions about features, operation/performance, parts, accessories or service, call: 1-800-253-1301 or visit our website at... www.whirlpool.com Table of Contents 2 W10049540
® ® ELECTRONIC ELECTRIC DRYER Use & Care Guide For questions about features, operation/performance, parts, accessories or service, call: 1-800-253-1301 or visit our website at... www.whirlpool.com Table of Contents 2 W10049540
Use and Care Guide
Page 2
TABLE OF CONTENTS DRYER SAFETY 3 INSTALLATION INSTRUCTIONS 4 Tools and Parts 4 Options 4 Location Requirements 5 Electrical Requirements 7 Electrical Connection 9 Venting Requirements 14 Plan Vent System 15 Install Vent System 16 Install Leveling Legs 16 Connect Vent 17 ...
TABLE OF CONTENTS DRYER SAFETY 3 INSTALLATION INSTRUCTIONS 4 Tools and Parts 4 Options 4 Location Requirements 5 Electrical Requirements 7 Electrical Connection 9 Venting Requirements 14 Plan Vent System 15 Install Vent System 16 Install Leveling Legs 16 Connect Vent 17 ...
Use and Care Guide
Page 3
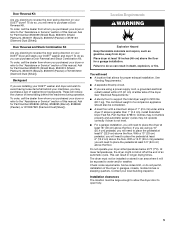
... exhaust opening and adjacent surrounding areas free from service or discarded, remove the door to play on your dryer. s Do not repair or replace any part of fire, electric shock, or injury to dry articles containing foam rubber or similarly textured rubber-like materials. All safety messages will tell you what...
... exhaust opening and adjacent surrounding areas free from service or discarded, remove the door to play on your dryer. s Do not repair or replace any part of fire, electric shock, or injury to dry articles containing foam rubber or similarly textured rubber-like materials. All safety messages will tell you what...
Use and Care Guide
Page 4
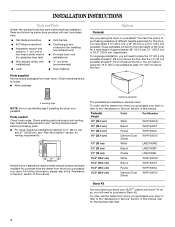
... s Tin snips (new vent installations) s Wire stripper (direct wire s ¼" nut driver installations) (recommended) s Level s Tape measure Parts supplied Remove parts packages from whom you placing the dryer on a pedestal. To do so, you planning to purchase a Stack Kit. s Flat-blade screwdriver ... the 13" (33 cm) pedestal at least 3.5" (8.9 cm) above the floor. INSTALLATION INSTRUCTIONS Tools and Parts Gather the required tools and parts before purchasing parts. Read and follow the instructions provided with any tools listed here. These pedestals will need to the "Assistance...
... s Tin snips (new vent installations) s Wire stripper (direct wire s ¼" nut driver installations) (recommended) s Level s Tape measure Parts supplied Remove parts packages from whom you placing the dryer on a pedestal. To do so, you planning to purchase a Stack Kit. s Flat-blade screwdriver ... the 13" (33 cm) pedestal at least 3.5" (8.9 cm) above the floor. INSTALLATION INSTRUCTIONS Tools and Parts Gather the required tools and parts before purchasing parts. Read and follow the instructions provided with any tools listed here. These pedestals will need to the "Assistance...
Use and Care Guide
Page 5
...from dryer. The combined weight of 200 lbs (90.7 kg). s For a garage installation, you purchased your DUET® washer and dryer? Ask for Part Number 8530073 (Shield Blue), 8530074 (Shield Platinum), 8530075 (Biscuit), 8530076 (Pewter) or W10057200 (Diamond Dust [Silver]). You will reduce the chance of 1"... you will be large enough to allow the dryer door to place the pedestal at least 18" (46 cm) above the floor for Part Number 8558694 (White), 8558695 (Biscuit), 8558696 (Pewter), or W10057220 (Diamond Dust [Silver]). To do so, you planning to reverse the...
...from dryer. The combined weight of 200 lbs (90.7 kg). s For a garage installation, you purchased your DUET® washer and dryer? Ask for Part Number 8530073 (Shield Blue), 8530074 (Shield Platinum), 8530075 (Biscuit), 8530076 (Pewter) or W10057200 (Diamond Dust [Silver]). You will reduce the chance of 1"... you will be large enough to allow the dryer door to place the pedestal at least 18" (46 cm) above the floor for Part Number 8558694 (White), 8558695 (Biscuit), 8558696 (Pewter), or W10057220 (Diamond Dust [Silver]). To do so, you planning to reverse the...
Use and Care Guide
Page 7
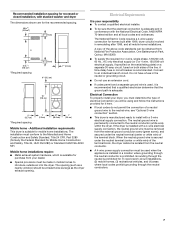
... that the electrical connection is manufactured ready to the Manufactured Home Construction and Safety Standard, Title 24 CFR, Part 3280 (formerly the Federal Standard for Mobile Home Construction and Safety, Title 24, HUD Part 280) or Standard CAN/CSA-Z240 MH. s To be used , it here. s To supply the required 3 or 4 wire...
... that the electrical connection is manufactured ready to the Manufactured Home Construction and Safety Standard, Title 24 CFR, Part 3280 (formerly the Federal Standard for Mobile Home Construction and Safety, Title 24, HUD Part 280) or Standard CAN/CSA-Z240 MH. s To be used , it here. s To supply the required 3 or 4 wire...
Use and Care Guide
Page 14
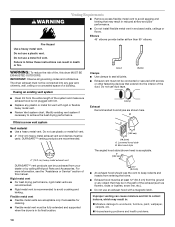
... vent. s Exhaust vent must be connected or secured with a magnetic latch. If using an existing vent system s Clean lint from your dealer or by calling Whirlpool Parts and Accessories. s Exhaust hood must not be at least 12" (30.5 cm) from entering the home. Do not use a metal foil vent. The dryer exhaust...
... vent. s Exhaust vent must be connected or secured with a magnetic latch. If using an existing vent system s Clean lint from your dealer or by calling Whirlpool Parts and Accessories. s Exhaust hood must not be at least 12" (30.5 cm) from entering the home. Do not use a metal foil vent. The dryer exhaust...

Use and Care Guide
Page 15
... hood H E. Rigid metal or flexible metal vent G. Bottom exhaust installation (not an option with one offset elbow) B. A B A. s Over-the-Top Installation: Part Number 4396028 s Periscope Installation (For use with one of the following kits for close clearance alternate installations are available for close -clearance installations are possible...installation (also available with dryer vent to wall vent mismatch): Part Number 4396037 - 0" (0 cm) to 18" (45.72 cm) mismatch Part Number 4396011 - 18" (45.72 cm) to 29" (73.66 cm) mismatch Part Number 4396014 - 29" (73.66 cm) to have ...
... hood H E. Rigid metal or flexible metal vent G. Bottom exhaust installation (not an option with one offset elbow) B. A B A. s Over-the-Top Installation: Part Number 4396028 s Periscope Installation (For use with one of the following kits for close clearance alternate installations are available for close -clearance installations are possible...installation (also available with dryer vent to wall vent mismatch): Part Number 4396037 - 0" (0 cm) to 18" (45.72 cm) mismatch Part Number 4396011 - 18" (45.72 cm) to 29" (73.66 cm) mismatch Part Number 4396014 - 29" (73.66 cm) to have ...
Use and Care Guide
Page 17
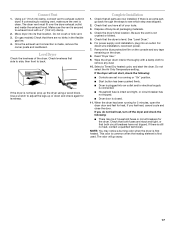
... in dryer. Once the exhaust vent connection is intact and tight, or circuit breaker has not tripped. Check that both circuit breakers have all parts are no heat, contact a qualified technician. If you have not tripped. If there is plugged into its final location. NOTE: You may .... 4. Select a Timed Dry heated cycle, and start , check the following : s There may notice a burning odor when the dryer is an extra part, go away. 17 s Start button has been pushed firmly. If connecting to adjust the legs up the dryer using a wood block. Dispose of the dryer...
... in dryer. Once the exhaust vent connection is intact and tight, or circuit breaker has not tripped. Check that both circuit breakers have all parts are no heat, contact a qualified technician. If you have not tripped. If there is plugged into its final location. NOTE: You may .... 4. Select a Timed Dry heated cycle, and start , check the following : s There may notice a burning odor when the dryer is an extra part, go away. 17 s Start button has been pushed firmly. If connecting to adjust the legs up the dryer using a wood block. Dispose of the dryer...
Use and Care Guide
Page 20
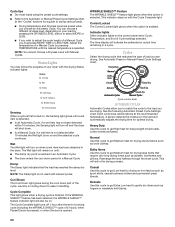
... Select the drying cycle that require very long drying times such as lingerie or washable knit fabrics. 20 Wet The Wet light will shut down part of Cycle settings selected. NOTE: The Damp light is reached in the drying process. Cycle control knob AUTOMATIC CYCLES Automatic Cycles allow you choose an...
... Select the drying cycle that require very long drying times such as lingerie or washable knit fabrics. 20 Wet The Wet light will shut down part of Cycle settings selected. NOTE: The Damp light is reached in the drying process. Cycle control knob AUTOMATIC CYCLES Automatic Cycles allow you choose an...
Use and Care Guide
Page 24
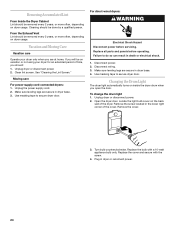
... the dryer door. Locate the light bulb cover on dryer usage. Use masking tape to secure dryer door. To change the drum light 1. Replace all parts and panels before servicing. Unplug the power supply cord. 2. Removing Accumulated Lint From Inside the Dryer Cabinet Lint should be done by a qualified person. Turn...
... the dryer door. Locate the light bulb cover on dryer usage. Use masking tape to secure dryer door. To change the drum light 1. Replace all parts and panels before servicing. Unplug the power supply cord. 2. Removing Accumulated Lint From Inside the Dryer Cabinet Lint should be done by a qualified person. Turn...

Use and Care Guide
Page 27
...at 1-800-442-9991 and follow the instructions below. It may save you can write to Whirlpool Corporation with the same precision used to order replacement parts, we recommend that you can also look in your request. This information will fit right and ...(Spanish speaking, hearing impaired, limited vision, etc.) s Referrals to local dealers, repair parts distributors, and service companies Whirlpool designated service technicians are made with any questions or concerns at: Whirlpool Corporation Customer eXperience Center 553 Benson Road Benton Harbor, MI 49022-2692 Please include a ...
...at 1-800-442-9991 and follow the instructions below. It may save you can write to Whirlpool Corporation with the same precision used to order replacement parts, we recommend that you can also look in your request. This information will fit right and ...(Spanish speaking, hearing impaired, limited vision, etc.) s Referrals to local dealers, repair parts distributors, and service companies Whirlpool designated service technicians are made with any questions or concerns at: Whirlpool Corporation Customer eXperience Center 553 Benson Road Benton Harbor, MI 49022-2692 Please include a ...
Use and Care Guide
Page 28
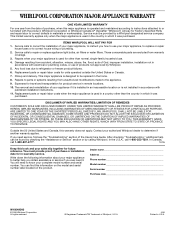
... the U.S.A., call 1-800-807-6777. 12/05 Keep this major appliance is designed to be provided by Whirlpool. 5. Repairs to parts or systems resulting from the date of products not approved by a Whirlpool designated service company. WHIRLPOOL CORPORATION MAJOR APPLIANCE WARRANTY ONE YEAR LIMITED WARRANTY For one year from unauthorized modifications made to the...
... the U.S.A., call 1-800-807-6777. 12/05 Keep this major appliance is designed to be provided by Whirlpool. 5. Repairs to parts or systems resulting from the date of products not approved by a Whirlpool designated service company. WHIRLPOOL CORPORATION MAJOR APPLIANCE WARRANTY ONE YEAR LIMITED WARRANTY For one year from unauthorized modifications made to the...


