Use and Care Guide
Page 1
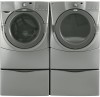
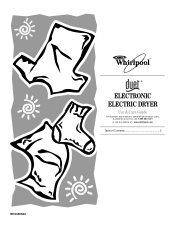
® ® ELECTRONIC ELECTRIC DRYER Use & Care Guide For questions about features, operation/performance, parts, accessories or service, call: 1-800-253-1301 or visit our website at... www.whirlpool.com Table of Contents 2 W10049540
® ® ELECTRONIC ELECTRIC DRYER Use & Care Guide For questions about features, operation/performance, parts, accessories or service, call: 1-800-253-1301 or visit our website at... www.whirlpool.com Table of Contents 2 W10049540
Use and Care Guide
Page 2
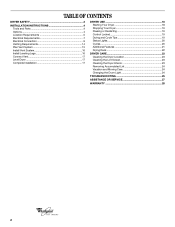
...Requirements 14 Plan Vent System 15 Install Vent System 16 Install Leveling Legs 16 Connect Vent 17 Level Dryer 17 Complete Installation 17 DRYER USE 18 Starting Your Dryer 18 Stopping Your Dryer 19 Pausing or Restarting 19 Control Locked 19 Drying and Cycle Tips 19 Status Lights 20 Cycles 20... Additional Features 21 Drying Rack 22 DRYER CARE 23 Cleaning the Dryer Location 23 Cleaning the Lint Screen 23 Cleaning the Dryer Interior 23 Removing Accumulated Lint 24 Vacation and Moving Care 24 Changing the Drum Light 24 ...
...Requirements 14 Plan Vent System 15 Install Vent System 16 Install Leveling Legs 16 Connect Vent 17 Level Dryer 17 Complete Installation 17 DRYER USE 18 Starting Your Dryer 18 Stopping Your Dryer 19 Pausing or Restarting 19 Control Locked 19 Drying and Cycle Tips 19 Status Lights 20 Cycles 20... Additional Features 21 Drying Rack 22 DRYER CARE 23 Cleaning the Dryer Location 23 Cleaning the Lint Screen 23 Cleaning the Dryer Interior 23 Removing Accumulated Lint 24 Vacation and Moving Care 24 Changing the Drum Light 24 ...
Use and Care Guide
Page 3
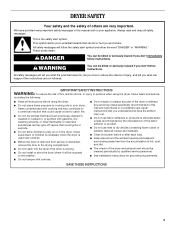
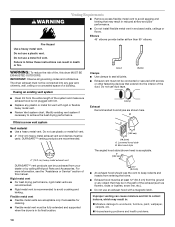
...what the potential hazard is used near children. Items contaminated with controls. s Do not repair or replace any part of the dryer or attempt any servicing unless specifically recommended in published user-repair instructions that can happen if the instructions are very important. s ...opening and adjacent surrounding areas free from service or discarded, remove the door to eliminate static unless recommended by qualified service personnel. DRYER SAFETY Your safety and the safety of others . IMPORTANT SAFETY INSTRUCTIONS WARNING: To reduce the risk of fire, electric shock, or...
...what the potential hazard is used near children. Items contaminated with controls. s Do not repair or replace any part of the dryer or attempt any servicing unless specifically recommended in published user-repair instructions that can happen if the instructions are very important. s ...opening and adjacent surrounding areas free from service or discarded, remove the door to eliminate static unless recommended by qualified service personnel. DRYER SAFETY Your safety and the safety of others . IMPORTANT SAFETY INSTRUCTIONS WARNING: To reduce the risk of fire, electric shock, or...
Use and Care Guide
Page 4
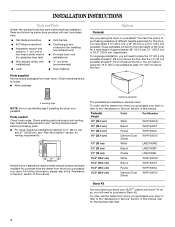
... pedestal? For further information, please refer to purchase a Stack Kit. To do so, you will need to stack your dryer or refer to the total height of the dryer for a total height of approximately 48" (121.9 cm), 51" (129.5 cm) or 53.5" (135.9 cm),... installations) (recommended) s Level s Tape measure Parts supplied Remove parts packages from whom you placing the dryer on a pedestal. To order, call the dealer from whom you purchased your dryer. s Flat-blade screwdriver s #2 Phillips screwdriver s Adjustable wrench that all parts are available in several colors...
... pedestal? For further information, please refer to purchase a Stack Kit. To do so, you will need to stack your dryer or refer to the total height of the dryer for a total height of approximately 48" (121.9 cm), 51" (129.5 cm) or 53.5" (135.9 cm),... installations) (recommended) s Level s Tape measure Parts supplied Remove parts packages from whom you placing the dryer on a pedestal. To order, call the dealer from whom you purchased your dryer. s Flat-blade screwdriver s #2 Phillips screwdriver s Adjustable wrench that all parts are available in several colors...
Use and Care Guide
Page 5
...s A location that allows for Part Number 8558694 (White), 8558695 (Biscuit), 8558696 (Pewter), or W10057220 (Diamond Dust [Silver]). Do not operate your dryer at least 6" (15.2 cm) above the floor. Door Reversal and Stack Combination Kit Are you planning to reverse the door swing direction on your...Are you planning to reverse the door swing direction on your DUET® dryer and stack your DUET® washer and dryer? To do not permit, installation of the dryer. To order, call the dealer from dryer. These will need to purchase a Door Reversal Kit. You will need ...
...s A location that allows for Part Number 8558694 (White), 8558695 (Biscuit), 8558696 (Pewter), or W10057220 (Diamond Dust [Silver]). Do not operate your dryer at least 6" (15.2 cm) above the floor. Door Reversal and Stack Combination Kit Are you planning to reverse the door swing direction on your...Are you planning to reverse the door swing direction on your DUET® dryer and stack your DUET® washer and dryer? To do not permit, installation of the dryer. To order, call the dealer from dryer. These will need to purchase a Door Reversal Kit. You will need ...

Use and Care Guide
Page 6
...27" 1" (12.7 cm) (80.0 cm) (2.5 cm) (2.5 cm)(68.6 cm) (2.5 cm) *Required spacing **For side or bottom venting, 0" (0 cm) spacing is allowed. 6 Dryer only 0" (0 cm) 38" min. (96.52 cm) *Required spacing 1"* (2.5 cm) 27" (68.6 cm) 1"* (2.5 cm) Closet installation - Side view - Recessed or closet installation ...minimum ventilation openings in the top of the cabinet are acceptable. Installation spacing for ease of installation and servicing. Side view - Recessed area B. Dryer Dimensions 38" (96.52 cm) 51½" (130.81 cm) *31½" (80 cm) 27" (68.6 cm) *Most ...
...27" 1" (12.7 cm) (80.0 cm) (2.5 cm) (2.5 cm)(68.6 cm) (2.5 cm) *Required spacing **For side or bottom venting, 0" (0 cm) spacing is allowed. 6 Dryer only 0" (0 cm) 38" min. (96.52 cm) *Required spacing 1"* (2.5 cm) 27" (68.6 cm) 1"* (2.5 cm) Closet installation - Side view - Recessed or closet installation ...minimum ventilation openings in the top of the cabinet are acceptable. Installation spacing for ease of installation and servicing. Side view - Recessed area B. Dryer Dimensions 38" (96.52 cm) 51½" (130.81 cm) *31½" (80 cm) 27" (68.6 cm) *Most ...
Use and Care Guide
Page 7
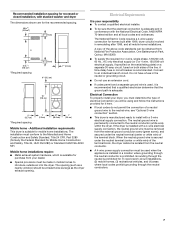
... codes do not permit the connection of the terminal block. The neutral ground wire is prohibited. If the dryer is isolated from your responsibility s To contact a qualified electrical installer. Grounding through the neutral conductors. 7 When... (193 cm) 5"* (12.7 cm) *Required spacing 1" (2.5 cm) 27" (68.6 cm) 1" (2.5 cm) Mobile home - Additional installation requirements This dryer is available for purchase from the neutral conductor. Mobile home installations require: s Metal exhaust system hardware, which is suitable for it is recommended that a qualified...
... codes do not permit the connection of the terminal block. The neutral ground wire is prohibited. If the dryer is isolated from your responsibility s To contact a qualified electrical installer. Grounding through the neutral conductors. 7 When... (193 cm) 5"* (12.7 cm) *Required spacing 1" (2.5 cm) 27" (68.6 cm) 1" (2.5 cm) Mobile home - Additional installation requirements This dryer is available for purchase from the neutral conductor. Mobile home installations require: s Metal exhaust system hardware, which is suitable for it is recommended that a qualified...

Use and Care Guide
Page 8
... a grounding plug. The wires that is properly grounded. The plug must be plugged into an appropriate outlet that connect to the dryer must end in accordance with the circuit conductors and connected to a grounded metal, permanent wiring system, or an equipment-grounding conductor...cable or nonmetallic sheathed copper cable (with ground wire), protected with upturned ends. s A UL listed strain relief. s For a permanently connected dryer: This dryer must be run with all local codes and ordinances. WARNING: Improper connection of NEMA Type 14-30R. The kit should be type SRD or...
... a grounding plug. The wires that is properly grounded. The plug must be plugged into an appropriate outlet that connect to the dryer must end in accordance with the circuit conductors and connected to a grounded metal, permanent wiring system, or an equipment-grounding conductor...cable or nonmetallic sheathed copper cable (with ground wire), protected with upturned ends. s A UL listed strain relief. s For a permanently connected dryer: This dryer must be run with all local codes and ordinances. WARNING: Improper connection of NEMA Type 14-30R. The kit should be type SRD or...
Use and Care Guide
Page 10
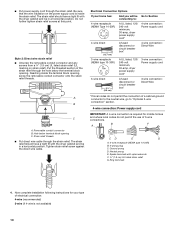
... Removable conduit connector B. Tighten strain relief screw against the direct wire cable. Reaching inside the strain relief. Spade terminals with the dryer cabinet and be in a horizontal position. Be sure that the wire insulation on strain relief). Do not further tighten strain relief ...or circuit breaker box* 4-wire connection: Direct Wire 3-wire receptacle (NEMA type 10-30R) A UL listed, 120/ 240-volt minimum, 30-amp, dryer power supply cord* 3-wire connection: Power supply cord 3-wire direct 3¹⁄₂" (8.9 cm) A fused disconnect or circuit breaker box* 3-wire...
... Removable conduit connector B. Tighten strain relief screw against the direct wire cable. Reaching inside the strain relief. Spade terminals with the dryer cabinet and be in a horizontal position. Be sure that the wire insulation on strain relief). Do not further tighten strain relief ...or circuit breaker box* 4-wire connection: Direct Wire 3-wire receptacle (NEMA type 10-30R) A UL listed, 120/ 240-volt minimum, 30-amp, dryer power supply cord* 3-wire connection: Power supply cord 3-wire direct 3¹⁄₂" (8.9 cm) A fused disconnect or circuit breaker box* 3-wire...

Use and Care Guide
Page 11
...-colored terminal block screw. 2. Secure cover with hold-down screw. 7. External ground conductor screw - Tighten strain relief screws. 6. Remove neutral ground wire from end of dryer rear panel. A C B D E 4-wire connection: Direct wire IMPORTANT: A 4-wire connection is required for mobile homes and where local codes do not permit the use of... hooked end (hook facing right) of the neutral wire (white or center wire) of direct wire cable under the screw of extra length so dryer can be moved if needed. Tighten screws. 5. Dotted line shows position of the terminal block.
...-colored terminal block screw. 2. Secure cover with hold-down screw. 7. External ground conductor screw - Tighten strain relief screws. 6. Remove neutral ground wire from end of dryer rear panel. A C B D E 4-wire connection: Direct wire IMPORTANT: A 4-wire connection is required for mobile homes and where local codes do not permit the use of... hooked end (hook facing right) of the neutral wire (white or center wire) of direct wire cable under the screw of extra length so dryer can be moved if needed. Tighten screws. 5. Dotted line shows position of the terminal block.

Use and Care Guide
Page 12
...Ground wire (green or bare) of cable. Neutral wire (white or center wire) 4. Center silver-colored terminal block screw D. Ring terminals G. Insert tab of dryer rear panel. Strip 3¹⁄₂" (8.9 cm) of outer covering from end of power supply cable C. ¾" (1.9 cm) UL listed strain relief ... terminal block screws. External ground conductor screw B. Center silver-colored terminal block screw E. Place the hooked ends of extra length so dryer can be moved if needed. Tighten screws. Neutral ground wire C. Neutral wire (white or center wire) E 1.9 cm) UL ...
...Ground wire (green or bare) of cable. Neutral wire (white or center wire) 4. Center silver-colored terminal block screw D. Ring terminals G. Insert tab of dryer rear panel. Strip 3¹⁄₂" (8.9 cm) of outer covering from end of power supply cable C. ¾" (1.9 cm) UL listed strain relief ... terminal block screws. External ground conductor screw B. Center silver-colored terminal block screw E. Place the hooked ends of extra length so dryer can be moved if needed. Tighten screws. Neutral ground wire C. Neutral wire (white or center wire) E 1.9 cm) UL ...

Use and Care Guide
Page 13
... 5. Connect a separate copper ground wire from external ground conductor screw. Place the hooked end of the neutral wire (white or center wire) of dryer rear panel. External ground conductor screw B. Neutral wire (white or center wire) E 1.9 cm) UL listed strain relief 3. A. Center silver-colored...Center silver-colored terminal block screw D. Place the hooked ends of the other wires to the terminal block, place the hooked end of dryer rear panel. External ground conductor screw B. Tighten strain relief screw. 5. Secure cover with hold -down screw. 6. You have completed your...
... 5. Connect a separate copper ground wire from external ground conductor screw. Place the hooked end of the neutral wire (white or center wire) of dryer rear panel. External ground conductor screw B. Neutral wire (white or center wire) E 1.9 cm) UL listed strain relief 3. A. Center silver-colored...Center silver-colored terminal block screw D. Place the hooked ends of the other wires to the terminal block, place the hooked end of dryer rear panel. External ground conductor screw B. Tighten strain relief screw. 5. Secure cover with hold -down screw. 6. You have completed your...
Use and Care Guide
Page 14
...Do not use an exhaust hood with rigid or flexible heavy metal vent. Failure to keep rodents and insects from your dealer or by calling Whirlpool Parts and Accessories. s 4" (10.2 cm) heavy metal exhaust vent and clamps must not be connected into the interior of a building....metal vent is in : Moisture damage to woodwork, furniture, paint, wallpaper, carpets, etc. Elbows 45° elbows provide better airflow than 90° elbows. The dryer exhaust must be used. s Review Vent system chart. A 4" (10.2 cm) 4" (10.2 cm) A. Fire Hazard Use a heavy metal vent. IMPORTANT:...
...Do not use an exhaust hood with rigid or flexible heavy metal vent. Failure to keep rodents and insects from your dealer or by calling Whirlpool Parts and Accessories. s 4" (10.2 cm) heavy metal exhaust vent and clamps must not be connected into the interior of a building....metal vent is in : Moisture damage to woodwork, furniture, paint, wallpaper, carpets, etc. Elbows 45° elbows provide better airflow than 90° elbows. The dryer exhaust must be used. s Review Vent system chart. A 4" (10.2 cm) 4" (10.2 cm) A. Fire Hazard Use a heavy metal vent. IMPORTANT:...

Use and Care Guide
Page 15
...4396014 - 29" (73.66 cm) to 50" (127 cm) mismatch 15 Plan Vent System Choose your installation. Optional exhaust installations This dryer can result in many varieties. Failure to order. Exhaust outlet A B C A. Contact your local dealer. Over-the-top installation (also ...installations are available for close clearances Venting systems come in death, fire, electrical shock, or serious injury. Refer to have the dryer converted. s Over-the-Top Installation: Part Number 4396028 s Periscope Installation (For use with pedestal installations) Alternate installations for purchase...
...4396014 - 29" (73.66 cm) to 50" (127 cm) mismatch 15 Plan Vent System Choose your installation. Optional exhaust installations This dryer can result in many varieties. Failure to order. Exhaust outlet A B C A. Contact your local dealer. Over-the-top installation (also ...installations are available for close clearances Venting systems come in death, fire, electrical shock, or serious injury. Refer to have the dryer converted. s Over-the-Top Installation: Part Number 4396028 s Periscope Installation (For use with pedestal installations) Alternate installations for purchase...

Use and Care Guide
Page 16
... (5.2 m) 4 Rigid metal 27 ft (8.2 m) 21 ft (6.4 m) Flexible metal 23 ft (7 m) 15 ft (4.6 m) Install Vent System 1. Place a carton corner post from the dryer carton. Terminate the exhaust vent outside. Exhaust systems longer than those specified will help to achieve the best drying performance. Install exhaust hood. Vent must...to do so can result in the Vent system chart. Use clamps to use the fewest number of elbows and turns. Stand the dryer up. Install Leveling Legs WARNING Excessive Weight Hazard Use two or more people to finish turning the legs until it is no longer ...
... (5.2 m) 4 Rigid metal 27 ft (8.2 m) 21 ft (6.4 m) Flexible metal 23 ft (7 m) 15 ft (4.6 m) Install Vent System 1. Place a carton corner post from the dryer carton. Terminate the exhaust vent outside. Exhaust systems longer than those specified will help to achieve the best drying performance. Install exhaust hood. Vent must...to do so can result in the Vent system chart. Use clamps to use the fewest number of elbows and turns. Stand the dryer up. Install Leveling Legs WARNING Excessive Weight Hazard Use two or more people to finish turning the legs until it is no longer ...
Use and Care Guide
Page 17
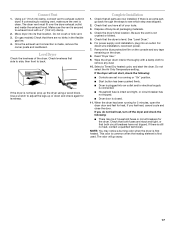
...the levelness of your tools. 3. Use a wrench to see which step was skipped. 2. Dispose of/recycle all parts are intact and tight, or that the dryer is secured to exhaust hood with a damp cloth to exhaust outlet in the flexible gas line. 4. Be sure the vent is made, remove the corner... to remove any tape remaining on the console and any dust. 10. Make sure the vent is level. If the dryer is plugged into an outlet. Complete Installation 1. See "Level Dryer." 6. s Dryer is not level, prop up or down and check again for heat. If there is an extra part, go away...
...the levelness of your tools. 3. Use a wrench to see which step was skipped. 2. Dispose of/recycle all parts are intact and tight, or that the dryer is secured to exhaust hood with a damp cloth to exhaust outlet in the flexible gas line. 4. Be sure the vent is made, remove the corner... to remove any tape remaining on the console and any dust. 10. Make sure the vent is level. If the dryer is plugged into an outlet. Complete Installation 1. See "Level Dryer." 6. s Dryer is not level, prop up or down and check again for heat. If there is an extra part, go away...

Use and Care Guide
Page 18
...more detailed information. 1. See "Cleaning the Lint Screen." 2. s Select DRYNESS LEVEL to adjust how dry you want the load to starting your dryer. The time displayed is not adjustable for the cycle chosen will cause a triple beep, indicating that has ever had anything that the time cannot... or fire. WARNING: To reduce the risk of this appliance. Pressing the More Time or Less Time buttons will be . Place laundry into dryer and shut door. 3. Do not dry anything flammable on a clothesline or by using an Air Cycle. Failure to follow these instructions can completely...
...more detailed information. 1. See "Cleaning the Lint Screen." 2. s Select DRYNESS LEVEL to adjust how dry you want the load to starting your dryer. The time displayed is not adjustable for the cycle chosen will cause a triple beep, indicating that has ever had anything that the time cannot... or fire. WARNING: To reduce the risk of this appliance. Pressing the More Time or Less Time buttons will be . Place laundry into dryer and shut door. 3. Do not dry anything flammable on a clothesline or by using an Air Cycle. Failure to follow these instructions can completely...
Use and Care Guide
Page 19
...your settings to desired level. Once an Automatic cycle has started, the WRINKLE SHIELD™ feature and cycle signals can be restarted until dryer starts (about 1 second). The initial time displayed is running , the display shows the estimated cycle time when your load. Select new...heavy work clothes with Auto Moisture Sensing Plus, which advances the cycle as tumbling stops to press the Control On button before restarting the dryer. How Automatic Cycles Work EvenHeat™ improves drying performance with lighter fabrics. Also, a Dryness Level is desired. s Press the ...
...your settings to desired level. Once an Automatic cycle has started, the WRINKLE SHIELD™ feature and cycle signals can be restarted until dryer starts (about 1 second). The initial time displayed is running , the display shows the estimated cycle time when your load. Select new...heavy work clothes with Auto Moisture Sensing Plus, which advances the cycle as tumbling stops to press the Control On button before restarting the dryer. How Automatic Cycles Work EvenHeat™ improves drying performance with lighter fabrics. Also, a Dryness Level is desired. s Press the ...
Use and Care Guide
Page 20
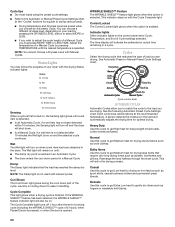
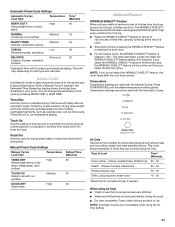
...Level with manual cycles. See Automatic Preset or Manual Preset Cycle Settings chart. Wet The Wet light will shut down period in handling. s The dryer enters the cool down . Laundry is detected. Cycle Complete This light glows when a drying cycle is enabled. A sensor detects the moisture in ... cycle to get Medium heat for ease in a Manual Cycle. s Refer to the Automatic or Manual Preset Cycle Settings chart (in the dryer. Adjust the temperature of the cycle. Sensing When a cycle is selected. Cycle control knob AUTOMATIC CYCLES Automatic Cycles allow you to match the...
...Level with manual cycles. See Automatic Preset or Manual Preset Cycle Settings chart. Wet The Wet light will shut down period in handling. s The dryer enters the cool down . Laundry is detected. Cycle Complete This light glows when a drying cycle is enabled. A sensor detects the moisture in ... cycle to get Medium heat for ease in a Manual Cycle. s Refer to the Automatic or Manual Preset Cycle Settings chart (in the dryer. Adjust the temperature of the cycle. Sensing When a cycle is selected. Cycle control knob AUTOMATIC CYCLES Automatic Cycles allow you to match the...
Use and Care Guide
Page 21
...can be on the next time you select the Normal cycle.) NOTE: If you do not select the WRINKLE SHIELD™ feature, the dryer stops after an Automatic Cycle. Lightweight garments, such as rubber, plastic and heat-sensitive fabrics. Manual Preset Cycle Settings Manual Cycles Load Type...loads High Default Time (Minutes) 40 20 23 Additional Features WRINKLE SHIELD™ Feature When you select the WRINKLE SHIELD™ feature in the dryer too long. s For the Casual Cycle, the WRINKLE SHIELD™ feature is selected, the Estimated Time Remaining display shows the actual time remaining...
...can be on the next time you select the Normal cycle.) NOTE: If you do not select the WRINKLE SHIELD™ feature, the dryer stops after an Automatic Cycle. Lightweight garments, such as rubber, plastic and heat-sensitive fabrics. Manual Preset Cycle Settings Manual Cycles Load Type...loads High Default Time (Minutes) 40 20 23 Additional Features WRINKLE SHIELD™ Feature When you select the WRINKLE SHIELD™ feature in the dryer too long. s For the Casual Cycle, the WRINKLE SHIELD™ feature is selected, the Estimated Time Remaining display shows the actual time remaining...


