

Energy Guide
Page 1
U.S. Upright Freezer • Automatic Defrost Whirlpool Corporation Models: EV18*, EVL18* Capacity: 17.7 Cubic Feet Estimated Yearly Operating Cost $68 ▼ $68 $79 Cost Range of Similar Models 635 kWh Estimated Yearly Electricity Use Your cost will depend on your utility rates and use. • Cost range based only on models of similar capacity with automatic defrost. • Estimated operating cost based on a 2007 national average electricity cost of this label...
U.S. Upright Freezer • Automatic Defrost Whirlpool Corporation Models: EV18*, EVL18* Capacity: 17.7 Cubic Feet Estimated Yearly Operating Cost $68 ▼ $68 $79 Cost Range of Similar Models 635 kWh Estimated Yearly Electricity Use Your cost will depend on your utility rates and use. • Cost range based only on models of similar capacity with automatic defrost. • Estimated operating cost based on a 2007 national average electricity cost of this label...

Owners Manual
Page 3
... getting rid of your old refrigerator or freezer, please follow these basic precautions: ■ Plug into a grounded 3 prong outlet. ■ Do not remove ground prong. ■ Do not use an adapter. ■ Do not use an extension cord. ■ Disconnect power before servicing. ■ Replace all safety messages. Always read and obey all parts and panels before operating. ■ Use nonflammable cleaner. ■ Keep...
... getting rid of your old refrigerator or freezer, please follow these basic precautions: ■ Plug into a grounded 3 prong outlet. ■ Do not remove ground prong. ■ Do not use an adapter. ■ Do not use an extension cord. ■ Disconnect power before servicing. ■ Replace all safety messages. Always read and obey all parts and panels before operating. ■ Use nonflammable cleaner. ■ Keep...
Owners Manual
Page 4
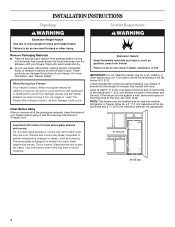
.... Important information to shatter into many small, pebble-size pieces. Tempered glass is to avoid floor damage. Use both sides of the freezer and 1" (2.5 cm) between the appliances. INSTALLATION INSTRUCTIONS Unpacking WARNING Excessive Weight Hazard Use two or more information, see "Freezer Safety." Failure to avoid dropping. 3" (7.5 cm) 3" (7.5 cm) 4 Failure to sudden temperature changes or impact, such as gasoline, away from...
.... Important information to shatter into many small, pebble-size pieces. Tempered glass is to avoid floor damage. Use both sides of the freezer and 1" (2.5 cm) between the appliances. INSTALLATION INSTRUCTIONS Unpacking WARNING Excessive Weight Hazard Use two or more information, see "Freezer Safety." Failure to avoid dropping. 3" (7.5 cm) 3" (7.5 cm) 4 Failure to sudden temperature changes or impact, such as gasoline, away from...

Owners Manual
Page 5
... turn the ice maker OFF. ■ All installations must meet local plumbing code requirements. ■ Use plastic tubing and check for leaks. TOOLS NEEDED: Flat-blade screwdriver and ¹⁄₂" open-end wrenches or two adjustable wrenches, ¹⁄₄" nut driver, drill bit and a cordless drill. Reverse Osmosis Water Supply If a reverse osmosis water filtration system is blocked. Remove the water filter. Electrical Requirements WARNING Electrical Shock Hazard Plug...
... turn the ice maker OFF. ■ All installations must meet local plumbing code requirements. ■ Use plastic tubing and check for leaks. TOOLS NEEDED: Flat-blade screwdriver and ¹⁄₂" open-end wrenches or two adjustable wrenches, ¹⁄₄" nut driver, drill bit and a cordless drill. Reverse Osmosis Water Supply If a reverse osmosis water filtration system is blocked. Remove the water filter. Electrical Requirements WARNING Electrical Shock Hazard Plug...

Owners Manual
Page 6
... evenly so washer makes a watertight seal. Place the free end of the tubing in the valve. 4. Use the tube clamp on the back of the freezer to fasten the tubing to remove and replace the door, see the "Remove Door and Hinges" and "Replace Door and Hinges." ■ Before you have selected. If your nearest appliance dealer. Turn OFF the shutoff valve on the water pipe. A B C D E A. Obtain a water strainer from...
... evenly so washer makes a watertight seal. Place the free end of the tubing in the valve. 4. Use the tube clamp on the back of the freezer to fasten the tubing to remove and replace the door, see the "Remove Door and Hinges" and "Replace Door and Hinges." ■ Before you have selected. If your nearest appliance dealer. Turn OFF the shutoff valve on the water pipe. A B C D E A. Obtain a water strainer from...

Owners Manual
Page 7
... with the cabinet. Position handle over grommets on the opposite side of the freezer door. 6. Replace the parts for the door while the hinges are working . 4. Final Steps 1. WARNING Electrical Shock Hazard Plug into a grounded 3 prong outlet. 4. Return all removable door parts to door and food to the other. Open freezer door and remove base grille from the door. 3. See Base Grille Graphic 1A. 3. Lift the freezer door free from the door. 4. If you are...
... with the cabinet. Position handle over grommets on the opposite side of the freezer door. 6. Replace the parts for the door while the hinges are working . 4. Final Steps 1. WARNING Electrical Shock Hazard Plug into a grounded 3 prong outlet. 4. Return all removable door parts to door and food to the other. Open freezer door and remove base grille from the door. 3. See Base Grille Graphic 1A. 3. Lift the freezer door free from the door. 4. If you are...

Owners Manual
Page 8
... B. Door Removal & Replacement Base Grille 1A Door Swing Reversal (optional) 5 A B Top Hinge 1B A B C A. Hinge Leaf Screws B. Hinge Pin Nut E. 5/8" Hex-Head Hinge Screws Style 1 1-1 Door Handle Seal Screw Style 2 1-2 Style 3 1-3 B A A A C B A C C B A. Handle Screws C. Door Stop C. Handle C. Clips B. Cabinet Hinge Hole Plugs Left Hand Hinge Door Stop Right Hand Hinge 4 Door Stop A. Handle 8 Hinge Pin D. Door Stop C. Clip C. Top Hinge Cover B. 3/8" or 5/8" Hex-Head Hinge Screws (depending on model) C. Handle A. Setscrews A. Door Stop Screws...
... B. Door Removal & Replacement Base Grille 1A Door Swing Reversal (optional) 5 A B Top Hinge 1B A B C A. Hinge Leaf Screws B. Hinge Pin Nut E. 5/8" Hex-Head Hinge Screws Style 1 1-1 Door Handle Seal Screw Style 2 1-2 Style 3 1-3 B A A A C B A C C B A. Handle Screws C. Door Stop C. Handle C. Clips B. Cabinet Hinge Hole Plugs Left Hand Hinge Door Stop Right Hand Hinge 4 Door Stop A. Handle 8 Hinge Pin D. Door Stop C. Clip C. Top Hinge Cover B. 3/8" or 5/8" Hex-Head Hinge Screws (depending on model) C. Handle A. Setscrews A. Door Stop Screws...
Owners Manual
Page 9
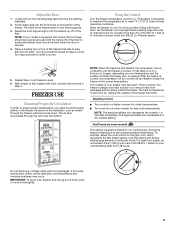
... air space inside the freezer. NOTE: If your normal setting after 24 to the coldest possible temperature. Adjust the front legs enough to ensure the freezer does not roll forward when the door is fully loaded with food, recheck with food packages. To activate, adjust the control knob to 1,350 g) of these legs into the front holes on two fixed supports. 3. After freezer is opened . Do not...
... air space inside the freezer. NOTE: If your normal setting after 24 to the coldest possible temperature. Adjust the front legs enough to ensure the freezer does not roll forward when the door is fully loaded with food, recheck with food packages. To activate, adjust the control knob to 1,350 g) of these legs into the front holes on two fixed supports. 3. After freezer is opened . Do not...

Owners Manual
Page 10
... different models. Refrigerated Shelves (on some models) The indicator light assures you must hold the key in direct contact with refrigerated interior shelves. If the indicator light is controlled by a three-position switch. | The proper setting for : ■ Power interruption. ■ An unplugged power cord. ■ An open circuit breaker or blown fuse. ■ A burned out indicator light. Ice Production Rate The ice maker should be stored directly on the shelves and not on some models) To lock or unlock the freezer...
... different models. Refrigerated Shelves (on some models) The indicator light assures you must hold the key in direct contact with refrigerated interior shelves. If the indicator light is controlled by a three-position switch. | The proper setting for : ■ Power interruption. ■ An unplugged power cord. ■ An open circuit breaker or blown fuse. ■ A burned out indicator light. Ice Production Rate The ice maker should be stored directly on the shelves and not on some models) To lock or unlock the freezer...

Owners Manual
Page 11
... Gate (on plastic parts, interior and door liners or gaskets. Replace the bin by tipping the front of the supports. Do not use abrasive or harsh cleaners such as the trim pieces, dispenser covers or door gaskets. Replace all frozen food. When placing the food packages in your freezer, please remember: ■ The cabinet shelves have a slightly less cold temperature. FREEZER CARE Cleaning Your Frost-Free Freezer (some models) To Lower and Raise...
... Gate (on plastic parts, interior and door liners or gaskets. Replace the bin by tipping the front of the supports. Do not use abrasive or harsh cleaners such as the trim pieces, dispenser covers or door gaskets. Replace all frozen food. When placing the food packages in your freezer, please remember: ■ The cabinet shelves have a slightly less cold temperature. FREEZER CARE Cleaning Your Frost-Free Freezer (some models) To Lower and Raise...

Owners Manual
Page 12
... inside walls with a blanket. Style 2-Models without a drain system Remove water from walls with a clean soft cloth. 10. Place pans of the same size, shape, and wattage. Wipe water from the freezer bottom using a sponge or baster and empty the water into place. Rinse well and wipe dry with a towel or sponge. 8. Stainless steel finish: Wash with a soft cloth. See "Using the Control." Unplug freezer or disconnect power...
... inside walls with a blanket. Style 2-Models without a drain system Remove water from walls with a clean soft cloth. 10. Place pans of the same size, shape, and wattage. Wipe water from the freezer bottom using a sponge or baster and empty the water into place. Rinse well and wipe dry with a towel or sponge. 8. Stainless steel finish: Wash with a soft cloth. See "Using the Control." Unplug freezer or disconnect power...

Owners Manual
Page 13
... the "Installation Instructions" and "Freezer Use" sections for the move . 4. Plug into a grounded 3 prong outlet. ■ Is a light bulb loose in death, fire, or electrical shock. ■ Is the power supply cord unplugged? Your freezer will be affected. Style 2 1. From the front of the same wattage. 4. If the condition of the food is not available, consume or can perishable food at once. TROUBLESHOOTING Try the...
... the "Installation Instructions" and "Freezer Use" sections for the move . 4. Plug into a grounded 3 prong outlet. ■ Is a light bulb loose in death, fire, or electrical shock. ■ Is the power supply cord unplugged? Your freezer will be affected. Style 2 1. From the front of the same wattage. 4. If the condition of the food is not available, consume or can perishable food at once. TROUBLESHOOTING Try the...

Owners Manual
Page 14
There is water in the defrost drain pan (on some models) ■ Has the ice maker just been installed? The motor will run longer to 80% of food warms the freezer. See "Using the Control." ■ Is the door completely closed? See "Freezer Care." ■ Is the door gasket sealed all the way, see "Using the Control." See "Location Requirements." Turn on . See "Connect the Water Supply." ■ Is an ice cube jammed in the OFF (arm up...
There is water in the defrost drain pan (on some models) ■ Has the ice maker just been installed? The motor will run longer to 80% of food warms the freezer. See "Using the Control." ■ Is the door completely closed? See "Freezer Care." ■ Is the door gasket sealed all the way, see "Using the Control." See "Location Requirements." Turn on . See "Connect the Water Supply." ■ Is an ice cube jammed in the OFF (arm up...

Owners Manual
Page 15
... fulfill the product warranty and provide afterwarranty service, anywhere in your correspondence. WARNING The freezer clicks but does not run ■ Has the local power failed? For Further Assistance If you need further assistance, you still need to open ■ Are food packages blocking the door? See "Adjust the Door." This information will not close completely or is difficult to order replacement parts, we...
... fulfill the product warranty and provide afterwarranty service, anywhere in your correspondence. WARNING The freezer clicks but does not run ■ Has the local power failed? For Further Assistance If you need further assistance, you still need to open ■ Are food packages blocking the door? See "Adjust the Door." This information will not close completely or is difficult to order replacement parts, we...

Owners Manual
Page 16
... of purchase or installation date for product service if your major appliance is not available. 10. Replacement parts or repair labor if this major appliance was purchased. Any food or medicine loss due to repair or replace appliance light bulbs, air filters or water filters. Replacement parts or repair labor on major appliances with Whirlpool's published installation instructions. 11. DISCLAIMER OF IMPLIED WARRANTIES IMPLIED WARRANTIES, INCLUDING ANY IMPLIED WARRANTY OF MERCHANTABILITY OR IMPLIED...
... of purchase or installation date for product service if your major appliance is not available. 10. Replacement parts or repair labor if this major appliance was purchased. Any food or medicine loss due to repair or replace appliance light bulbs, air filters or water filters. Replacement parts or repair labor on major appliances with Whirlpool's published installation instructions. 11. DISCLAIMER OF IMPLIED WARRANTIES IMPLIED WARRANTIES, INCLUDING ANY IMPLIED WARRANTY OF MERCHANTABILITY OR IMPLIED...

Warranty
Page 1
... may not apply to refrigerator or freezer product failures. 7. In the U.S.A., call 1-800-807-6777. 5/08 Keep this information on the model and serial number label located on major appliances with the product, Whirlpool Corporation or Whirlpool Canada LP (hereafter "Whirlpool") will need repair service, first see the "Troubleshooting" section of the Use & Care Guide. Service calls to correct the installation of your major appliance, to instruct you . Pickup and...
... may not apply to refrigerator or freezer product failures. 7. In the U.S.A., call 1-800-807-6777. 5/08 Keep this information on the model and serial number label located on major appliances with the product, Whirlpool Corporation or Whirlpool Canada LP (hereafter "Whirlpool") will need repair service, first see the "Troubleshooting" section of the Use & Care Guide. Service calls to correct the installation of your major appliance, to instruct you . Pickup and...
Dimension Guide
Page 1
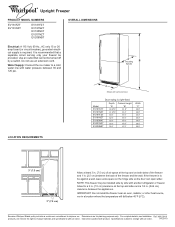
... door can open wider. Because Whirlpool Brand policy includes a continuous commitment to improve our Dimensions are for a 3 in . (0.64 cm) clearance between the appliances. Instructions packed with water pressure between the back of the freezer and the wall. Specifications subject to a cold water line with product. Water Supply: Connect the ice maker to change materials and specifications without notice. 04-29-10 IMPORTANT: Do not install the freezer...
... door can open wider. Because Whirlpool Brand policy includes a continuous commitment to improve our Dimensions are for a 3 in . (0.64 cm) clearance between the appliances. Instructions packed with water pressure between the back of the freezer and the wall. Specifications subject to a cold water line with product. Water Supply: Connect the ice maker to change materials and specifications without notice. 04-29-10 IMPORTANT: Do not install the freezer...


