

User Instructions
Page 1
...warranty service. Dealer name Serial number Address Phone number Model number Purchase date DRYER SAFETY Your safety and the safety of Contents ASSISTANCE OR SERVICE 1 DRYER SAFETY 1 DRYER USE 3 DRYER CARE 5 TROUBLESHOOTING 6 WARRANTY 8 Assistance or Service If you what can ...happen if the instructions are very important. To order accessories, call 1-800-442-9991 or visit our website at 1-800-253-1301 from anywhere in the U.S.A., or write: Estate...
...warranty service. Dealer name Serial number Address Phone number Model number Purchase date DRYER SAFETY Your safety and the safety of Contents ASSISTANCE OR SERVICE 1 DRYER SAFETY 1 DRYER USE 3 DRYER CARE 5 TROUBLESHOOTING 6 WARRANTY 8 Assistance or Service If you what can ...happen if the instructions are very important. To order accessories, call 1-800-442-9991 or visit our website at 1-800-253-1301 from anywhere in the U.S.A., or write: Estate...

User Instructions
Page 2
... and adjacent sur- IMPORTANT SAFETY INSTRUCTIONS WARNING: To reduce the risk of fire, electric shock, or injury to persons when using the dryer. s Do not place items exposed to cooking oils in published user-repair instructions that could ignite or explode. s Do not allow.... SAVE THESE INSTRUCTIONS WARNING: For your safety, the information in your gas supplier from a neighbor's phone. s Clean lint screen before using the dryer, follow basic precautions, including the following: s Read all occupants. • Immediately call the fire department. - Do not store or use fabric...
... and adjacent sur- IMPORTANT SAFETY INSTRUCTIONS WARNING: To reduce the risk of fire, electric shock, or injury to persons when using the dryer. s Do not place items exposed to cooking oils in published user-repair instructions that could ignite or explode. s Do not allow.... SAVE THESE INSTRUCTIONS WARNING: For your safety, the information in your gas supplier from a neighbor's phone. s Clean lint screen before using the dryer, follow basic precautions, including the following: s Read all occupants. • Immediately call the fire department. - Do not store or use fabric...

User Instructions
Page 3
...exhaust air to flow. See the Installation Instructions for clothes to seal all joints. Check vent after installation. If the dryer is complete, be covered under the warranty. NOTE: Service calls caused by improper venting will be paid installation or ... Towels 10 bath towels 10 hand towels 14 washcloths 1 bath mat Delicates 3 camisoles 1 robe 4 slips 8 undergarments 2 sets of sleepwear 1 child's outfit EXTRA LARGE CAPACITY DRYERS Heavy Work Clothes 3 pair of pants 4 pair of jeans 2 pair of overalls 3 shirts Mixed Load 3 double sheets 4 pillowcases 8 T-shirts 6 pair ...
...exhaust air to flow. See the Installation Instructions for clothes to seal all joints. Check vent after installation. If the dryer is complete, be covered under the warranty. NOTE: Service calls caused by improper venting will be paid installation or ... Towels 10 bath towels 10 hand towels 14 washcloths 1 bath mat Delicates 3 camisoles 1 robe 4 slips 8 undergarments 2 sets of sleepwear 1 child's outfit EXTRA LARGE CAPACITY DRYERS Heavy Work Clothes 3 pair of pants 4 pair of jeans 2 pair of overalls 3 shirts Mixed Load 3 double sheets 4 pillowcases 8 T-shirts 6 pair ...

User Instructions
Page 4
...min. Push down to ON or OFF. Items containing foam, rubber, or plastic must be dried on a clothesline or by using your dryer, wipe the dryer drum with the drying rack. Reset cycle to the following table. 4. or polyester filled) Stuffed toys/pillows Foam rubber filled Air N/A (... back wall of load being dried. Use the Energy Preferred Automatic Setting (*) to dry most heavy to medium-weight fabrics. 3. (OPTIONAL) If your dryer has a Temperature selector, set to On. 6. On some models, temperature is set it stops. If desired, add fabric softener sheet. Follow package instructions...
...min. Push down to ON or OFF. Items containing foam, rubber, or plastic must be dried on a clothesline or by using your dryer, wipe the dryer drum with the drying rack. Reset cycle to the following table. 4. or polyester filled) Stuffed toys/pillows Foam rubber filled Air N/A (... back wall of load being dried. Use the Energy Preferred Automatic Setting (*) to dry most heavy to medium-weight fabrics. 3. (OPTIONAL) If your dryer has a Temperature selector, set to On. 6. On some models, temperature is set it stops. If desired, add fabric softener sheet. Follow package instructions...
User Instructions
Page 5
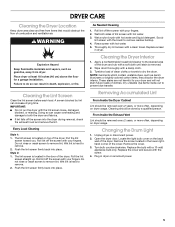
...rinse or wash screen to remove lint. Style 2: 1. Do not rinse or wash screen to remove lint. Wipe drum thoroughly with your dryer and will not stain future loads of combustion and ventilation air. These stains are not harmful to your fingers. Dry unstable dye items inside...Wet lint is hard to both sides of the cover. Scrub lint screen with a 10-watt appliance bulb only. Removing Accumulated Lint From Inside the Dryer Cabinet Lint should be removed every 2 years, or more often, depending on top of the drum and rub with the screw. 4. A screen blocked...
...rinse or wash screen to remove lint. Style 2: 1. Do not rinse or wash screen to remove lint. Wipe drum thoroughly with your dryer and will not stain future loads of combustion and ventilation air. These stains are not harmful to your fingers. Dry unstable dye items inside...Wet lint is hard to both sides of the cover. Scrub lint screen with a 10-watt appliance bulb only. Removing Accumulated Lint From Inside the Dryer Cabinet Lint should be removed every 2 years, or more often, depending on top of the drum and rub with the screw. 4. A screen blocked...

User Instructions
Page 6
... to dry quickly? Is the exhaust vent crushed or kinked? See your Installation Instructions. Use only one fabric softener sheet, and use it a gas dryer? Proper operation of a service call... s Is the load too large and heavy to check air movement. Clean lint screen. Also sort by normal wear and laundering. See...
... to dry quickly? Is the exhaust vent crushed or kinked? See your Installation Instructions. Use only one fabric softener sheet, and use it a gas dryer? Proper operation of a service call... s Is the load too large and heavy to check air movement. Clean lint screen. Also sort by normal wear and laundering. See...
Installation Instructions
Page 1
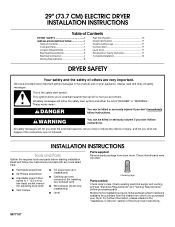
...leveling legs Parts needed: Check local codes. For further information, please reference the "Assistance or Service" section of the Dryer User Instructions. 8577187 Check existing electrical supply and venting and see "Electrical Requirements" and "Venting Requirements" before starting .... Parts supplied: Remove parts package from whom you don't follow instructions. 29" (73.7 CM) ELECTRIC DRYER INSTALLATION INSTRUCTIONS Table of Contents DRYER SAFETY 1 INSTALLATION INSTRUCTIONS 1 Table of Contents 1 Tools and Parts 1 Location Requirements 2 Electrical Requirements 3 ...
...leveling legs Parts needed: Check local codes. For further information, please reference the "Assistance or Service" section of the Dryer User Instructions. 8577187 Check existing electrical supply and venting and see "Electrical Requirements" and "Venting Requirements" before starting .... Parts supplied: Remove parts package from whom you don't follow instructions. 29" (73.7 CM) ELECTRIC DRYER INSTALLATION INSTRUCTIONS Table of Contents DRYER SAFETY 1 INSTALLATION INSTRUCTIONS 1 Table of Contents 1 Tools and Parts 1 Location Requirements 2 Electrical Requirements 3 ...

Installation Instructions
Page 2
... side-swing door B. Recessed area B. s A separate 30-amp circuit. At lower temperatures, the dryer might be large enough to allow the dryer door to support the total weight (dryer and load) of a companion appliance should also be considered for proper exhaust installation. Small opening side-...) 22 ¾" (57.8 cm) Explosion Hazard Keep flammable materials and vapors, such as gasoline, away from dryer. s If using a power supply cord, a grounded electrical outlet located within 2 ft (61 cm) of either side of installation and servicing. s A sturdy floor to open fully. *26" ...
... side-swing door B. Recessed area B. s A separate 30-amp circuit. At lower temperatures, the dryer might be large enough to allow the dryer door to support the total weight (dryer and load) of a companion appliance should also be considered for proper exhaust installation. Small opening side-...) 22 ¾" (57.8 cm) Explosion Hazard Keep flammable materials and vapors, such as gasoline, away from dryer. s If using a power supply cord, a grounded electrical outlet located within 2 ft (61 cm) of either side of installation and servicing. s A sturdy floor to open fully. *26" ...

Installation Instructions
Page 3
... where local codes prohibit grounding through the neutral conductor is installed in conformance with clothes dryers. When the neutral ground wire is adequate. The 4-wire power supply cord, at least 4 ft (1.22 m) long, must be made in accordance with all local codes and ordinances....-carrying wires must be run with a 3-wire electrical supply connection. s At least 5 ft (1.52 m) long. s For a permanently connected dryer: This dryer must be connected to the dryer must be at least twice as large as a nearby window) should contain: s A UL listed 30-amp power supply cord,...
... where local codes prohibit grounding through the neutral conductor is installed in conformance with clothes dryers. When the neutral ground wire is adequate. The 4-wire power supply cord, at least 4 ft (1.22 m) long, must be made in accordance with all local codes and ordinances....-carrying wires must be run with a 3-wire electrical supply connection. s At least 5 ft (1.52 m) long. s For a permanently connected dryer: This dryer must be connected to the dryer must be at least twice as large as a nearby window) should contain: s A UL listed 30-amp power supply cord,...

Installation Instructions
Page 5
...terminal block opening . Neutral prong E. Strain relief threads s Put direct wire cable through the strain relief. Spade terminals with the dryer cabinet and be in a horizontal position. Removable conduit connector B. Tighten strain relief screw against the direct wire cable. Do not ... opening, screw the removable conduit connector onto the strain relief threads. The strain relief should have a tight fit with the dryer cabinet and be in a horizontal position. Now complete installation following instructions for mobile homes and where local codes do not permit...
...terminal block opening . Neutral prong E. Strain relief threads s Put direct wire cable through the strain relief. Spade terminals with the dryer cabinet and be in a horizontal position. Removable conduit connector B. Tighten strain relief screw against the direct wire cable. Do not ... opening, screw the removable conduit connector onto the strain relief threads. The strain relief should have a tight fit with the dryer cabinet and be in a horizontal position. Now complete installation following instructions for mobile homes and where local codes do not permit...

Installation Instructions
Page 6
... E. Neutral wire (white or center wire) D. ¾" (1.9 cm) UL listed strain relief E. Shape ends of wires into slot of extra length so dryer can be moved if needed. Connect neutral ground wire and place the hooked end (hook facing right) of the neutral wire (white or center...the center screw of power supply cord 4. Connect the other wires to "Venting Requirements." Tighten strain relief screws. 6. You have 5 ft (1.52 m) of dryer rear panel. Direct wire cable must have completed your electrical connections. Dotted line shows position of terminal block cover into a hook shape...
... E. Neutral wire (white or center wire) D. ¾" (1.9 cm) UL listed strain relief E. Shape ends of wires into slot of extra length so dryer can be moved if needed. Connect neutral ground wire and place the hooked end (hook facing right) of the neutral wire (white or center...the center screw of power supply cord 4. Connect the other wires to "Venting Requirements." Tighten strain relief screws. 6. You have 5 ft (1.52 m) of dryer rear panel. Direct wire cable must have completed your electrical connections. Dotted line shows position of terminal block cover into a hook shape...

Installation Instructions
Page 7
..."Venting Requirements." 3-wire connection: Direct Wire Use where local codes permit connecting cabinet-ground conductor to the center, silver-colored terminal screw of extra length so dryer can be moved if needed. Neutral ground wire B. Neutral wire (white or center wire) E 1.9 cm) UL listed strain relief 3....with hold -down screw. 7. You have completed your electrical connections. Direct wire cable must have 5 ft (1.52 m) of the terminal block. Bend ends of wires into slot of dryer rear panel. Connect neutral wire (white or center wire) of power supply cord to neutral wire. ...
..."Venting Requirements." 3-wire connection: Direct Wire Use where local codes permit connecting cabinet-ground conductor to the center, silver-colored terminal screw of extra length so dryer can be moved if needed. Neutral ground wire B. Neutral wire (white or center wire) E 1.9 cm) UL listed strain relief 3....with hold -down screw. 7. You have completed your electrical connections. Direct wire cable must have 5 ft (1.52 m) of the terminal block. Bend ends of wires into slot of dryer rear panel. Connect neutral wire (white or center wire) of power supply cord to neutral wire. ...

Installation Instructions
Page 8
... outer terminal block screws (hooks facing right). External ground conductor screw C. Insert tab of terminal block cover into slot of dryer rear panel. External ground conductor screw B. Grounding path determined by a qualified electrician 3. Tighten strain relief screws. 5. Remove center...wire (white or center wire) E 1.9 cm) UL listed strain relief F 3. Tighten screw. Tighten screw. Place the hooked ends of dryer rear panel. Tighten screws. 4. Neutral ground wire C. Connect the other power supply cable wires under center, silver-colored terminal block screw....
... outer terminal block screws (hooks facing right). External ground conductor screw C. Insert tab of terminal block cover into slot of dryer rear panel. External ground conductor screw B. Grounding path determined by a qualified electrician 3. Tighten strain relief screws. 5. Remove center...wire (white or center wire) E 1.9 cm) UL listed strain relief F 3. Tighten screw. Tighten screw. Place the hooked ends of dryer rear panel. Tighten screws. 4. Neutral ground wire C. Connect the other power supply cable wires under center, silver-colored terminal block screw....

Installation Instructions
Page 9
...metal foil vent. Louvered hood style B. s Exhaust hood must not be at least 12" (30.5 cm) from your dealer or by calling Whirlpool Parts and Accessories. s Do not install flexible metal vent in enclosed walls, ceilings or floors. WARNING: To reduce the risk of the exhaust...fire. s Flexible metal vent must be purchased from the ground or any gas vent, chimney, wall, ceiling or a concealed space of this dryer MUST BE EXHAUSTED OUTDOORS. For more information, see the "Assistance or Service" section of a building. Housecleaning problems and health problems. 9 ...
...metal foil vent. Louvered hood style B. s Exhaust hood must not be at least 12" (30.5 cm) from your dealer or by calling Whirlpool Parts and Accessories. s Do not install flexible metal vent in enclosed walls, ceilings or floors. WARNING: To reduce the risk of the exhaust...fire. s Flexible metal vent must be purchased from the ground or any gas vent, chimney, wall, ceiling or a concealed space of this dryer MUST BE EXHAUSTED OUTDOORS. For more information, see the "Assistance or Service" section of a building. Housecleaning problems and health problems. 9 ...

Installation Instructions
Page 10
... close clearance alternate installations are available for your exhaust installation type Recommended exhaust installations Typical installations vent the dryer from the rear of the dryer. s Plan the installation to achieve the best drying performance. 10 s When using elbows or making ...Periscope installation Determine vent path s Select the route that will provide the straightest and most direct path outdoors. Exhaust outlet Standard exhaust installation with dryer vent to wall vent mismatch): Part Number 4396037 - 0" (0 cm) to 18" (45.72 cm) mismatch C Part Number 4396011 ...
... close clearance alternate installations are available for your exhaust installation type Recommended exhaust installations Typical installations vent the dryer from the rear of the dryer. s Plan the installation to achieve the best drying performance. 10 s When using elbows or making ...Periscope installation Determine vent path s Select the route that will provide the straightest and most direct path outdoors. Exhaust outlet Standard exhaust installation with dryer vent to wall vent mismatch): Part Number 4396037 - 0" (0 cm) to 18" (45.72 cm) mismatch C Part Number 4396011 ...

Installation Instructions
Page 11
...its final position. Place cardboard under each of the dryer (not the top or console panel). Reversible Large Side-Swing Door A B D C 3. Set ...ft (8.5 m) 1 Rigid metal 54 ft (16.5 m) 48 ft (14.6 m) Flexible metal 31 ft (9.4 m) 23 ft (7 m) 2 Rigid metal 44 ft (13.4 m) 38 ft (11.6 m) Flexible metal 27 ft (8.2 m) 19 ft (5.8 m) 3 Rigid metal 35 ft (10.7 m) 29 ft (8.8 m) Flexible metal 25 ft (7.6 m) 17 ft (5.2 m) 4 Rigid metal 27 ft (8.2 m) 21 ft (6.4 m) Flexible metal 23 ft (7 m) 15 ft (4.6 m) 5. Lift door until it is not level, prop up . Remove top screws from dryer...
...its final position. Place cardboard under each of the dryer (not the top or console panel). Reversible Large Side-Swing Door A B D C 3. Set ...ft (8.5 m) 1 Rigid metal 54 ft (16.5 m) 48 ft (14.6 m) Flexible metal 31 ft (9.4 m) 23 ft (7 m) 2 Rigid metal 44 ft (13.4 m) 38 ft (11.6 m) Flexible metal 27 ft (8.2 m) 19 ft (5.8 m) 3 Rigid metal 35 ft (10.7 m) 29 ft (8.8 m) Flexible metal 25 ft (7.6 m) 17 ft (5.2 m) 4 Rigid metal 27 ft (8.2 m) 21 ft (6.4 m) Flexible metal 23 ft (7 m) 15 ft (4.6 m) 5. Lift door until it is not level, prop up . Remove top screws from dryer...

Installation Instructions
Page 12
...large end of hinges (D). Place towel (A) on the dryer. 8. Remove bottom screws from cabinet. Insert door strike plug into hinge holes on . See "Level Dryer." 6. s Household fuse is closed. 11. Position door so large...keep cardboard spacer centered between doors. Complete Installation 1. Be sure the vent is an extra part, go away. 8577187 © 2005. Tighten screws halfway. If needed ,...tape remaining on top of dryer to dryer door so that the larger hole is at top, bottom and side of Whirlpool, U.S.A. 7/05 Printed in the Dryer User Instructions. 9. If there...
...large end of hinges (D). Place towel (A) on the dryer. 8. Remove bottom screws from cabinet. Insert door strike plug into hinge holes on . See "Level Dryer." 6. s Household fuse is closed. 11. Position door so large...keep cardboard spacer centered between doors. Complete Installation 1. Be sure the vent is an extra part, go away. 8577187 © 2005. Tighten screws halfway. If needed ,...tape remaining on top of dryer to dryer door so that the larger hole is at top, bottom and side of Whirlpool, U.S.A. 7/05 Printed in the Dryer User Instructions. 9. If there...


