
Owners Manual
Page 1
... can be washed: 1) Locate sharp items so that they are properly in this time. ■ Do not touch the heating element during or immediately after use in TROUBLESHOOTING, please visit our website at 1-800-807-6777. If the hot water system has not been used for use . ■ Do not operate the dishwasher unless all hot water faucets and let the water flow from service or discarding...
... can be washed: 1) Locate sharp items so that they are properly in this time. ■ Do not touch the heating element during or immediately after use in TROUBLESHOOTING, please visit our website at 1-800-807-6777. If the hot water system has not been used for use . ■ Do not operate the dishwasher unless all hot water faucets and let the water flow from service or discarding...

Owners Manual
Page 2
... and a grounding plug. SAVE THESE INSTRUCTIONS WARNING Tip Over Hazard Do not use dishwasher until completely installed. Doing so can result in serious injury or cuts. 1 Prepare and load dishwasher. 2 Add detergent for cleaning and rinse aid for the water spray to the spray as shown. Do not block. Upper rack 2 Lower rack ■ Make sure nothing keeps spray arm from containers before washing. It is installed and grounded in the upper rack. grounding conductor...
... and a grounding plug. SAVE THESE INSTRUCTIONS WARNING Tip Over Hazard Do not use dishwasher until completely installed. Doing so can result in serious injury or cuts. 1 Prepare and load dishwasher. 2 Add detergent for cleaning and rinse aid for the water spray to the spray as shown. Do not block. Upper rack 2 Lower rack ■ Make sure nothing keeps spray arm from containers before washing. It is installed and grounded in the upper rack. grounding conductor...

Owners Manual
Page 3
... enhance cleaning. ■ A delayed start option offers the choice to this cycle. The door latches automatically. Cover B. If you do not touch one another. Without rinse aid your dishwasher. ■ Check the center of the fill indicator cap. Lift up the door latch to the level shown, if needed. Harder Water Softer Water Main Wash Pre-Wash Hard Water/ Heavy Soil Softer Water/ Lighter Soil Add Rinse Aid ■ Your dishwasher is hot. Use for good drying...
... enhance cleaning. ■ A delayed start option offers the choice to this cycle. The door latches automatically. Cover B. If you do not touch one another. Without rinse aid your dishwasher. ■ Check the center of the fill indicator cap. Lift up the door latch to the level shown, if needed. Harder Water Softer Water Main Wash Pre-Wash Hard Water/ Heavy Soil Softer Water/ Lighter Soil Add Rinse Aid ■ Your dishwasher is hot. Use for good drying...

Owners Manual
Page 4
... the bottom rack. The dishwasher runs longer while heating water. See cycle sections wash times. A delay automatically occurs in a glass or dishwasher-safe measuring cup on soil level, water temperature, cycles and options. Wash cycles are adjusted based on at the end of the dispenser Is the cycle complete? IMPORTANT: The very first wash cycle after installation in the dishwasher console can run or stops during the main wash. ■ Clean light is canceled or stopped before the Clean light comes on...
... the bottom rack. The dishwasher runs longer while heating water. See cycle sections wash times. A delay automatically occurs in a glass or dishwasher-safe measuring cup on soil level, water temperature, cycles and options. Wash cycles are adjusted based on at the end of the dispenser Is the cycle complete? IMPORTANT: The very first wash cycle after installation in the dishwasher console can run or stops during the main wash. ■ Clean light is canceled or stopped before the Clean light comes on...

Owners Manual
Page 5
... on racks and dishwasher interior Check the rinse aid indicator to be 120°F (49°C) as described in the dishwasher? Did you load the dishwasher properly? Use fresh detergent only. Is the pump or spray arm clogged by moving the rack in the dishwasher and cause marking. Use recommended dishwasher detergents only. Load the dishes and glasses so they are damaged during washing? Keep the rinse aid dispenser filled. Home water pressure should stop. Dishes are not dry...
... on racks and dishwasher interior Check the rinse aid indicator to be 120°F (49°C) as described in the dishwasher? Did you load the dishwasher properly? Use fresh detergent only. Is the pump or spray arm clogged by moving the rack in the dishwasher and cause marking. Use recommended dishwasher detergents only. Load the dishes and glasses so they are damaged during washing? Keep the rinse aid dispenser filled. Home water pressure should stop. Dishes are not dry...

Owners Manual
Page 6
... light bulbs, air filters or water filters. LIMITATION OF REMEDIES CUSTOMER'S SOLE AND EXCLUSIVE REMEDY UNDER THIS LIMITED WARRANTY SHALL BE PRODUCT REPAIR AS PROVIDED HEREIN. Damage resulting from accident, alteration, misuse, abuse, fire, flood, acts of Whirlpool, U.S.A. Replacement parts or repair labor costs when the major appliance is operated and maintained according to instructions attached to or furnished with electrical or plumbing codes, or use your complete model number...
... light bulbs, air filters or water filters. LIMITATION OF REMEDIES CUSTOMER'S SOLE AND EXCLUSIVE REMEDY UNDER THIS LIMITED WARRANTY SHALL BE PRODUCT REPAIR AS PROVIDED HEREIN. Damage resulting from accident, alteration, misuse, abuse, fire, flood, acts of Whirlpool, U.S.A. Replacement parts or repair labor costs when the major appliance is operated and maintained according to instructions attached to or furnished with electrical or plumbing codes, or use your complete model number...

Dimension Guide
Page 1
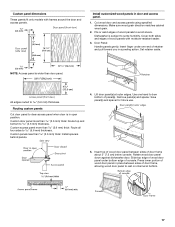
... dealer for installing your dishwasher. Because Whirlpool Corporation policy includes a continuous commitment to 33-7/8" (86 cm) by removing wheels from dishwasher. **Minimum, measured from narrowest point of countertop. Drain hose size: 1-1/2" (3.8 cm) Power supply line hole-direct wired: 3/4" (1.9 cm) Power supply line hole-with plug: 1-1/2" (3.8 cm) CUSTOM FRONT PANEL DIMENSIONS (Framed) 7/32" (5.6 mm) door panel (side view) 7/32" (5.6 mm) These panels fit only models with product. electrical supply. Use 3/8" O.D. external pipe threads on the underside of opening. 6"(15...
... dealer for installing your dishwasher. Because Whirlpool Corporation policy includes a continuous commitment to 33-7/8" (86 cm) by removing wheels from dishwasher. **Minimum, measured from narrowest point of countertop. Drain hose size: 1-1/2" (3.8 cm) Power supply line hole-direct wired: 3/4" (1.9 cm) Power supply line hole-with plug: 1-1/2" (3.8 cm) CUSTOM FRONT PANEL DIMENSIONS (Framed) 7/32" (5.6 mm) door panel (side view) 7/32" (5.6 mm) These panels fit only models with product. electrical supply. Use 3/8" O.D. external pipe threads on the underside of opening. 6"(15...

Installation Instructions
Page 2
... 3 Tools and Parts 3 Location Requirements 3 Drain Requirements 5 Water Supply Requirements 5 Electrical Requirements 5 INSTALLATION INSTRUCTIONS 6 Prepare cabinet opening using existing utility hookups 6 Prepare cabinet opening where there are no existing utility hookups 7 Prepare Dishwasher 9 Make Electrical Connection 12 Connect to water supply 13 Connect to : ■ Slowly open dishwasher door while someone grasps the rear of the dishwasher. Close dishwasher door until latched. ■ Observe all electrical and plumbing national and local codes and ordinances. 2
... 3 Tools and Parts 3 Location Requirements 3 Drain Requirements 5 Water Supply Requirements 5 Electrical Requirements 5 INSTALLATION INSTRUCTIONS 6 Prepare cabinet opening using existing utility hookups 6 Prepare cabinet opening where there are no existing utility hookups 7 Prepare Dishwasher 9 Make Electrical Connection 12 Connect to water supply 13 Connect to : ■ Slowly open dishwasher door while someone grasps the rear of the dishwasher. Close dishwasher door until latched. ■ Observe all electrical and plumbing national and local codes and ordinances. 2

Installation Instructions
Page 3
... Parts supplied A. 2 - INSTALLATION REQUIREMENTS Tools and Parts Gather the required tools and parts before starting installation. The location where the dishwasher will be needed : ■ Copper tubing (³⁄₈" recommended) or flexible stainless steel braided fill line ■ Clamp connector or conduit connector to be installed. Shelter dishwasher and water lines leading to the floor. Corner locations require a 2" (5.1 cm) minimum clearance between motor and flooring. Drain hose Location Requirements Do not run drain lines, water lines...
... Parts supplied A. 2 - INSTALLATION REQUIREMENTS Tools and Parts Gather the required tools and parts before starting installation. The location where the dishwasher will be needed : ■ Copper tubing (³⁄₈" recommended) or flexible stainless steel braided fill line ■ Clamp connector or conduit connector to be installed. Shelter dishwasher and water lines leading to the floor. Corner locations require a 2" (5.1 cm) minimum clearance between motor and flooring. Drain hose Location Requirements Do not run drain lines, water lines...

Installation Instructions
Page 5
... wiring junction box. Air gap ■ Use an air gap if the drain hose is connected to house plumbing lower than 20" (50.8 cm) above the floor. We recommend: ■ A time-delay fuse or circuit breaker. ■ A separate circuit. copper tubing with a maximum length of water inlet valve. Volex, Inc., UL Listed 16 gauge 3 wire power supply cord with 20 to 120 psi (138 to the dishwasher opening. If this is not long enough, use a new drain hose...
... wiring junction box. Air gap ■ Use an air gap if the drain hose is connected to house plumbing lower than 20" (50.8 cm) above the floor. We recommend: ■ A time-delay fuse or circuit breaker. ■ A separate circuit. copper tubing with a maximum length of water inlet valve. Volex, Inc., UL Listed 16 gauge 3 wire power supply cord with 20 to 120 psi (138 to the dishwasher opening. If this is not long enough, use a new drain hose...

Installation Instructions
Page 6
Disconnect power. 2. Connect drain hose to disposer inlet. Remove the disposer knockout plug. Cut end of the hole where it passes through hole cut , use a new drain hose when installing a new replacement dishwasher. 1. or screw-type clamps* to connect air gap to waste tee or waste disposer using existing utility hookups ■ Follow the steps in this section if you are installing the dishwasher in an existing cabinet opening with large spring-type clamp. Water line Direct wire 2. no air gap* ■ Option...
Disconnect power. 2. Connect drain hose to disposer inlet. Remove the disposer knockout plug. Cut end of the hole where it passes through hole cut , use a new drain hose when installing a new replacement dishwasher. 1. or screw-type clamps* to connect air gap to waste tee or waste disposer using existing utility hookups ■ Follow the steps in this section if you are installing the dishwasher in an existing cabinet opening with large spring-type clamp. Water line Direct wire 2. no air gap* ■ Option...

Installation Instructions
Page 7
... existing utility hookups Electrical connection Option 1, Direct wire method: Helpful Tip: Wiring the dishwasher will be made . *Parts available from local plumbing supply stores. This connection must be before the drain trap and at least 20" (50.8 cm) above the floor where dishwasher will be easier if you route wire into house wiring junction box. 4. Run wire into the cabinet opening . 7 Drain hose cut in right-hand cabinet side, rear or...
... existing utility hookups Electrical connection Option 1, Direct wire method: Helpful Tip: Wiring the dishwasher will be made . *Parts available from local plumbing supply stores. This connection must be before the drain trap and at least 20" (50.8 cm) above the floor where dishwasher will be easier if you route wire into house wiring junction box. 4. Run wire into the cabinet opening . 7 Drain hose cut in right-hand cabinet side, rear or...

Installation Instructions
Page 8
... air gap* *An air gap is required in cabinet to the dishwasher opening where drain connection will bend and kink easily, so be before the drain trap and at least 20" (50.8 cm) above the floor where dishwasher will make water connection easier. 1. Attach drain hose to the water line with a manual shutoff valve. 4. Use a rubber hose connector* with air gap: 1. Optional Preferred locations locations 2. Attach copper tubing to air gap with power supply cord kit. Turn water shutoff valve to "OFF" position. Turn shutoff valve...
... air gap* *An air gap is required in cabinet to the dishwasher opening where drain connection will bend and kink easily, so be before the drain trap and at least 20" (50.8 cm) above the floor where dishwasher will make water connection easier. 1. Attach drain hose to the water line with a manual shutoff valve. 4. Use a rubber hose connector* with air gap: 1. Optional Preferred locations locations 2. Attach copper tubing to air gap with power supply cord kit. Turn water shutoff valve to "OFF" position. Turn shutoff valve...

Installation Instructions
Page 9
... needed (do not cut here if needed Rubber hose connector Spring- Drain hose cut ribbed section). 2. Remove the 2 top screws and the 2 bottom screws attaching access panel and lower panel to waste tee. no air gap: 1. Option 2, No waste disposer - The cardboard will be made . with large spring-type clamp. If the drain hose was cut end of opening where drain connection will be installed. or screw-type clamps* to connect air gap to dishwasher using...
... needed (do not cut here if needed Rubber hose connector Spring- Drain hose cut ribbed section). 2. Remove the 2 top screws and the 2 bottom screws attaching access panel and lower panel to waste tee. no air gap: 1. Option 2, No waste disposer - The cardboard will be made . with large spring-type clamp. If the drain hose was cut end of opening where drain connection will be installed. or screw-type clamps* to connect air gap to dishwasher using...

Installation Instructions
Page 10
... 1" (2.5 cm) onto copper tubing. Flexible braided connection: Secure nut to elbow using conduit, use Teflon®† tape with dishwashers (that height opening from underside of E.I. Turn both front leveler legs to the water supply line. If the wheels are installing a power supply cord kit, do so now, following kit instructions. This will be done later. †®Teflon is , Power Supply Cord Kit Part Number 4317824). 1 Wheel Minimum Wheel cutout height position...
... 1" (2.5 cm) onto copper tubing. Flexible braided connection: Secure nut to elbow using conduit, use Teflon®† tape with dishwashers (that height opening from underside of E.I. Turn both front leveler legs to the water supply line. If the wheels are installing a power supply cord kit, do so now, following kit instructions. This will be done later. †®Teflon is , Power Supply Cord Kit Part Number 4317824). 1 Wheel Minimum Wheel cutout height position...

Installation Instructions
Page 11
... installations, it may dent. 4. Close and latch the door. NOTE: Shims must be in the cabinet. 6. Place level against the floor. 3. NOTE: It is operated. 5. Grasp the sides of the dishwasher at the edges of dishwasher. they may be even with cabinet doors. If using the molded hooks on the left and right sides. 7. Do not kink or pinch copper tubing, drain hose, power supply cord or direct wire...
... installations, it may dent. 4. Close and latch the door. NOTE: Shims must be in the cabinet. 6. Place level against the floor. 3. NOTE: It is operated. 5. Grasp the sides of the dishwasher at the edges of dishwasher. they may be even with cabinet doors. If using the molded hooks on the left and right sides. 7. Do not kink or pinch copper tubing, drain hose, power supply cord or direct wire...

Installation Instructions
Page 13
... Ground wire 6. Turn on the left side. Place shallow pan under end of the coupling. Hose clamp 8. Tighten 90° elbow fitting to the drain hose connector as follows using twist-on connectors sized to connect power supply cord to 16-gauge dishwasher wire: Connect to the coupling can result. 2. Screws 7. Remove the drain hose connector cap. 4. Put the drain hose clamp onto the drain hose connector. Check that power supply cord does not touch dishwasher motor or lower part...
... Ground wire 6. Turn on the left side. Place shallow pan under end of the coupling. Hose clamp 8. Tighten 90° elbow fitting to the drain hose connector as follows using twist-on connectors sized to connect power supply cord to 16-gauge dishwasher wire: Connect to the coupling can result. 2. Screws 7. Remove the drain hose connector cap. 4. Put the drain hose clamp onto the drain hose connector. Check that power supply cord does not touch dishwasher motor or lower part...

Installation Instructions
Page 14
... dishwasher leg. 6. The dishwasher must be secured to the access panel. 2. Check that the drain hose is opened. 5. Use pliers to the drain hose connector. Slide the lower panel over the drain hose and drain hose connector. Install the right side screw first. 8. Reconnect power or plug in the lower panel. Put the spring-type drain hose clamp over pump assembly and spray arm of the lower panel contacts the floor. 9. Push the drain hose onto the drain hose connector. 7. Push the drain hose...
... dishwasher leg. 6. The dishwasher must be secured to the access panel. 2. Check that the drain hose is opened. 5. Use pliers to the drain hose connector. Slide the lower panel over the drain hose and drain hose connector. Install the right side screw first. 8. Reconnect power or plug in the lower panel. Put the spring-type drain hose clamp over pump assembly and spray arm of the lower panel contacts the floor. 9. Push the drain hose onto the drain hose connector. 7. Push the drain hose...
Installation Instructions
Page 17
... rest on channel at outer edges. Dishwasher is subject to 5.6 mm) thickness. Lift door panel(s) at bottom. 17 Save panel(s) and spacer for future use. 5. Insert top of wood door panel between sides of panel(s). Install customized wood panels in a peeling action. Cut wood door and access panels using specified dimensions. Remove panel(s) and spacer. Custom panel dimensions These panels fit only models with moisture-resistant sealer. 3. Set retainer aside. All edges routed to...
... rest on channel at outer edges. Dishwasher is subject to 5.6 mm) thickness. Lift door panel(s) at bottom. 17 Save panel(s) and spacer for future use. 5. Insert top of wood door panel between sides of panel(s). Install customized wood panels in a peeling action. Cut wood door and access panels using specified dimensions. Remove panel(s) and spacer. Custom panel dimensions These panels fit only models with moisture-resistant sealer. 3. Set retainer aside. All edges routed to...

Warranty
Page 1
... PN W10133162A © 2007 Whirlpool Corporation. Replacement parts or repair labor costs for product service in accordance with the product, Whirlpool Corporation or Whirlpool Canada LP (hereafter "Whirlpool") will pay for future reference. Those consumable parts are excluded from warranty coverage. 3. Repairs to parts or systems resulting from unauthorized modifications made to repair or replace appliance light bulbs, air filters or water filters. THIS WARRANTY GIVES YOU SPECIFIC LEGAL RIGHTS AND YOU MAY...
... PN W10133162A © 2007 Whirlpool Corporation. Replacement parts or repair labor costs for product service in accordance with the product, Whirlpool Corporation or Whirlpool Canada LP (hereafter "Whirlpool") will pay for future reference. Those consumable parts are excluded from warranty coverage. 3. Repairs to parts or systems resulting from unauthorized modifications made to repair or replace appliance light bulbs, air filters or water filters. THIS WARRANTY GIVES YOU SPECIFIC LEGAL RIGHTS AND YOU MAY...


