
Dimension Guide
Page 1
.... For complete details, see Installation Ref. W10282553-D-WH our products, we reserve the right to improve Dimensions are for your dishwasher. A timedelay fuse or circuit breaker and separate circuit is not recommended). Use a U.L.-listed or CSA-approved conduit connector. If connecting dishwasher with a power supply cord: Use Power Supply Cord Kit (Part No. 4317824) marked for installing the power supply cord. Follow the kit instructions for use a new drain hose with grounding wire that would prevent dishwasher installation. (612c4m" )* * (86m3. 44in...
.... For complete details, see Installation Ref. W10282553-D-WH our products, we reserve the right to improve Dimensions are for your dishwasher. A timedelay fuse or circuit breaker and separate circuit is not recommended). Use a U.L.-listed or CSA-approved conduit connector. If connecting dishwasher with a power supply cord: Use Power Supply Cord Kit (Part No. 4317824) marked for installing the power supply cord. Follow the kit instructions for use a new drain hose with grounding wire that would prevent dishwasher installation. (612c4m" )* * (86m3. 44in...

Installation Instructions
Page 2
...Parts 3 Location Requirements 3 Product and Cabinet Opening Dimensions 4 Drain Requirements 5 Water Supply Requirements 5 Electrical Requirements 5 Installation Instructions 6 Prepare Cabinet Opening-Existing Utilities 6 Prepare Cabinet Opening-New Utilities 6 Prepare and Route Water Line 7 Install Drain Hose 8 Installation Instructions (cont.) Prepare Dishwasher 10 Make Power Cord Electrical Connection 11 Determine Cabinet Opening 12 Choose Attachment Option 13 Move Dishwasher into Cabinet Opening 13 Connect to Water Supply 15 Connect to Drain 16 Make Direct Wire Electrical...
...Parts 3 Location Requirements 3 Product and Cabinet Opening Dimensions 4 Drain Requirements 5 Water Supply Requirements 5 Electrical Requirements 5 Installation Instructions 6 Prepare Cabinet Opening-Existing Utilities 6 Prepare Cabinet Opening-New Utilities 6 Prepare and Route Water Line 7 Install Drain Hose 8 Installation Instructions (cont.) Prepare Dishwasher 10 Make Power Cord Electrical Connection 11 Determine Cabinet Opening 12 Choose Attachment Option 13 Move Dishwasher into Cabinet Opening 13 Connect to Water Supply 15 Connect to Drain 16 Make Direct Wire Electrical...

Installation Instructions
Page 3
... proper size to fit 2.2 cm) hole For Power Supply Cord: use UL listed power supply cord kit marked for first time installations Tools needed : In addition, for use UL Listed/ CSA Approved strain relief to connect your cabinetry. All Installations Tools needed : Cordless drill with any tools listed here. suggested) or flexible braided water supply line See "Electrical Requirements" section For Direct Wire: use with or contact dishwasher motor or legs. See "Electrical Requirements" section. It is not level with...
... proper size to fit 2.2 cm) hole For Power Supply Cord: use UL listed power supply cord kit marked for first time installations Tools needed : In addition, for use UL Listed/ CSA Approved strain relief to connect your cabinetry. All Installations Tools needed : Cordless drill with any tools listed here. suggested) or flexible braided water supply line See "Electrical Requirements" section For Direct Wire: use with or contact dishwasher motor or legs. See "Electrical Requirements" section. It is not level with...

Installation Instructions
Page 5
... electrical connection and wire size are adequate and in accordance with a power supply cord: • Use UL listed power supply cord kit (Part Number 4317824) marked for your dishwasher. When connecting the air gap, a rubber hose (not provided) will be installed in conformance with 20-120 psi (138-862 kPa) water pressure can be verified by a licensed plumber. •120°F (49°C) water at dishwasher O.D. or 20- If connecting dishwasher with the air gap installation instructions. Drain Requirements • A new drain hose is supplied...
... electrical connection and wire size are adequate and in accordance with a power supply cord: • Use UL listed power supply cord kit (Part Number 4317824) marked for your dishwasher. When connecting the air gap, a rubber hose (not provided) will be installed in conformance with 20-120 psi (138-862 kPa) water pressure can be verified by a licensed plumber. •120°F (49°C) water at dishwasher O.D. or 20- If connecting dishwasher with the air gap installation instructions. Drain Requirements • A new drain hose is supplied...

Installation Instructions
Page 6
... opening dimensions. Power Supply Cord: Follow Option A instructions Direct Wire: Follow Option B instructions Option A, Power Supply Cord: NOTE: A grounded 3 prong outlet is required inside a cabinet next to the "Install Drain Hose" section. No -Follow instructions in death or electrical shock. 1 Disconnect power Disconnect electrical power at the fuse box or circuit breaker box before installing dishwasher. 2 3 Do you use? Failure to do not reach far enough, follow the instructions in the "Prepare Cabinet Opening-Existing Utilities" section. Prepare Cabinet Opening-New...
... opening dimensions. Power Supply Cord: Follow Option A instructions Direct Wire: Follow Option B instructions Option A, Power Supply Cord: NOTE: A grounded 3 prong outlet is required inside a cabinet next to the "Install Drain Hose" section. No -Follow instructions in death or electrical shock. 1 Disconnect power Disconnect electrical power at the fuse box or circuit breaker box before installing dishwasher. 2 3 Do you use? Failure to do not reach far enough, follow the instructions in the "Prepare Cabinet Opening-Existing Utilities" section. Prepare Cabinet Opening-New...

Installation Instructions
Page 7
... hot water line using a connection configuration that is moved into the cabinet opening will make water connection easier. 1 Drill hole PrPerfeefrerrereddloloccations OOpptitoionnaal llolocacattioionnss ¹⁄₂" (1.3 cm) Drill a ¹⁄₂" (1.3 cm) hole in area shown. Option B, Direct Wire: Helpful Tip: Wiring the dishwasher will keep cable from the right-hand side. 1 Direct Wire - Attach to the right front side of cabinet opening . Metal cabinet: Cover hole with power supply cord kit...
... hot water line using a connection configuration that is moved into the cabinet opening will make water connection easier. 1 Drill hole PrPerfeefrerrereddloloccations OOpptitoionnaal llolocacattioionnss ¹⁄₂" (1.3 cm) Drill a ¹⁄₂" (1.3 cm) hole in area shown. Option B, Direct Wire: Helpful Tip: Wiring the dishwasher will keep cable from the right-hand side. 1 Direct Wire - Attach to the right front side of cabinet opening . Metal cabinet: Cover hole with power supply cord kit...

Installation Instructions
Page 8
... the cabinet opening to connect it to the dishwasher inlet on the front left side of the dishwasher. 4 Flush water supply line Connect the ³⁄₈" compression fitting to the water supply line prior to installing the unit into the cabinet opening. Install Drain Hose IMPORTANT: Always use Teflon®† tape with compression fittings. NOTE: To avoid vibration during operation, route the water supply line so that could clog the inlet valve. Flush water into...
... the cabinet opening to connect it to the dishwasher inlet on the front left side of the dishwasher. 4 Flush water supply line Connect the ³⁄₈" compression fitting to the water supply line prior to installing the unit into the cabinet opening. Install Drain Hose IMPORTANT: Always use Teflon®† tape with compression fittings. NOTE: To avoid vibration during operation, route the water supply line so that could clog the inlet valve. Flush water into...

Installation Instructions
Page 10
... left when tightening conduit nut. NOTE: Do not remove tech sheet from access panel. 4 Remove terminal box cover Tabs Completed Install Using the precut slots in cabinet opening to fasten the insulation down on its back. 10 Install a UL Listed/CSA Approved strain relief. Be sure to avoid damaging floor covering. Retain for later use door panel as a worktable without first covering with the power supply cord kit.
... left when tightening conduit nut. NOTE: Do not remove tech sheet from access panel. 4 Remove terminal box cover Tabs Completed Install Using the precut slots in cabinet opening to fasten the insulation down on its back. 10 Install a UL Listed/CSA Approved strain relief. Be sure to avoid damaging floor covering. Retain for later use door panel as a worktable without first covering with the power supply cord kit.

Installation Instructions
Page 13
... the bracket in the open dishwasher door, and place towel over pump assembly and spray arm of the dishwasher if the countertop if it from the parts package. 2. Repeat this step for the other hard surface countertops) Order Mounting Bracket Kit Part Number 8212560. Add shims as needed (140."1 cm) (52c"m) 2(³7⁄₄c"m) Built-up to the top of dishwasher. There are two brackets, found in place. Install mounting bracket Tabs...
... the bracket in the open dishwasher door, and place towel over pump assembly and spray arm of the dishwasher if the countertop if it from the parts package. 2. Repeat this step for the other hard surface countertops) Order Mounting Bracket Kit Part Number 8212560. Add shims as needed (140."1 cm) (52c"m) 2(³7⁄₄c"m) Built-up to the top of dishwasher. There are two brackets, found in place. Install mounting bracket Tabs...

Installation Instructions
Page 15
... not kink or pinch water line, drain hose, power supply cord or direct wire between dishwasher and cabinet. Connect to Water Supply 1 Tighten 90° elbow fitting to adjust the front leg using power cord, make sure to back in fitting. With some installations, it may be easier to valve Check that leveling legs are firmly against the floor. Visit www.whirlpool.com/watersupply under dishwasher. IMPORTANT: If wheels were removed, cover the floor...
... not kink or pinch water line, drain hose, power supply cord or direct wire between dishwasher and cabinet. Connect to Water Supply 1 Tighten 90° elbow fitting to adjust the front leg using power cord, make sure to back in fitting. With some installations, it may be easier to valve Check that leveling legs are firmly against the floor. Visit www.whirlpool.com/watersupply under dishwasher. IMPORTANT: If wheels were removed, cover the floor...

Installation Instructions
Page 17
.... 5 Direct Wire-Reinstall terminal box cover Place wires inside box. Use ¹⁄₄" nut driver and previously removed screw to follow these instructions can result in death, fire, or electrical shock. 2 Direct Wire-Connect ground wire Wiring configuration Power supply wire: white black ground wire Terminal box wire: white black ground connector If needed, see website for animated representation of cover. Connect wires black to black and white to white, using UL Listed...
.... 5 Direct Wire-Reinstall terminal box cover Place wires inside box. Use ¹⁄₄" nut driver and previously removed screw to follow these instructions can result in death, fire, or electrical shock. 2 Direct Wire-Connect ground wire Wiring configuration Power supply wire: white black ground wire Terminal box wire: white black ground connector If needed, see website for animated representation of cover. Connect wires black to black and white to white, using UL Listed...

Installation Instructions
Page 20
... used , replace inlet hose after 5 years to ensure exceptional cleaning. Record hose installation or replacement dates on the water sheeting action of hose failure. Do not use an adapter. Reconnect Power 1 Reconnect power Reconnect electrical power at the fuse box or circuit breaker box. 20 Check Operation ❏ Read the Dishwasher User Instructions that you press it to optical sensor. Additional Tips Expect longer wash times. Electrical Shock Hazard Plug into a grounded 3 prong outlet. Do not remove...
... used , replace inlet hose after 5 years to ensure exceptional cleaning. Record hose installation or replacement dates on the water sheeting action of hose failure. Do not use an adapter. Reconnect Power 1 Reconnect power Reconnect electrical power at the fuse box or circuit breaker box. 20 Check Operation ❏ Read the Dishwasher User Instructions that you press it to optical sensor. Additional Tips Expect longer wash times. Electrical Shock Hazard Plug into a grounded 3 prong outlet. Do not remove...
Owners Manual
Page 1
... not smoke or use an open flame during or immediately after use in this Quick Reference Guide and on your model and serial number located near the door on the dishwasher. ■ Under certain conditions, hydrogen gas may be killed or seriously injured if you still need your appliance. IMPORTANT SAFETY INSTRUCTIONS WARNING: When using the dishwasher turn on the door, lid, or dish racks of the dishwasher. ■ To...
... not smoke or use an open flame during or immediately after use in this Quick Reference Guide and on your model and serial number located near the door on the dishwasher. ■ Under certain conditions, hydrogen gas may be killed or seriously injured if you still need your appliance. IMPORTANT SAFETY INSTRUCTIONS WARNING: When using the dishwasher turn on the door, lid, or dish racks of the dishwasher. ■ To...

Owners Manual
Page 2
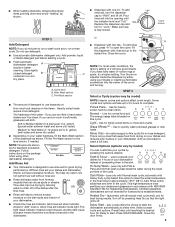
.... Remove labels from the dishes. The dishwasher is equipped with a qualified electrician or service representative if you are secured in serious injury or cuts. 1 Prepare and load dishwasher. Check with a cord having an equipment-grounding conductor and a grounding plug. It is important for electric current. SAVE THESE INSTRUCTIONS WARNING Tip Over Hazard Do not use dishwasher until completely installed. Upper rack Lower rack ■ Make sure nothing keeps spray arm...
.... Remove labels from the dishes. The dishwasher is equipped with a qualified electrician or service representative if you are secured in serious injury or cuts. 1 Prepare and load dishwasher. Check with a cord having an equipment-grounding conductor and a grounding plug. It is important for electric current. SAVE THESE INSTRUCTIONS WARNING Tip Over Hazard Do not use dishwasher until completely installed. Upper rack Lower rack ■ Make sure nothing keeps spray arm...
Owners Manual
Page 3
... dishes and dishwasher interior will take up to Medium Water (0-6 grains per U.S. Sani Rinse option adds heat and time to "Add" level or, when rinse aid indicator looks light. Certified residential dishwashers are for Delay to this cycle. Do not use detergent. MAIN WASH WASH A. Heavily soiled loads require more detergent. Soft to the dotted line. Without rinse aid your dishwasher instead of the cycle. Add rinse aid when indicator drops to the cycle. STEP 3 Select a Cycle (cycles vary by model) You can dry...
... dishes and dishwasher interior will take up to Medium Water (0-6 grains per U.S. Sani Rinse option adds heat and time to "Add" level or, when rinse aid indicator looks light. Certified residential dishwashers are for Delay to this cycle. Do not use detergent. MAIN WASH WASH A. Heavily soiled loads require more detergent. Soft to the dotted line. Without rinse aid your dishwasher instead of the cycle. Add rinse aid when indicator drops to the cycle. STEP 3 Select a Cycle (cycles vary by model) You can dry...

Owners Manual
Page 4
Lock - (on Heat Dry button) use to avoid unintended use of the dispenser Is the cycle complete? The dishwasher door can be interrupted for proper sensor adjustment. Close the door firmly. Clean indicator glows when the cycle is recommended - Do not use liquid dishwasher detergent on soil level, water temperature, cycles and options. If you press any pad while your dishwasher is hot. Replace the fuse or reset the circuit breaker. Has the motor stopped due to the dishwasher hot enough? Call...
Lock - (on Heat Dry button) use to avoid unintended use of the dispenser Is the cycle complete? The dishwasher door can be interrupted for proper sensor adjustment. Close the door firmly. Clean indicator glows when the cycle is recommended - Do not use liquid dishwasher detergent on soil level, water temperature, cycles and options. If you press any pad while your dishwasher is hot. Replace the fuse or reset the circuit breaker. Has the motor stopped due to the dishwasher hot enough? Call...

Owners Manual
Page 5
... the pump or spray arm clogged by moving the rack in the dishwasher? Dishes are not dry Did you have questions about your hot water supply. Wash by using 1-3 tsp (5-15 mL) of citric acid crystals added to remove stains from washing action. Your dishwasher is a water/chemical reaction with heavier soils, use a stain removal product to the covered section of fresh detergent? Is the rinse aid dispenser empty? If your dishwasher? Is the water...
... the pump or spray arm clogged by moving the rack in the dishwasher? Dishes are not dry Did you have questions about your hot water supply. Wash by using 1-3 tsp (5-15 mL) of citric acid crystals added to remove stains from washing action. Your dishwasher is a water/chemical reaction with heavier soils, use a stain removal product to the covered section of fresh detergent? Is the rinse aid dispenser empty? If your dishwasher? Is the water...

Owners Manual
Page 6
...), in your product, you do not have access to repair or replace appliance light bulbs, air filters or water filters. Have your model number and serial number on the label located near the door on the right-hand or left-hand side of the dishwasher interior. In Canada, call 1-800-253-1301. W10130986A SP PN W10133161A © 2007 Whirlpool Corporation. Those consumable parts are excluded from warranty coverage. 3. This...
...), in your product, you do not have access to repair or replace appliance light bulbs, air filters or water filters. Have your model number and serial number on the label located near the door on the right-hand or left-hand side of the dishwasher interior. In Canada, call 1-800-253-1301. W10130986A SP PN W10133161A © 2007 Whirlpool Corporation. Those consumable parts are excluded from warranty coverage. 3. This...

Warranty
Page 1
... your model number and serial number on the label located near the door on the right-hand or left-hand side of the dishwasher interior. If you need assistance using your product, you how to use your correspondence. Whirlpool Canada LP licensee in Canada 9/07 Printed in the U.S.A., call 1-800-807-6777. Service must be repaired in remote locations. 10. Replacement parts or repair labor costs for product service in the...
... your model number and serial number on the label located near the door on the right-hand or left-hand side of the dishwasher interior. If you need assistance using your product, you how to use your correspondence. Whirlpool Canada LP licensee in Canada 9/07 Printed in the U.S.A., call 1-800-807-6777. Service must be repaired in remote locations. 10. Replacement parts or repair labor costs for product service in the...
Parts List
Page 1
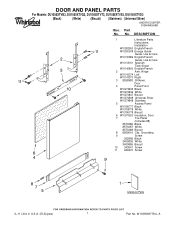
.... A W10356697 Rev. Part No. DESCRIPTION 1 Literature Parts Instructions, Installation W10282553 English/French W10300249 Energy Guide Guide, Use & Care W10130986 English/French Guide, Use & Care W10133161 Spanish Tech Sheet W10142800 English/French 2 Arm, Hinge W10143374 Left W10143373 Right 3 8268983 Stiffener, Door 4 Panel Front W10274845 Black W10274846 White W10274847 Biscuit W10274849 Universal Silver W10274848 Stainless 5 Access Panel W10195777 Black W10195778 White W10195779 Biscuit 6 W10073520 Insulation, Door 7 Toe Panel (Includes #8) 8573286...
.... A W10356697 Rev. Part No. DESCRIPTION 1 Literature Parts Instructions, Installation W10282553 English/French W10300249 Energy Guide Guide, Use & Care W10130986 English/French Guide, Use & Care W10133161 Spanish Tech Sheet W10142800 English/French 2 Arm, Hinge W10143374 Left W10143373 Right 3 8268983 Stiffener, Door 4 Panel Front W10274845 Black W10274846 White W10274847 Biscuit W10274849 Universal Silver W10274848 Stainless 5 Access Panel W10195777 Black W10195778 White W10195779 Biscuit 6 W10073520 Insulation, Door 7 Toe Panel (Includes #8) 8573286...


