Installation Instructions
Page 1
INSTALLATION INSTRUCTIONS COMMERCIAL DRYER Gas (120-Volt, 60-Hz) or Electric (120/240-Volt, 60-Hz) Table of Contents 2 8563800B www.roper.com
INSTALLATION INSTRUCTIONS COMMERCIAL DRYER Gas (120-Volt, 60-Hz) or Electric (120/240-Volt, 60-Hz) Table of Contents 2 8563800B www.roper.com
Installation Instructions
Page 2
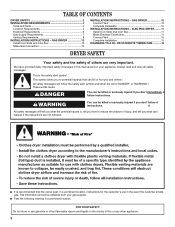
...WARNING." I Post the following warning in the event the customer smells gas. I It is the safety alert symbol. TABLE OF CONTENTS DRYER SAFETY 2 INSTALLATION REQUIREMENTS 4 Tools and Parts 4 Location Requirements 5 Electrical Requirements 6 Gas Supply Requirements 7 Venting Requirements 8 INSTALLATION INSTRUCTIONS ... for the customer's use gasoline or other flammable vapors and liquids in this or any other appliance. 2 ELECTRIC DRYER ........ 11 Install Coin Slide and Coin Box 11 Make Electrical Connection 11 Connect Vent 15 Complete Installation 15 CHANGING TO...
...WARNING." I Post the following warning in the event the customer smells gas. I It is the safety alert symbol. TABLE OF CONTENTS DRYER SAFETY 2 INSTALLATION REQUIREMENTS 4 Tools and Parts 4 Location Requirements 5 Electrical Requirements 6 Gas Supply Requirements 7 Venting Requirements 8 INSTALLATION INSTRUCTIONS ... for the customer's use gasoline or other flammable vapors and liquids in this or any other appliance. 2 ELECTRIC DRYER ........ 11 Install Coin Slide and Coin Box 11 Make Electrical Connection 11 Connect Vent 15 Complete Installation 15 CHANGING TO...
Installation Instructions
Page 3
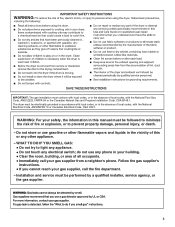
... to prevent property damage, personal injury, or death. - Follow the gas supplier's instructions. • If you cannot reach your gas supplier from a neighbor's phone. The dryer must be electrically grounded in the absence of this manual must be followed to minimize the risk of fire or explosion, or to light any...
... to prevent property damage, personal injury, or death. - Follow the gas supplier's instructions. • If you cannot reach your gas supplier from a neighbor's phone. The dryer must be electrically grounded in the absence of this manual must be followed to minimize the risk of fire or explosion, or to light any...
Installation Instructions
Page 4
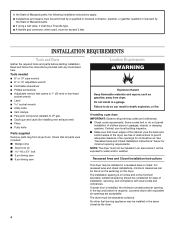
... Installations and repairs must be performed by a qualified or licensed contractor, plumber, or gasfitter qualified or licensed by the State of clothes dryers in garages, closets, or sleeping quarters. Read and follow the instructions provided with local codes and ordinances. Failure to permit adequate clearance... vent) I Pliers I If using a ball valve, it will be a T-handle type. Recessed Area and Closet Installation Instructions This dryer may be considered for ease of air openings for combustion air. Additional spacing should be installed in inches and is in the same closet...
... Installations and repairs must be performed by a qualified or licensed contractor, plumber, or gasfitter qualified or licensed by the State of clothes dryers in garages, closets, or sleeping quarters. Read and follow the instructions provided with local codes and ordinances. Failure to permit adequate clearance... vent) I Pliers I If using a ball valve, it will be a T-handle type. Recessed Area and Closet Installation Instructions This dryer may be considered for ease of air openings for combustion air. Additional spacing should be installed in inches and is in the same closet...
Installation Instructions
Page 5
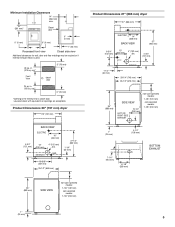
...minimum for a closet door. cm)* 3" (76 mm) *Opening is used. 48 sq. Louvered doors with equivalent air openings are acceptable. Product Dimensions 29" (737 mm) dryer 29" (737 mm) BACK VIEW ELECTRIC 16" (406 mm) 4-3/4" (121 mm) 13" (330 mm) 4" (102 mm) dia. in . (310 sq. GAS EXHAUST...mm) 25-1/2" (648 mm) 35" (889 mm) SIDE VIEW non-coin-operated models: 7-1/8" (181 mm) coin-operated models: 7-7/8" (200 mm) Product Dimensions 27" (686 mm) dryer 27" (686 mm) ELECTRIC 14" (356 mm) BACK VIEW 37" (940 mm) 6-3/4" (152 mm) 13" (330 mm) GAS 4" (102 mm) dia. 4-3/4" (121 ...
...minimum for a closet door. cm)* 3" (76 mm) *Opening is used. 48 sq. Louvered doors with equivalent air openings are acceptable. Product Dimensions 29" (737 mm) dryer 29" (737 mm) BACK VIEW ELECTRIC 16" (406 mm) 4-3/4" (121 mm) 13" (330 mm) 4" (102 mm) dia. in . (310 sq. GAS EXHAUST...mm) 25-1/2" (648 mm) 35" (889 mm) SIDE VIEW non-coin-operated models: 7-1/8" (181 mm) coin-operated models: 7-7/8" (200 mm) Product Dimensions 27" (686 mm) dryer 27" (686 mm) ELECTRIC 14" (356 mm) BACK VIEW 37" (940 mm) 6-3/4" (152 mm) 13" (330 mm) GAS 4" (102 mm) dia. 4-3/4" (121 ...
Installation Instructions
Page 6
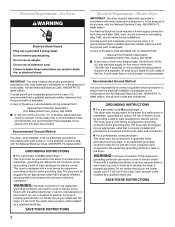
... homes built after 1996, and all local codes and ordinances. Recommended Ground Method The dryer, when installed, must be grounded. This dryer is adequate. I For a permanently connected dryer: This dryer must be connected to a grounded metal, permanent wiring system, or an equipment-grounding ... A time-delay fuse or circuit breaker is adequate and in a risk of electric shock. GROUNDING INSTRUCTIONS I For a grounded, cord-connected dryer: This dryer must be obtained from : National Fire Protection Association One Batterymarch Park, Quincy, MA 02269 I A 120-volt, 60-Hz, AC-only, ...
... homes built after 1996, and all local codes and ordinances. Recommended Ground Method The dryer, when installed, must be grounded. This dryer is adequate. I For a permanently connected dryer: This dryer must be connected to a grounded metal, permanent wiring system, or an equipment-grounding ... A time-delay fuse or circuit breaker is adequate and in a risk of electric shock. GROUNDING INSTRUCTIONS I For a grounded, cord-connected dryer: This dryer must be obtained from : National Fire Protection Association One Batterymarch Park, Quincy, MA 02269 I A 120-volt, 60-Hz, AC-only, ...
Installation Instructions
Page 7
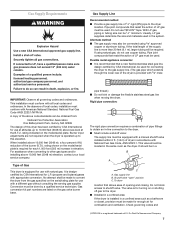
... local service company. Pipe joint compounds that a new flexible stainless steel gas line, design-certified by CSA International for connecting the dryer to convert the dryer from : National Fire Protection Association One Batterymarch Park, Quincy, MA 02269 The design of this elevation. With LP gas, piping ...or tubing size can be required. If the total length of dryer in the system. This installation must be equipped with a manual shutoff valve installed within 6 ft. (1.8 m) of the supply line is ...
... local service company. Pipe joint compounds that a new flexible stainless steel gas line, design-certified by CSA International for connecting the dryer to convert the dryer from : National Fire Protection Association One Batterymarch Park, Quincy, MA 02269 The design of this elevation. With LP gas, piping ...or tubing size can be required. If the total length of dryer in the system. This installation must be equipped with a manual shutoff valve installed within 6 ft. (1.8 m) of the supply line is ...
Installation Instructions
Page 8
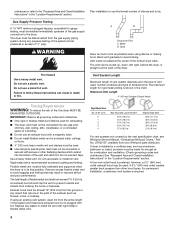
... the back of the system at least 12" (305 mm) from your Whirlpool parts distributor. The total length of fire, this dryer MUST BE EXHAUSTED OUTDOORS. of vent used . Bend vent gradually to the dryer. I Use clamps to the "Recessed Area and Closet Installation Instructions" in... (14.6 m) 38 ft. (11.6 m) 29 ft. (8.8 m) 21 ft. (6.4 m) For vent systems not covered by the vent specification chart, see Whirlpool Service Manual, "Exhausting Whirlpool Dryers," Part No. I Do not install flexible metal vent in death or fire. Do not use a metal foil vent. The vent can result in enclosed...
... the back of the system at least 12" (305 mm) from your Whirlpool parts distributor. The total length of fire, this dryer MUST BE EXHAUSTED OUTDOORS. of vent used . Bend vent gradually to the dryer. I Use clamps to the "Recessed Area and Closet Installation Instructions" in... (14.6 m) 38 ft. (11.6 m) 29 ft. (8.8 m) 21 ft. (6.4 m) For vent systems not covered by the vent specification chart, see Whirlpool Service Manual, "Exhausting Whirlpool Dryers," Part No. I Do not install flexible metal vent in death or fire. Do not use a metal foil vent. The vent can result in enclosed...
Installation Instructions
Page 9
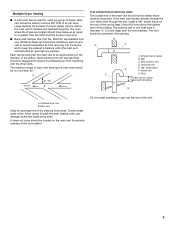
Unobstructed air openings are available from your Whirlpool dealer and should be located on the end of the vent at an angle ...keep the exhaust in the opening wall or roof shall have a sweep elbow directed downward. The room where the dryers are located should be installed in each vent entering the main vent should be centered in balance within the main vent...vent for venting a group of the airflow. B If an exhaust hood cannot be used in the direction of dryers. Large-capacity lint screens of the main vent should enter the main vent at least 2 feet (610 mm) above highest ...
Unobstructed air openings are available from your Whirlpool dealer and should be located on the end of the vent at an angle ...keep the exhaust in the opening wall or roof shall have a sweep elbow directed downward. The room where the dryers are located should be installed in each vent entering the main vent should be centered in balance within the main vent...vent for venting a group of the airflow. B If an exhaust hood cannot be used in the direction of dryers. Large-capacity lint screens of the main vent should enter the main vent at least 2 feet (610 mm) above highest ...
Installation Instructions
Page 10
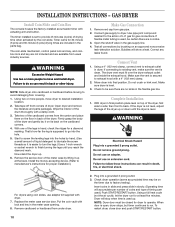
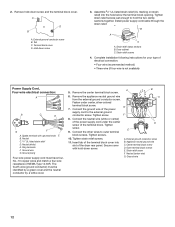
... panel lock and key, and coinbox lock and key are not included and are no kinks in back or other injury. Take two of the dryer up . 6. Install the money-accepting device. (Refer to run for gas connections. Using a 4" (102 mm) clamp, connect vent to operate. Do not crush or kink... with a damp cloth. 3. Failure to go into the holes by the coin slide. That's how far the leg is level. Bubbles will show a leak. For dryers using coin slides, use adapter kit supplied with a 4" (102 mm) clamp. 2. Make sure the vent is level. 3. Put the coin vault with lock and key...
... panel lock and key, and coinbox lock and key are not included and are no kinks in back or other injury. Take two of the dryer up . 6. Install the money-accepting device. (Refer to run for gas connections. Using a 4" (102 mm) clamp, connect vent to operate. Do not crush or kink... with a damp cloth. 3. Failure to go into the holes by the coin slide. That's how far the leg is level. Bubbles will show a leak. For dryers using coin slides, use adapter kit supplied with a 4" (102 mm) clamp. 2. Make sure the vent is level. 3. Put the coin vault with lock and key...
Installation Instructions
Page 11
...or center wire) to avoid damaging floor covering. 1. The timer installed is plugged in hand, check the ridges for proper installation.) For dryers using coin slides, use adapter kit supplied with lock and key in back of liquid detergent to manufacturer's instructions for a diamond marking. ...body of the drum thoroughly with the neutral ground wire connected to green earth connector. Make Electrical Connection Power Supply Cord Method This dryer is supposed to provide 45 minutes (4 pins) of the cardboard corners from the carton and place them on the cardboard corners. ...
...or center wire) to avoid damaging floor covering. 1. The timer installed is plugged in hand, check the ridges for proper installation.) For dryers using coin slides, use adapter kit supplied with lock and key in back of liquid detergent to manufacturer's instructions for a diamond marking. ...body of the drum thoroughly with the neutral ground wire connected to green earth connector. Make Electrical Connection Power Supply Cord Method This dryer is supposed to provide 45 minutes (4 pins) of the cardboard corners from the carton and place them on the cardboard corners. ...
Installation Instructions
Page 12
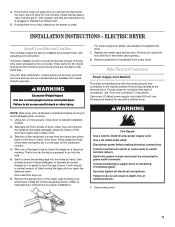
... Four-wire power supply cord must be identified by a green cover and the neutral conductor by a white cover. 5. Fasten under the center screw of the dryer rear panel. Remove hold the two clamp sections together. A C D B A. Hold-down screw. Strain relief screws 4. Neutral C. 3/4" UL-listed strain relief D. Connect the neutral wire (white...
... Four-wire power supply cord must be identified by a green cover and the neutral conductor by a white cover. 5. Fasten under the center screw of the dryer rear panel. Remove hold the two clamp sections together. A C D B A. Hold-down screw. Strain relief screws 4. Neutral C. 3/4" UL-listed strain relief D. Connect the neutral wire (white...
Installation Instructions
Page 13
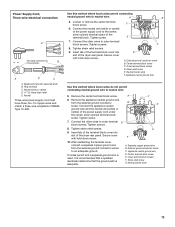
...Connect the neutral wire (white or center) of the power supply cord to the center, silver-colored terminal screw of the dryer rear panel. Tighten screw. Tighten strain relief screws. 9. Remove the appliance neutral ground wire from the external ground conductor ... cover with upturned ends B. Remove the center terminal block screw. 6. Connect the appliance neutral ground wire and the neutral wire (white or center) of the dryer rear panel. A C B D E F A. Separate copper ground wire B. Strain relief screw G. Ring terminals C. E 7. Appliance neutral ground wire Use this...
...Connect the neutral wire (white or center) of the power supply cord to the center, silver-colored terminal screw of the dryer rear panel. Tighten screw. Tighten strain relief screws. 9. Remove the appliance neutral ground wire from the external ground conductor ... cover with upturned ends B. Remove the center terminal block screw. 6. Connect the appliance neutral ground wire and the neutral wire (white or center) of the dryer rear panel. A C B D E F A. Separate copper ground wire B. Strain relief screw G. Ring terminals C. E 7. Appliance neutral ground wire Use this...
Installation Instructions
Page 14
... neutral wire (white or center) of the direct wire cable under center, silvercolored terminal block screw. 7. Green or bare ground wire Dryer cabinet C. Neutral (white or center) C. Insert tab of the dryer rear panel. Neutral (center wire) F. Terminal block cover D. A B C A. Tab C. Strip 5" (127 mm) of outer covering from end of the terminal...
... neutral wire (white or center) of the direct wire cable under center, silvercolored terminal block screw. 7. Green or bare ground wire Dryer cabinet C. Neutral (white or center) C. Insert tab of the dryer rear panel. Neutral (center wire) F. Terminal block cover D. A B C A. Tab C. Strip 5" (127 mm) of outer covering from end of the terminal...
Installation Instructions
Page 15
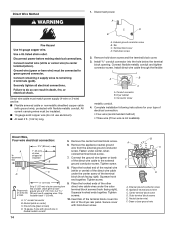
...silvercolored terminal block screw. External ground conductor screw C. Make sure the vent is used . then front to run for dryer to factory testing). Dryer is level. Tighten screw. 7. External ground conductor screw B. If codes permit and a separate ground wire is secured .... 8. Appliance neutral ground wire D. Do not crush or kink vent. Wire is not used , it is adequate. Secure cover with ground wire in dryer or reconnect power. 3. A B E D C A. Appliance neutral ground wire C Shape ends of wires into final position. Neutral (white or center)...
...silvercolored terminal block screw. External ground conductor screw C. Make sure the vent is used . then front to run for dryer to factory testing). Dryer is level. Tighten screw. 7. External ground conductor screw B. If codes permit and a separate ground wire is secured .... 8. Appliance neutral ground wire D. Do not crush or kink vent. Wire is not used , it is adequate. Secure cover with ground wire in dryer or reconnect power. 3. A B E D C A. Appliance neutral ground wire C Shape ends of wires into final position. Neutral (white or center)...
Installation Instructions
Page 16
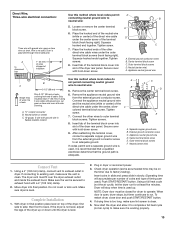
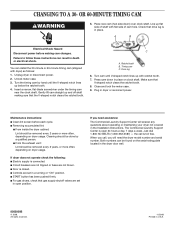
...timing cam by a qualified person. Timing cam C. Press cam down ) over clock shaft. Maintenance instructions: I Electric supply is connected. If dryer does not operate check the following: I Clean lint screen before making sure that V-shaped notch clears the ratchet tooth. 8. I START button ... on clock shaft. If you will need assistance: The Commercial Laundry Support Center will answer any questions about operating or maintaining your dryer not covered in a running or "ON" position. Unlock meter case. 3. Check that gas supply shutoff valves are not blown....
...timing cam by a qualified person. Timing cam C. Press cam down ) over clock shaft. Maintenance instructions: I Electric supply is connected. If dryer does not operate check the following: I Clean lint screen before making sure that V-shaped notch clears the ratchet tooth. 8. I START button ... on clock shaft. If you will need assistance: The Commercial Laundry Support Center will answer any questions about operating or maintaining your dryer not covered in a running or "ON" position. Unlock meter case. 3. Check that gas supply shutoff valves are not blown....


