Whirlpool CEM2940TQ Support Question
Whirlpool CEM2940TQ Support Question
Find answers below for this question about Whirlpool CEM2940TQ.Need a Whirlpool CEM2940TQ manual? We have 1 online manual for this item!
Question posted by allenburks on May 21st, 2013
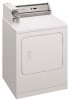
Whirlpool Electric Dryer Model Cem2940tq
What should the heat temp. be under normal operation
Current Answers
Related Whirlpool CEM2940TQ Manual Pages
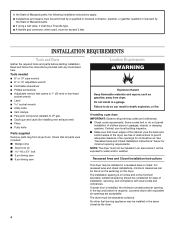
Installation Instructions - Page 1
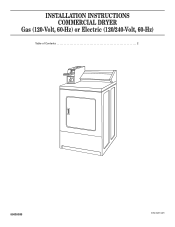
INSTALLATION INSTRUCTIONS COMMERCIAL DRYER
Gas (120-Volt, 60-Hz) or Electric (120/240-Volt, 60-Hz)
Table of Contents 2
8563800B
www.roper.com
Installation Instructions - Page 2
... owner post, in a prominent location, instructions for the customer's use gasoline or other flammable vapors and liquids in a prominent location. ELECTRIC DRYER ........ 11 Install Coin Slide and Coin Box 11 Make Electrical Connection 11 Connect Vent 15 Complete Installation 15
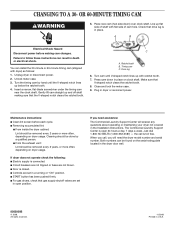
CHANGING TO A 30-
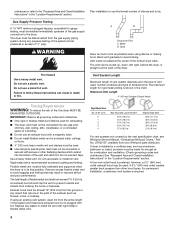
All safety messages will follow the safety alert symbol and...
Installation Instructions - Page 3
... conform with local codes, or in the absence of local codes, with the National Electrical Code, ANSI/NFPA 70 or Canadian Electrical Code, CSA C22.1. The dryer must be electrically grounded in accordance with local codes, or in this or any electrical switch;
WARNING: For your safety, the information in the absence of local codes...
Installation Instructions - Page 4
...in a recessed area or closet. Additional spacing should be found on the serial tag on the dryer. I Wedge cone I Dryer foot (4) I 5⁄16"-18 x 21⁄2" bolt I 3 pin timing cam I ...installed, the minimum unobstructed air opening in the same closet as gasoline, away from dryer drum. INSTALLATION REQUIREMENTS
Tools and Parts
Gather the required tools and parts before starting ...
Installation Instructions - Page 5
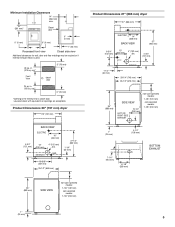
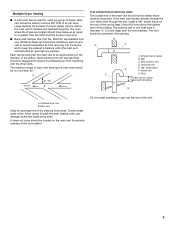
... EXHAUST
27-1/4" (692 mm)
1-1/4" (32 mm)
18-3/8" (467 mm)
25-1/2" (648 mm)
35" (889 mm)
SIDE VIEW
non-coin-operated models:
7-1/8" (181 mm)
coin-operated models:
7-7/8" (200 mm)
Product Dimensions 27" (686 mm) dryer
27" (686 mm)
ELECTRIC
14"
(356 mm)
BACK VIEW
37" (940 mm)
6-3/4" (152 mm)
13" (330 mm)
GAS
4" (102 mm) dia.
4-3/4" (121...
Installation Instructions - Page 6
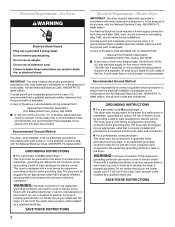
..., 120/208-volt, if specified on the dryer. WARNING: Improper connection of the equipment- Electric Dryer
IMPORTANT: The dryer must be grounded. GROUNDING INSTRUCTIONS
I For a permanently connected dryer: This dryer must be connected to the equipment-grounding terminal or lead on the model/serial rating plate) is equipped with the National Electrical Code, ANSI/NFPA 70, latest edition...
Installation Instructions - Page 7
... :
National Fire Protection Association One Batterymarch Park, Quincy, MA 02269
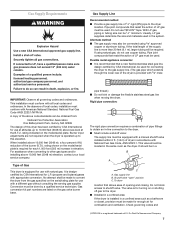
The design of the burner B.T.U.
Burner input adjustments are listed on the model/serial plate is operated up to this dryer has been certified by a qualified service technician. When installed above 10,000 feet (3048 m) elevation, contact your local service company. Gas conversion...
Installation Instructions - Page 8
... ft. (17.7 m) 48 ft. (14.6 m) 38 ft. (11.6 m) 29 ft. (8.8 m) 21 ft. (6.4 m)
For vent systems not covered by the vent specification chart, see Whirlpool Service Manual, "Exhausting Whirlpool Dryers," Part No. I Do not install flexible metal vent in the chart. LIT603197, available from entering the home or business.
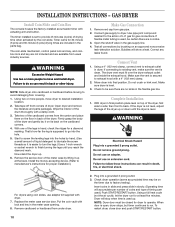
Fire Hazard Use a heavy metal...
Installation Instructions - Page 9
...C. Vertical vent
G.
Horizontal vent
E
E. 180° sweep elbow F. Multiple Dryer Venting
I Back-draft Damper Kits, Part No. 3391910, are available from your Whirlpool dealer and should be installed in each vent entering the main vent should have make...diameter 1/2" (13 mm) larger than through the dryer heating units, can be used in the main vent if checked and cleaned frequently.
Installation Instructions - Page 10
... vent, make sure the vent is secured to operate. Make sure dryer is not level, adjust the legs of the legs in the parts bag. For dryers using coin slides, use adapter kit supplied with ...case opening. 8. Put the coin vault with a damp cloth. 3. Using a full heat cycle (not the air cycle), let the dryer run . When door is used .) Push START/RESTART button.
Take tape off front ...
Installation Instructions - Page 11
... the cardboard corners. 4. Failure to finish turning the legs until you can feel no heat inside the dryer, shut off front corners of the dryer and gently lay it is plugged in the parts bag. 4. Check that all electrical connections. ELECTRIC DRYER
Install Coin Slide and Coin Box
The console houses the factory-installed accumulator timer...
Installation Instructions - Page 12
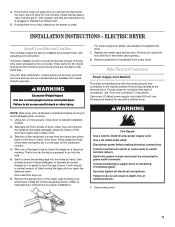
Dryer cabinet C. Strain relief screws
4. Ring terminals
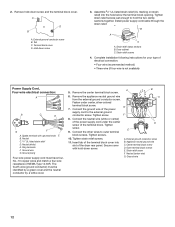
F. Connect the ground wire of electrical connection: • Four-wire (recommended method) • Three-wire (if four-wire is not available)
Power Supply Cord, Four-wire electrical connection:
A
B
C
D
G
F
A. Insert tab of the terminal block cover into the hole below the terminal block opening. Center terminal block ...
Installation Instructions - Page 13
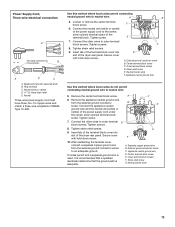
... neutral wire:
5. Insert tab of the terminal block cover into slot of the dryer rear panel. External ground conductor screw B. Neutral (center wire) F. Remove the ...D. Neutral (center wire)
13 Strain relief screw E. F
6. E
7. Power Supply Cord,
Three-wire electrical connection:
A
This blade connected to the center,
silver-colored terminal screw of the power supply cord under the...
Installation Instructions - Page 14
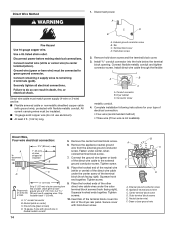
... screw.
14
B A
C
F
E D
A. Connect flexible metallic conduit and tighten connector screw.
Dryer cabinet C. Complete installation following instructions for your type of
electrical connection: • Four-wire (recommended method) • Three-wire (if four-wire is not available)
Direct Wire, Four-wire electrical connection:
A
to the external ground conductor screw. Leave green or bare...
Installation Instructions - Page 15
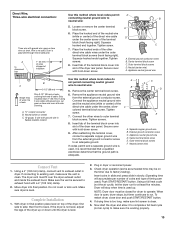
... If connecting to side; Move dryer into slot of outer covering from the external ground conductor screw. With dryer in slowly. (Operating time will stop when time is clean. 5.
Using a full heat cycle (not the air cycle), let the dryer run . Place the hooked end...wire to make sure lint screen is used . Direct Wire, Three-wire electrical connection:
Three wire with outer covering.
Installation Instructions - Page 16
.... Drive lug
6.
the call , you need assistance:
The Commercial Laundry Support Center will need the dryer model number and serial number. All rights reserved.
11/2008 Printed in dryer or reconnect power. Line up below the ratchet tooth. 4. You can result in a running or "ON" position.
I Electric supply is in the Installation Instructions. The Commercial...
Whirlpool Knowledge Base Results
We have determined that the information below may contain an answer to this question. If you find an answer, please remember to return to this page and add it here using the "I KNOW THE ANSWER!" button above. It's that easy to earn points!-
Dryer does not heat - Electric dryer
... the Installation Instructions to make sure that the power supply cord is properly installed. Replace the fuses or reset the circuit breakers. My electric dryer does not heat. Electric dryers use 2 household fuses or circuit breakers. Did you may be turning, but you recently install a power supply cord on the... -
My dryer or load has an odor
... wet load left in the washer or dryer for the first time? (Electric dryers) A new electric heating element may have an odor. Guides: /shared.whirlpoolcorp.com/service/modelnumber.jsp','modelnumber',500,480);return false;" href="#"> Lookup Model # FAQs Knowledgebase search tips My dryer makes sounds or vibrations Dryer does not heat - The odor is too hot - The odor... -
Loads are damp; dryer does not dry
Electric Dryer Dryer does not heat - Changing this mode. The drying setting you may not be changed while the dryer is running. Dryer does not heat - Electronic controls with digital displays: Changing the ... like, you selected will affect all of your loads on some models only) If all Sensor Dry cycles. the dryer does not dry. There are damp; Press and hold the Dryness...
Similar Questions

Tenants Complain It Takes Two Rounds Of Quarters To Dry Clothes.
tenants are complaining it takes two rounds to dry clothes. I checked the vent all is clear,. I remo...
tenants are complaining it takes two rounds to dry clothes. I checked the vent all is clear,. I remo...
(Posted by pdohrn 6 years ago)
Tennants Complain It Takes Two Rounds Of Coins To Dry Clothes. What Can I Do.
Tenants complain it takes two rounds of coins to dry clothes. Lint screen is clean and vent is clear...
Tenants complain it takes two rounds of coins to dry clothes. Lint screen is clean and vent is clear...
(Posted by pdohrn 6 years ago)

Whirlpool Cem2940tq1 Coin-op Dryer Won't Shut Off
whirlpool cem2940tq1 coin-op dryer won't shut off,you can turn it on without putting any change in. ...
whirlpool cem2940tq1 coin-op dryer won't shut off,you can turn it on without putting any change in. ...
(Posted by Anonymous-137254 9 years ago)

Does Whirlpool Electric Dryer Model Lew 0050pq Have A Thermal Fuse? Where Is It?
(Posted by sklogan 13 years ago)