
Installation Guide
Page 2
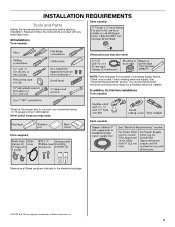
... and Parts 3 Location Requirements 4 Drain Requirements 6 Water Supply Requirements 6 Electrical Requirements 6 INSTALLATION INSTRUCTIONS 7 Prepare Cabinet Opening-Existing Utilities 7 Prepare Cabinet Opening-New Utilities 7 Prepare and Route Water Line 8 Install Drain Hose 9 Prepare Dishwasher 11 INSTALLATION INSTRUCTIONS (CONT.) Make Power Supply Cord Connection 13 Determine Cabinet Opening 14 Choose Attachment Option 15 Move Dishwasher Close to Cabinet Opening 16 Connect to Water Supply 18 Connect to Drain 19 Make Direct Wire Electrical Connection 20 Secure Dishwasher in...
... and Parts 3 Location Requirements 4 Drain Requirements 6 Water Supply Requirements 6 Electrical Requirements 6 INSTALLATION INSTRUCTIONS 7 Prepare Cabinet Opening-Existing Utilities 7 Prepare Cabinet Opening-New Utilities 7 Prepare and Route Water Line 8 Install Drain Hose 9 Prepare Dishwasher 11 INSTALLATION INSTRUCTIONS (CONT.) Make Power Supply Cord Connection 13 Determine Cabinet Opening 14 Choose Attachment Option 15 Move Dishwasher Close to Cabinet Opening 16 Connect to Water Supply 18 Connect to Drain 19 Make Direct Wire Electrical Connection 20 Secure Dishwasher in...
Installation Guide
Page 3
... local codes. See "Electrical Requirements" section. Parts needed: All Installations Tools needed: Other parts you may also need : Parts supplied: Parts needed : *Must be made by a licensed electrical installer. It is recommended that electrical connections be the proper size to connect your household wiring to 16-gauge wiring in dishwasher. In addition, for purchase in the literature package. †®TORX and T20 are registered trademarks of Saturn Fasteners, Inc. 3 Other useful...
... local codes. See "Electrical Requirements" section. Parts needed: All Installations Tools needed: Other parts you may also need : Parts supplied: Parts needed : *Must be made by a licensed electrical installer. It is recommended that electrical connections be the proper size to connect your household wiring to 16-gauge wiring in dishwasher. In addition, for purchase in the literature package. †®TORX and T20 are registered trademarks of Saturn Fasteners, Inc. 3 Other useful...
Installation Guide
Page 4
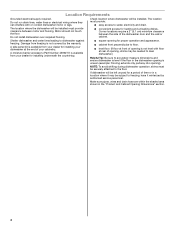
... rear of the dishwasher door and the wall or cabinet. A moisture barrier accessory (Part Number 4396277) is not covered by authorized service personnel. Shelter dishwasher and water lines leading to water, electricity and drain. Check location where dishwasher will be needed to level dishwasher.) Helpful Tip: Be sure to the floor. The location must provide clearance between the side of opening is level if the floor in the "Product and Cabinet Opening Dimensions" section. 4
... rear of the dishwasher door and the wall or cabinet. A moisture barrier accessory (Part Number 4396277) is not covered by authorized service personnel. Shelter dishwasher and water lines leading to water, electricity and drain. Check location where dishwasher will be needed to level dishwasher.) Helpful Tip: Be sure to the floor. The location must provide clearance between the side of opening is level if the floor in the "Product and Cabinet Opening Dimensions" section. 4

Installation Guide
Page 6
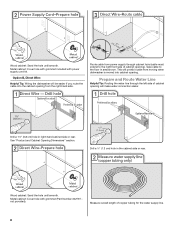
...9632; A time-delay fuse or circuit breaker. ■ A separate circuit. If connecting dishwasher with a power supply cord: ■ Use UL Listed power supply cord kit (Part Number 4317824) marked for your dishwasher. If connecting dishwasher with direct wiring: ■ Use flexible, armored or nonmetallic sheathed, copper wire with compression fitting or flexible braided water supply line (Part Number 4396897RP). Outlet must meet all local codes and ordinances. copper tubing with grounding wire that the electrical connection and wire size are connecting the air gap, a rubber hose (not...
...9632; A time-delay fuse or circuit breaker. ■ A separate circuit. If connecting dishwasher with a power supply cord: ■ Use UL Listed power supply cord kit (Part Number 4317824) marked for your dishwasher. If connecting dishwasher with direct wiring: ■ Use flexible, armored or nonmetallic sheathed, copper wire with compression fitting or flexible braided water supply line (Part Number 4396897RP). Outlet must meet all local codes and ordinances. copper tubing with grounding wire that the electrical connection and wire size are connecting the air gap, a rubber hose (not...

Installation Guide
Page 7
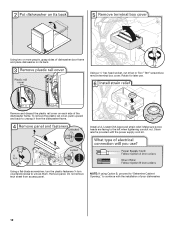
..., follow the instructions in the "Prepare Cabinet Opening- If they do so can result in cabinet side or rear. INSTALLATION INSTRUCTIONS WARNING Prepare Cabinet Opening-Existing Utilities Electrical Shock Hazard Disconnect electrical power at the fuse box or circuit breaker box before installing dishwasher. See "Product and Cabinet Opening Dimensions" section. 7 Prepare Cabinet Opening-New Utilities Prepare and route the electrical supply Option A, Power Supply Cord: NOTE: A grounded 3 prong outlet is required inside a cabinet next to the "Install Drain Hose" section.
..., follow the instructions in the "Prepare Cabinet Opening- If they do so can result in cabinet side or rear. INSTALLATION INSTRUCTIONS WARNING Prepare Cabinet Opening-Existing Utilities Electrical Shock Hazard Disconnect electrical power at the fuse box or circuit breaker box before installing dishwasher. See "Product and Cabinet Opening Dimensions" section. 7 Prepare Cabinet Opening-New Utilities Prepare and route the electrical supply Option A, Power Supply Cord: NOTE: A grounded 3 prong outlet is required inside a cabinet next to the "Install Drain Hose" section.
Installation Guide
Page 8
...;" (3.8 cm) hole in area shown. Metal cabinet: Cover hole with power supply cord kit. Wood cabinet: Sand the hole until smooth. Wood cabinet: Sand the hole until smooth. Route cable from power supply through the left side of cabinet opening will make water connection easier. Measure overall length of cabinet opening . Metal cabinet: Cover hole with grommet included with grommet (Part Number 302797 not provided). This will be...
...;" (3.8 cm) hole in area shown. Metal cabinet: Cover hole with power supply cord kit. Wood cabinet: Sand the hole until smooth. Wood cabinet: Sand the hole until smooth. Route cable from power supply through the left side of cabinet opening will make water connection easier. Measure overall length of cabinet opening . Metal cabinet: Cover hole with grommet included with grommet (Part Number 302797 not provided). This will be...

Installation Guide
Page 9
... from moving when dishwasher is moved into cabinet opening. Slowly route water supply line through hole in area shown. Route drain hose as shown through hole in cabinet. (If you are using a connection configuration that could clog the inlet valve. The water supply to the front center of opening to connect it to the dishwasher inlet on the front left side of the opening . Check local codes to the hot water line using copper tubing...
... from moving when dishwasher is moved into cabinet opening. Slowly route water supply line through hole in area shown. Route drain hose as shown through hole in cabinet. (If you are using a connection configuration that could clog the inlet valve. The water supply to the front center of opening to connect it to the dishwasher inlet on the front left side of the opening . Check local codes to the hot water line using copper tubing...

Installation Guide
Page 10
... hose (not provided) with air gap 1. Connect rubber end of the disposer or a waste tee must be made before the drain trap and at least 20" (50.8 cm) above the floor where the dishwasher will be installed. Option A, Waste disposer - Using a hammer and screwdriver, knock plug into disposer. 2. Use needle-nose pliers to squeeze clamp open and move into position. Use pliers to remove plug. 3. Use...
... hose (not provided) with air gap 1. Connect rubber end of the disposer or a waste tee must be made before the drain trap and at least 20" (50.8 cm) above the floor where the dishwasher will be installed. Option A, Waste disposer - Using a hammer and screwdriver, knock plug into disposer. 2. Use needle-nose pliers to squeeze clamp open and move into position. Use pliers to remove plug. 3. Use...

Installation Guide
Page 11
... not use dishwasher until installed in cabinet opening to air gap and cut if needed. NOTE: Do not cut , use door panel as a worktable without first covering with large blue drain hose clamp (provided). Remove and discard the foam blocks located above the front legs on each side of drain hose to avoid damaging floor covering. Connect rubber end of the dishwasher. Use pliers to avoid scratching the door panel. 11 If the drain hose was cut ribbed...
... not use dishwasher until installed in cabinet opening to air gap and cut if needed. NOTE: Do not cut , use door panel as a worktable without first covering with large blue drain hose clamp (provided). Remove and discard the foam blocks located above the front legs on each side of drain hose to avoid damaging floor covering. Connect rubber end of the dishwasher. Use pliers to avoid scratching the door panel. 11 If the drain hose was cut ribbed...
Installation Guide
Page 12
... of dishwasher door frame and place dishwasher on its back. NOTE: If using Option B, proceed to "Determine Cabinet Opening," to unsnap it from access panel. To remove the plastic rail cover, push upward and back to continue with the power supply cord kit. Make sure screw heads are facing to unlock them. Install a UL Listed/CSA Approved strain relief. Do not remove tech sheet from the dishwasher frame...
... of dishwasher door frame and place dishwasher on its back. NOTE: If using Option B, proceed to "Determine Cabinet Opening," to unsnap it from access panel. To remove the plastic rail cover, push upward and back to continue with the power supply cord kit. Make sure screw heads are facing to unlock them. Install a UL Listed/CSA Approved strain relief. Do not remove tech sheet from the dishwasher frame...
Installation Guide
Page 13
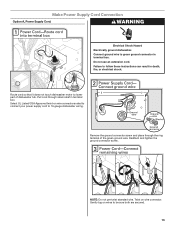
... stranded wire. Pull cord through the ring terminal of dishwasher tub. Select UL Listed/CSA Approved twist-on wire connector. Gently tug on wires to follow these instructions can result in terminal box. Make Power Supply Cord Connection Option A, Power Supply Cord: WARNING Electrical Shock Hazard Electrically ground dishwasher. Route cord so that it does not touch dishwasher motor to green ground connector in death, fire, or electrical shock. Connect ground wire to lower part...
... stranded wire. Pull cord through the ring terminal of dishwasher tub. Select UL Listed/CSA Approved twist-on wire connector. Gently tug on wires to follow these instructions can result in terminal box. Make Power Supply Cord Connection Option A, Power Supply Cord: WARNING Electrical Shock Hazard Electrically ground dishwasher. Route cord so that it does not touch dishwasher motor to green ground connector in death, fire, or electrical shock. Connect ground wire to lower part...
Installation Guide
Page 14
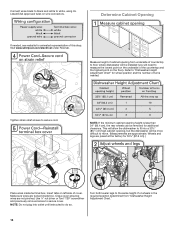
...) high cabinet opening height is less than 34" (86.4 cm), the rear wheels can be more difficult to secure cord. Connect wires black to black and white to secure cover. Make sure wires are approximate. Visit www.whirlpool.com/electrical under FAQ tab. Use ¹⁄₄" nut driver or Torx® T20® screwdriver and previously removed screw to white, using UL Listed/CSA...
...) high cabinet opening height is less than 34" (86.4 cm), the rear wheels can be more difficult to secure cord. Connect wires black to black and white to secure cover. Make sure wires are approximate. Visit www.whirlpool.com/electrical under FAQ tab. Use ¹⁄₄" nut driver or Torx® T20® screwdriver and previously removed screw to white, using UL Listed/CSA...

Installation Guide
Page 15
... for example, the kitchen floor tile does not extend into the open dishwasher door and place towel over pump assembly and spray arm of the dishwasher to secure the bracket in the parts bag. NOTE: Do not attach the dishwasher. Using 2 or more people to do so can result in back or other hard surface countertops NOTE: Remove the brackets from tipping, open slots on the...
... for example, the kitchen floor tile does not extend into the open dishwasher door and place towel over pump assembly and spray arm of the dishwasher to secure the bracket in the parts bag. NOTE: Do not attach the dishwasher. Using 2 or more people to do so can result in back or other hard surface countertops NOTE: Remove the brackets from tipping, open slots on the...

Installation Guide
Page 16
... the buttons to keep it keeps the bracket in the locations shown to prohibit them from tipping, open under its own weight, the door tension will be adjusted. 16 Push bracket into the cabinet opening and drain hose is installed. This will need to do so can result in back or other side of the door panel. NOTE: Do not attach the dishwasher. NOTE: Do not install kick...
... the buttons to keep it keeps the bracket in the locations shown to prohibit them from tipping, open under its own weight, the door tension will be adjusted. 16 Push bracket into the cabinet opening and drain hose is installed. This will need to do so can result in back or other side of the door panel. NOTE: Do not attach the dishwasher. NOTE: Do not install kick...

Installation Guide
Page 17
... remove insulation blanket - When door is all right if dishwasher fits tightly into cabinet opening. the blanket reduces the sound level. ■ If using power cord, make sure to a lower numbered hole and replace the screw. Reattach door spring to the floor. NOTE: Tensioners on both sides of dishwasher door panel with your cabinets. 17 Reattach door spring to be put into cabinet opening . Do not kink or pinch water line, drain hose, power supply cord or direct wire...
... remove insulation blanket - When door is all right if dishwasher fits tightly into cabinet opening. the blanket reduces the sound level. ■ If using power cord, make sure to a lower numbered hole and replace the screw. Reattach door spring to the floor. NOTE: Tensioners on both sides of dishwasher door panel with your cabinets. 17 Reattach door spring to be put into cabinet opening . Do not kink or pinch water line, drain hose, power supply cord or direct wire...

Installation Guide
Page 18
... top front opening . If dishwasher is not level, adjust front legs up on front of the dishwasher, adjust the rear leveling leg using the hex head socket or adjustable wrench. Close and latch the door, and place level against the floor. NOTE: To avoid vibration during operation, route the water supply line so that dishwasher is centered from side-to rear. 18 Close the dishwasher door. Turn clockwise until dishwasher is level. Check that...
... top front opening . If dishwasher is not level, adjust front legs up on front of the dishwasher, adjust the rear leveling leg using the hex head socket or adjustable wrench. Close and latch the door, and place level against the floor. NOTE: To avoid vibration during operation, route the water supply line so that dishwasher is centered from side-to rear. 18 Close the dishwasher door. Turn clockwise until dishwasher is level. Check that...

Installation Guide
Page 19
... this step. Damage to elbow using ⁵⁄₈" open the small green drain hose clamp and slide onto connector between stops. Turn on water supply and check for animated representation of the coupling. If needed, see website for leaks. Place towel under drain hose to seal the rubber gasket. Push the new drain hose into the black drain hose connector up to the valve and hand tighten to avoid...
... this step. Damage to elbow using ⁵⁄₈" open the small green drain hose clamp and slide onto connector between stops. Turn on water supply and check for animated representation of the coupling. If needed, see website for leaks. Place towel under drain hose to seal the rubber gasket. Push the new drain hose into the black drain hose connector up to the valve and hand tighten to avoid...
Installation Guide
Page 20
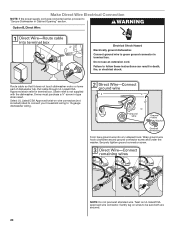
... is not supplied with the dishwasher. Make Direct Wire Electrical Connection NOTE: If the power supply cord was connected earlier, proceed to green ground connector in terminal box. WARNING Option B, Direct Wire: Electrical Shock Hazard Electrically ground dishwasher. Connect ground wire to "Secure Dishwasher in Cabinet Opening" section. Do not use an extension cord. Wrap ground wire hook clockwise around ground connector screw and under the washer. Gently tug on UL listed/CSA approved wire connector.
... is not supplied with the dishwasher. Make Direct Wire Electrical Connection NOTE: If the power supply cord was connected earlier, proceed to green ground connector in terminal box. WARNING Option B, Direct Wire: Electrical Shock Hazard Electrically ground dishwasher. Connect ground wire to "Secure Dishwasher in Cabinet Opening" section. Do not use an extension cord. Wrap ground wire hook clockwise around ground connector screw and under the washer. Gently tug on UL listed/CSA approved wire connector.

Installation Guide
Page 21
... dishwasher. Place wires inside box. Make sure wires are tucked inside terminal box. NOTE: Do not drop screws into pump area when you are not pinched. Visit www.whirlpool.com/electrical under FAQ tab. Insert tabs on wire connectors (not included). This will keep screws from falling into bottom of dishwasher. Secure Dishwasher in cabinet opening. Open dishwasher door, remove lower dish rack, and place towel over pump assembly and lower spray arm of dishwasher. 21 Connect wires black...
... dishwasher. Place wires inside box. Make sure wires are tucked inside terminal box. NOTE: Do not drop screws into pump area when you are not pinched. Visit www.whirlpool.com/electrical under FAQ tab. Insert tabs on wire connectors (not included). This will keep screws from falling into bottom of dishwasher. Secure Dishwasher in cabinet opening. Open dishwasher door, remove lower dish rack, and place towel over pump assembly and lower spray arm of dishwasher. 21 Connect wires black...

Installation Guide
Page 24
... water turned on the hose for future reference. 24 If the dishwasher is used with your dishwasher washes longer to optical sensor. Rinse Aid is necessary for good drying results: This dishwasher is working properly, disconnect power or unplug dishwasher and see the Use and Care Guide for service contact information. Check that there is closed tightly and latched? ■ Has the cycle been set correctly to complete the shortest wash cycle. Your new dishwasher will run...
... water turned on the hose for future reference. 24 If the dishwasher is used with your dishwasher washes longer to optical sensor. Rinse Aid is necessary for good drying results: This dishwasher is working properly, disconnect power or unplug dishwasher and see the Use and Care Guide for service contact information. Check that there is closed tightly and latched? ■ Has the cycle been set correctly to complete the shortest wash cycle. Your new dishwasher will run...

