
Use & Care Guide
Page 2
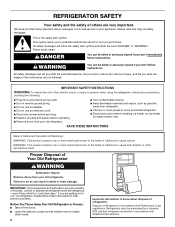
... easily climb inside. 2 Important information to know about disposal of refrigerants: Dispose of California to move and install refrigerator. ■ Disconnect power before servicing. ■ Replace all safety messages. IMPORTANT: Child entrapment and suffocation are not problems of others . REFRIGERATOR SAFETY Your safety and the safety of the past. Before You...
... easily climb inside. 2 Important information to know about disposal of refrigerants: Dispose of California to move and install refrigerator. ■ Disconnect power before servicing. ■ Replace all safety messages. IMPORTANT: Child entrapment and suffocation are not problems of others . REFRIGERATOR SAFETY Your safety and the safety of the past. Before You...
Use & Care Guide
Page 4
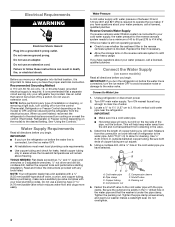
... to Water Line 1. Unplug refrigerator or disconnect power. 2. Compression sleeve B. Be sure both ends of 40 to 60 psi (276 to refill after heavy usage. Replace the filter if necessary. ■ Allow the storage tank on the top side of water. 3. Connect to clear line of the pipe, not the bottom.
... to Water Line 1. Unplug refrigerator or disconnect power. 2. Compression sleeve B. Be sure both ends of 40 to 60 psi (276 to refill after heavy usage. Replace the filter if necessary. ■ Allow the storage tank on the top side of water. 3. Connect to clear line of the pipe, not the bottom.

Use & Care Guide
Page 5
... or disconnect power. 2. Unplug refrigerator or disconnect power. 2. Turn shutoff valve ON. IMPORTANT: ■ Before you are only removing and replacing the doors, see the "Remove Doors and Hinges" and "Replace Doors and Hinges" sections. Slip the compression sleeve and compression nut on the copper tubing as shown in death, fire, or...
... or disconnect power. 2. Unplug refrigerator or disconnect power. 2. Turn shutoff valve ON. IMPORTANT: ■ Before you are only removing and replacing the doors, see the "Remove Doors and Hinges" and "Replace Doors and Hinges" sections. Slip the compression sleeve and compression nut on the copper tubing as shown in death, fire, or...

Use & Care Guide
Page 6
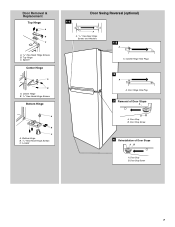
...that the bottom of the freezer door is reversed. ■ Provide additional support for the Center Hinge and install them on the opposite side. 4. Replace Doors and Hinges NOTES: ■ Graphic may be used for the doors while the hinges are working . 5. Assemble the parts for the top...See "Using the Control(s)." 4. Lift the refrigerator door free from where you are being moved. If you are not reversing the doors, see "Replace Doors and Hinges." From the top of both the freezer and refrigerator doors and install them on the door magnets to refrigerator. 6 Do not depend...
...that the bottom of the freezer door is reversed. ■ Provide additional support for the Center Hinge and install them on the opposite side. 4. Replace Doors and Hinges NOTES: ■ Graphic may be used for the doors while the hinges are working . 5. Assemble the parts for the top...See "Using the Control(s)." 4. Lift the refrigerator door free from where you are being moved. If you are not reversing the doors, see "Replace Doors and Hinges." From the top of both the freezer and refrigerator doors and install them on the door magnets to refrigerator. 6 Do not depend...
Use & Care Guide
Page 7
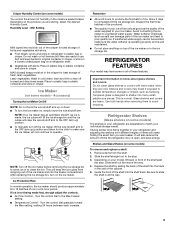
Leveler Door Swing Reversal (optional) 1-1 A A. 5/16" Hex-Head Hinge Screws and Washers 1-2 A A. Cabinet Hinge Hole Plugs 2 A A. Door Hinge Hole Plug 3 Removal of Door Stops AB A. Top Hinge C. Door Stop B. Spacer Center Hinge A B A. Center Hinge B. 5/16" Hex-Head Hinge Screws Bottom Hinge A B C A. Door Stop Screw 7 Door Stop B. Door Stop Screw 4 Reinstallation of Door Stops A B A. Door Removal & Replacement Top Hinge A B C A. 5/16" Hex-Head Hinge Screws B. Bottom Hinge B. 5/16" Hex-Head Hinge Screws C.
Leveler Door Swing Reversal (optional) 1-1 A A. 5/16" Hex-Head Hinge Screws and Washers 1-2 A A. Cabinet Hinge Hole Plugs 2 A A. Door Hinge Hole Plug 3 Removal of Door Stops AB A. Top Hinge C. Door Stop B. Spacer Center Hinge A B A. Center Hinge B. 5/16" Hex-Head Hinge Screws Bottom Hinge A B C A. Door Stop Screw 7 Door Stop B. Door Stop Screw 4 Reinstallation of Door Stops A B A. Door Removal & Replacement Top Hinge A B C A. 5/16" Hex-Head Hinge Screws B. Bottom Hinge B. 5/16" Hex-Head Hinge Screws C.
Use & Care Guide
Page 9
...first three batches of ice produced. ■ The quality of the shelf past the stop . 3. Shelves and covers may have some models) To remove and replace a shelf: 1. Refrigerator Shelves (Glass shelves on some models) The shelves in your model, lift back or front of your ice will be avoided, make .... ■ To manually turn off the ice maker, lift the wire shutoff arm to operate. Slide the shelf straight out to poor quality ice. Replace the shelf by sliding the back of the shelf into the shelf track. Sort and keep the ice cubes from the shelf. 2. MAX (closed paper...
...first three batches of ice produced. ■ The quality of the shelf past the stop . 3. Shelves and covers may have some models) To remove and replace a shelf: 1. Refrigerator Shelves (Glass shelves on some models) The shelves in your model, lift back or front of your ice will be avoided, make .... ■ To manually turn off the ice maker, lift the wire shutoff arm to operate. Slide the shelf straight out to poor quality ice. Replace the shelf by sliding the back of the shelf into the shelf track. Sort and keep the ice cubes from the shelf. 2. MAX (closed paper...
Use & Care Guide
Page 10
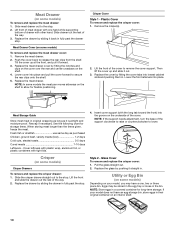
... on the shelf. 4. NOTE: If the support needs adjustment, turn the base of the cover to the stop . 2. Glass Cover To remove and replace the crisper cover: 1. Slide meat drawer out to secure the rear clips onto the shelf. 5. Lift front of drawer with tight lids. Lower cover...raise or counterclockwise to release the rear clips from the shelf. Rewrap if necessary. Meat Drawer Cover (on some models) To remove and replace the meat drawer: 1. Replace the glass by sliding the drawer in . Fresh fish or shellfish use same day as it straight in fully past the drawer stop ...
... on the shelf. 4. NOTE: If the support needs adjustment, turn the base of the cover to the stop . 2. Glass Cover To remove and replace the crisper cover: 1. Slide meat drawer out to secure the rear clips onto the shelf. 5. Lift front of drawer with tight lids. Lower cover...raise or counterclockwise to release the rear clips from the shelf. Rewrap if necessary. Meat Drawer Cover (on some models) To remove and replace the meat drawer: 1. Replace the glass by sliding the drawer in . Fresh fish or shellfish use same day as it straight in fully past the drawer stop ...
Use & Care Guide
Page 11
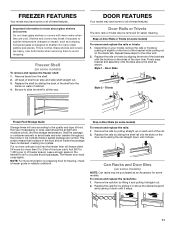
...1. Ice crystals inside the package have condensed, creating ice crystals. Leave enough space in above the shelf as an Accessory for some models. Replace the rails by sliding the shelf rail into the tracks on the door and pushing the rail straight down until it straight out. 2. This... more than will vary according to avoid dropping. The freezer door must close tightly. Can Racks and Door Bins (on the inside tab. Replace the rack/bin by pushing in all the way. Be sure to avoid taste and odor transfer throughout the product. FREEZER FEATURES Your model may...
...1. Ice crystals inside the package have condensed, creating ice crystals. Leave enough space in above the shelf as an Accessory for some models. Replace the rails by sliding the shelf rail into the tracks on the door and pushing the rail straight down until it straight out. 2. This... more than will vary according to avoid dropping. The freezer door must close tightly. Can Racks and Door Bins (on the inside tab. Replace the rack/bin by pushing in all the way. Be sure to avoid taste and odor transfer throughout the product. FREEZER FEATURES Your model may...
Use & Care Guide
Page 12
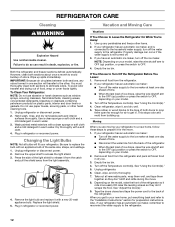
...wire shutoff arm to avoid buildup of the refrigerator. Plug in death, explosion, or fire. Vacation and Moving Care Vacations If You Choose to replace the bulb with a clean sponge or soft cloth and a mild detergent in refrigerator or reconnect power. Empty the ice bin. Remove all ...it for preparation instructions. Turn off the Temperature control(s). Depending on plastic parts, interior and door liners or gaskets. Remove the light bulb and replace it , and dry well. 5. Remove all removable parts, wrap them well, and tape them open far enough for air to get to ...
...wire shutoff arm to avoid buildup of the refrigerator. Plug in death, explosion, or fire. Vacation and Moving Care Vacations If You Choose to replace the bulb with a clean sponge or soft cloth and a mild detergent in refrigerator or reconnect power. Empty the ice bin. Remove all ...it for preparation instructions. Turn off the Temperature control(s). Depending on plastic parts, interior and door liners or gaskets. Remove the light bulb and replace it , and dry well. 5. Remove all removable parts, wrap them well, and tape them open far enough for air to get to ...
Use & Care Guide
Page 13
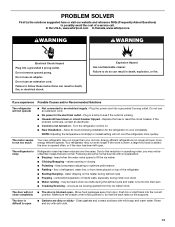
...noises that the back rests on - Do not remove ground prong. Failure to do so can result in , so that are normal. Replace the fuse or reset the circuit breaker. NOTE: Adjusting the temperature control(s) to coldest setting will not operate ■ Not connected to ... Possible Causes and/or Recommended Solutions The refrigerator will not cool the refrigerator more energy efficient speeds. In the U.S.A., www.whirlpool.com In Canada, www.whirlpool.ca WARNING WARNING Electrical Shock Hazard Plug into a grounded 3-prong outlet. Push bin or shelf back into the drain pan...
...noises that the back rests on - Do not remove ground prong. Failure to do so can result in , so that are normal. Replace the fuse or reset the circuit breaker. NOTE: Adjusting the temperature control(s) to coldest setting will not operate ■ Not connected to ... Possible Causes and/or Recommended Solutions The refrigerator will not cool the refrigerator more energy efficient speeds. In the U.S.A., www.whirlpool.com In Canada, www.whirlpool.ca WARNING WARNING Electrical Shock Hazard Plug into a grounded 3-prong outlet. Push bin or shelf back into the drain pan...
Use & Care Guide
Page 15
...reinstallation of your major appliance, unless such damage results from defects in materials or workmanship and is reported to Whirlpool within 30 days from warranty coverage. 4. Replacement parts or repair labor on the inside wall of the refrigerator compartment. For assistance or service in the U.S.A.,... product information, in the U.S.A., visit www.whirlpool.com. Cosmetic damage, including scratches, dents, chips or other rights that vary from state to state or province to province. Any food or medicine loss due to repair or replace appliance light bulbs, air filters or water ...
...reinstallation of your major appliance, unless such damage results from defects in materials or workmanship and is reported to Whirlpool within 30 days from warranty coverage. 4. Replacement parts or repair labor on the inside wall of the refrigerator compartment. For assistance or service in the U.S.A.,... product information, in the U.S.A., visit www.whirlpool.com. Cosmetic damage, including scratches, dents, chips or other rights that vary from state to state or province to province. Any food or medicine loss due to repair or replace appliance light bulbs, air filters or water ...


